Check that you have everything ready to do the workshop
Please check that you have the following requirements to complete the hands-on lab:
- Azure requirements
- Access to the Azure Portal
- Access to an active Azure subscription
- Contributor role in a resource group to be able to deploy an API Management instance
- During part 3 of this lab, we will add existing APIs to our API Management instance. The following APIs/websites should be available:
- Color API, in case this website is down you can deploy your own API using the following instructions
- Colors website, in case this website is down you can deploy your own API using the following instructions
- Star Wars api
- Calculator api
- For part 8 you need to have access to a valid Azure DevOps organization.
Create an API Management instance
Due to the substantial infrastructure, an API Management instance can take some time to provision. Expect ~45-75 minutes.
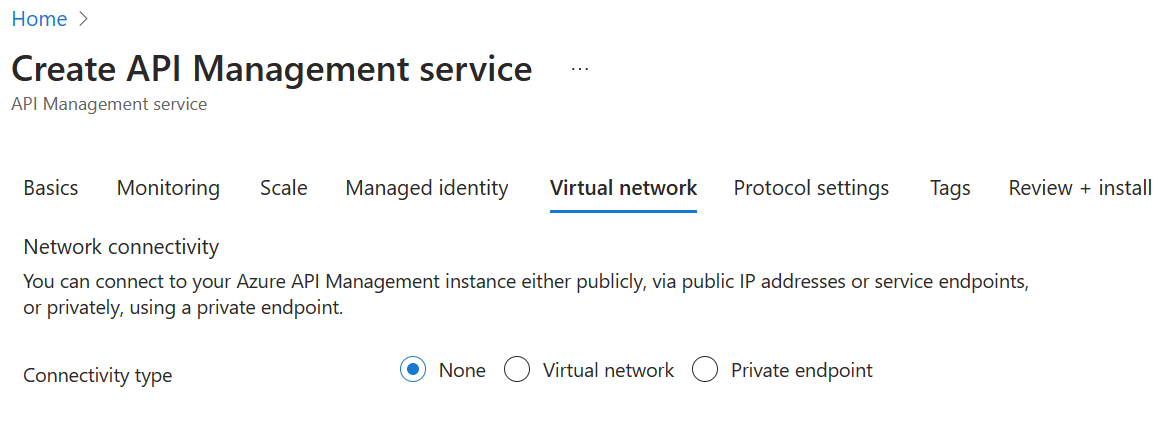
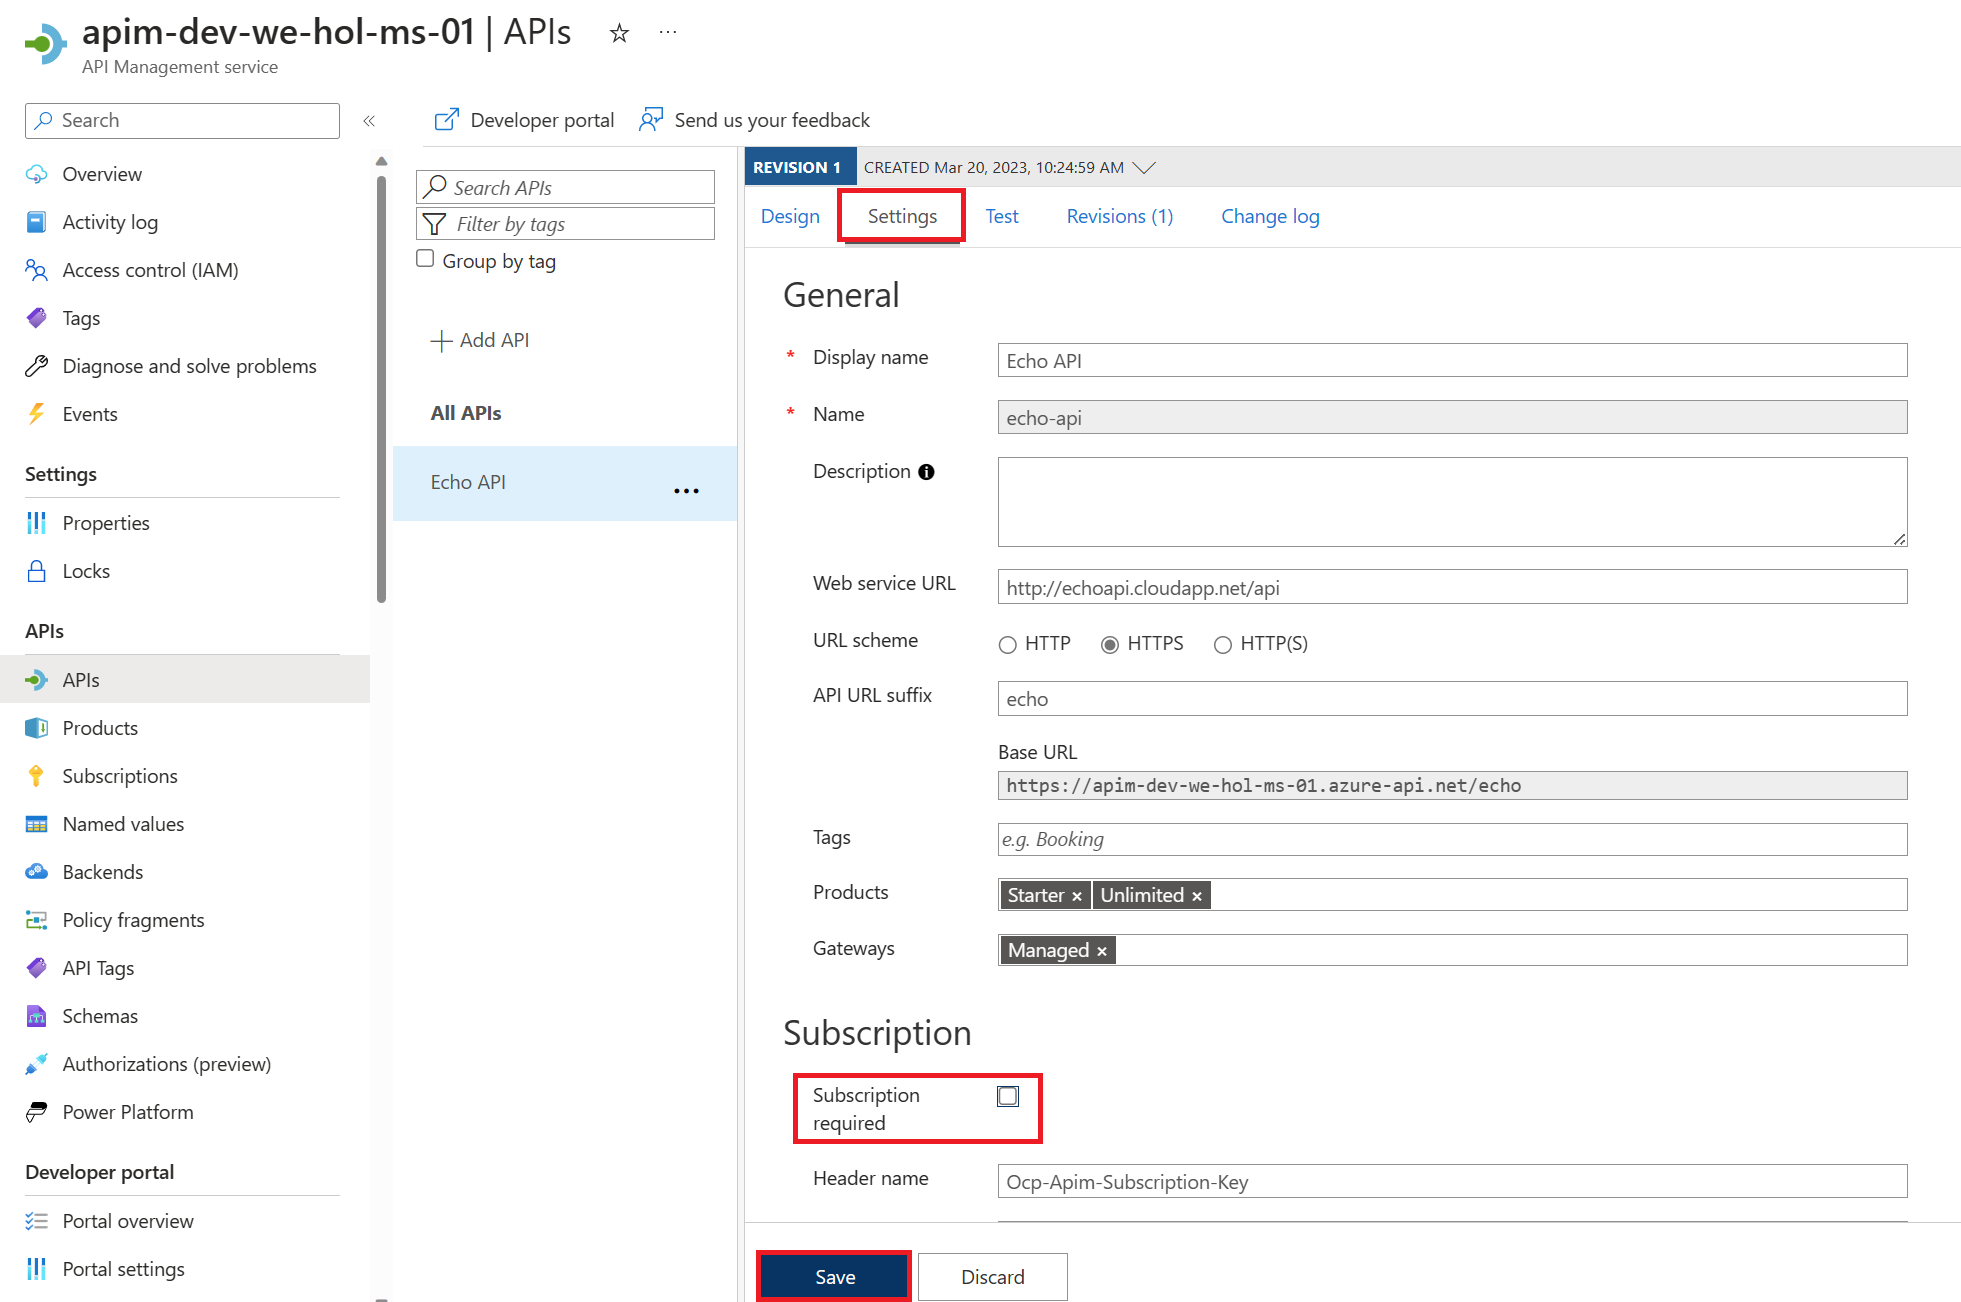
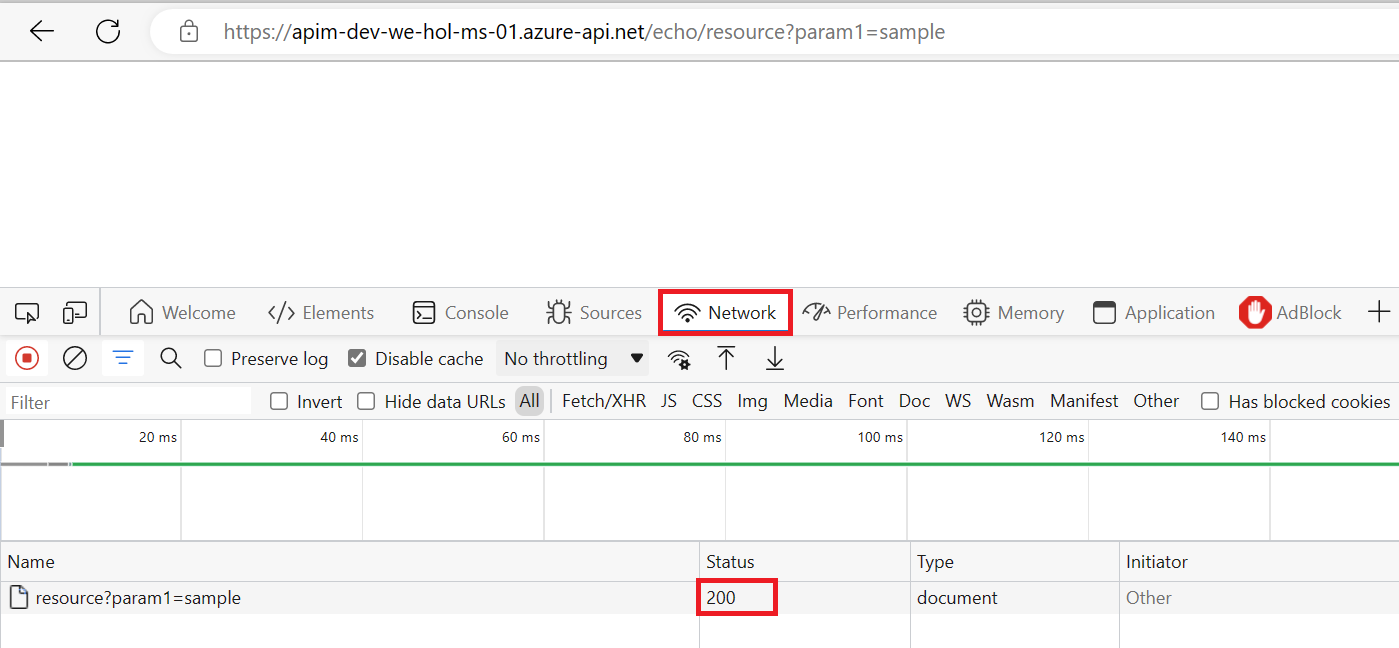
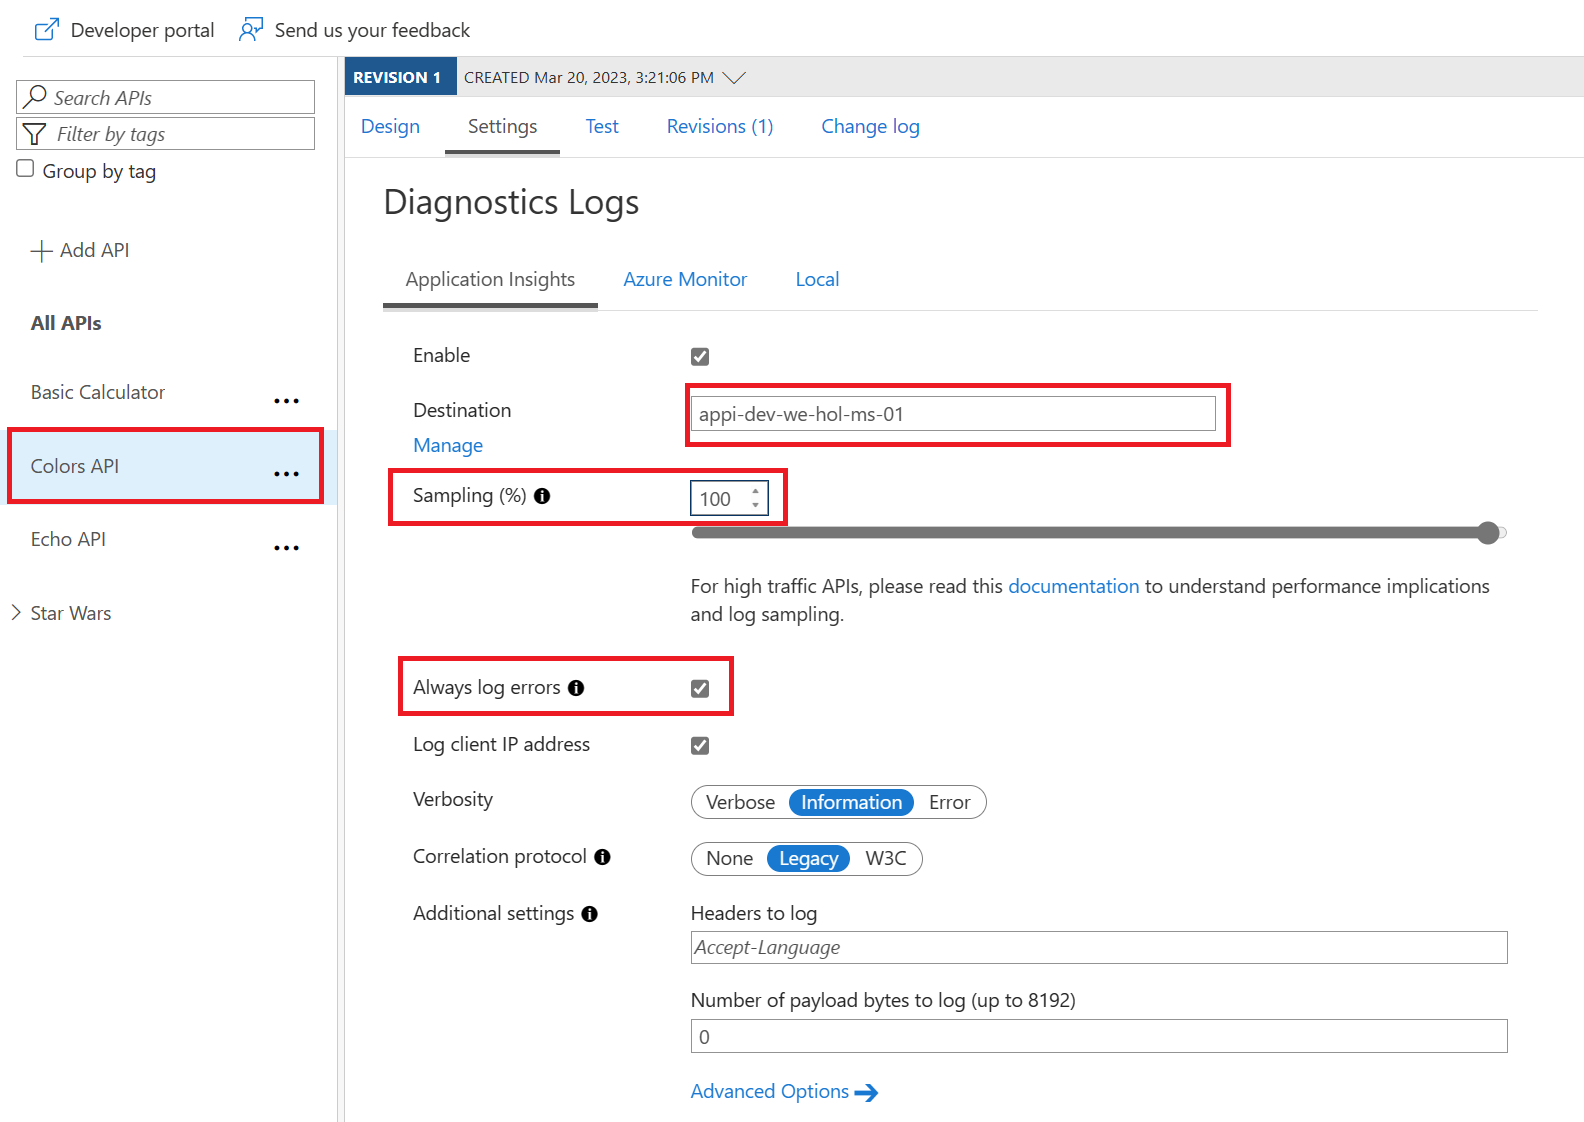
Using either your own or Azure’s common naming convention, fill in each required field and press Review + Create, followed by Create to provision the service. Please bear in mind that this APIM instance is entirely intended for the purposes of the lab, and the approach is simplified to provide every lab participant a common starting point. To that end, please do not modify any settings beyond the ones we ask for here as it may result in having to recreate the APIM instance later, which is costly with respect to time. Once started, it is not necessary to remain on this page or in the Azure Portal. If you entered a valid email address, you will receive a provisioning completion email. Please note that the service name must be unique. We recommend to include your initials and numeric date. Take note of APIM service name as you will need it for forming URLs in this lab. Please use the Developer tier, which provides all relevant features at the lowest cost. Please do not modify other settings. Specifically, the Virtual network tab should remain as None. We will allude to best practices for securing access to APIM later on in this workshop. Once the APIM instance has been created, please verify that it functions correctly by following these steps: 1) Navigate to the newly-created APIM instance in the Azure Portal. 5) Observe the At this time you have successfully verified that APIM is set up! You may have noticed the Request URL and may be tempted to put it in your browser, issue a CURL statement, etc. If you do, you may see a The reason for this the unauthorized access status code is that the Echo API requires a subscription key to be set. Whereas tests originating in APIM account for this automatically, external callers cannot (and, naturally, should not). Back in APIM, switch to the Settings tab and uncheck Subscription required and press Save at the bottom of the page. Subscriptions are important and useful, but in this case, we just want to quickly verify the APIM instance is working as intended. Accessing the link in your browser should now show you no error message. In fact, in order to verify the 200, it’s easiest to open your Developer Tools (F12), navigate to the Network tab, and look at All requests to see the 200. Alternatively, you can issue a verbose (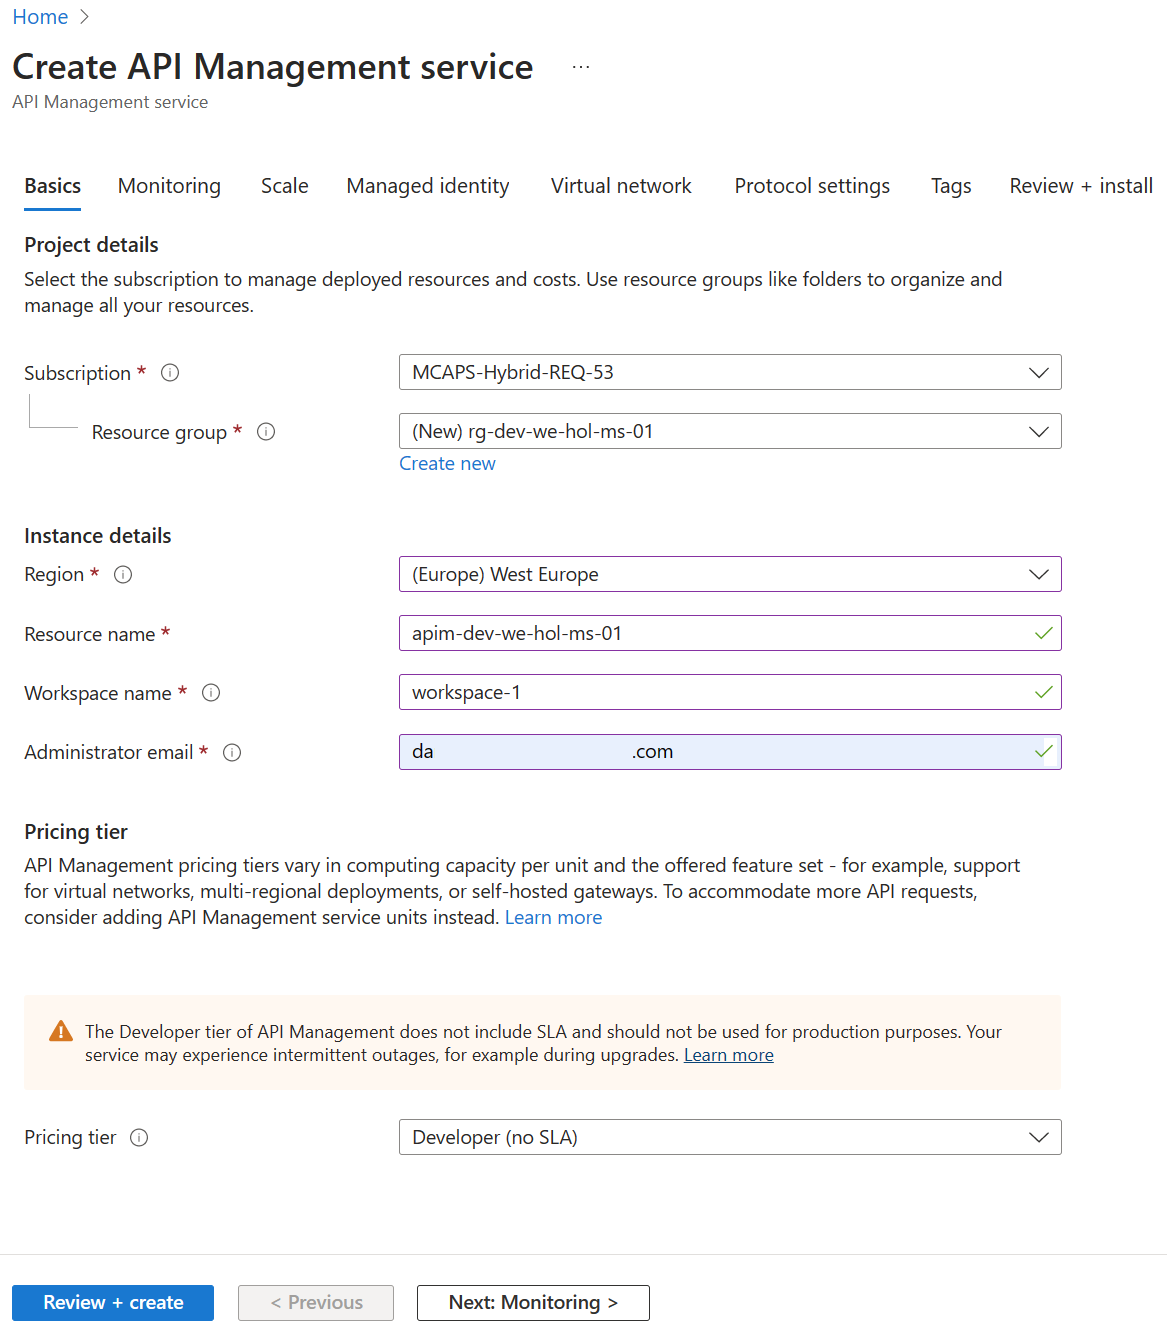
Verifying the API Management instance
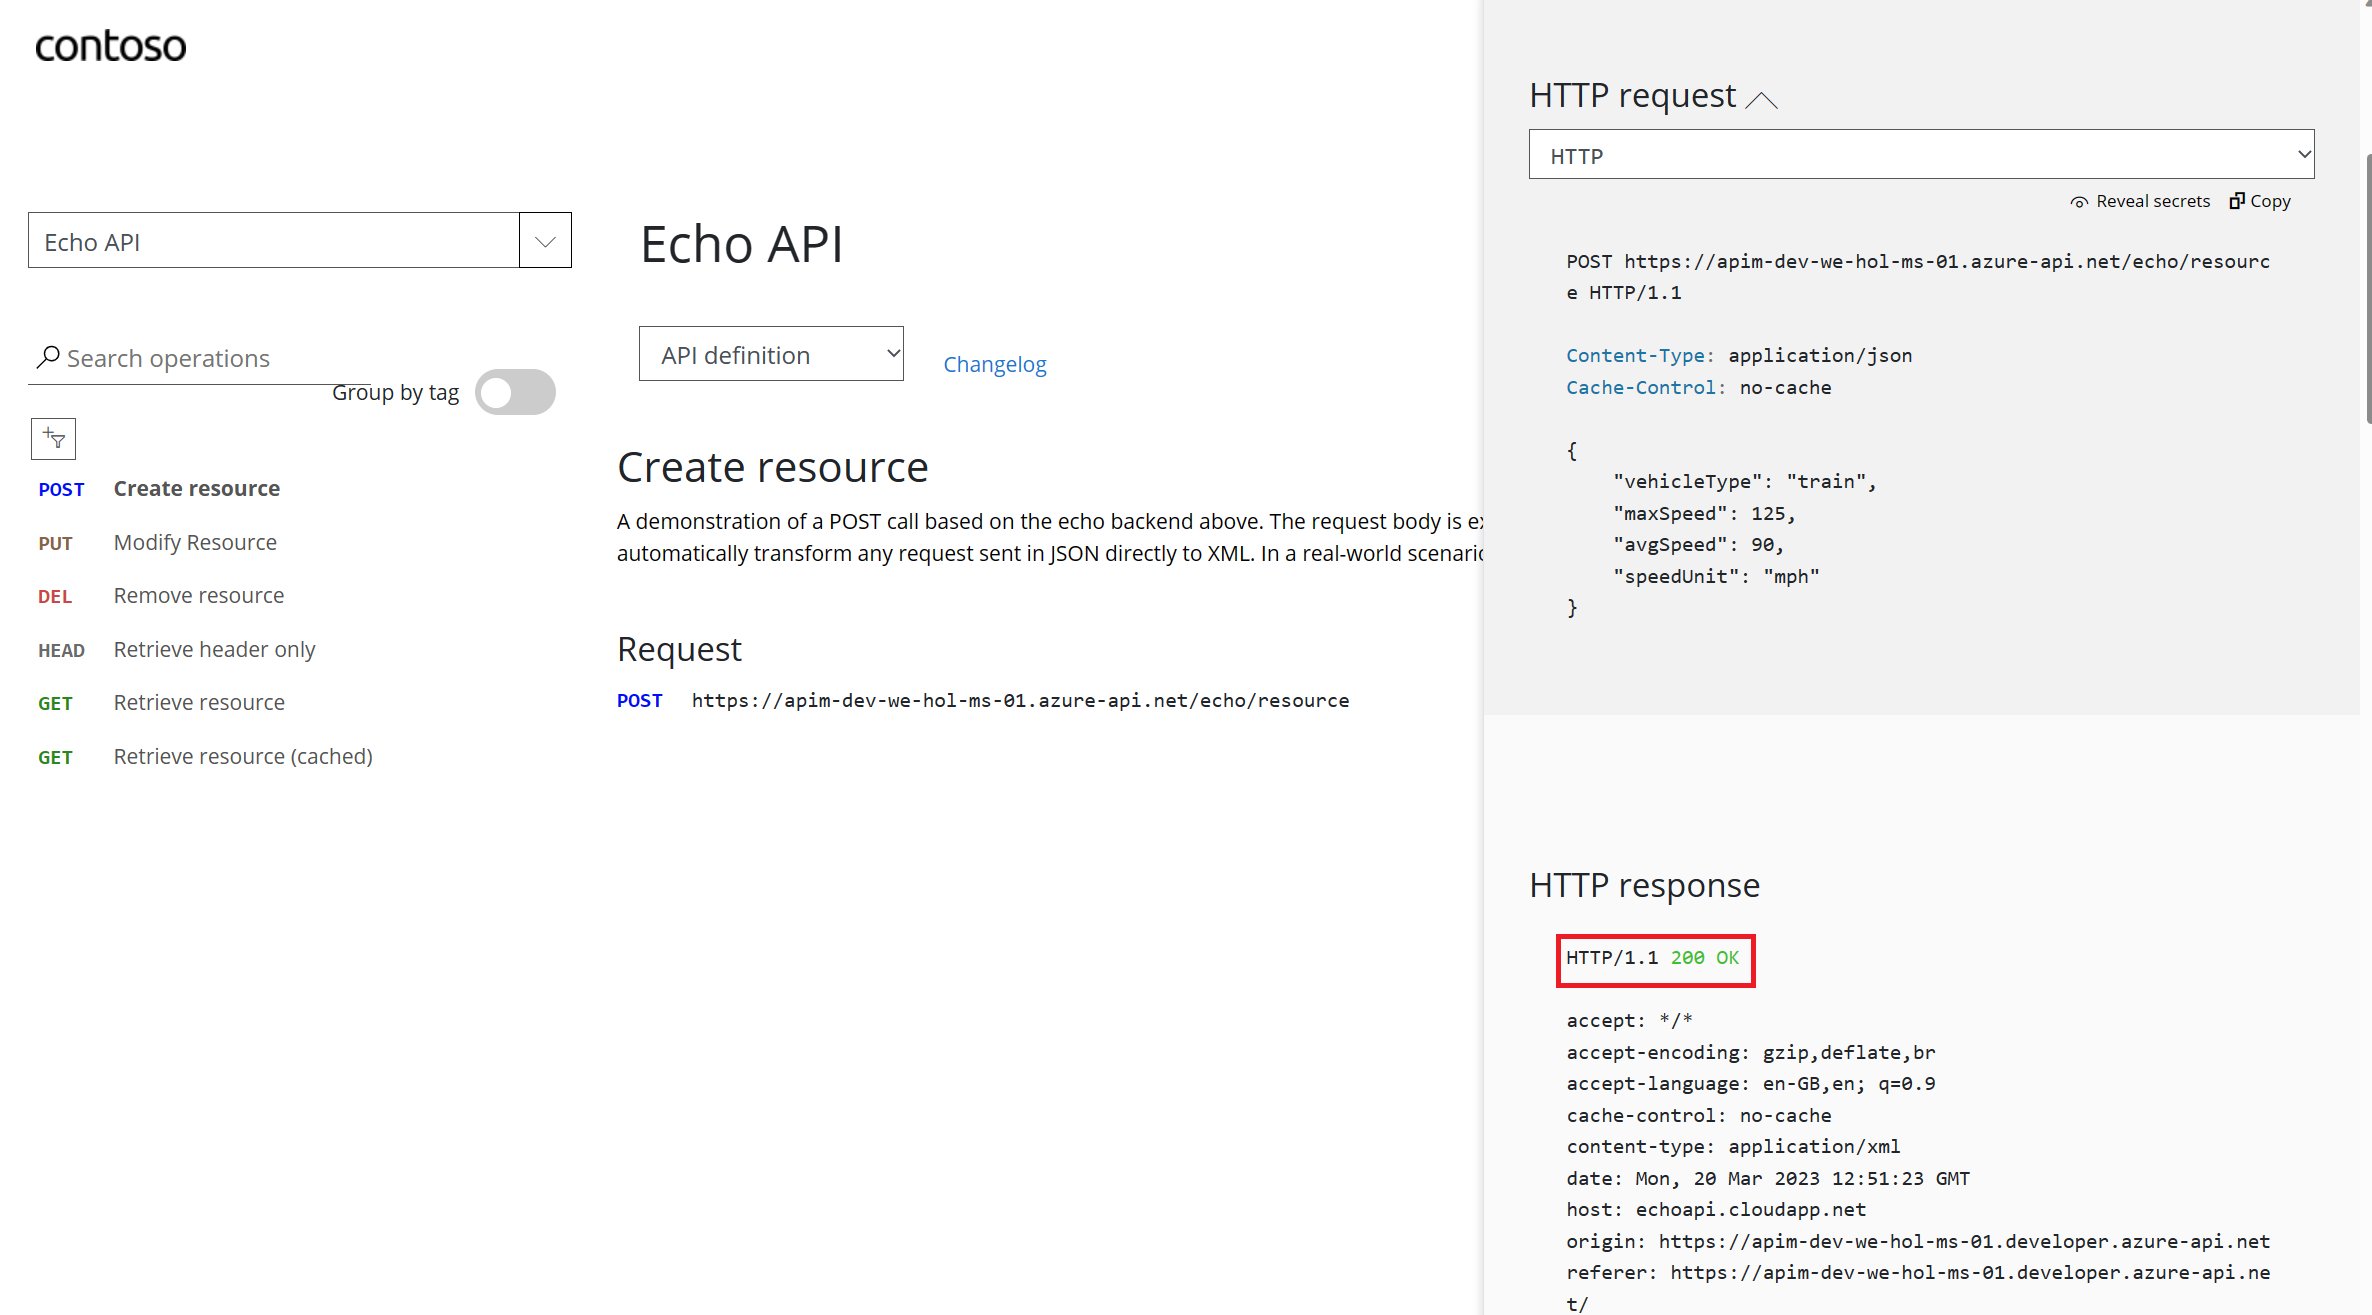
2) Select the APIs blade, then select the Echo API.
3) Press the Test tab, then select the GET Retrieve resource operation.
4) Press Send to issue a simple request.
200 Success response.
Verification Failure (and Path to Success)
401 error and wonder what’s happening.
-v) CURL command against the Echo API and observe the 200 Success: curl -v https://<your apim instance>.azure-api.net/echo/resource?param1=sample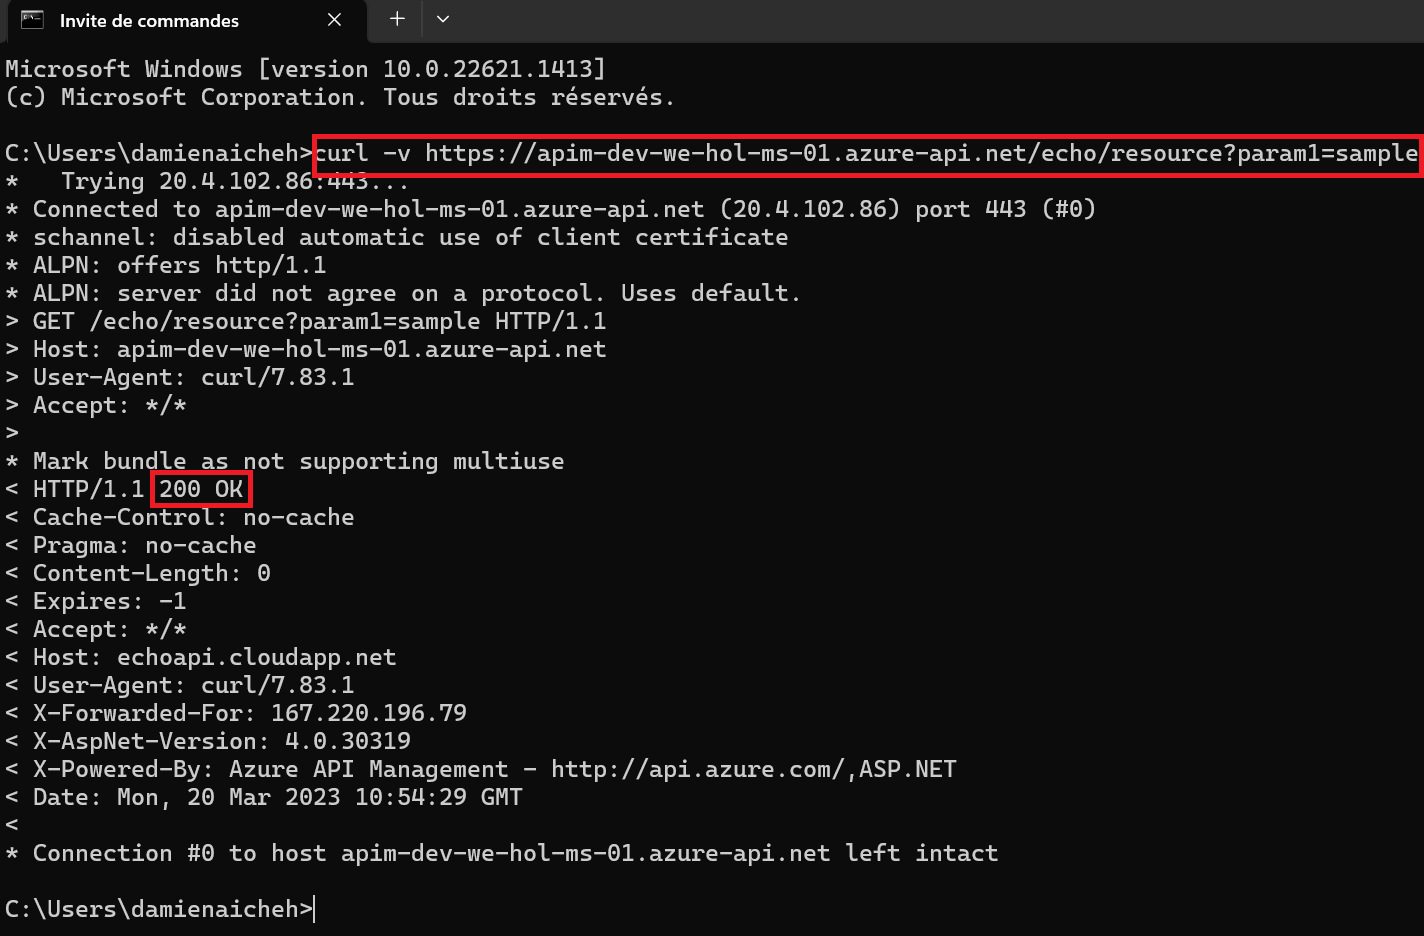
Hands-On lab
Exercise 1: Developer Portal
Duration: 20 minutes
The Developer Portal is an automatically generated, fully customizable website with the documentation of your APIs. It is where API consumers can discover your APIs, learn how to use them, request access, and try them out.
TABLE OF CONTENTS
- Publishing Developer Portal
- Customizing Developer Portal
- Product Management
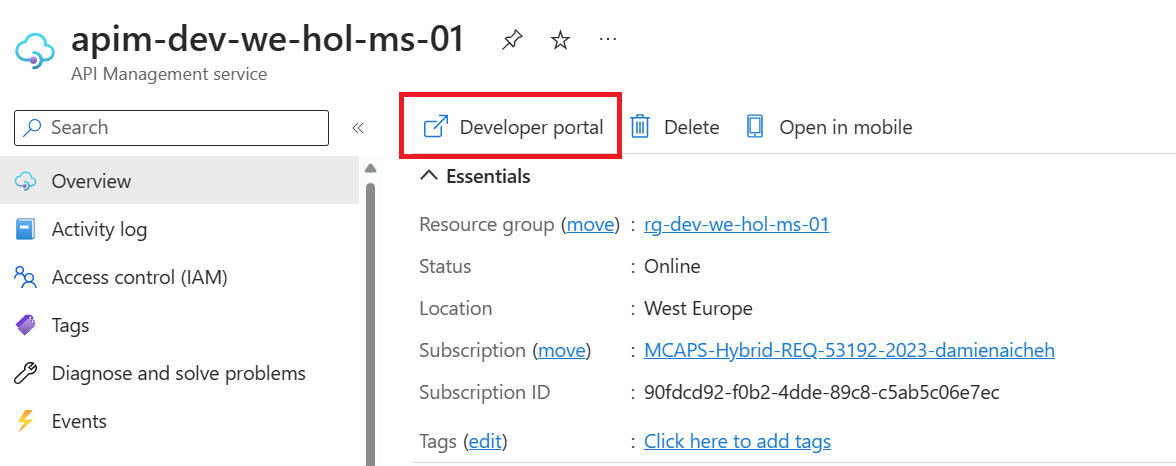
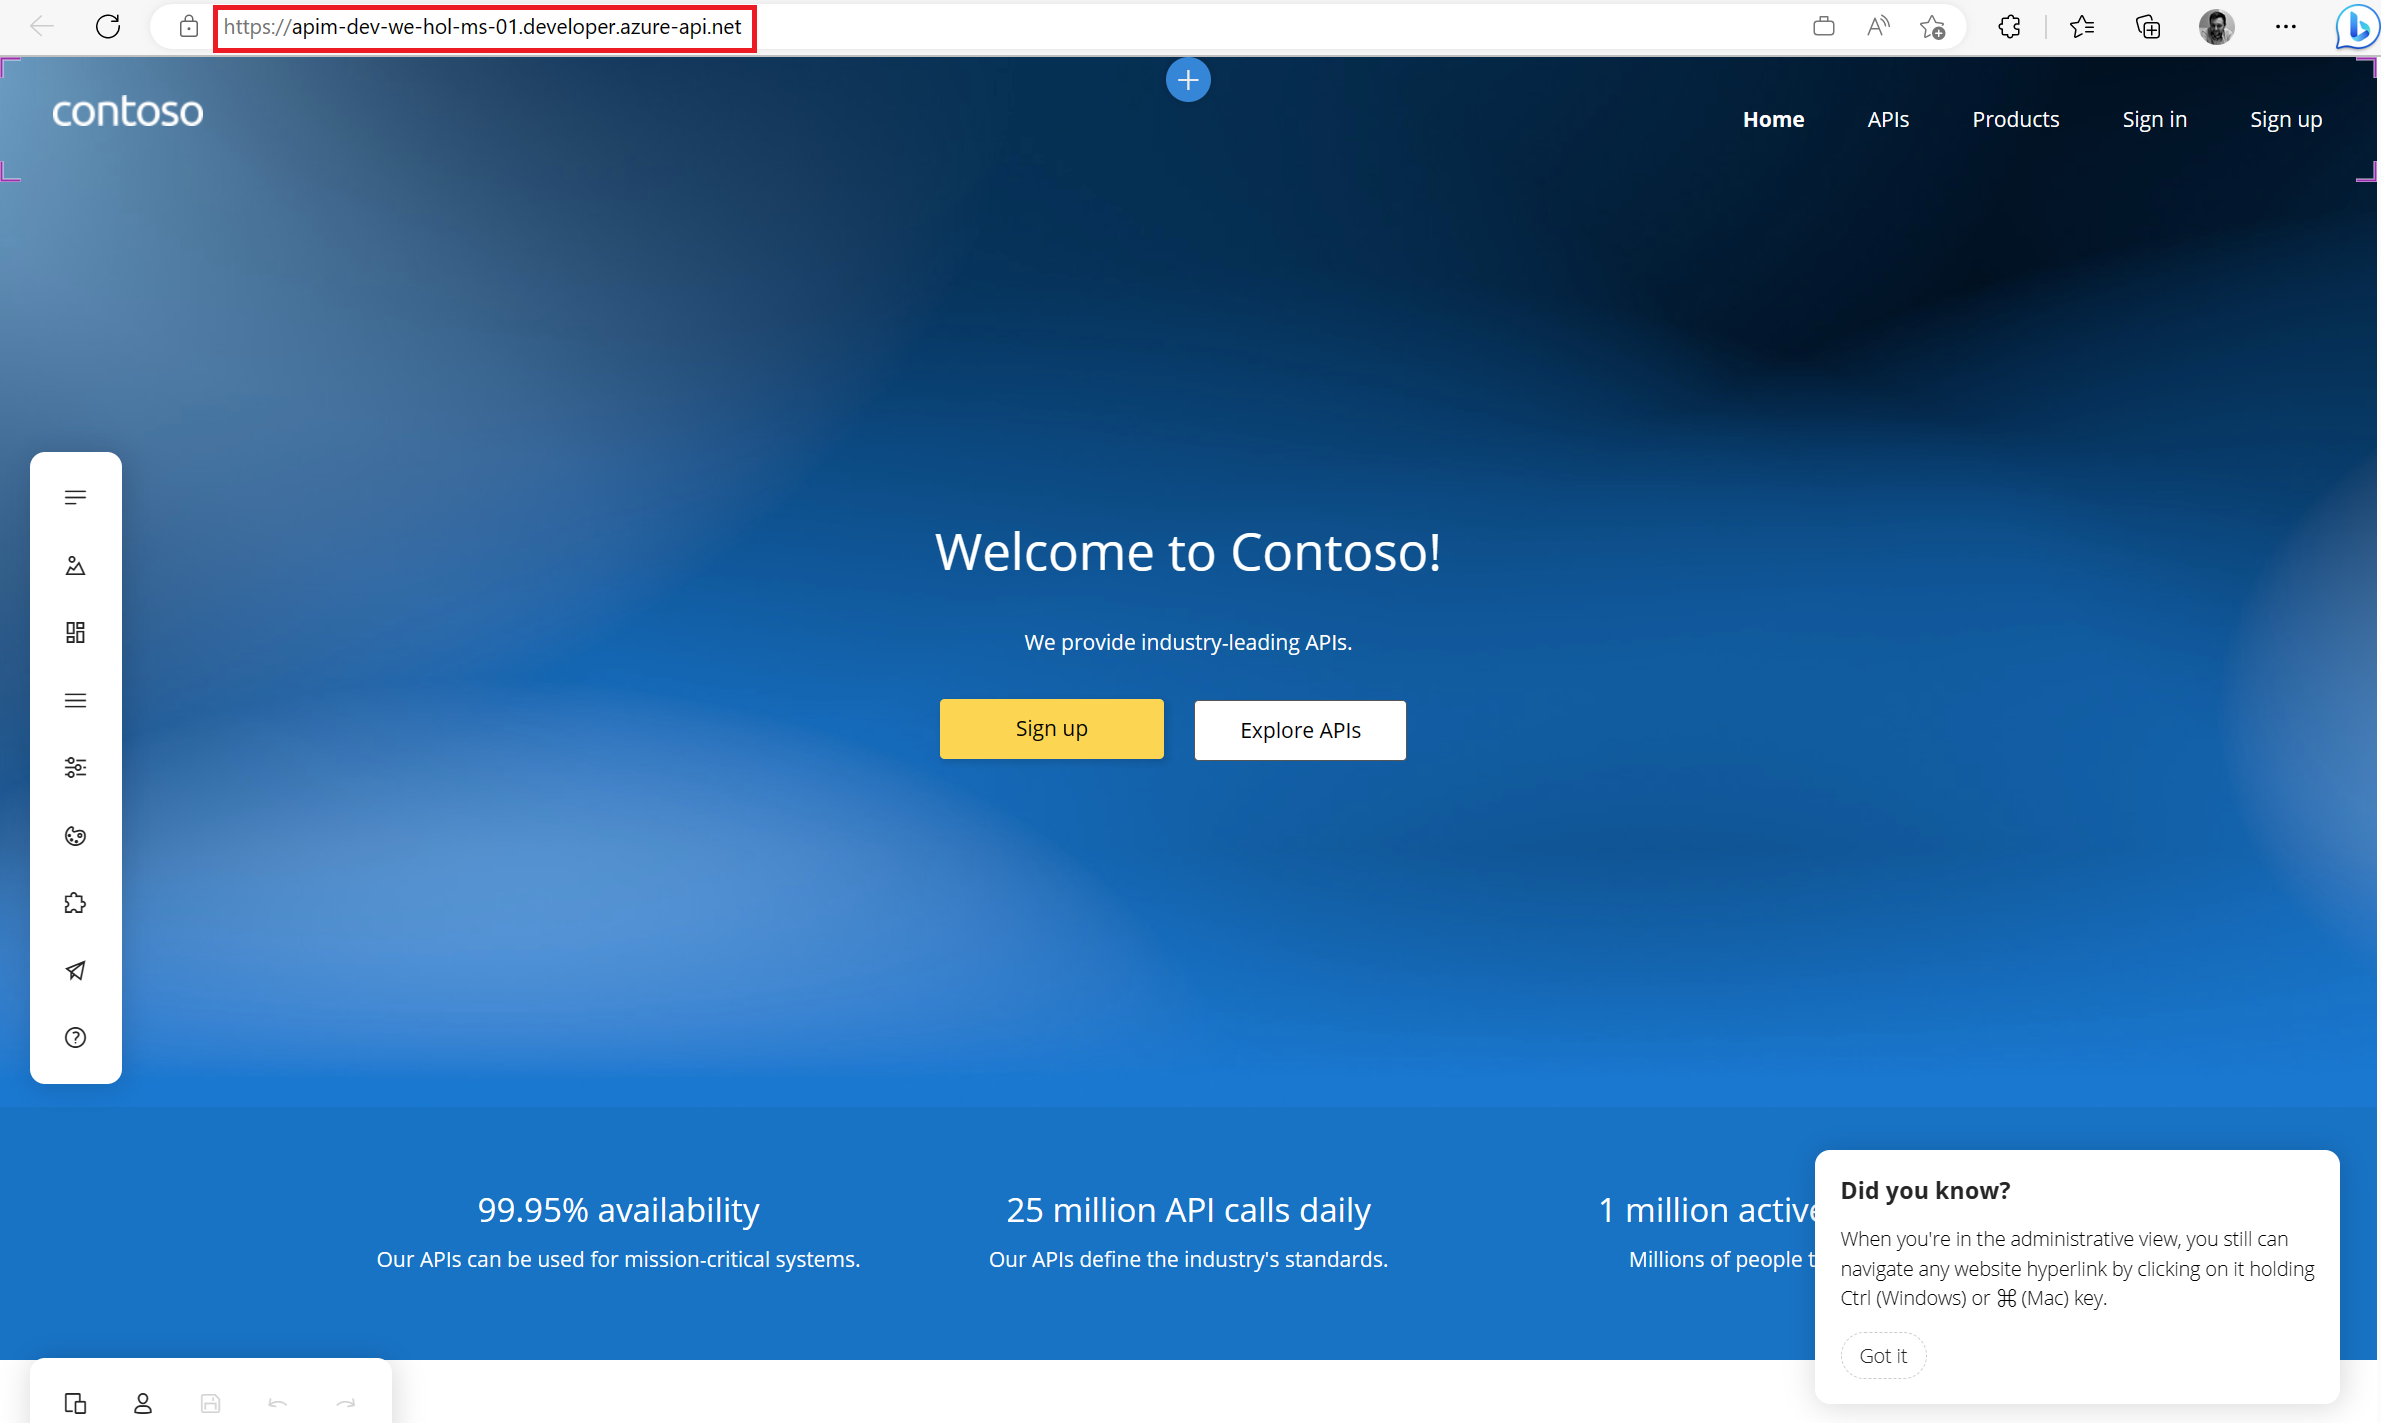
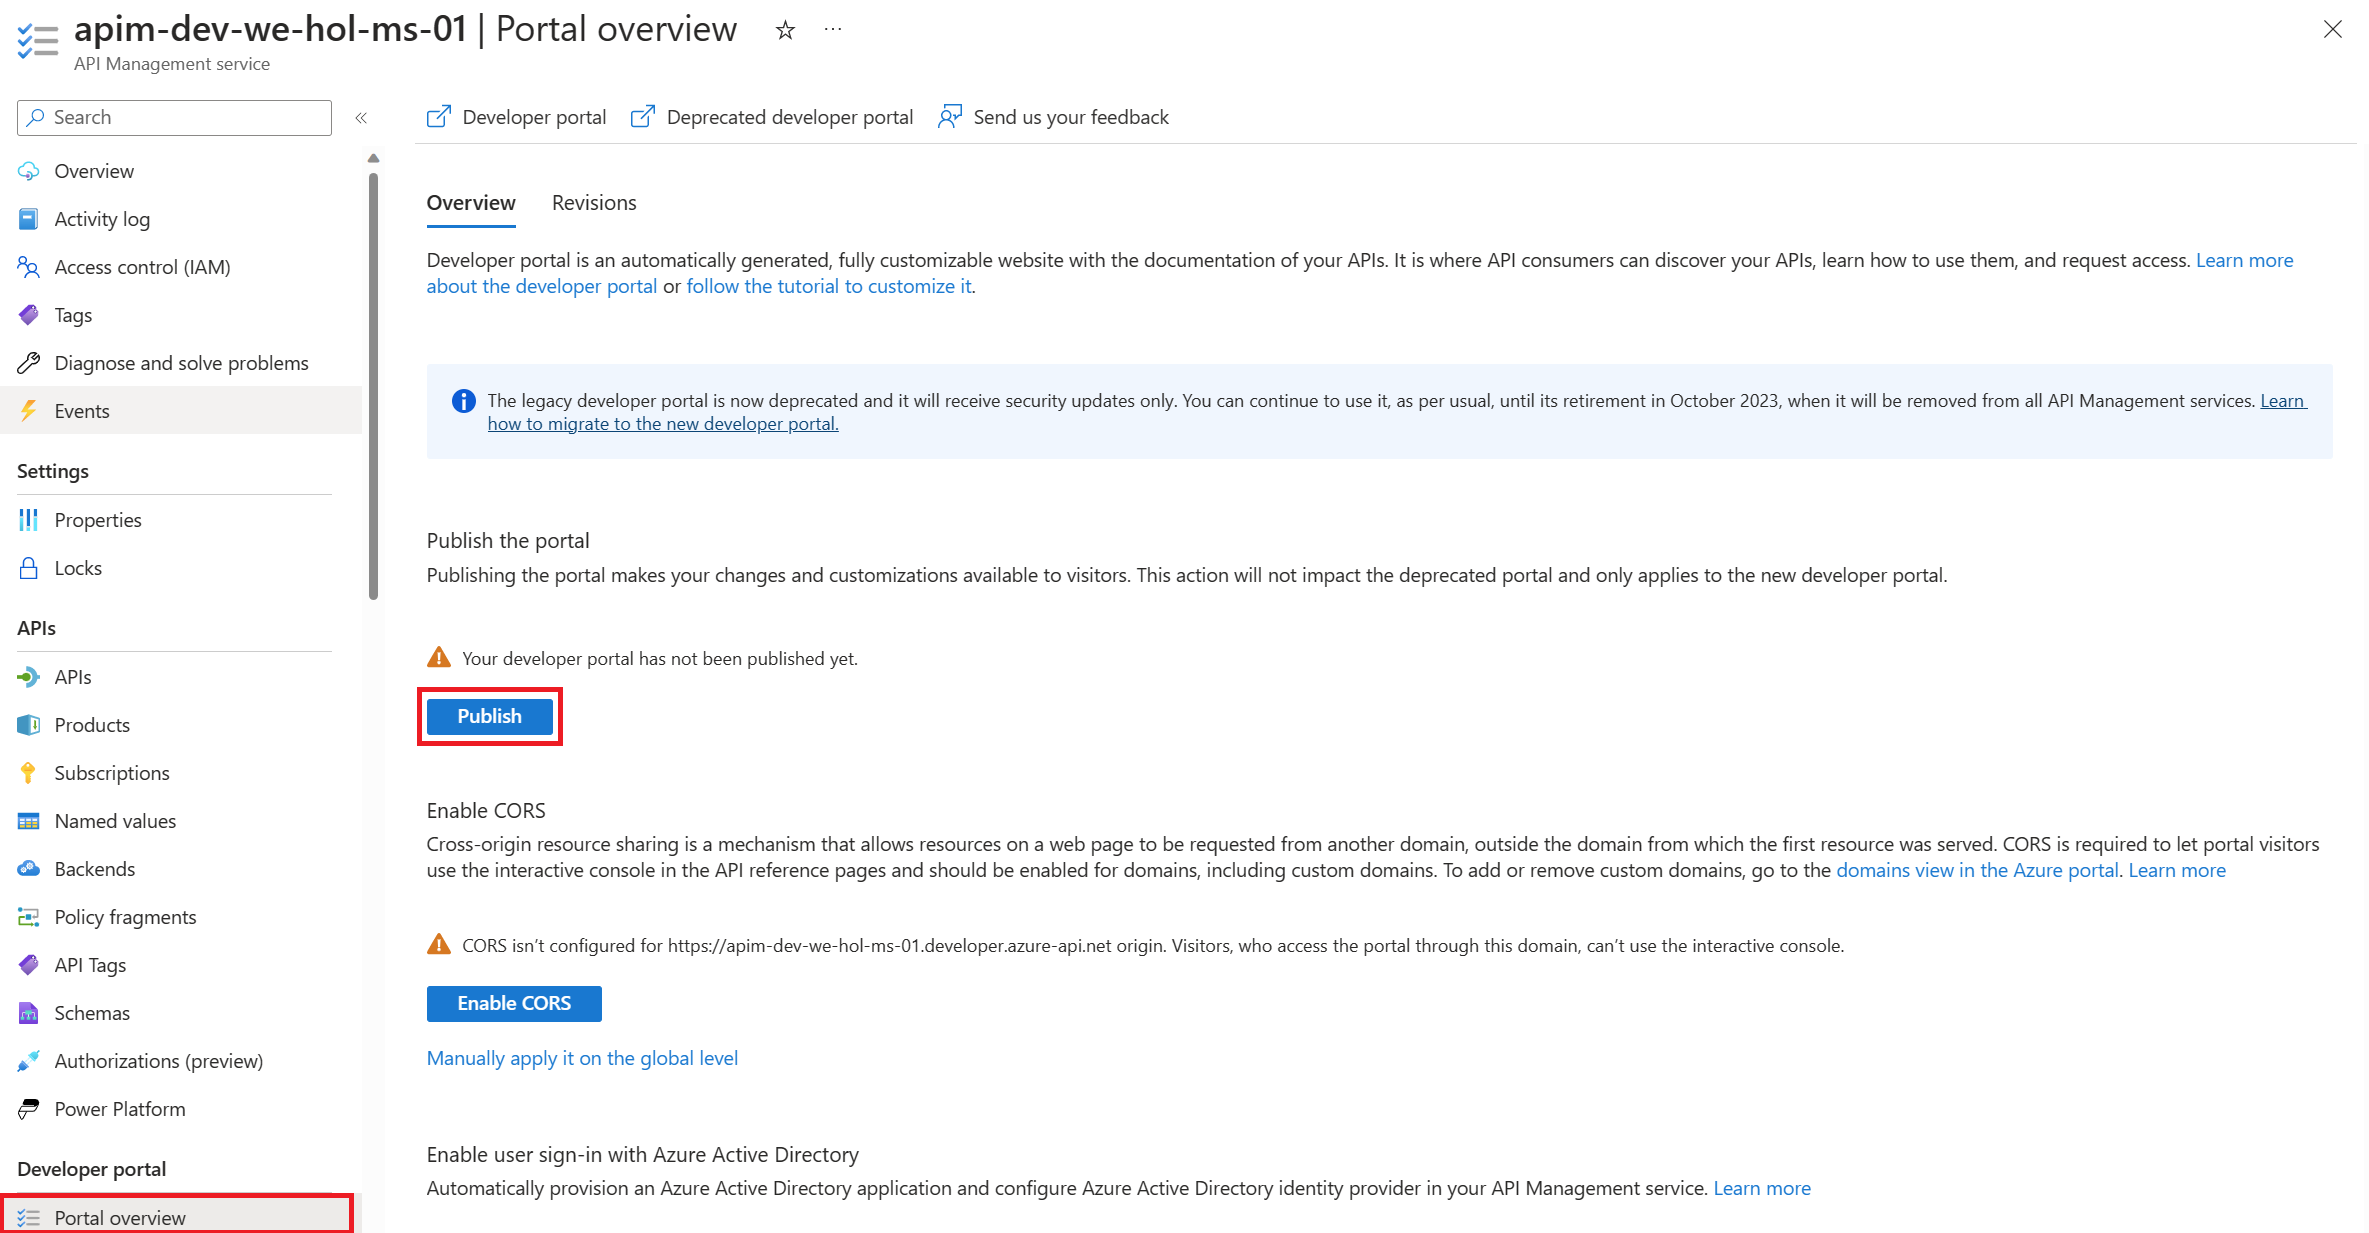
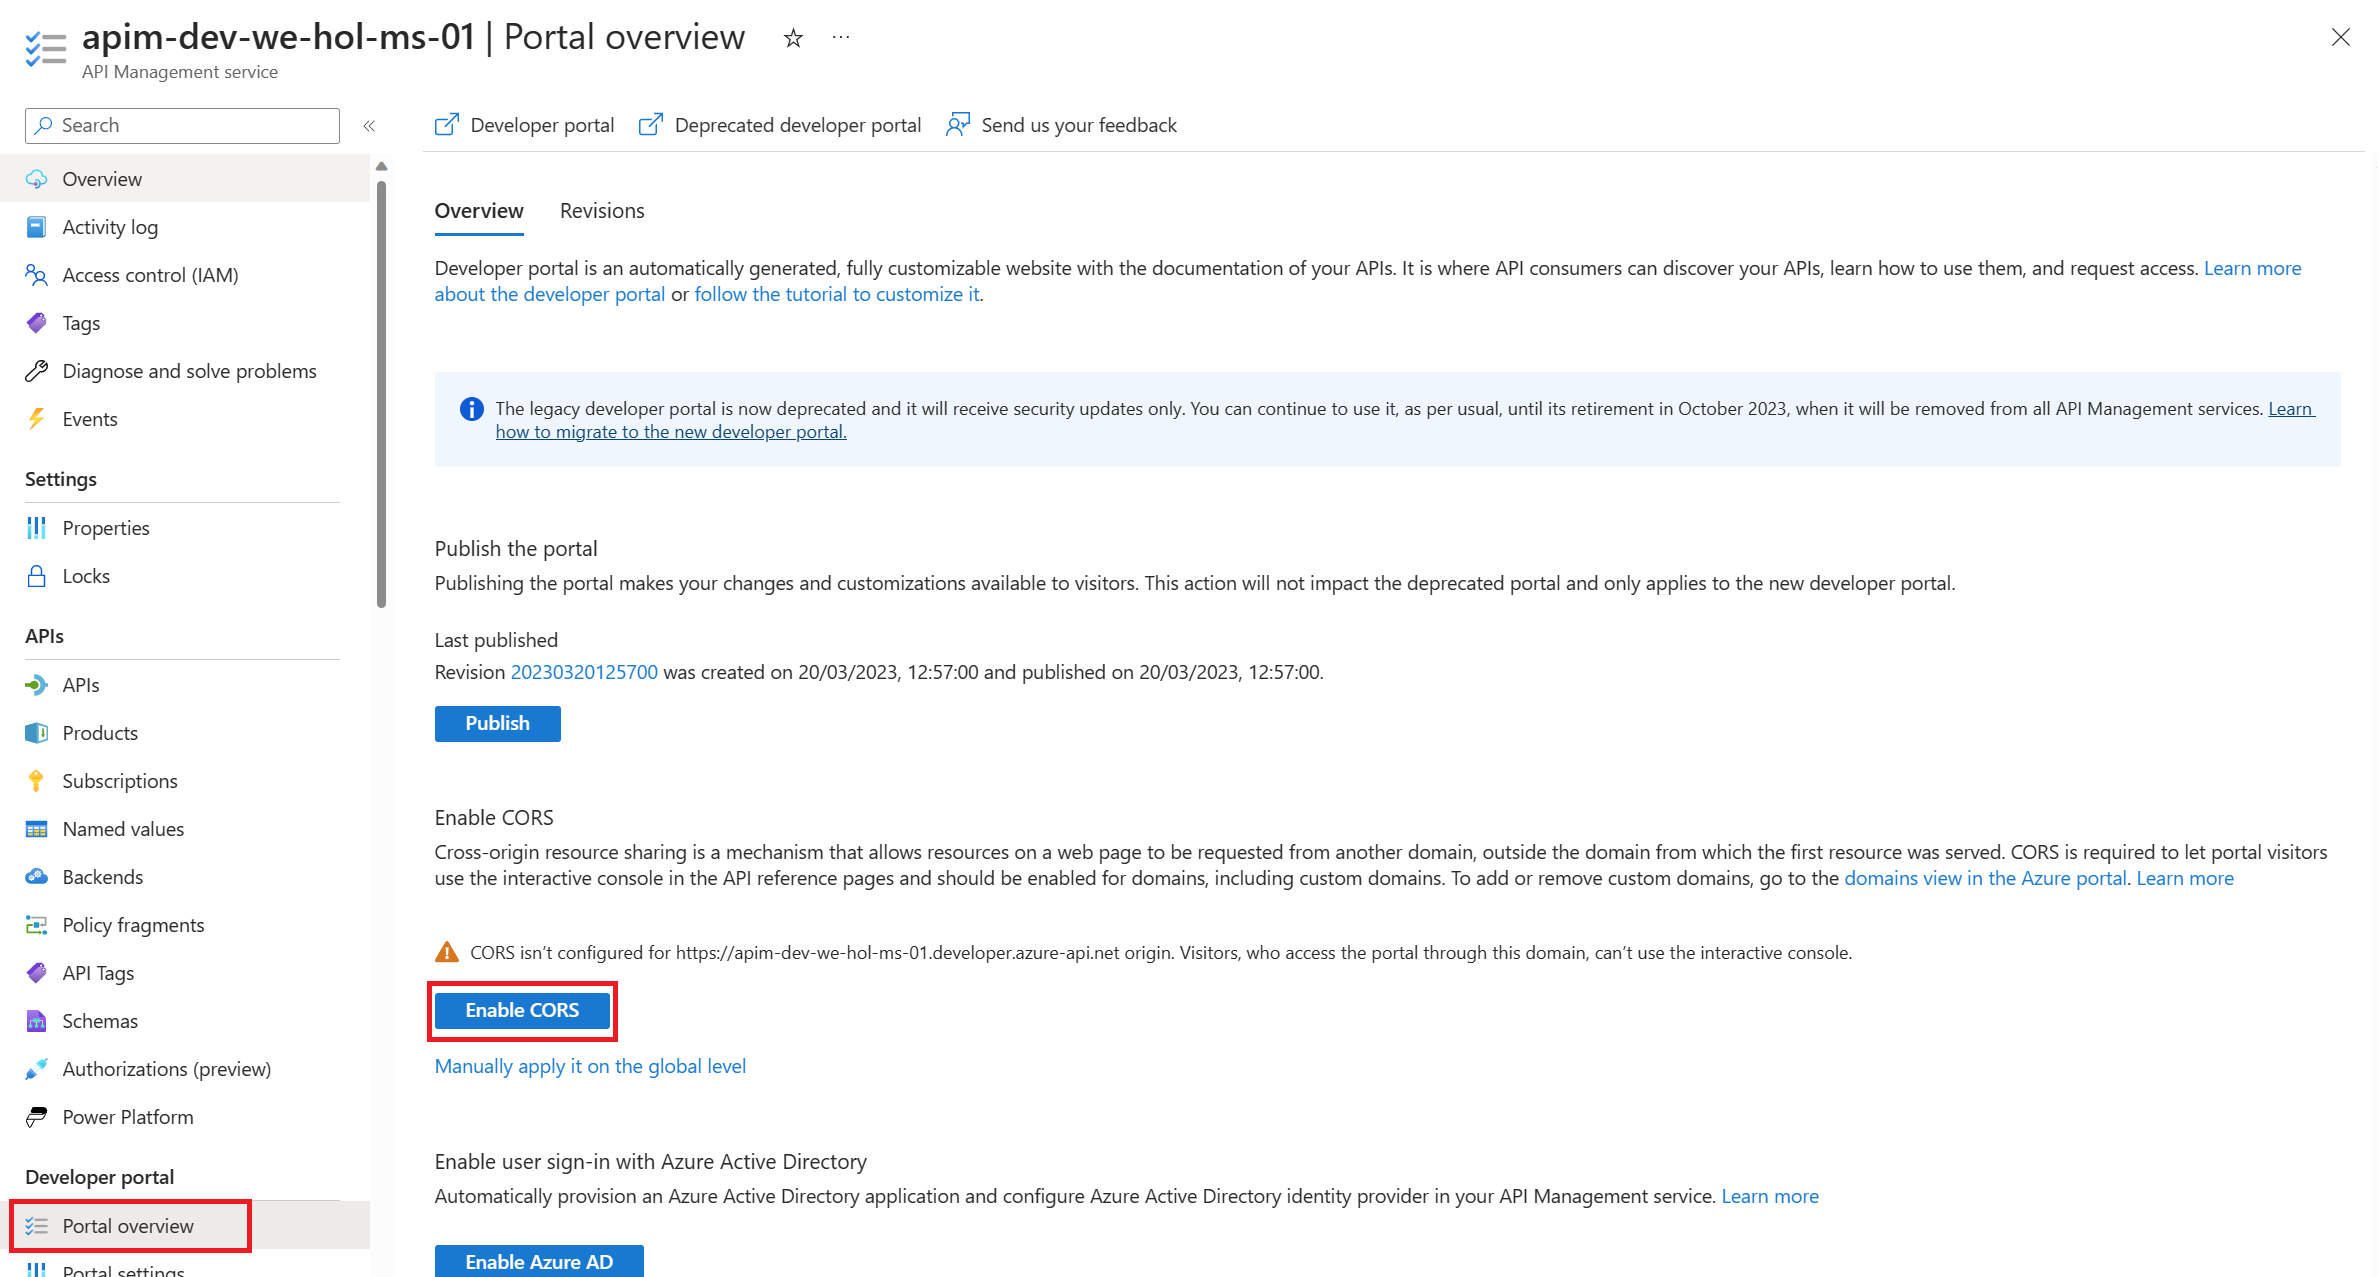
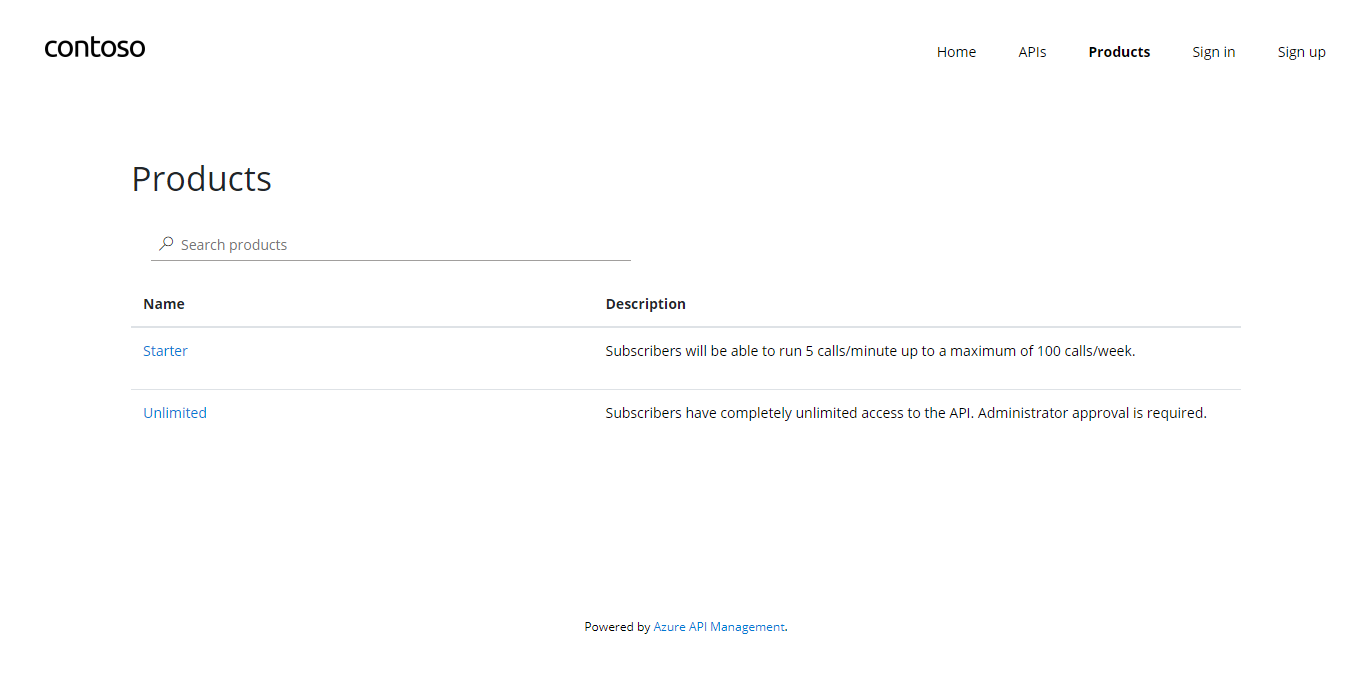
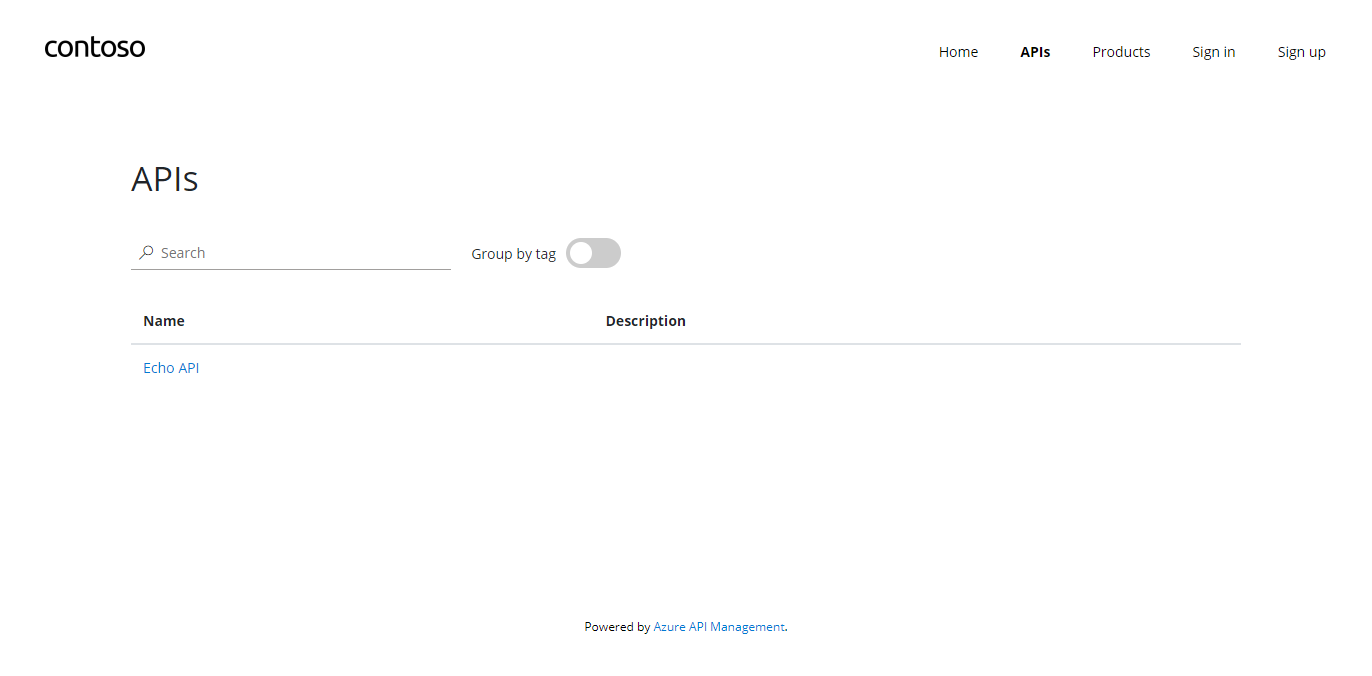
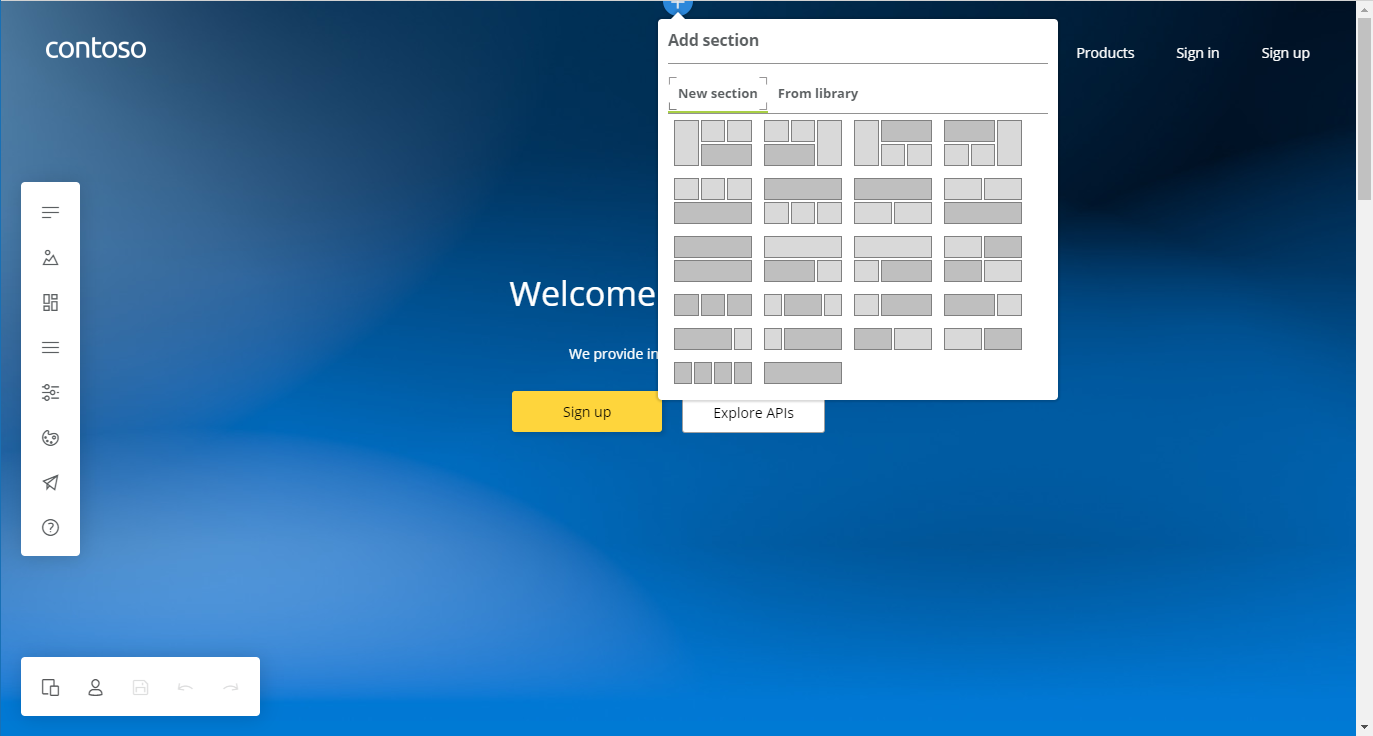
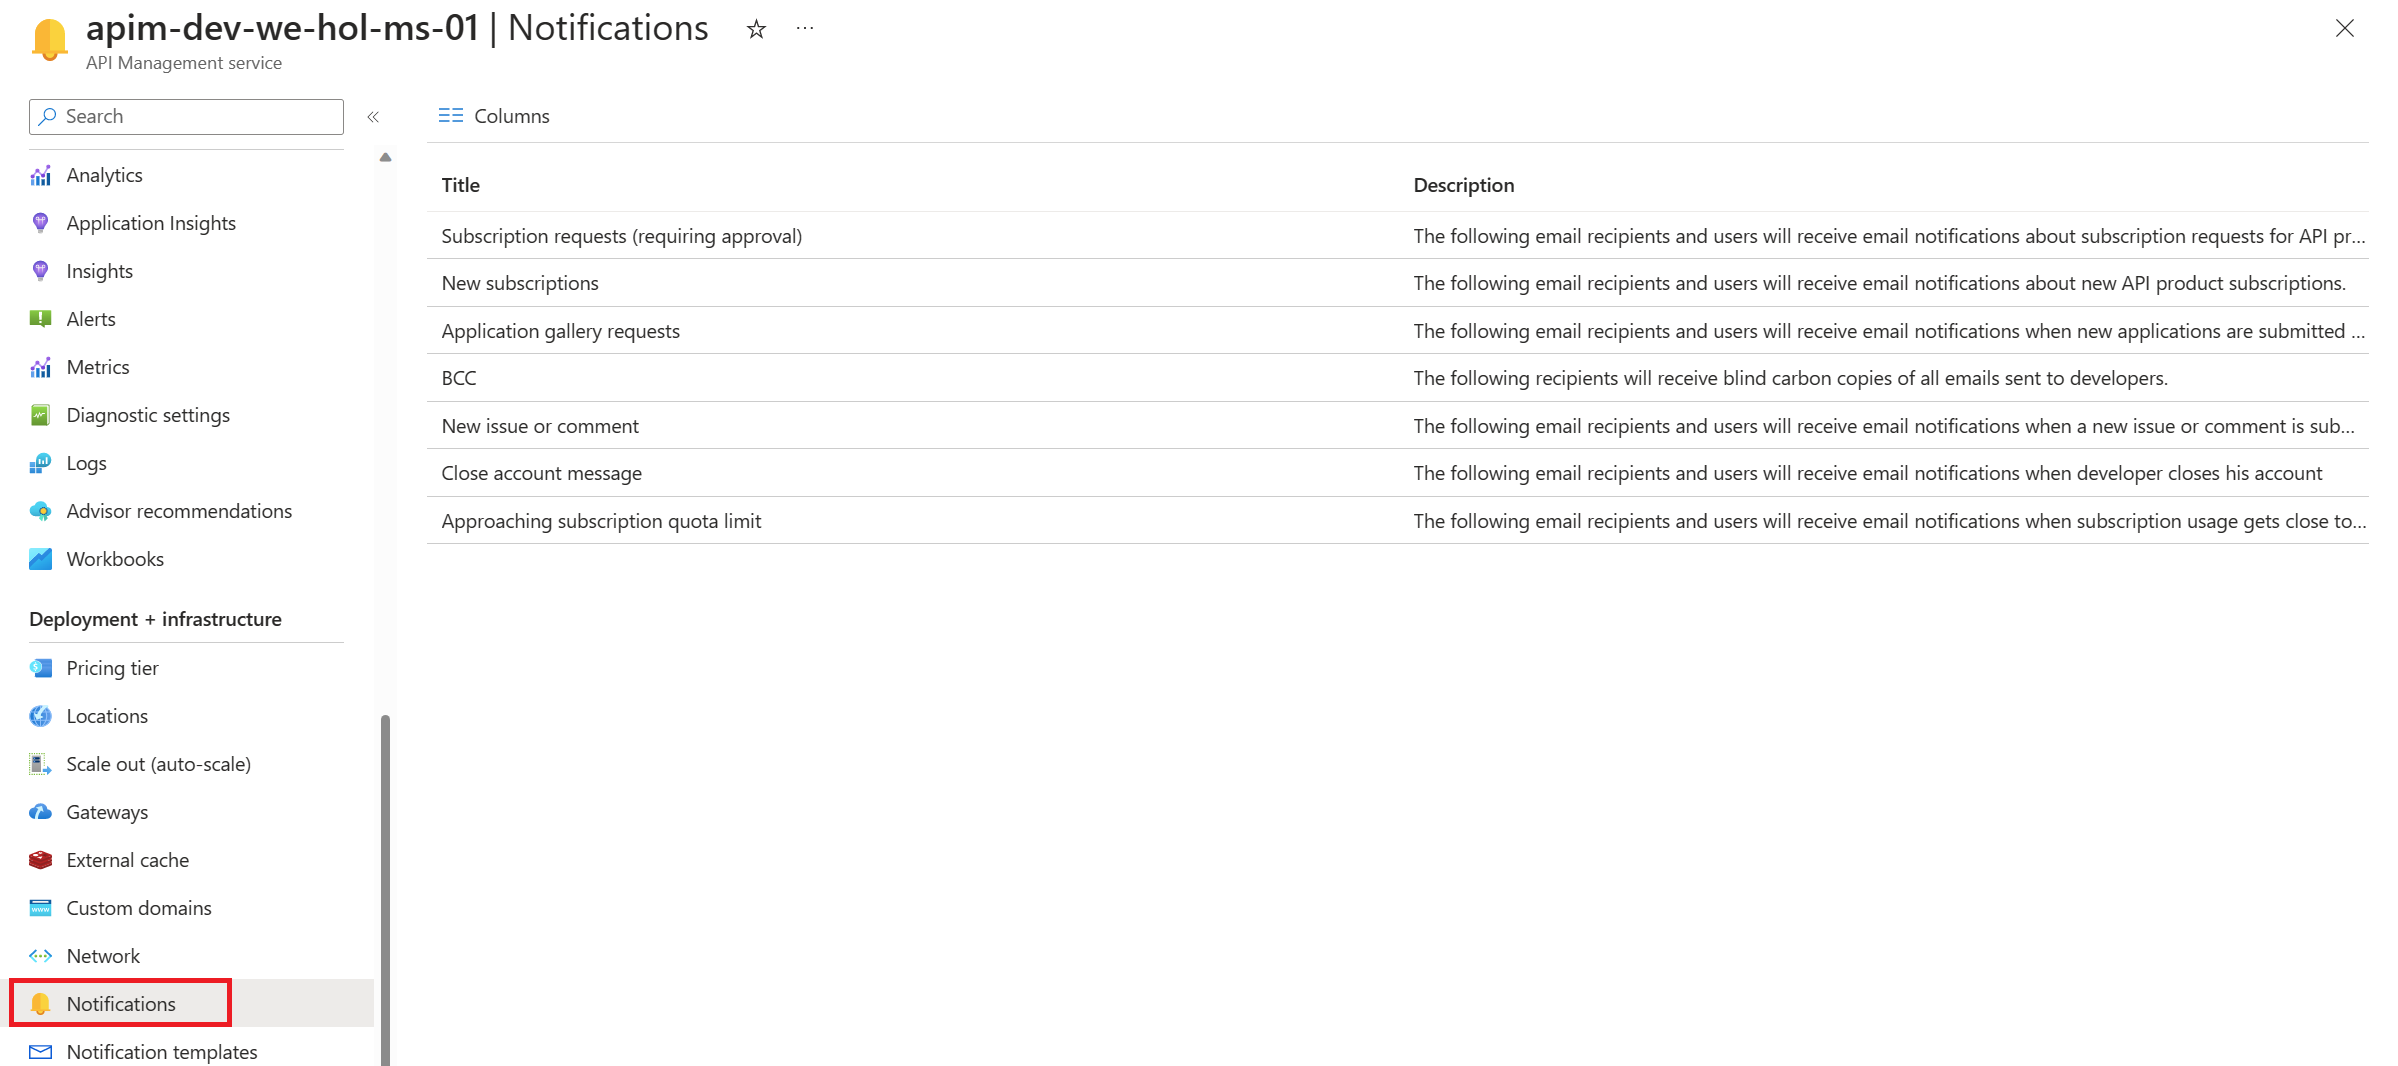
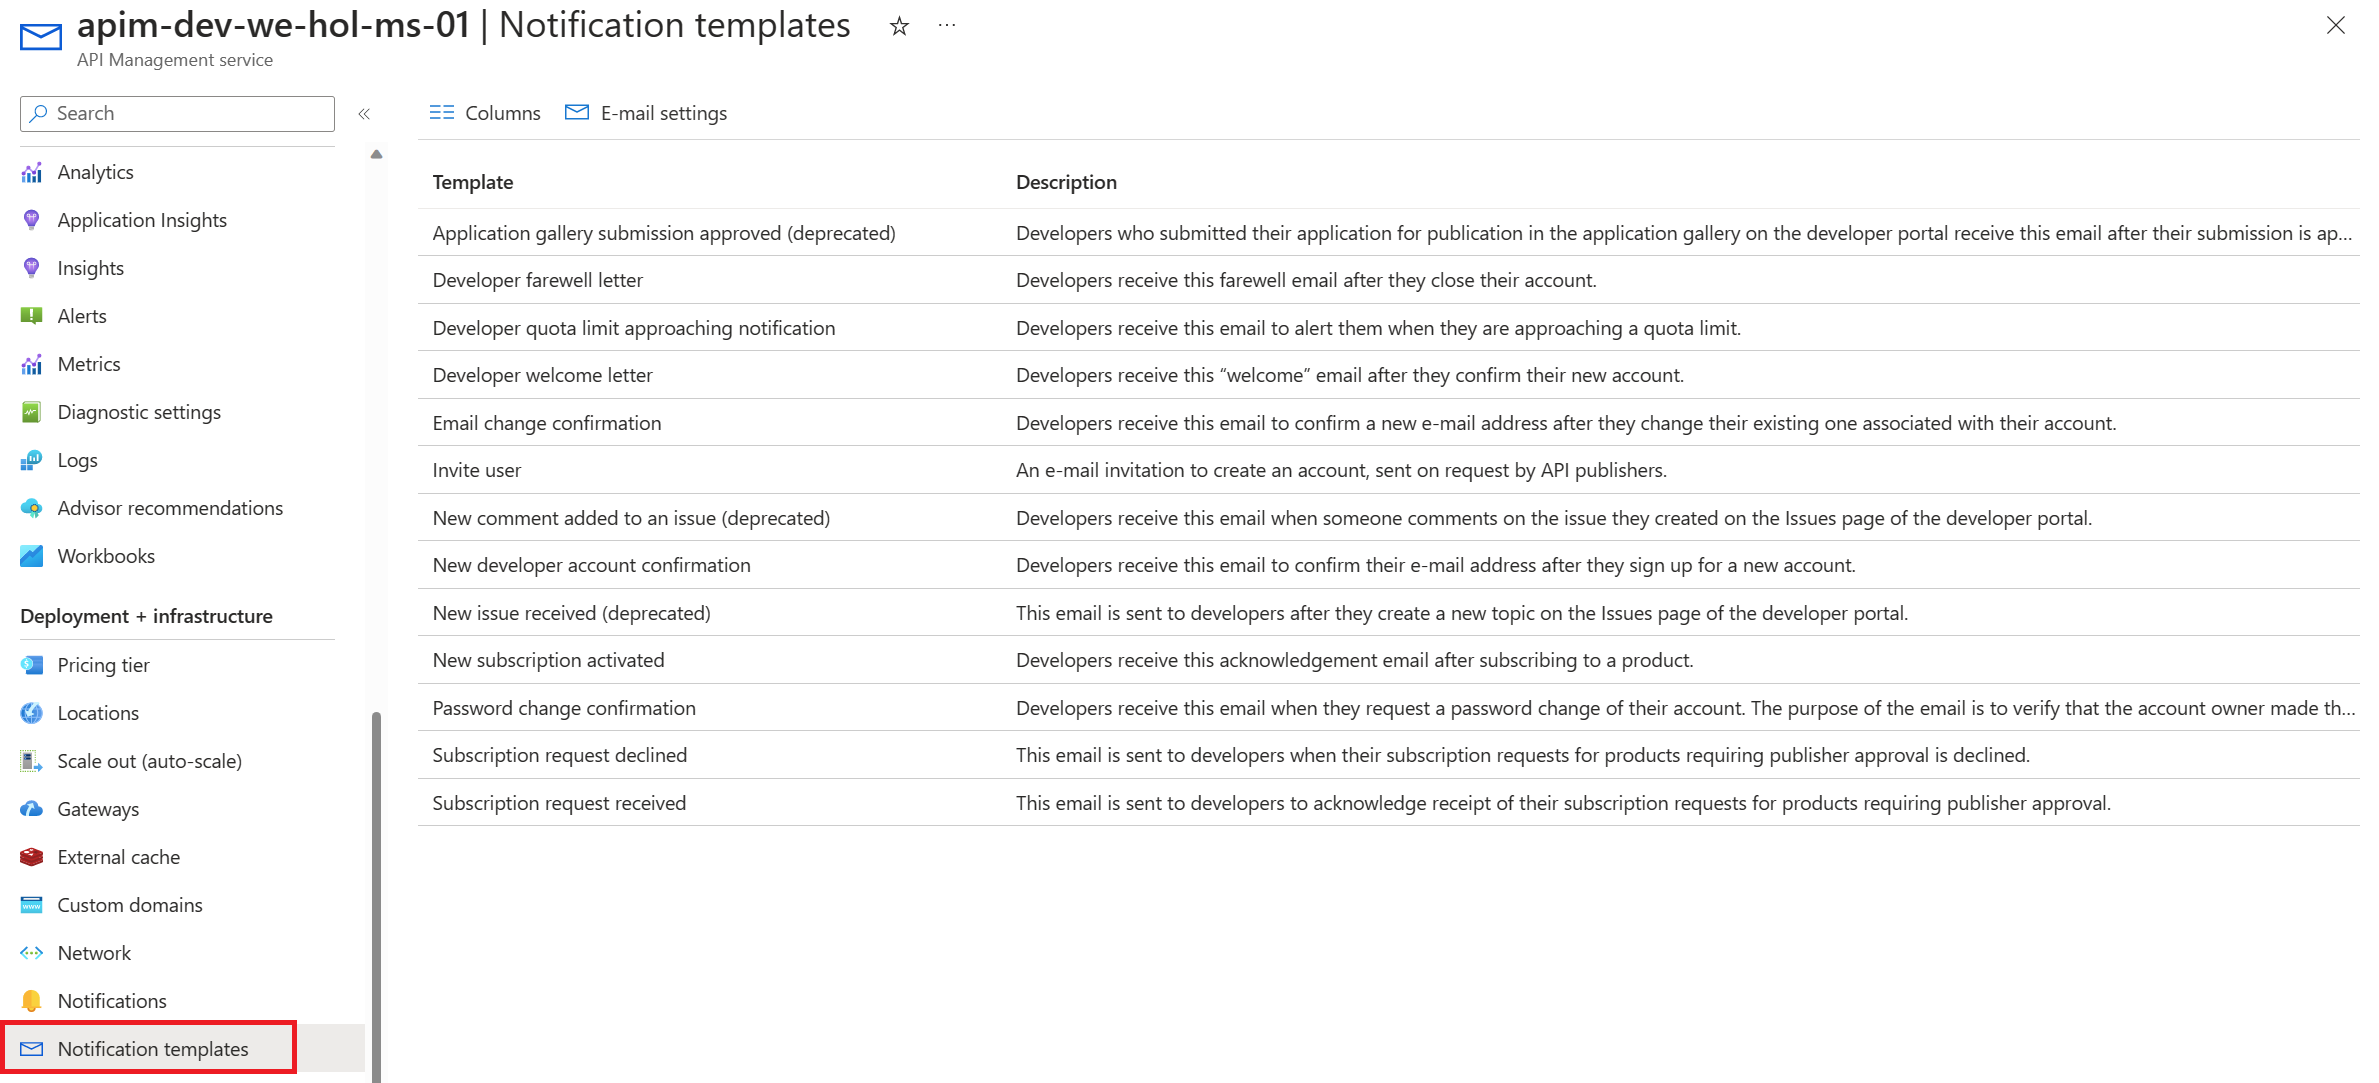
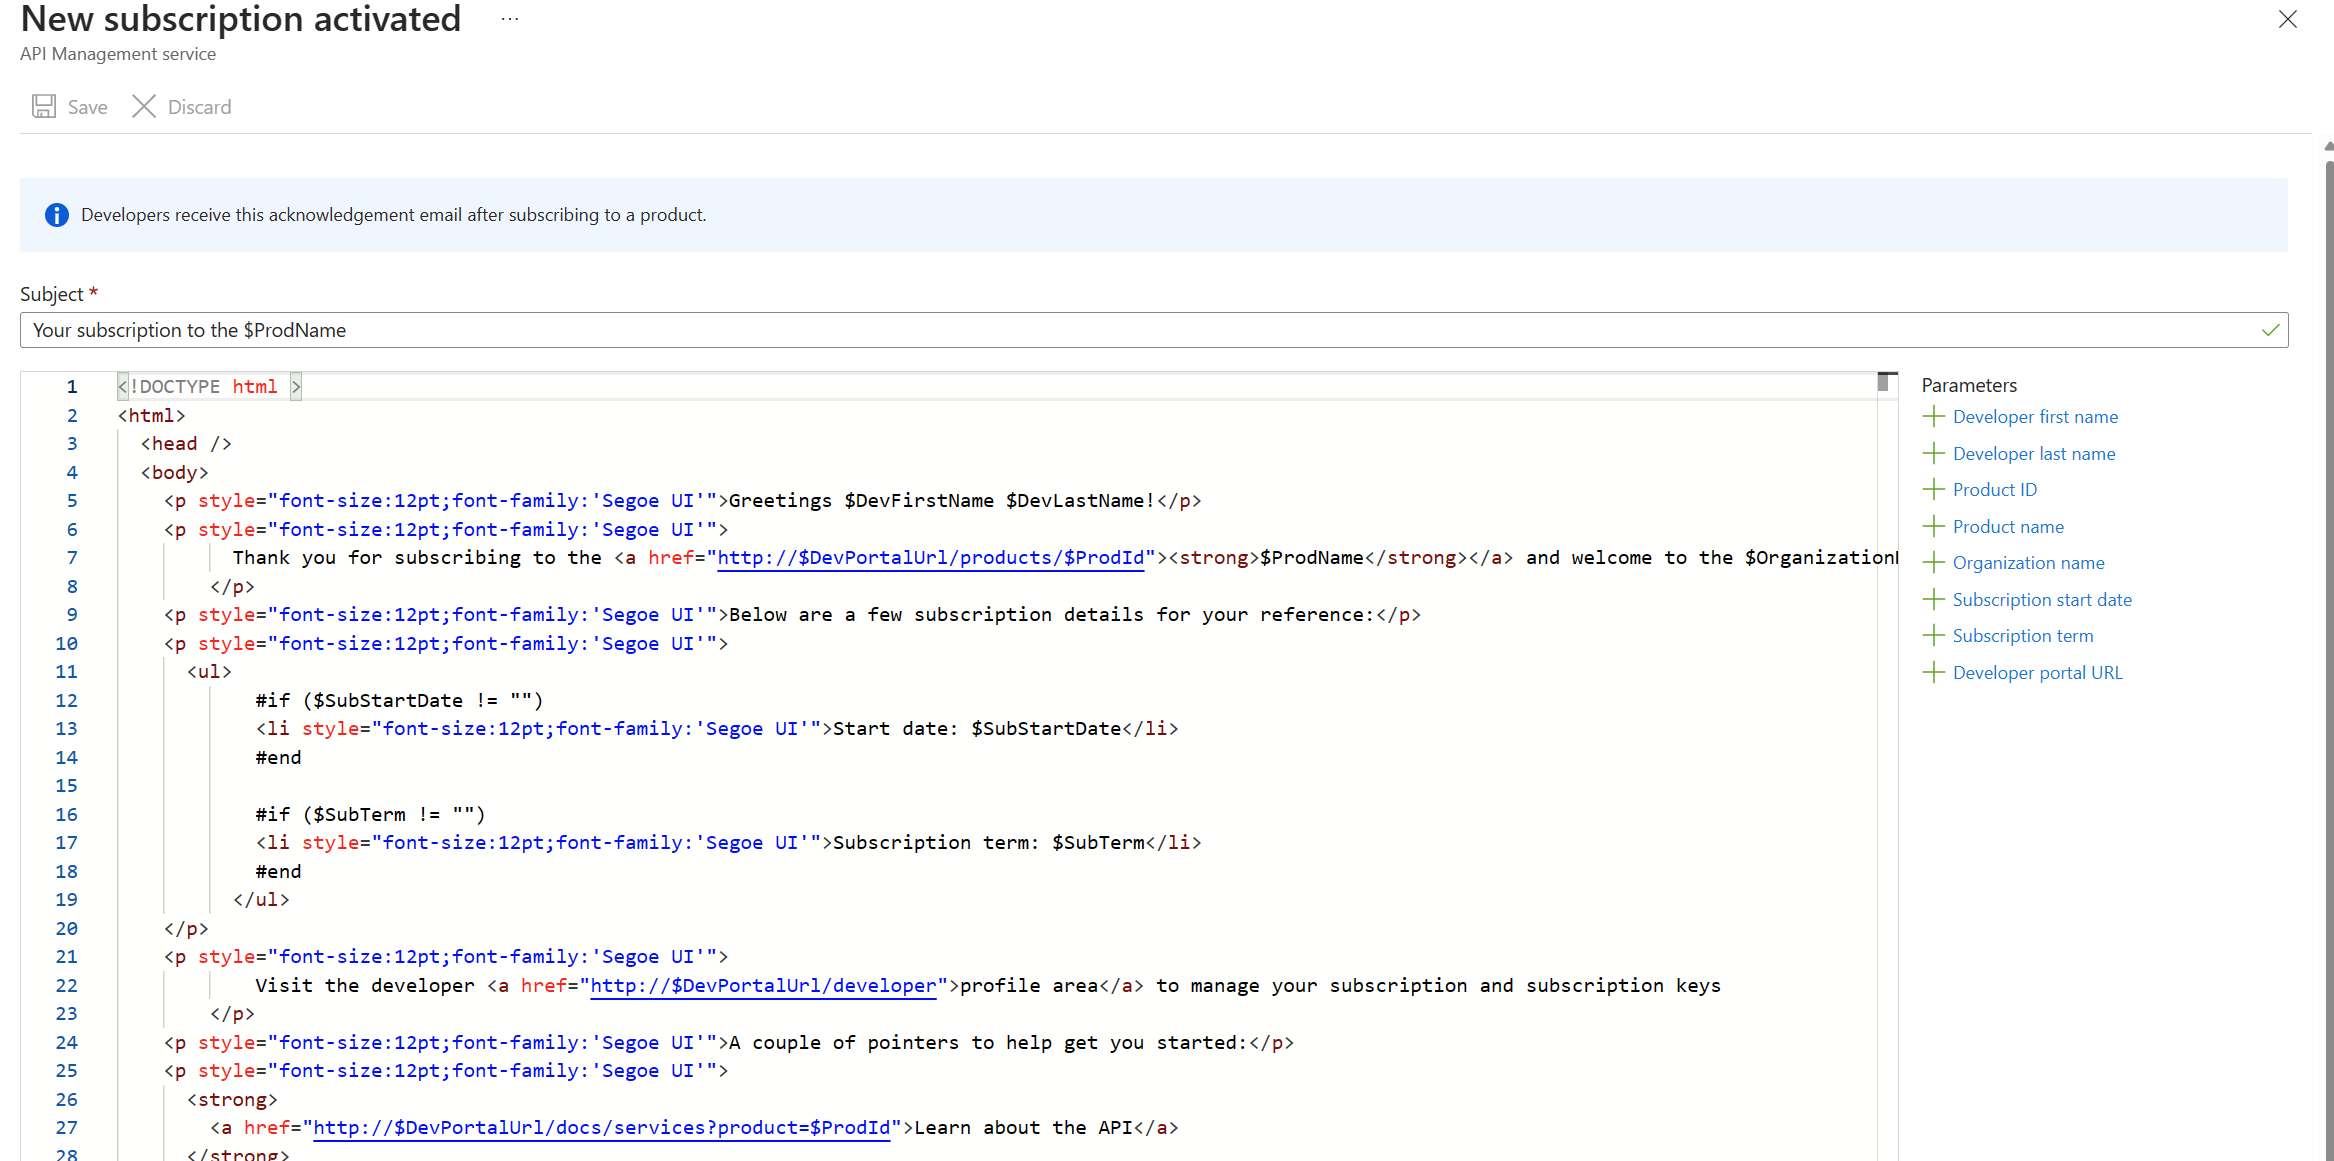
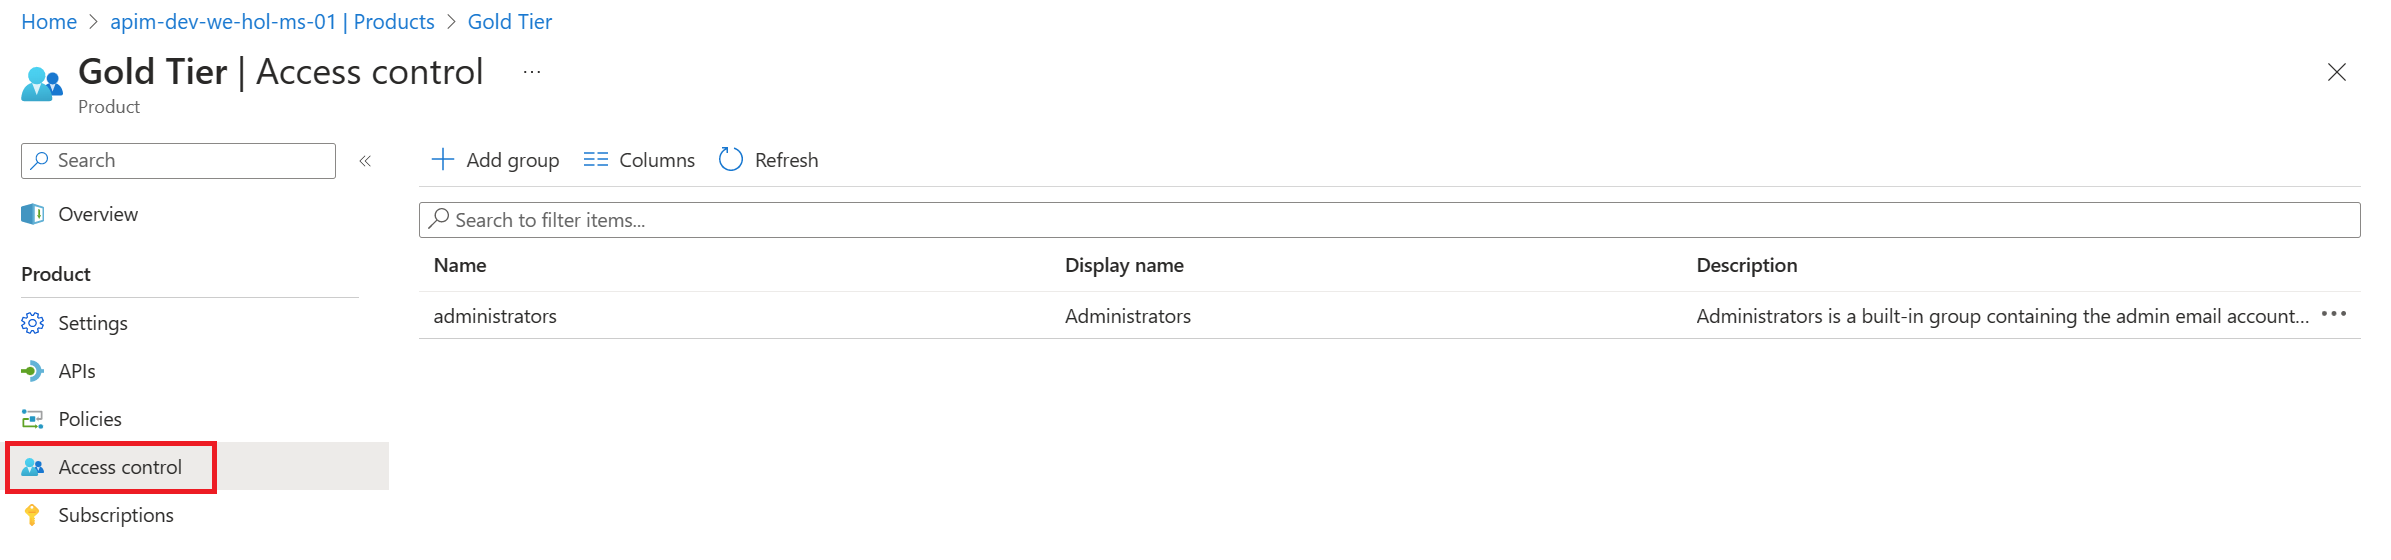
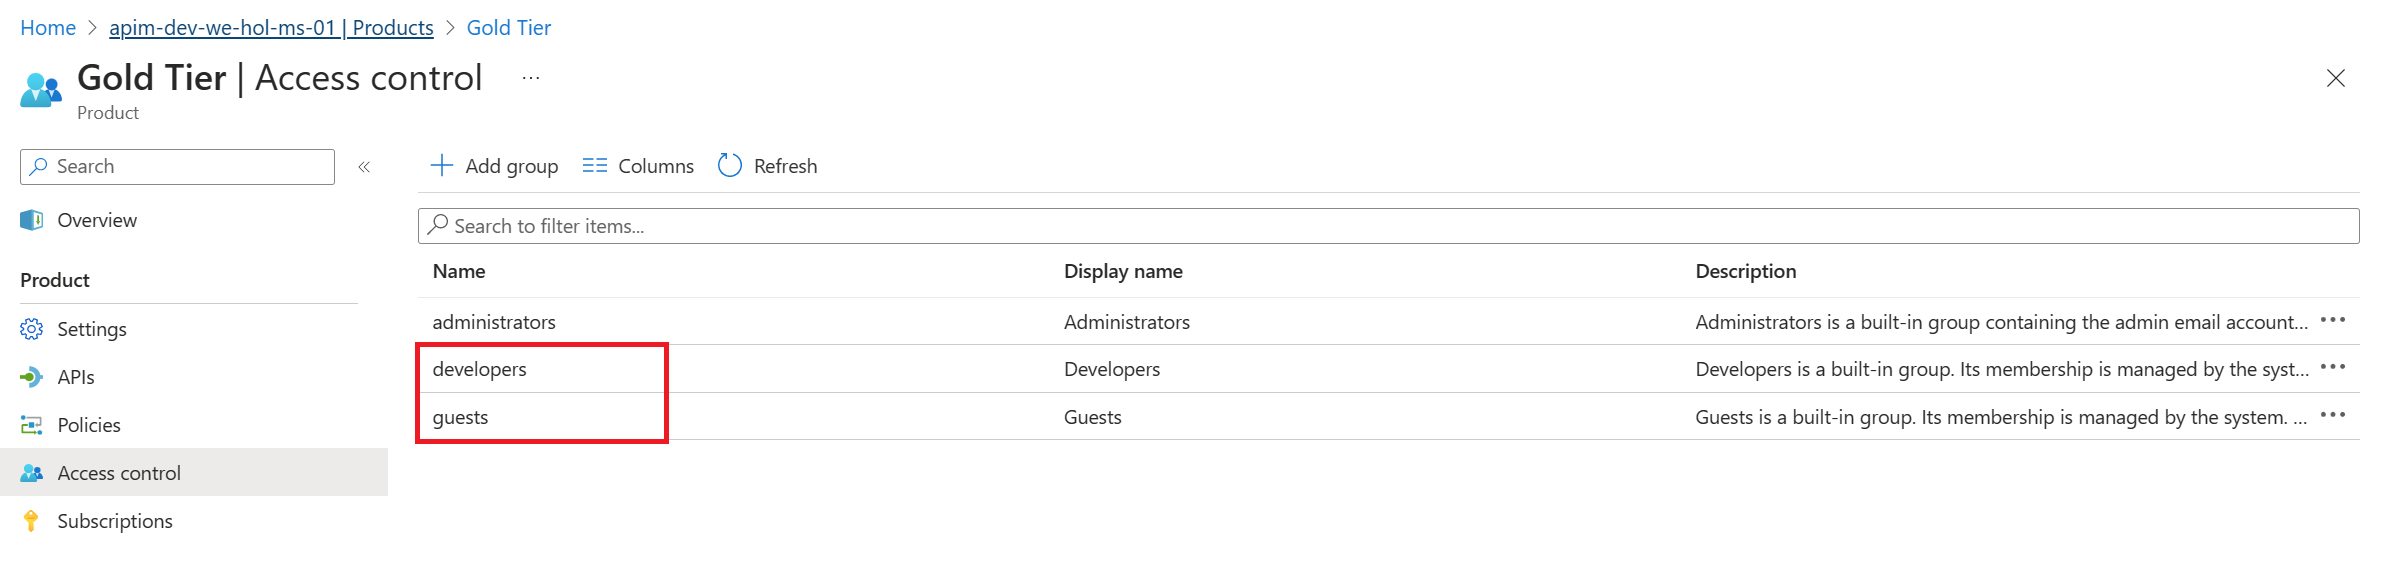
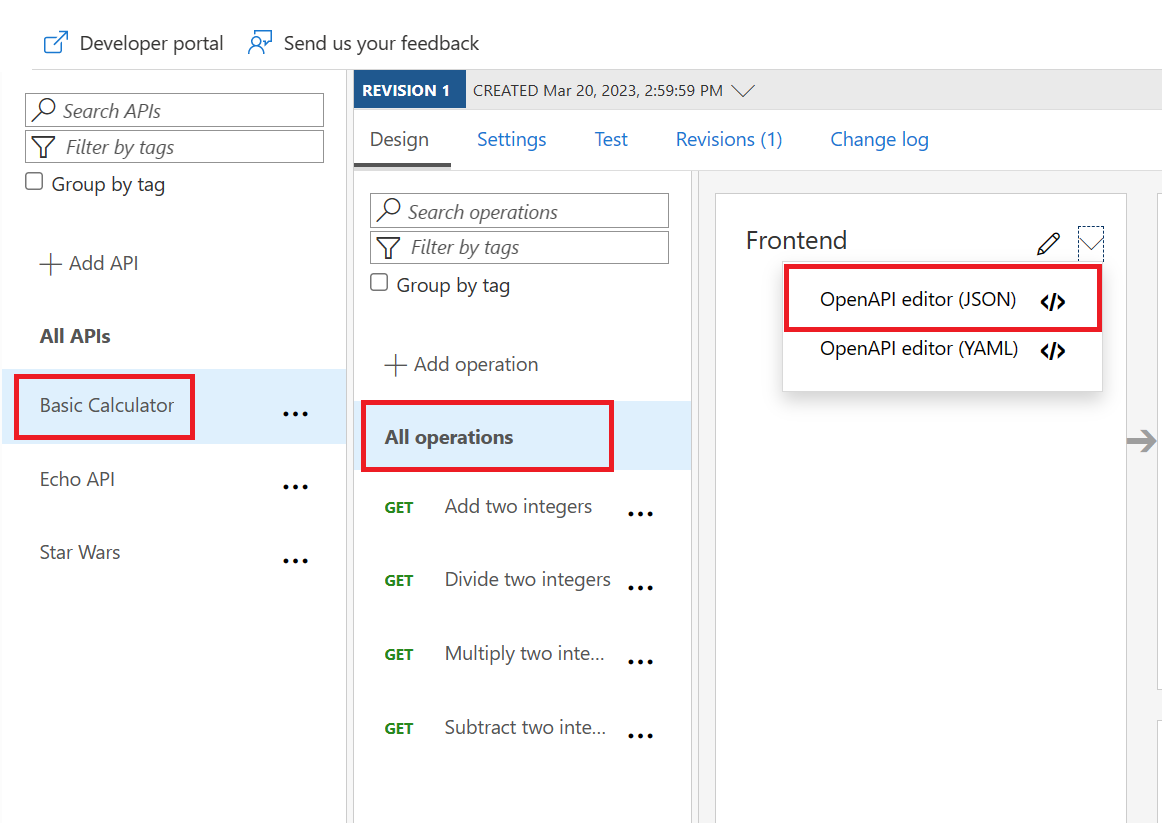
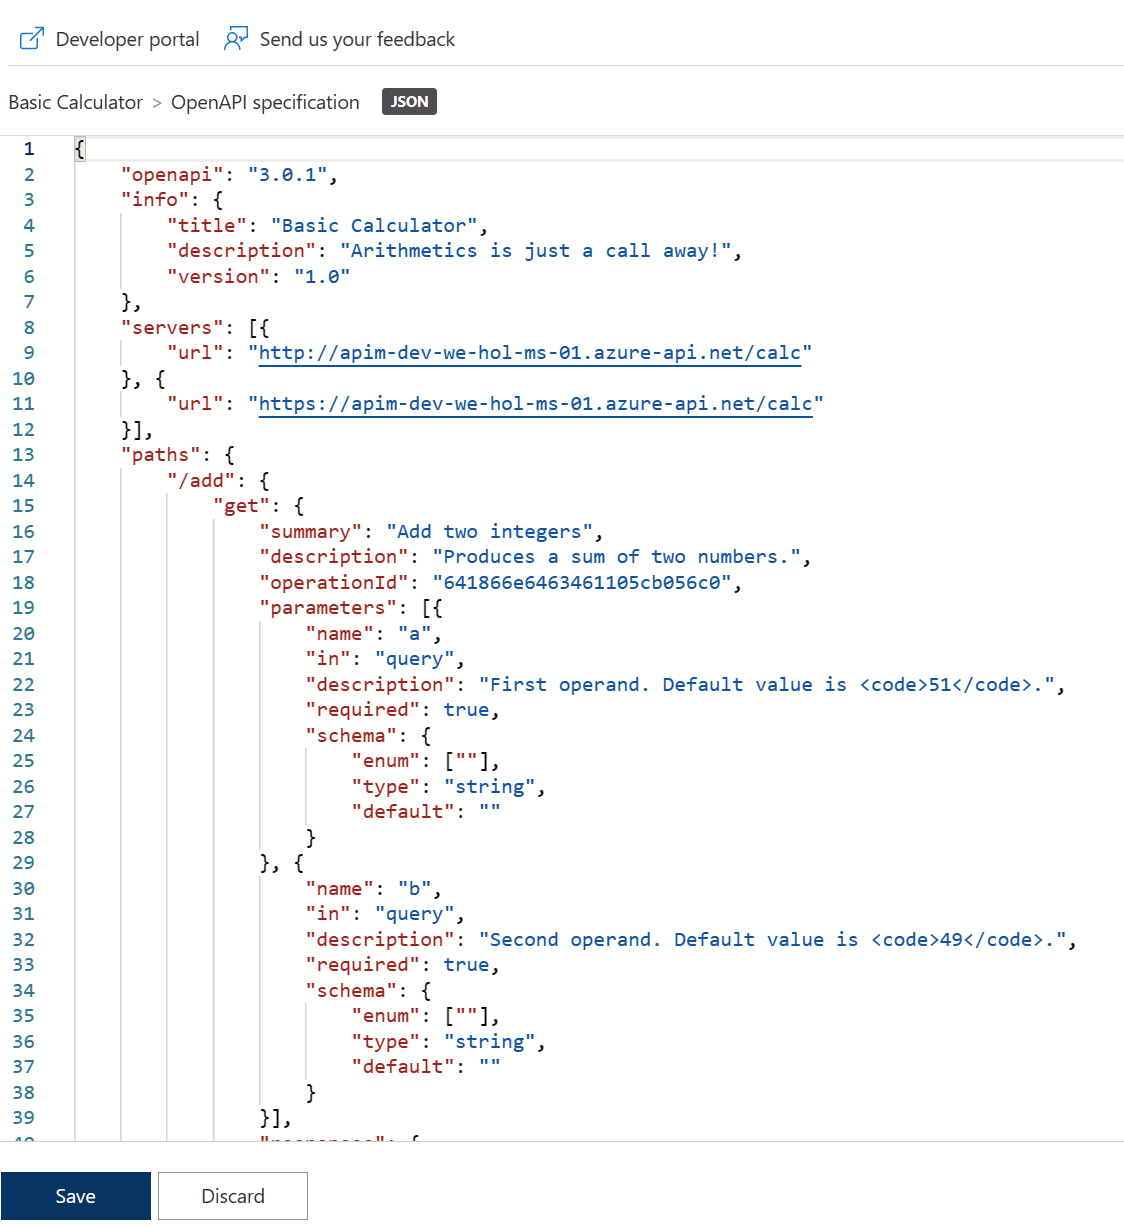
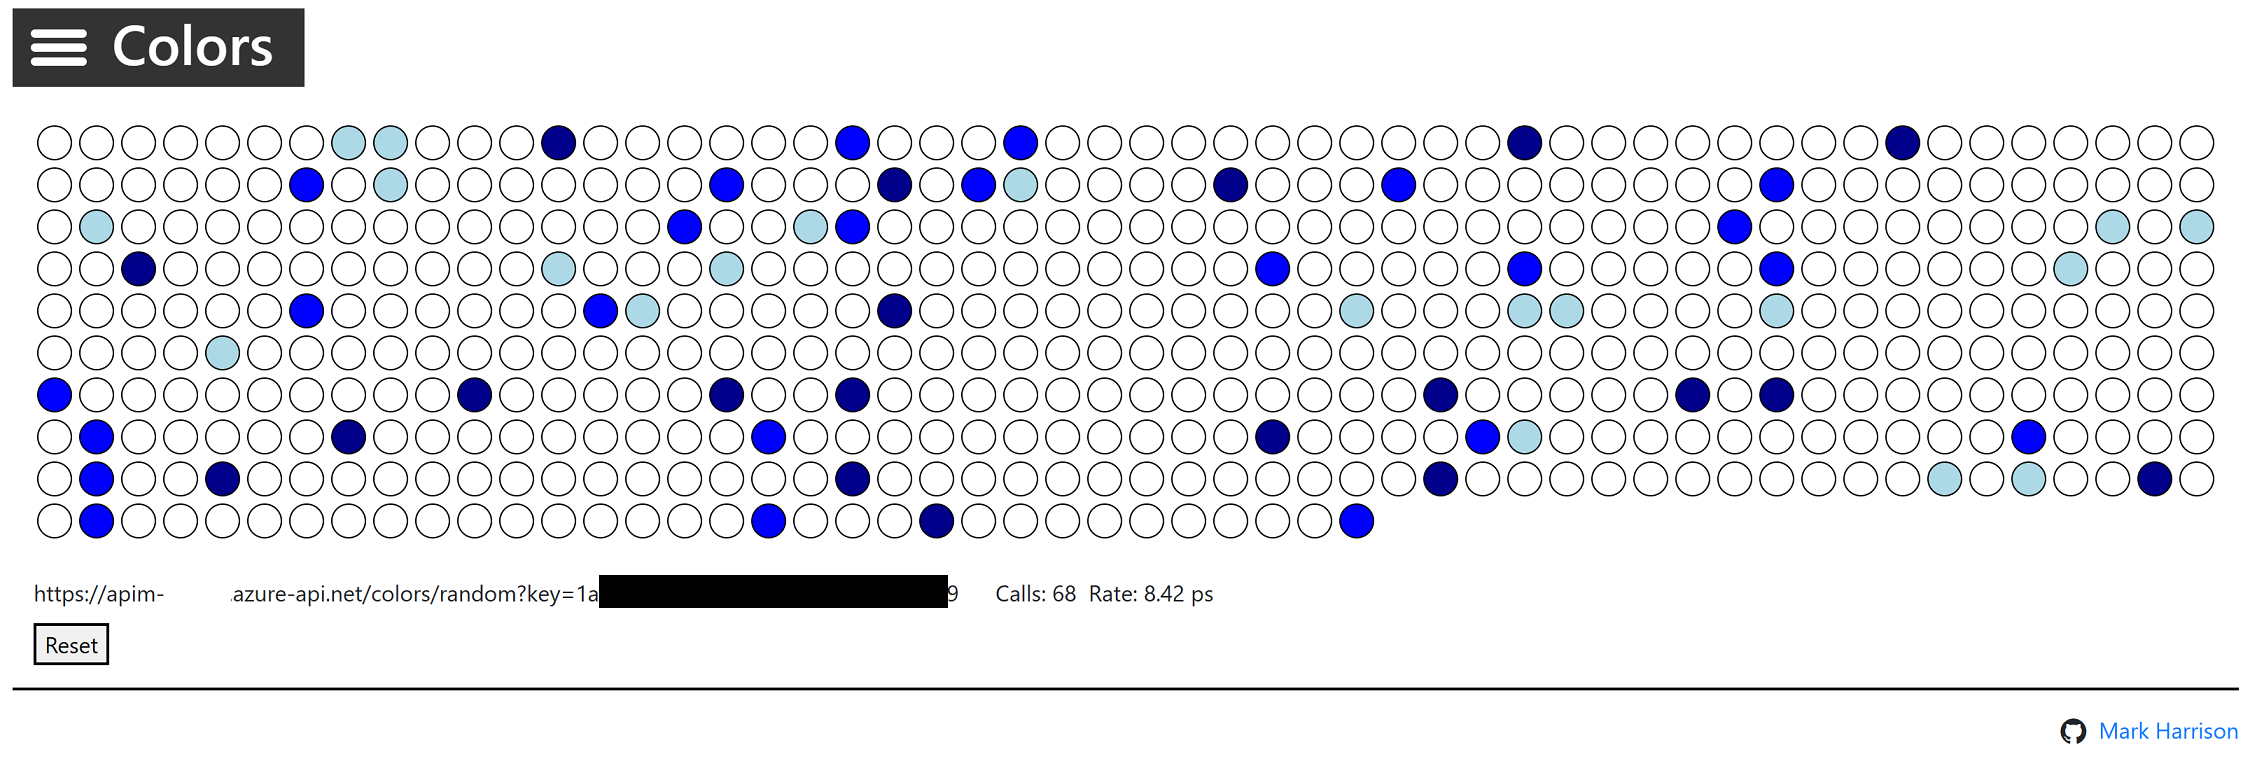
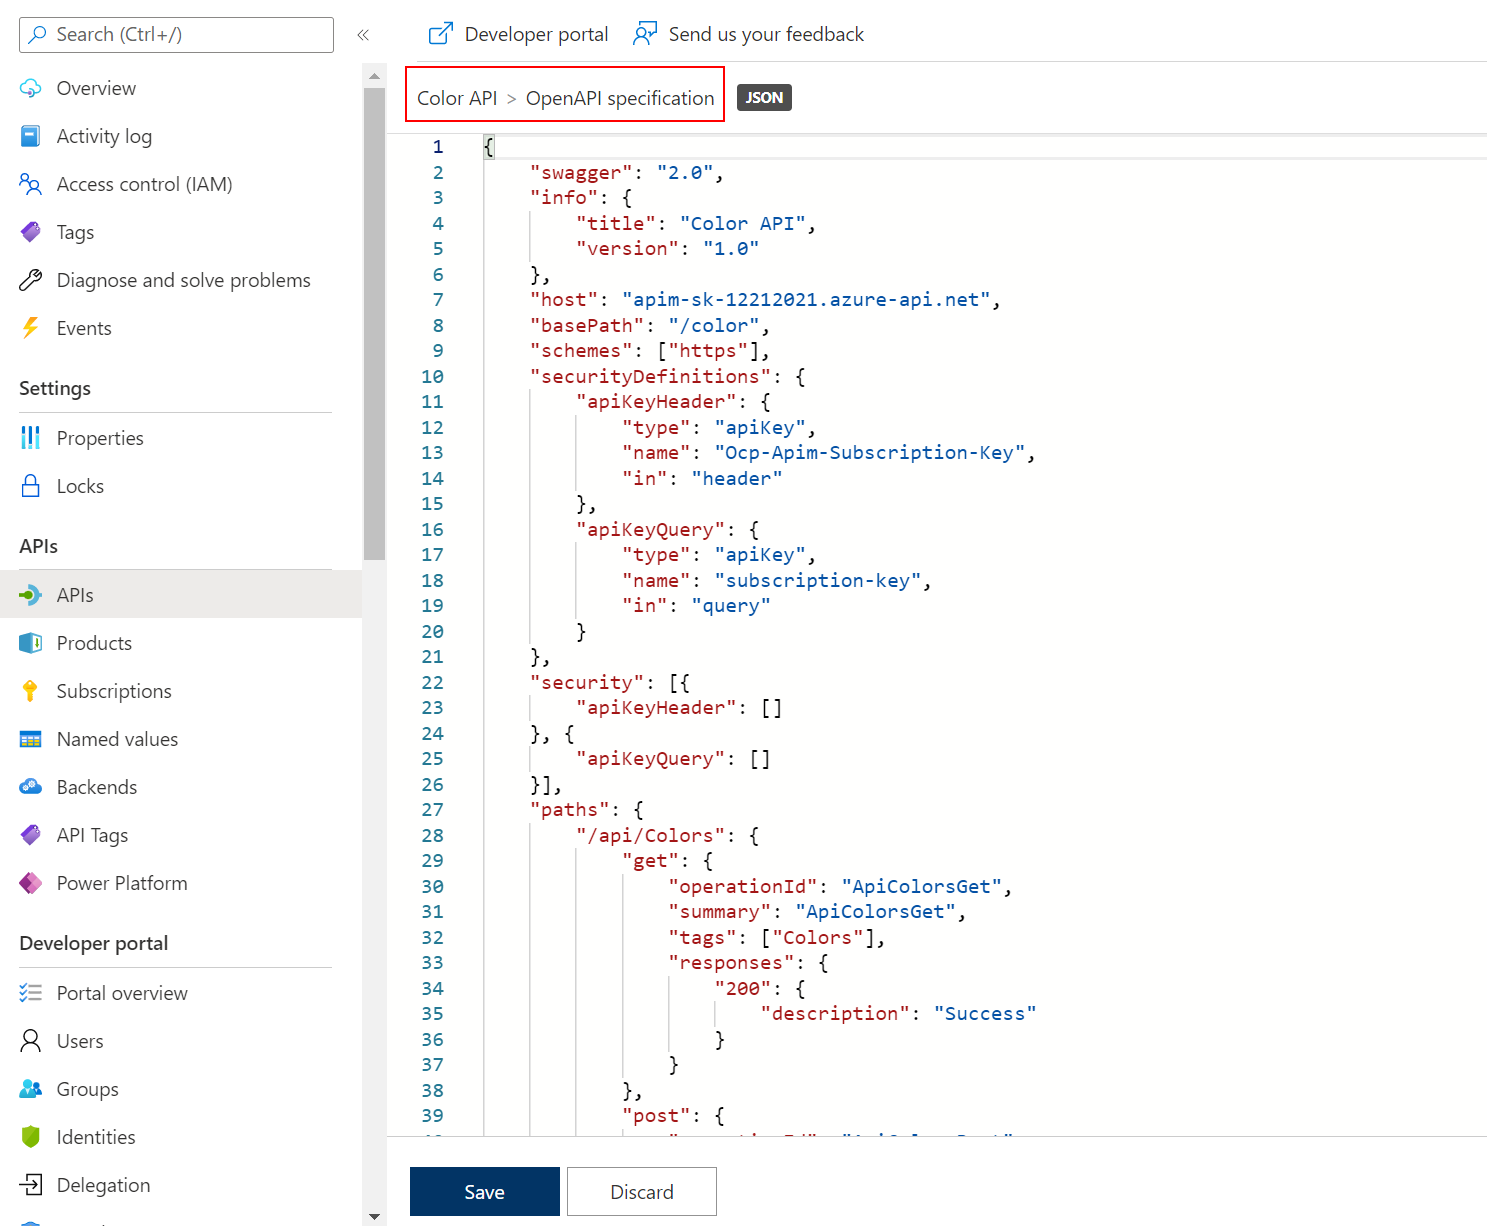
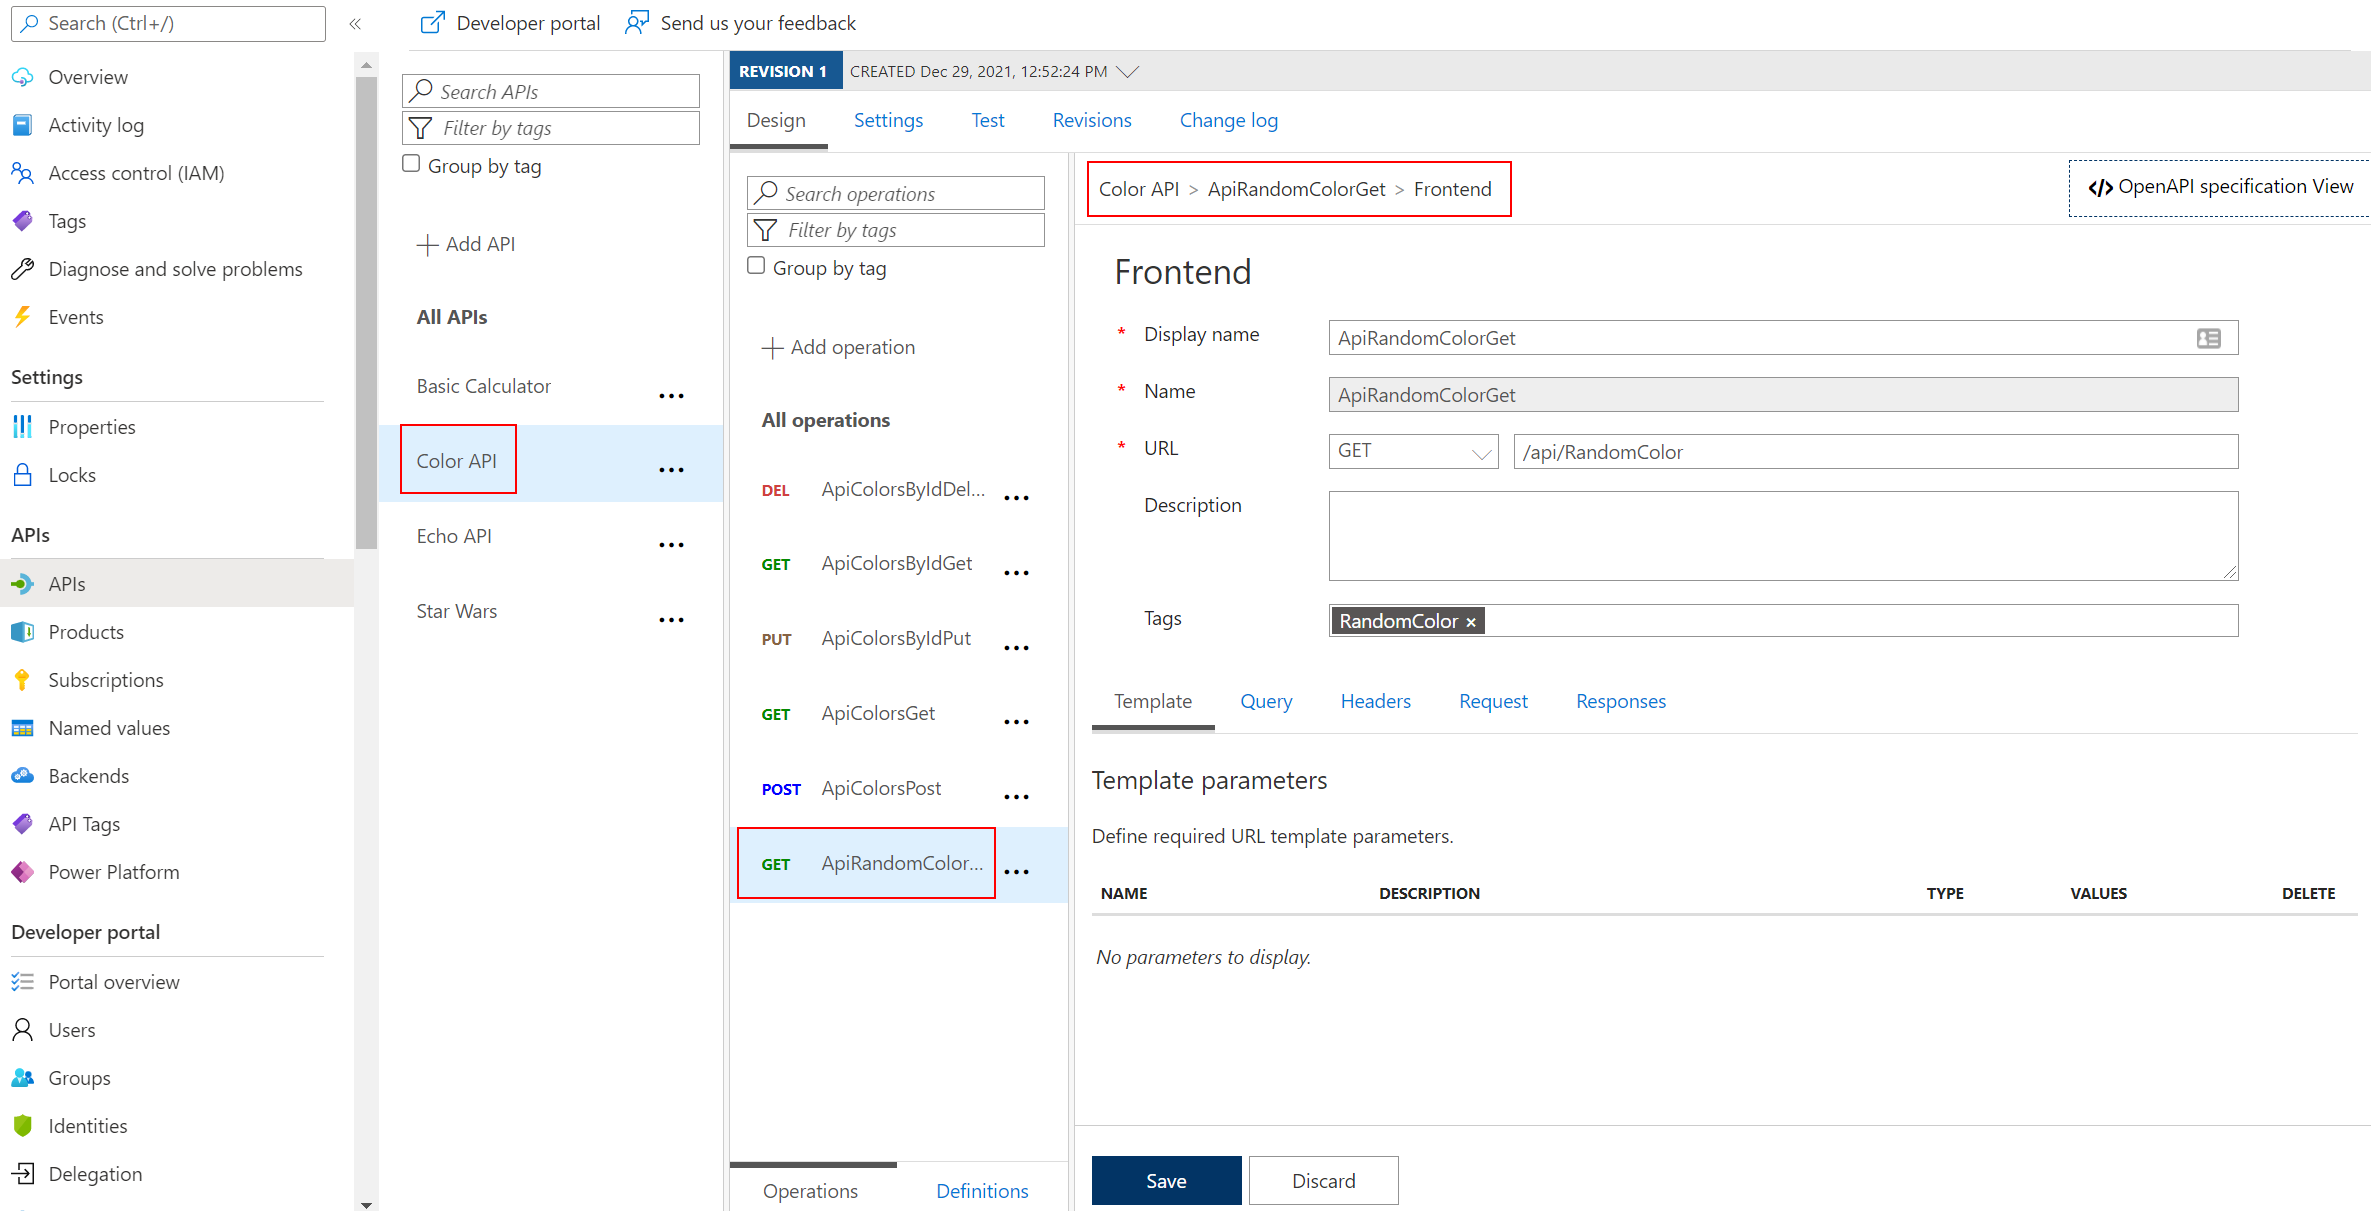
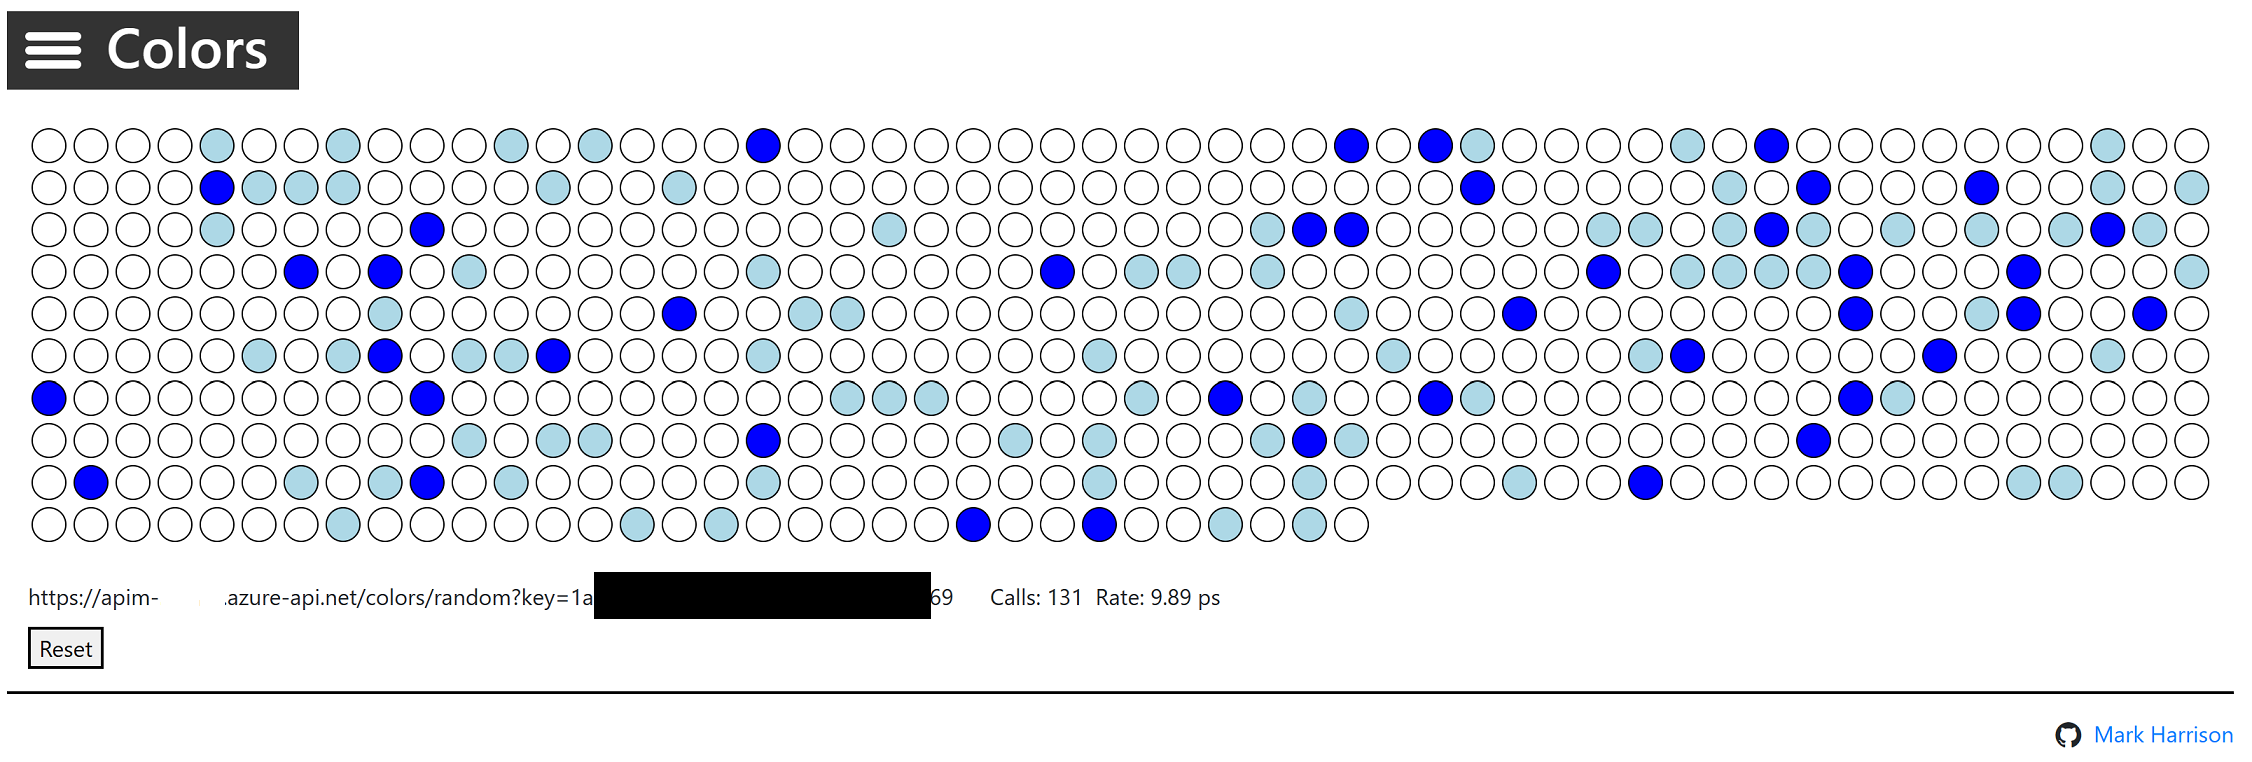
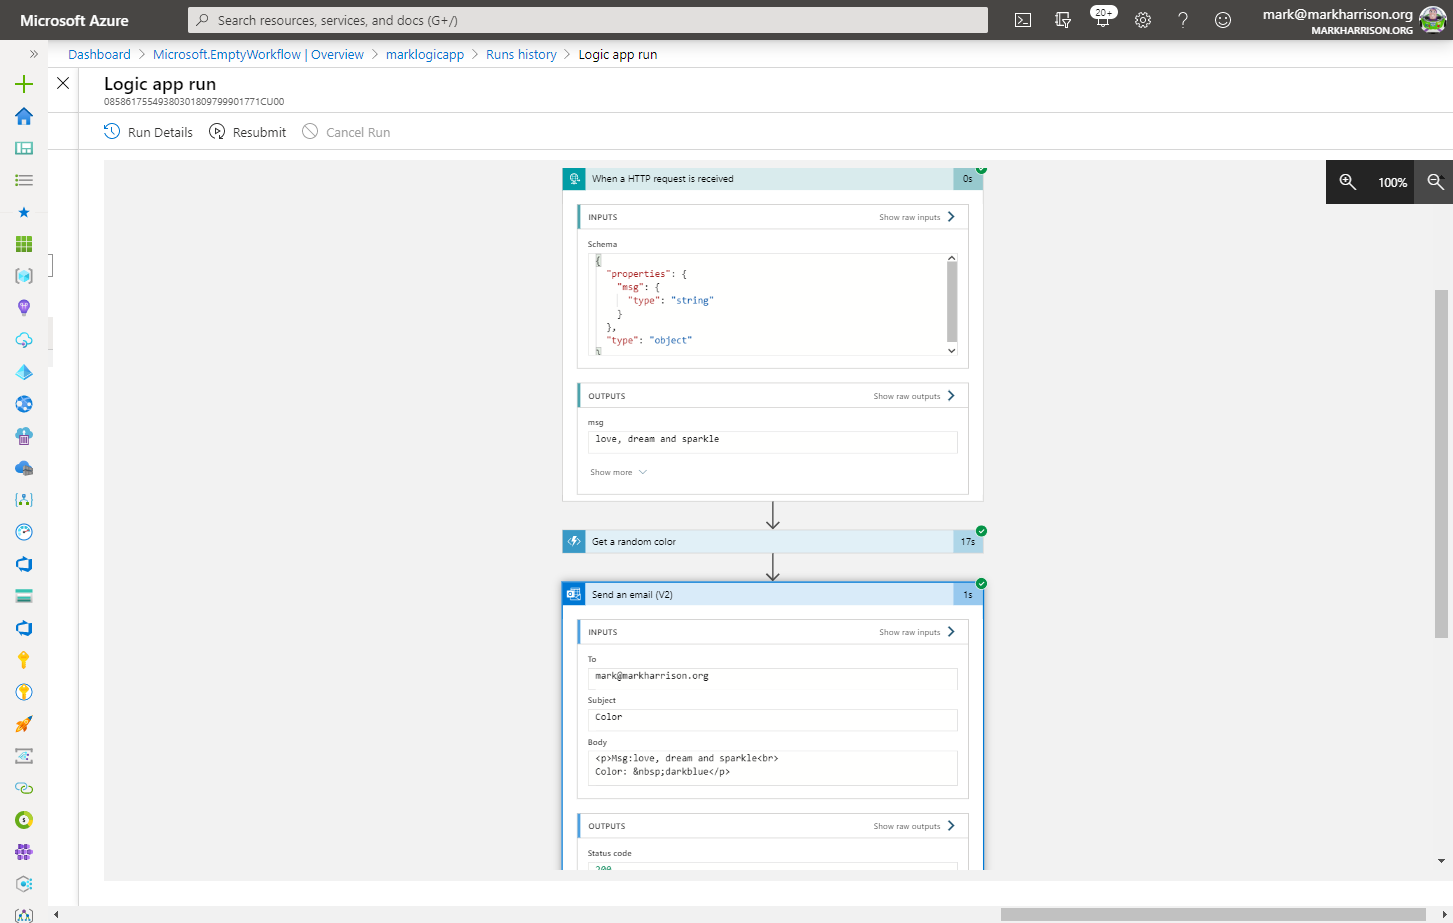
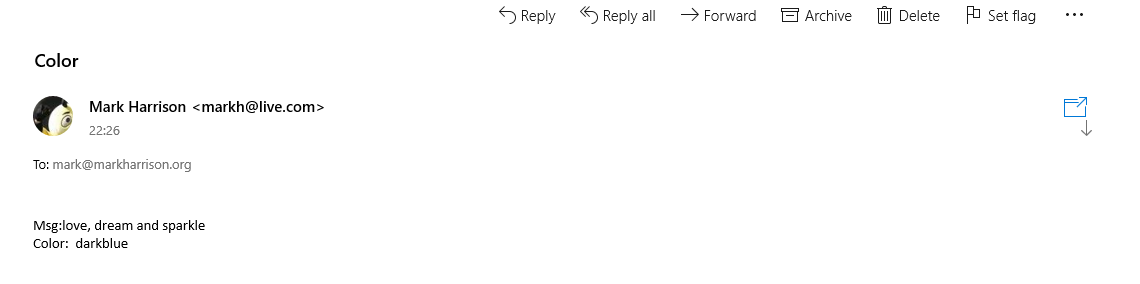
The APIM Developer Portal uses role-based access control (RBAC). After creating the APIM instance, you need to first access the Developer Portal using the admin role, which will trigger its activation. Click the Developer portal link in the Overview blade of the APIM instance: You can now proceed with publishing the Developer Portal to allow anonymous and authenticated roles. Back in the Azure Portal, locate Developer Portal in the left-hand resource menu, then click on Portal overview. Press the Publish button and confirm with Yes in the popup. The portal will then be available for users to access. You will see confirmation once the Developer Portal has been published. Cross-origin resource sharing (CORS) is a mechanism that allows resources on a web page to be requested from another domain, outside the domain from which the first resource was served. CORS is required to let portal visitors use the interactive console in the API reference pages and should be enabled for domains, including custom domains. CORS is enabled by using policies. We will go deeper on this topic in part 4. For now we will enable this using a built-in UI by pressing the Enable CORS button. Let’s experience how your users will navigate through your portal. In order to do this, we recommend opening a private tab in your browser or using another browser to avoid seeing the admin/edit version of the portal. Navigate to Keep this browser session open as we will use it frequently throughout our labs. As an unauthenticated user, have a look around the portal by checking out the APIs and products. Notice the difference between the Starter & Unlimited products. Check out the APIs. As you can see, all operations exposed are described and can also be tested directly within the portal. Let’s sign up for an account by pressing the Sign up link in the upper right-hand corner. The email can be your personal or a work email for this lab. Check your inbox for the acceptance email and confirm to activate your account. Back in the private browser, sign in with your new credentials. Enter Note that the Back in the Azure Portal, navigate to the Subscriptions blade to see the two new subscriptions that were just added. Enter the menu for the submitted Unlimited subscription, then press Activate subscription. – Provide additional comments, if you like, then confirm the activation. By default, this will send an activation confirmation email to the user. Back in the private browser, refresh the profile page to see the activated Unlimited subscription. It’s now time to test one of the published APIs. The Developer Portal is based on a fork of the Paperbits Web framework and is enriched with API Management-specific features. The fork resides at https://github.com/Azure/api-management-developer-portal. It is possible to self-host and manage your own Developer Portal outside of an API Management instance. This is an advanced option, which allows you to edit the portal’s codebase and extend the provided core functionality. This is documented at https://github.com/Azure/api-management-developer-portal/wiki and https://docs.microsoft.com/en-us/azure/api-management/api-management-howto-developer-portal. Before you make your portal available to visitors, you should personalize the automatically-generated content. Recommended changes include the layouts, styles, and the content of the home page. This is documented at https://docs.microsoft.com/en-us/azure/api-management/api-management-howto-developer-portal-customize. A video on customization is available at https://www.youtube.com/watch?v=5mMtUSmfUlw. The templates for the email notifications are managed from the Azure Management Portal, directly on the blade’s resource menu. Look at the available notifications and notifications templates which are customizable. A product contains one or more APIs as well as a usage quota and the terms of use. Once a product is published, developers can subscribe to the product and begin to use the product’s APIs. In the Azure Portal, open the resource menu item Let’s add a new product tier called Next, we’ll change the access control by clicking on Gold Tier and selecting Access control in the left pane. Press Add group, check Developers and Guests, then press Select. The two added roles are shown now. Back in the private browsing session, browse to Products and observe the new Gold Tier. Duration: 25 minutes An API represents a set of operations that can be invoked. New APIs are defined, and then the desired operations are added. An API is added to a product and can be published; it may then be subscribed to and used by developers. On the left menu, open the APIs blade. You will see all APIs, the possibility to add new ones, but also to customize existing ones. Instead of developing an API, for this lab you will use the existing Star Wars API: 1) Click on Add API. While it is conventionally a good idea to version APIs from the onset, we are omitting this step here for brevity of the labs. Once created, inside the Star Wars API press + Add operation to declare two new operations: 1) GetPeople 2) GetPeopleById Select Explore APIs. You should see both Echo API and Star Wars. Click on Star Wars. Try the GetPeople operation. Observe a successful Now try the GetPeopleById operation with Examine the successful Instead of importing operations one-by-one, you can also import a full API. The OpenAPI specification (aka Swagger) is a definition format to describe RESTful APIs. The specification creates a RESTful interface for easily developing and consuming an API by effectively mapping all the resources and operations associated with it. As a demo we will use an API that offers a simple calculator service : Calc API 1) On the left menu, open the APIs blade. Once the API is created, it will show in the list of APIs along with all of its operations. Back in the Developer Portal, try out the Calculator API via the Add two integers GET method, then examine the response. Accepting the defaults of We can inspect / edit the Open API definition by selecting the Edit icon from the Frontend block: This is likely a mixed-content CORS error in which you are attempting a call to an APIM endpoint that is only set up for HTTP. It fails as the Developer Portal runs on HTTPS. Please check the setup steps above for the URL scheme. Let’s add another API, the Color API. Use the API URL suffix color. We can test the newly-added API from the Test tab. Note the successful 200 response. Products can be configured after the API is initially created as well. On the Settings tab, set Products to include Starter and Unlimited, then press Save. Notice the successful API Management uses rate limiting to protect APIs from being overwhelmed and helps prevent exposure to DDoS attacks. As APIM sits in between your API and their callers, it effectively governs access to your APIs. We are going to use the Color website to demonstrate how rate limiting is applied. The website displays 500 lights. Each light will randomly make a call to the RandomColor API and then apply the returned color to the lights. First, we need to enable CORS for the domain name of the frontend. To achieve this we have to do the following in APIM: Click on the pencil icon next to that policy to edit it. Here we will see this form where we can add the domain name of our frontend After enabling CORS in APIM lets go back to our frontend https://markcolorweb.azurewebsites.net and follow these steps: Press Start to see how the frontend is calling the api. You should see a 401 response, indicating an auth error. This happens as our API requires a subscription, but we have not yet entered a subscription key. Append the primary keys for both subscriptions – one key per URL – to get unique URLs for Starter and Unlimited. Notice there is no rate limit – every light is randomly and continuously updated. Notice that only 5 lights get colored. Notice the error status / message returned. For example: Duration: 30 minutes Policy Expressions are used to control traffic to and modify the behavior of the Backend API. Policies can be applied at multiple scopes and follow this hierarchy. It is important to understand at what level to apply policy to appropriately yield security, robustness, and flexibility. Select an API (e.g. Color). Policy can be configured for Inbound processing, Backend, and Outbound processing. Most commonly, policies are applied in the Inbound processing section. Select the pencil icon to visually edit any section or the The Frontend section allows for editing of the OpenAPI / Swagger definition. Editing the Frontend: The Code View editor allows amendments to the OpenAPI / Swagger definition. Editing Inbound processing / Outbound processing / Backend: Using the Code Editor: Using the Form Editor: The cors policy adds cross-origin resource sharing (CORS) support to an operation or an API to allow cross-domain calls from browser-based clients. We have already configured the cors policy for our APIs in labs 2 & 3. Below is the resulting XML: API Management can be configured for response caching which can significantly reduce API latency, bandwidth consumption, and web service load for data that does not change frequently. Using the Azure Management portal, navigate to the Color API and set a set a caching policy for the Press Add policy. Select Cache responses. Simple caching configuration is not yet implemented in the Azure Management portal. We shall see later how it can be done using policy expressions. Notice that for each 15 second period the same color is set. Looking at the ApiRandomColor GET API policies in the Code View, you’ll see the caching policy defined: The find-and-replace policy finds a substring in a request or response and replaces it with a different string. Press Show snippets, then select the Find and replace string in body transformation policy. Fill in the Save the policy, then invoke the API using the Unlimited subscription key. Policies can be applied very granularly. In this example, you are modifying the Star Wars API to return a limited set of information if the caller is using the Starter subscription. Other products, such as the Unlimited subscription, will receive the full response. The context variable that is implicitly available in every policy expression provides access to the Similarly to the Color API, add the outbound policy to conditionally change the response body. Test the API on the Test tab with id 1 and apply the appropriate Starter or Unlimited product scope. Examine the different responses. With Starter product scope: With Unlimited product scope. Notice the four properties in red that are not included in the Starter scope response. A frequent requirement is to transform content, especially to maintain compatibility with legacy APIs. For this lab we are going back to the Calculator API that returned an XML response. Add an outbound policy to the Add two integers operation on the Calculator API to transform the response body to JSON. Test the API and examine the response. Note that it’s now JSON. A frequent requirement is to remove headers, especially ones that return security-related or superfluous information. Add an outbound policy to the same Calculator API operation to remove specific response headers. Invoke the API and examine the response, which now no longer contains the two headers. See above screenshot for how it looked prior. Query string parameters and headers can be easily modified prior to sending the request on to the backend. Back in the same Calculator API operation, add inbound policies to modify the query string and headers. Test the call by using either the Starter or Unlimited product, then inspect the result on the Trace tab. Named Values (aka Properties) are a collection of key/value pairs that are global to the service instance. These properties can be used to manage Value: The corresponding XML in the Code editor view should look like this: Examine the backend trace to find the added header with the evaluated named value: Mocking in APIM is a useful mechanism for API consumers to interact with APIs without waiting for the backend to be ready. In the Responses configuration tab, press + Add response, return Add Mock Response under Other policies after the ` tag. Invoke the API to receive a APIM integrates well with external services via HTTP-based interaction. This example shows a fire-and-forget send-one-way-request policy, which does not await a response. Alternatively, you can use a send-request policy to send a request and await a return. Some complex in-flight processing logic may also be better handled by using Logic Apps. The following policy and payload applies for both examples in this lab. Please ensure that you replace the value in Add the Webhook.site is a simple recipient to test webhook messages and requires no setup overhead, making this an ideal component in this lab, especially as we are not sending any sensitive information in our payload from our test APIM instance. Go to Webhook.site and copy the value for Your unique URL. Use this URL as the value in the Invoke the API from the APIM Test tab and observe the Check the Trace for the Outbound one-way message. Observe the success in the Webhook site. An optional lab, for Microsoft Teams, please review Create an Incoming Webhook. Get the URL of the webhook. Format the required payload. The payload sent to a Teams channel uses the MessageCard JSON schema. You can experiment with different cards in the MessageCard Playground. Invoke the API from the Test tab and observe the Look for a received message in your Teams channel: The ability to terminate a response gracefully is of importance in a number of cases such as error handling or business logic. Using the Replace the condition with more meaningful code. Now that you have seen how to gracefully terminate a request with a response, it is time to clean up the code to prevent a downstream impact in subsequent labs. Please remove the Duration: 15 minutes Versions and revisions provide you with elegant means to safely manage the lifecycle of your APIs. Versions of APIs are differentiated by a version identifier (e.g. Revisions allow you to safely make non-breaking changes to your API. Developers who consume the API can be given details about the changes. Revisions can safely be tested before being activated for your consumers. Revisions also allow you to rollback changes. For more information, visit the Versions & Revisions documentation. Proper version management not only helps organize your API, it also aids in API Management. In this exercise we are going to version an existing API. Integrate version management from the beginning with a This name must be unique across the APIM instance. Therefore, a combination of the API name and its version identifier is both semantic and suitable. Products: Starter and Unlimited Any previous implementation of the newly-versioned API will simply be set to Original. This is a purely organizational change within APIM. The version continues to operate on the same previous URL without a version identifier – there is no impact to the consumers. Sometimes, the version creation takes just a little bit of time. If you do not see it immediately, please keep refreshing and ensure you select the appropriate version as per below instructions. Select APIs and choose the Notice the request URL and the inclusion of Test the Now that you have created a new version of the API, you have the ability to introduce breaking changes. Often times a breaking change in a backend API necessitates an API version change in APIM. Leaving a legacy implementation behind to focus on more contemporary API implementations also is a common versioning use case. Whatever the reason may be, APIM provides means to abstract breaking changes in a responsible and safe manner. Add a new revision with description The new revision is online but not yet current. The previous revision continues to remain the active default. Having added the new revision has not resulted in change for your consumers. Revision 2 automatically became the active revision you are now making changes in. You can also switch between revisions, but be aware that changes to the Current revisions are live immediately. Add a 10-second caching policy for the GET operation. Note the revision number at the top of the page as well as in the request URL. Test the API twice. The test trace should then show that the cache-lookup occurred. Make Choose to post to the public change log for the API and provide a meaningful update. The new revision is now the current one. Note that the URL reflects the URL the consumer calls. The old revision is still online and can be accessed with the Unlike versioning, revisioning requires no URL updates for the API consumer. Duration: 20 minutes Analytics is available on the Analytics blade in APIM. The dashboard has several tabs on it. For example, here are Timeline, Geography, and APIs: Azure API Management allows for easy integration with Azure Application Insights – an extensible service for web developers building and managing apps on multiple platforms. This guide walks through every step of such an integration and describes strategies for reducing performance impact on your API Management instance. Before you can use Azure Application Insights, you first need to create an instance of the service. Open the Azure portal and navigate to Application Insights. Click + Create, then fill in the form. You may need to create a new Log Analytics Workspace if you don’t already have one. Click Review + Create, followed by Create. Click + Add. You have just created an Azure Application Insights logger with an instrumentation key. It should now appear in the list. Behind the scenes, a Logger entity is created in your API Management instance, containing the Instrumentation Key of the Application Insights instance. Check the Always log errors checkbox. Click Save. Overriding the default value 0 in the Number of payload bytes to log field may significantly decrease the performance of your APIs. Behind the scenes, a Diagnostic entity named ‘applicationinsights’ is created at the API level. Azure Application Insights receives: A failed request is a request which: Any request you make to the Color API in APIM will be subject to being received by Application Insights (recall the 100% sampling). To generate a large amount of requests quickly, you can invoke the API via the Color website. As we are presently caching the output for 15 seconds, you may get a lot of requests with the same color. Please feel free to disable the output caching in the Color API if you would like to see more variety. Open the Transaction search to see details on a transactional level: Logging all events may have serious performance implications, depending on incoming requests rate, payload size, etc. Based on internal load tests, enabling this feature caused a 40%-50% reduction in throughput when request rate exceeded 1,000 requests per second. Azure Application Insights is designed to use statistical analysis for assessing application performances. It is not intended to be an audit system and is not suited for logging each individual request for high-volume APIs. You can manipulate the number of requests being logged by adjusting the Sampling setting (see the steps above). 100% means all requests are logged, while 0% reflects no logging at all. Sampling helps to reduce the volume of telemetry, effectively preventing from significant performance degradation, while still carrying the benefits of logging. Sampling is an effective tool in diagnosing often general operational issues. For example, sampling can identify connectivity or integration issues as these would often occur in high quantity, not singular instances. A sampling rate of 50% is as effective in diagnosing such issues as 100% is. Skipping logging of headers and body of requests and responses will also have positive impact on alleviating performance issues. Azure Event Hubs is a fully managed, real-time data ingestion service. Millions of events per second can be aggregated to build dynamic data pipelines. We can use Event Hubs with API Management to obtain analytics of our API usage. An Event Hubs namespace provides a unique scoping container in which you create one or more event hubs. To create a namespace in your resource group using the Azure portal, follow these steps: Search for Event Hubs, then click on the resource. Select Review + Create at the bottom of the page, followed by Create. Press Go to resource. Confirm that you see the Event Hubs Namespace page similar to the following example: To create an event hub within the namespace, follow these steps: From the Event Hubs blade select + Event Hub> Type a name for your event hub, then select Create. The partition count setting allows you to parallelize consumption across many consumers. For more information, see Partitions. The message retention setting specifies how long the Event Hubs service keeps data. For more information, see Event retention. After the event hub is created, you see it in the list of event hubs. Click on + Add. On the right side of your screen create a ´sendpolicy´ with just ´Send´ permissions Click on the new policy created and copy the Connection string-primary key to a notepad. Also copy the Event Hub namespace. You will use both values in the next section. Now that you have an Event Hub, the next step is to configure a Logger in your API Management service, so that it can log events to the Event Hub. API Management loggers are configured using the API Management REST API. For this example we are going to use the “REST API Try it” Functionality to create the logger: Open the following link REST API Try It subscriptionId: your Azure subscription Replace the request Body with the following json. Make sure you replace the parameters appropriately: Your request parameters might then look similar to this: Note my deviation by intential masking my You should get a 201 response, confirming that the resource has been created. Once your logger is configured in API Management, you can configure your log-to-eventhub policy to log the desired events. The log-to-eventhub policy can be used in either the inbound policy section or the outbound policy section. In the window on the right, select Advanced policies > Log to EventHub. This inserts the Replace the policy with this snippet: Replace You can use any expression that returns a string as the value for the In the Azure portal open the Event Hub you created earlier. You should see recent events. If not, give it a minute, then refresh. What to do with the data that is now in Event Hub is beyond the scope of this lab as this lab primarily focused on APIM to Event Hub integration. In this lab, we are going to see how to use JSON Web Tokens with your APIs. JSON Web Tokens are an open-industry standard method for representing claims securely between two parties. More info at https://jwt.io. Use the following sites: https://www.unixtimestamp.com to get a future date using the Epoch Unix Timestamp at least one hour from the current time as the JWT will not work otherwise (e.g. 01/11/2029 = https://jwt.io to create a JWT with payload. In the Decoded section make these changes: Use the following Payload: Your configuration should be similar to this now: In the ‘Code View’ add an inbound Invoke the Divide two integers method on the API from the Test tab. Observe the Note the bearer token in the Request payload. Execute the test once more to see a Not only is it important that a JWT is valid, but as we use it for authorization, we must also assert that the token contains expected claims before granting access to our APIs. Modify the inbound Invoke the Divide two integers method with the Now change the It may often be necessary to pass (specific) claims onto the backend API to inform further processing. One such way – and this can be tailored to an API’s individuality – is to extract a claim and place it into a designated header the backend expects. Change the claim back from Use the Trace feature to inspect what was passed to backend. You should see the new header and the correct value from the claims. Based on what you have learned thus far, consider how you can improve your policies. For example, you may not want to hard-code the Based on the Microsoft Tech Community blog post by Sherry Sahni. The API Management is a proxy to the backend APIs, it’s a good practice to implement security mechanism to provide an extra layer of security to avoid unauthorized access to APIs. In this Diagram we can see the OAUTH flow with API Management in which: Different grant types: To configure Oauth2 with APIM the following needs to be created: Sign in to your organization’s Azure portal. From the Azure portal menu, select Create a resource. Select Identity, and then select Azure Active Directory. The Create directory page appears. On the Create directory page, enter the following information: Type Contoso into the Organization name box. Type Contoso into the Initial domain name box. Leave the United States option in the Country or region box. Select Create. Your new tenant is created with the domain labapimtenant.onmicrosoft.com. In Authorization code grant type, User is challenged to prove their identity providing user credentials. Upon successful authorization, the token end point is used to obtain an access token. The obtained token is sent to the resource server and gets validated before sending the secured data to the client application. To protect an API with Azure AD, first register an application in Azure AD that represents the API. The following steps use the Azure portal to register the application. First we need to access our the AAD tenant we created in the excercise before, be sure you are in the right tenant. Then select App registrations under Azure Portal to register an application: Every client application that calls the API needs to be registered as an application in Azure AD. In this example, the client application is the Developer Console in the API Management developer portal. In this case we will register another application in Azure AD to represent the Developer Console: At this point, we have created the applications in Azure AD, and granted proper permissions to allow the client-app to call the backend-app. In this demo, the Developer Console is the client-app and has a walk through on how to enable OAuth 2.0 user authorization in the Developer Console. Steps mentioned below: Specify the Authorization endpoint URL and Token endpoint URL. These values can be retrieved from the Endpoints page in your Azure AD tenant. Browse to the client App registrations page again and select Endpoints. We recommend using v2 endpoints. When using v2 endpoints, use the scope you created for the backend-app in the Default scope field. Also, make sure to set the value for the accessTokenAcceptedVersion property to 2 in your application manifest in Azure AD Client APP and Backend app. Now that you have configured an OAuth 2.0 authorization server, the Developer Console can obtain access tokens from Azure AD. The next step is to enable OAuth 2.0 user authorization for your API. This enables the Developer Console to know that it needs to obtain an access token on behalf of the user, before making calls to your API. Now that the OAuth 2.0 user authorization is enabled on your API, the Developer Console will obtain an access token on behalf of the user, before calling the API. Select Send to call the API successfully with 200 ok response. At this point we can call the APIs with the obtained bearer token. However, what if someone calls your API without a token or with an invalid token? For example, try to call the API without the Authorization header, the call will still go through. This is because the API Management does not validate the access token, It simply passes the Authorization header to the back-end API. To pre-Authorize requests, we can use We will now configure the Validate JWT policy to pre-authorize requests in API Management, by validating the access tokens of each incoming request. If a request does not have a valid token, API Management blocks it. In this section, we will be focusing on understanding how The claim value should be the Application ID of the Registered Azure AD Backend-APP. In Azure, an Active Directory identity can be assigned to a managed resource such as an Azure Function, App Service or even an API Management instance. Once an identity is assigned, it has many capabilities to work with other resources that leverage Azure AD for authentication, much like a service principal. Create an access policy Select the Select the principal and search for the name of your API Management instance Remember to click Save Please see aka.ms/apimdevops for more guidance and tools around automating deployment across multiple API Management environments. The following instructions demonstrate how to deploy the contents of this example repository using Azure DevOps Repos and Azure DevOps Pipelines. There are two options to execute te apim devops kit, locally with .net and azure cli or using the azure cloude shell. Please select your prefered option: Local Azure Cloud Shell Optional(if you want to deploy with a build pipeline): This is one example of how to use Azure DevOps Repo and Azure DevOps Pipelines to enable a Continuous Integration and Continuous Deployment (CI/CD) for API's on an Azure API Management Service. There’re other ways to do this, but this is a “Keep it Simple” to help you start. (Planning to have another version using Github and Github Actions soon). This is our Development API management. In general, developers will create their API's in one instance of APIM to test it. Create your API’s on API Management Development environment. (How to create API’s on API Management) Running the Extractor After a developer creates and tests APIs in API management, it is time to extract those APIs using this DevOps Resource Kit. Below are the steps to run the extractor from source code: Restore its packages using Make sure you have signed in using Azure CLI and have switched to the subscription containing the API Management instance from which the configurations will be extracted. Ensure you are using the correct Azure subscription: Extractor Arguments You have two choices when specifying your settings: By using a JSON file with key-values where the keys matches the table below. Use the Or you can also pass the arguments on the command line. For instance Where: sourceApimName: API Management where you created your API destinationApimName: It's just a convention to set the DESTINATION-API-NAME in front of the generated files. resourceGroup: Resource group where the DEV-APIM-NAME is hosted. fileFolder: (NOTE: git clone and create the local repos before executing the dotnet run extract) For more information on how to run the application and parameters, go to this page. For this example, we will pass the arguments on the command line. So, run the application with: i.e. After executing the command above, you will see something similar to this: Then you see the JSON files extracted: Now, push them to your Azure DevOps Repo We will use a Build Pipeline to pull the extracted files from a repo and put it on Azure DevOps Artefacts Folder. 1 – Add these tasks to your build: 2 – Configure the fields as show bellow: You can use this document as a reference on how to create a release pipeline. 1 – Add an Azure Deployment tasks for each file generated by the extractor, following the order: 2 – Set “Override template parameters” field with “-ApimServiceName “ 3 – Set set Deployment mode to Incremental When you finish the steps above, you will see something like this: Clone your QA environment and update the Resource Group and ApimServiceName value on “Override template parameters” field to reflect your “production” APIM. Now you will see your Release Pipeline like this: By using a combination of manual deployment approvals, gates, and manual intervention within a release pipeline in Azure Pipelines, you can quickly and easily configure a release pipeline with all the control and auditing capabilities you require for your DevOps CI/CD processes. You will find more information on this link. The premier Star Wars Fan club is growing and the club officers would like to upgrade from their existing member tracking worksheet to a mobile application that would be available to their members all over the world. The members would also like to see information about their favorite Star Wars movies and characters in the application that would update as new shows and movies are released. In this exercise, you will be using Star Wars API with Azure API Management instance that you created in part three of this lab. The Excel worksheet of member profiles will serve as the primary backing data source and will be used to generate a base application. You will export the Star Wars API from API Management as a Power Platform Custom Connector so that the Canvas App can access real-time Star Wars character information. For each of the Fan Club members, you can then search the Star Wars API character data and show information about their favorite character in the Canvas App. Note: This exercise requires access to Power Apps Premium connectors. Sign up for a free Developer Plan. From the existing Star Wars API Api in Azure API Management, click the ellipsis … and select the Create Power Connector option to generate a custom connector in your Power Platform environment. If you are unable to create a Power Connector from Azure API Management, you can also export an Repeat this import for the Your generated app will now be in edit mode in the Power Apps Studio. Your generated app will now be in edit mode in the Power Apps Studio. You can customize your app theme using the Theme drop-down menu and selecting an option. You can change or format the fields that are shown in the Gallery by selecting Tree view in the left pane, clicking on the BrowseGallery1, and making edits in the right formatting pane. Duration: 30 minutes In this section we provide you with a template architecture diagram for your apim baseline architecture. We recommend you take the time and answer the following questions: Download Diagram: Some of the demos use the ColourWeb web application and the ColourAPI API application. In this lab we will show you how to deploy your own instances of the Colours Web and Colours API. Note – ColoursWeb / ColoursAPI is new version of ColorsWeb/ColorsAPI … do not mix the web client and API versions. The code for the ColourWeb / ColourAPI applications is available here: Docker Containers exist for these applications and so provides an easy deployment option ( IMPORTANT : due to the new pull restrictions on Docker Hub images, in this lab we will be using the GitHub registry): With the container we can deploy to multiple hosting options : VM’s, App Services, ACI and also AKS. In this lab we are going to show you how to do it with Azure Container Instances. Open the Azure Cloud Shell and choose Bash Shell (do not choose Powershell) We proceed to create a unique identifier suffix for resources created in this Lab: Now we proceed to create a resource group for our ACI objects: Now we create our ACI and specify our colors-web github container Now we run the following command to check the status of the deployment and get the FQDN to access the app: The output should something like this: Once we have a “Succeeded” message we proceed to navigate to the FQDN. And we should see our home page for our Colours Web: Now we proceed to create the ACI for the colors-api github container: Now we run the following command to check the status of the deployment and get the FQDN to access the app: The output should something like this: Once we have a “Succeeded” message we proceed to navigate to the FQDN. And we should see our home page (Swagger UI) for our Colours API: Azure Serverless (Functions and Logic Apps) can be configured to benefit from the advantages of API Management. Example: Lets add the function to API Management. In the API blade select [+Add API] and the [Function App] tile As previously add CORS policy Validate the function works – either from the Azure management portal or the developer portal Example: Use the following sample message to generate the schema of the Request body payload. By specifying the schema, the individual fields (in this case Lets add the function to API Managament. In the API blade select [+Add API] and the [Logic App] tile As previously add CORS policy With the API Management self-hosted gateway, organisations have the ability to deploy an instance of the APIM gateway component to the environments where they host their applications and/or APIs – for example, in an on-premise data center. The self-hosted gateways are hosted in a Docker or Kuberenetes environment, and are managed from the API Management service they are connected to. This part of the lab assumes that the user has Docker Desktop installed. Installation instructions are here There are two terms to become familiar with: There can be multiple Gateway Deployments and multiple Gateway Nodes. The Gateway Deployments are chargeable – the Gateway Nodes are free i.e. an organization pays for the management control plane, but the compute is free (you are running on the organizations own hardware) To deploy a self-hosted gateway: The added gateway will appear in the list … this is the Gateway Deployment. From a command line – elevated to Administrator (needed for Docker commands) The first time this is executed, it will need to pull down the Docker image – and so there will be a small delay. Subsequently – if restarted – it will just use the downloaded image. Once downloaded, the log output from the container will display a Sputnik logo (this was an internal code name) and some diagnostic logs. Note that in the Gateway blade we can see the status – it will show there is one healthy Gateway Node connected to the Deployment. The Gateway Node will keep in sync, and be automatically updated should any of the Gateway Deployment config changes. Our Gateway Node is now deployed – and we can test that it works. Diagnostics for the API call will be logged by the container. Task 1 – Publishing the Developer Portal

Enabling CORS for the Developer Portal

User Experience
https://{apim-service-name}.developer.azure-api.net.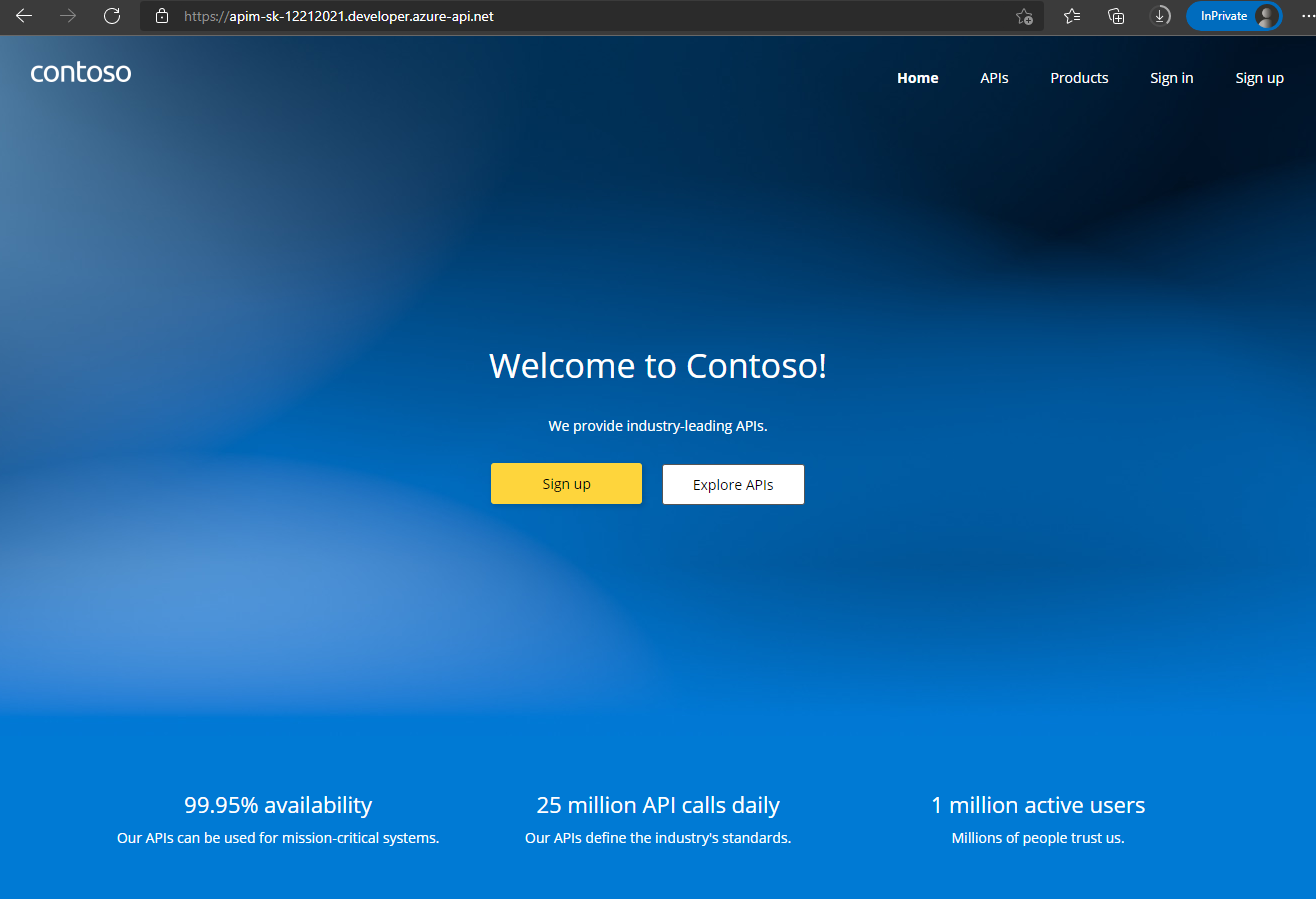
Anonymous User
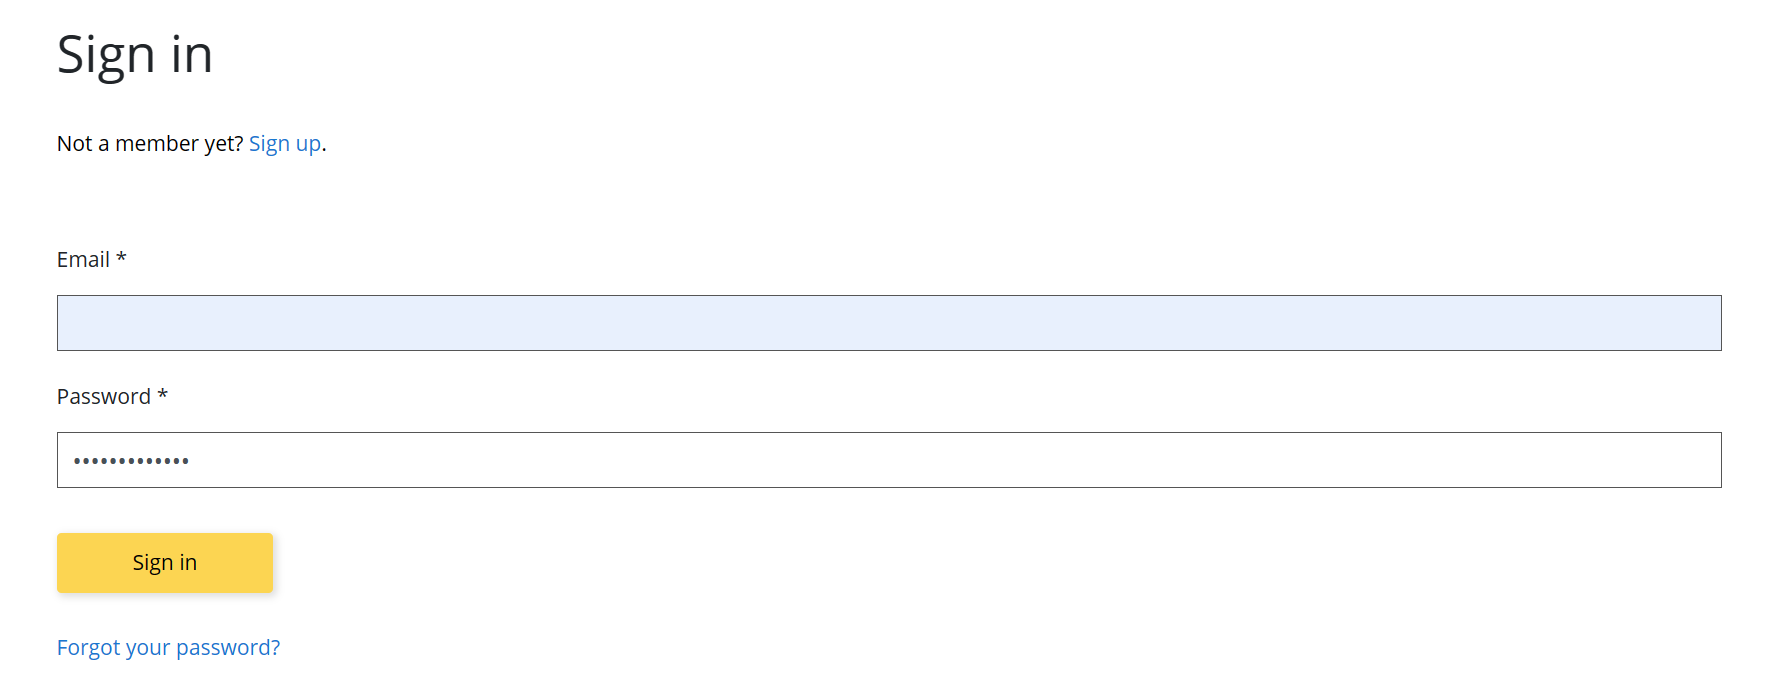
Register for an account


Sign into account
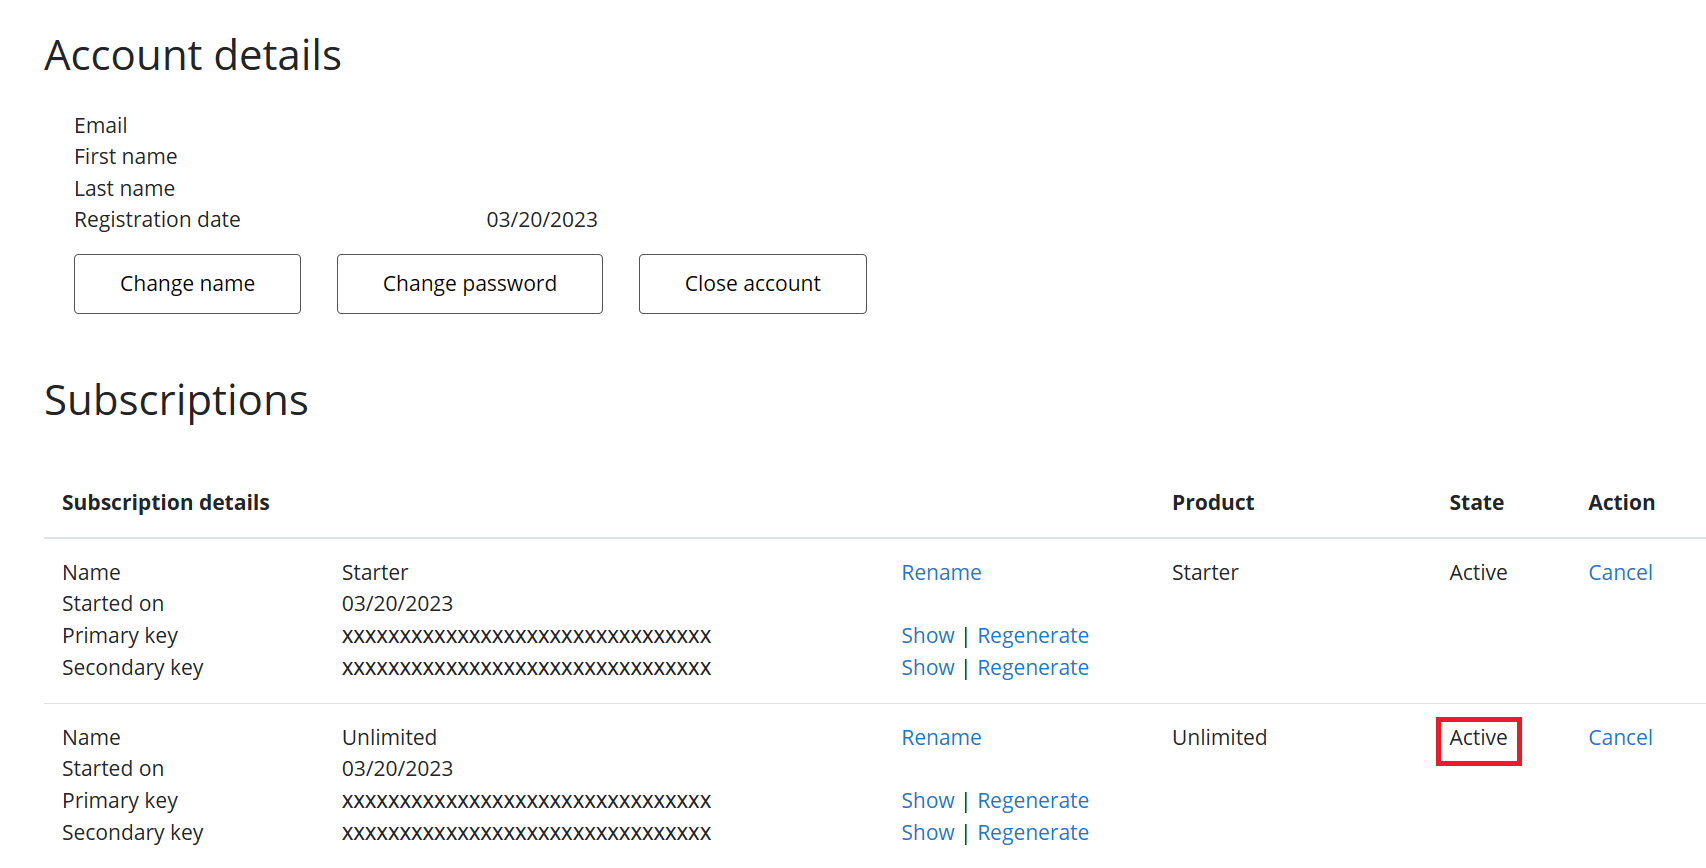
Starter as the subscription name, then press Subscribe. You should receive a confirmation email shortly.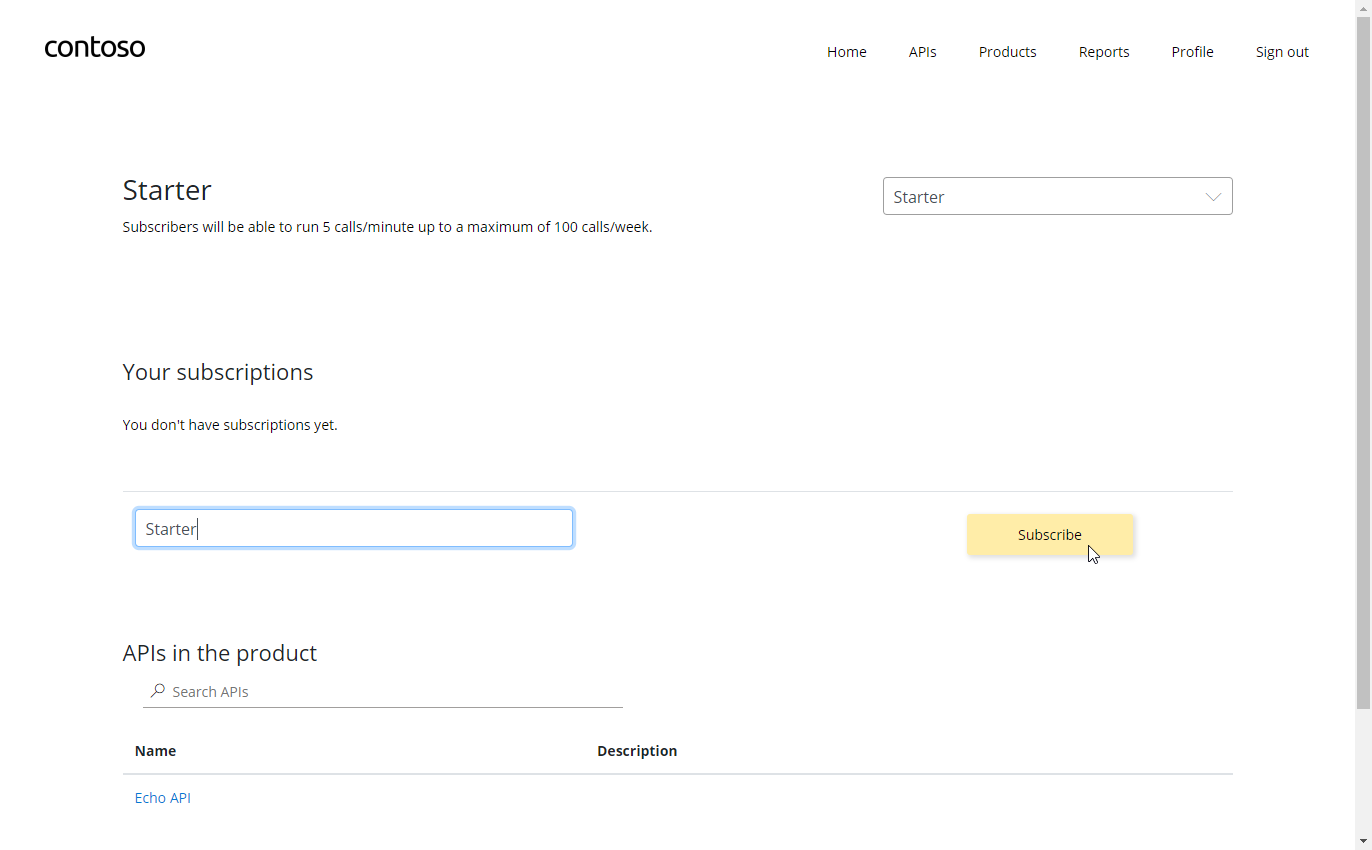
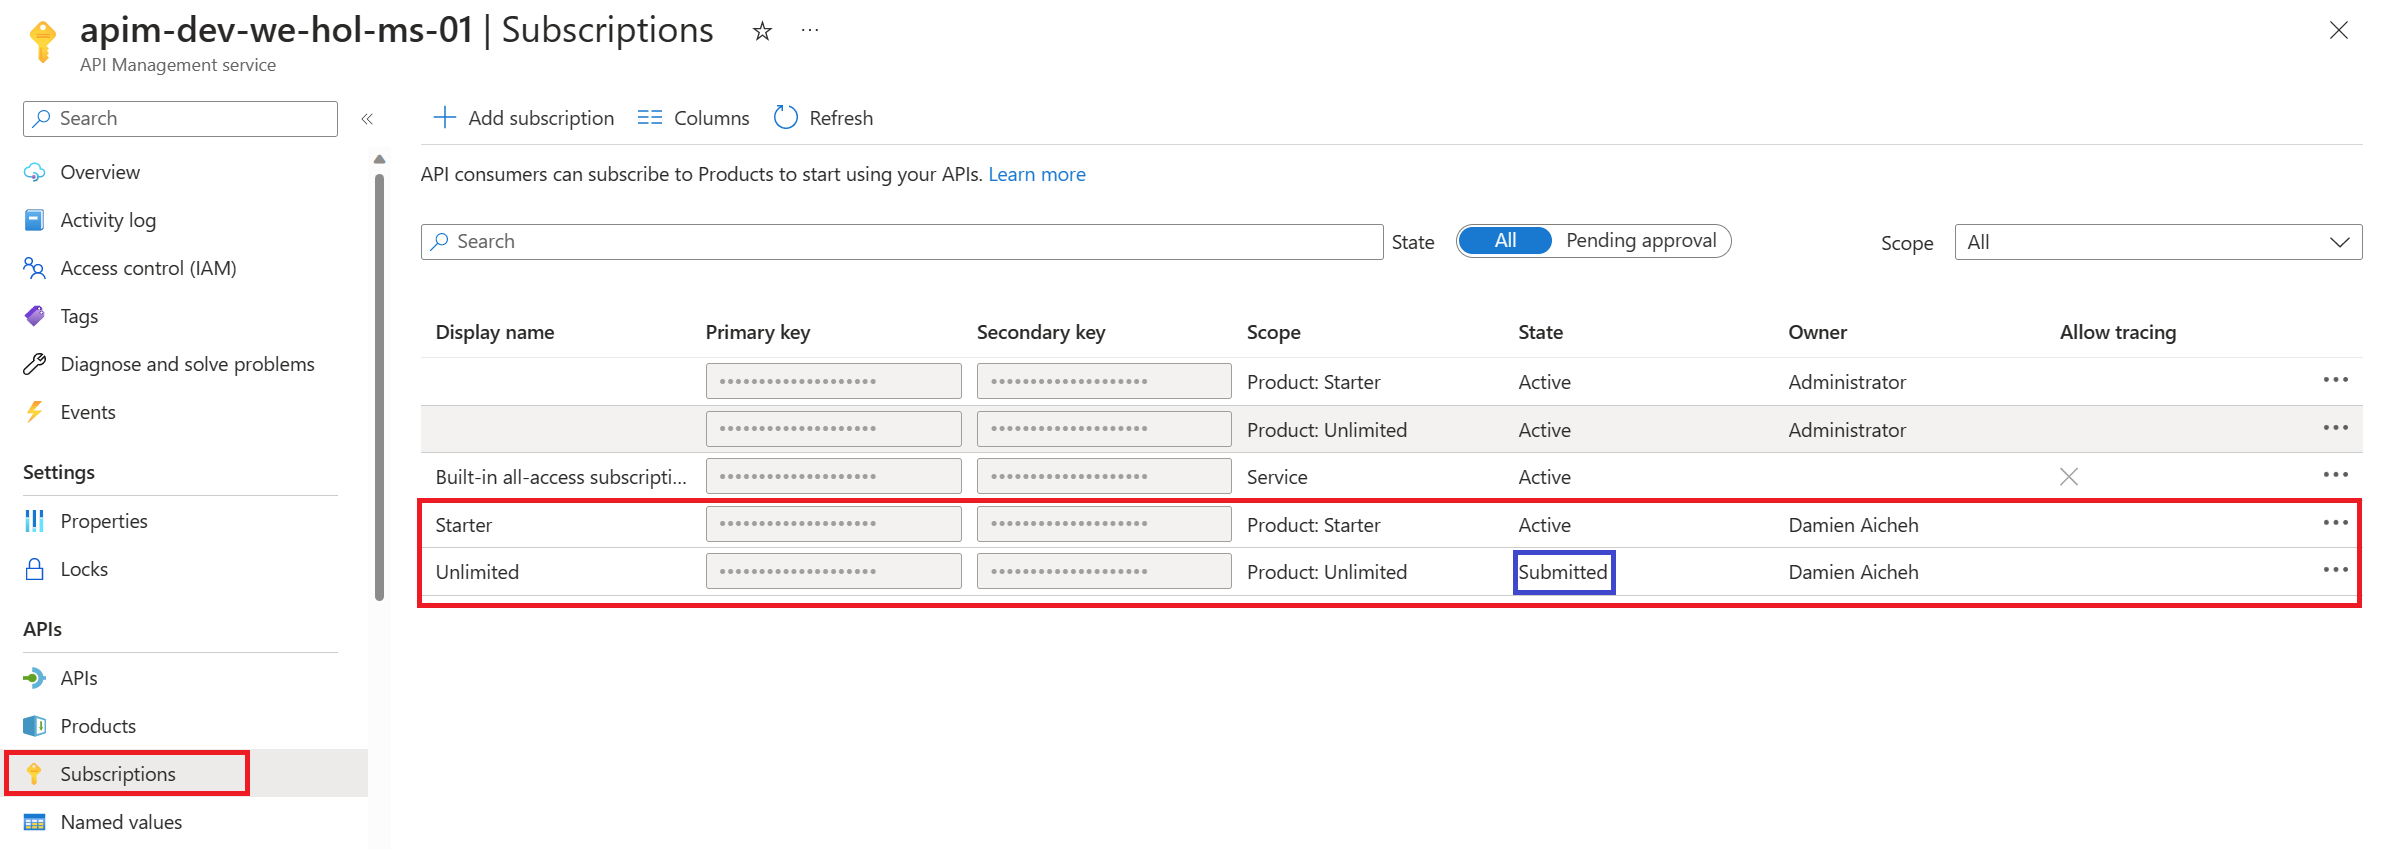
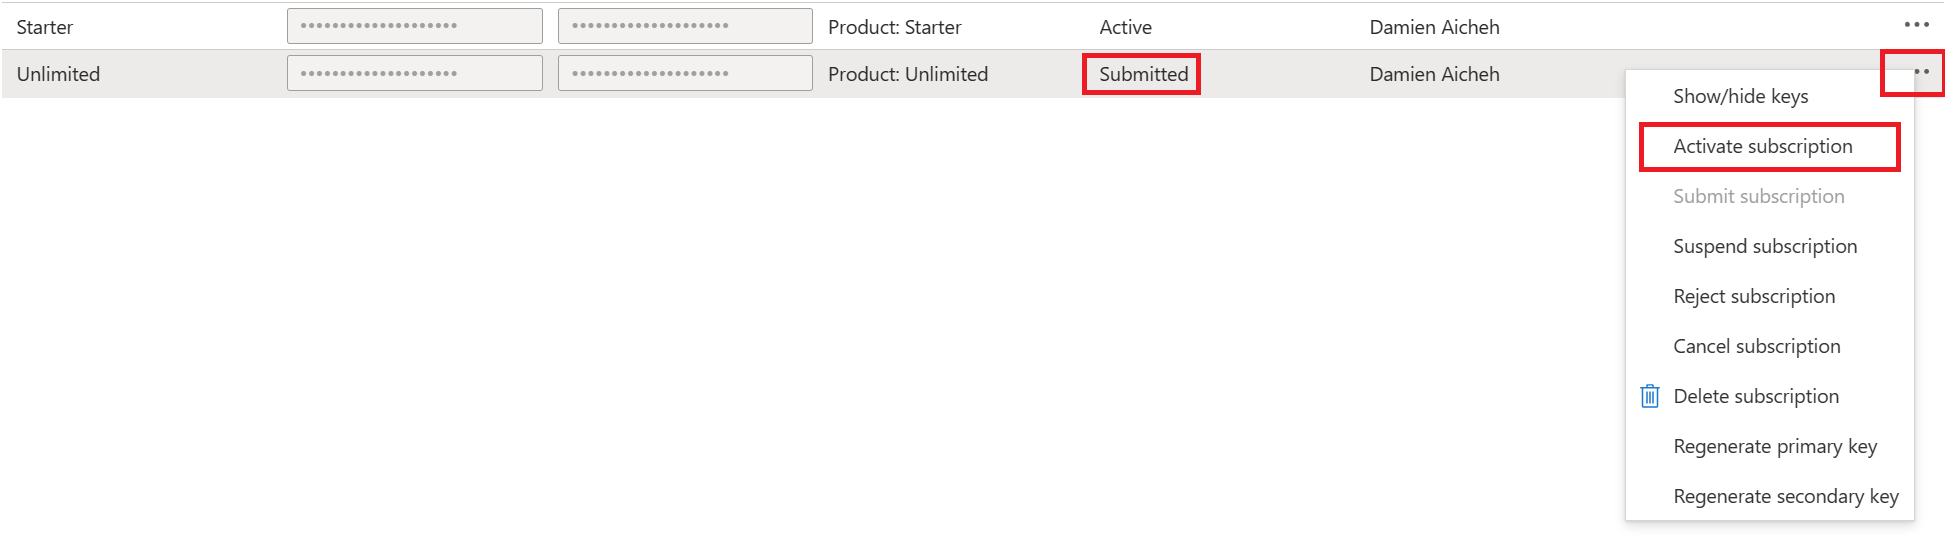
Unlimited as the subscription name, then press Subscribe.Unlimited subscription requires admin approval.Approving Subscriptions
Try an API
200 response.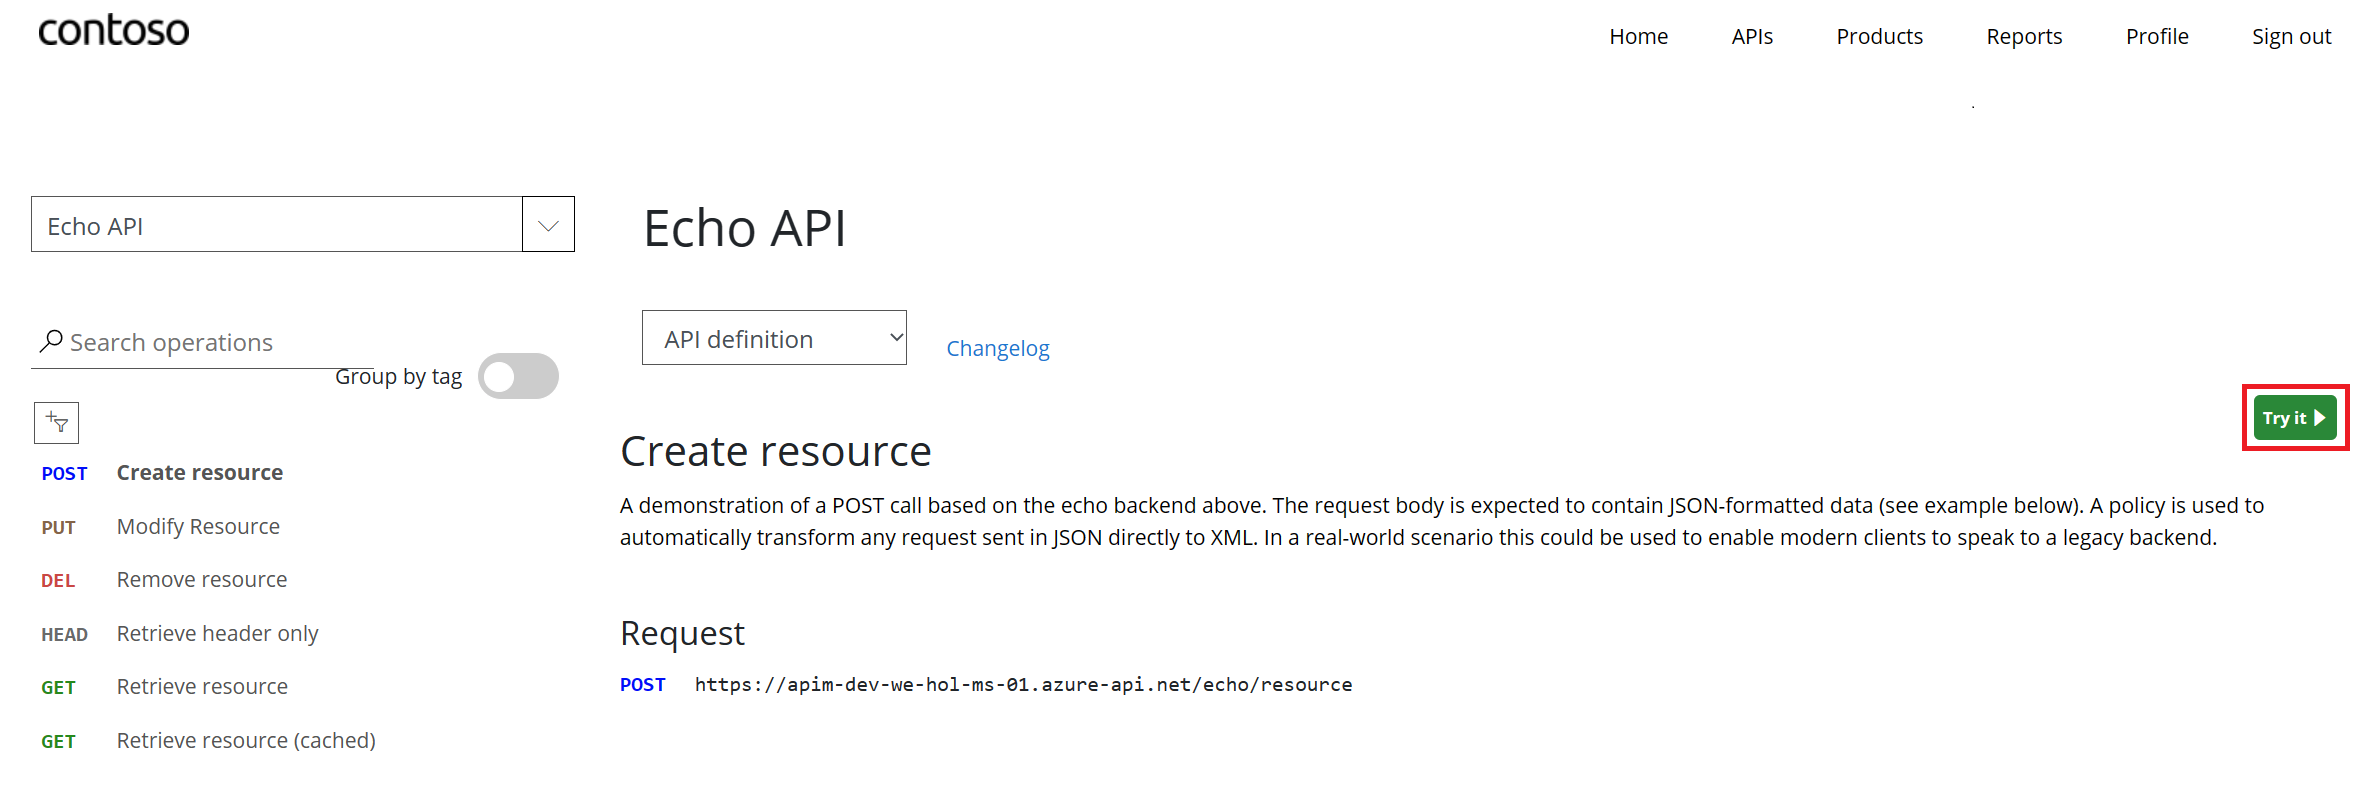
Task 2 – Customizing the Developer Portal
Site Configuration
Email Configuration
Task 3 – Product Management
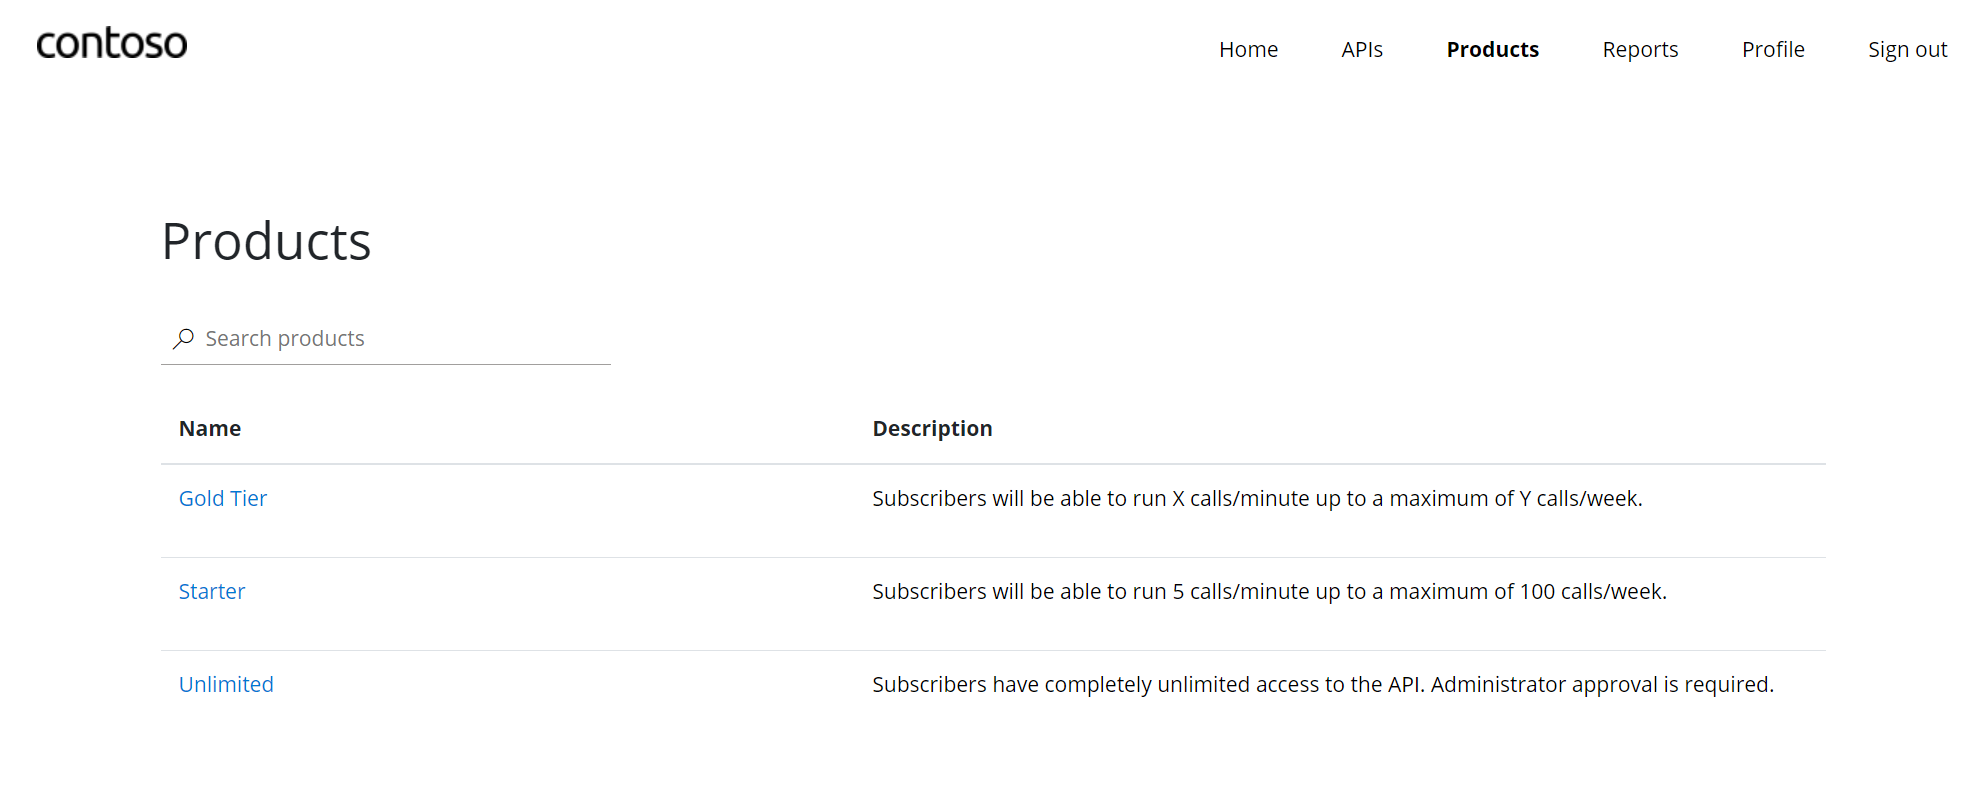
Product definition
Products.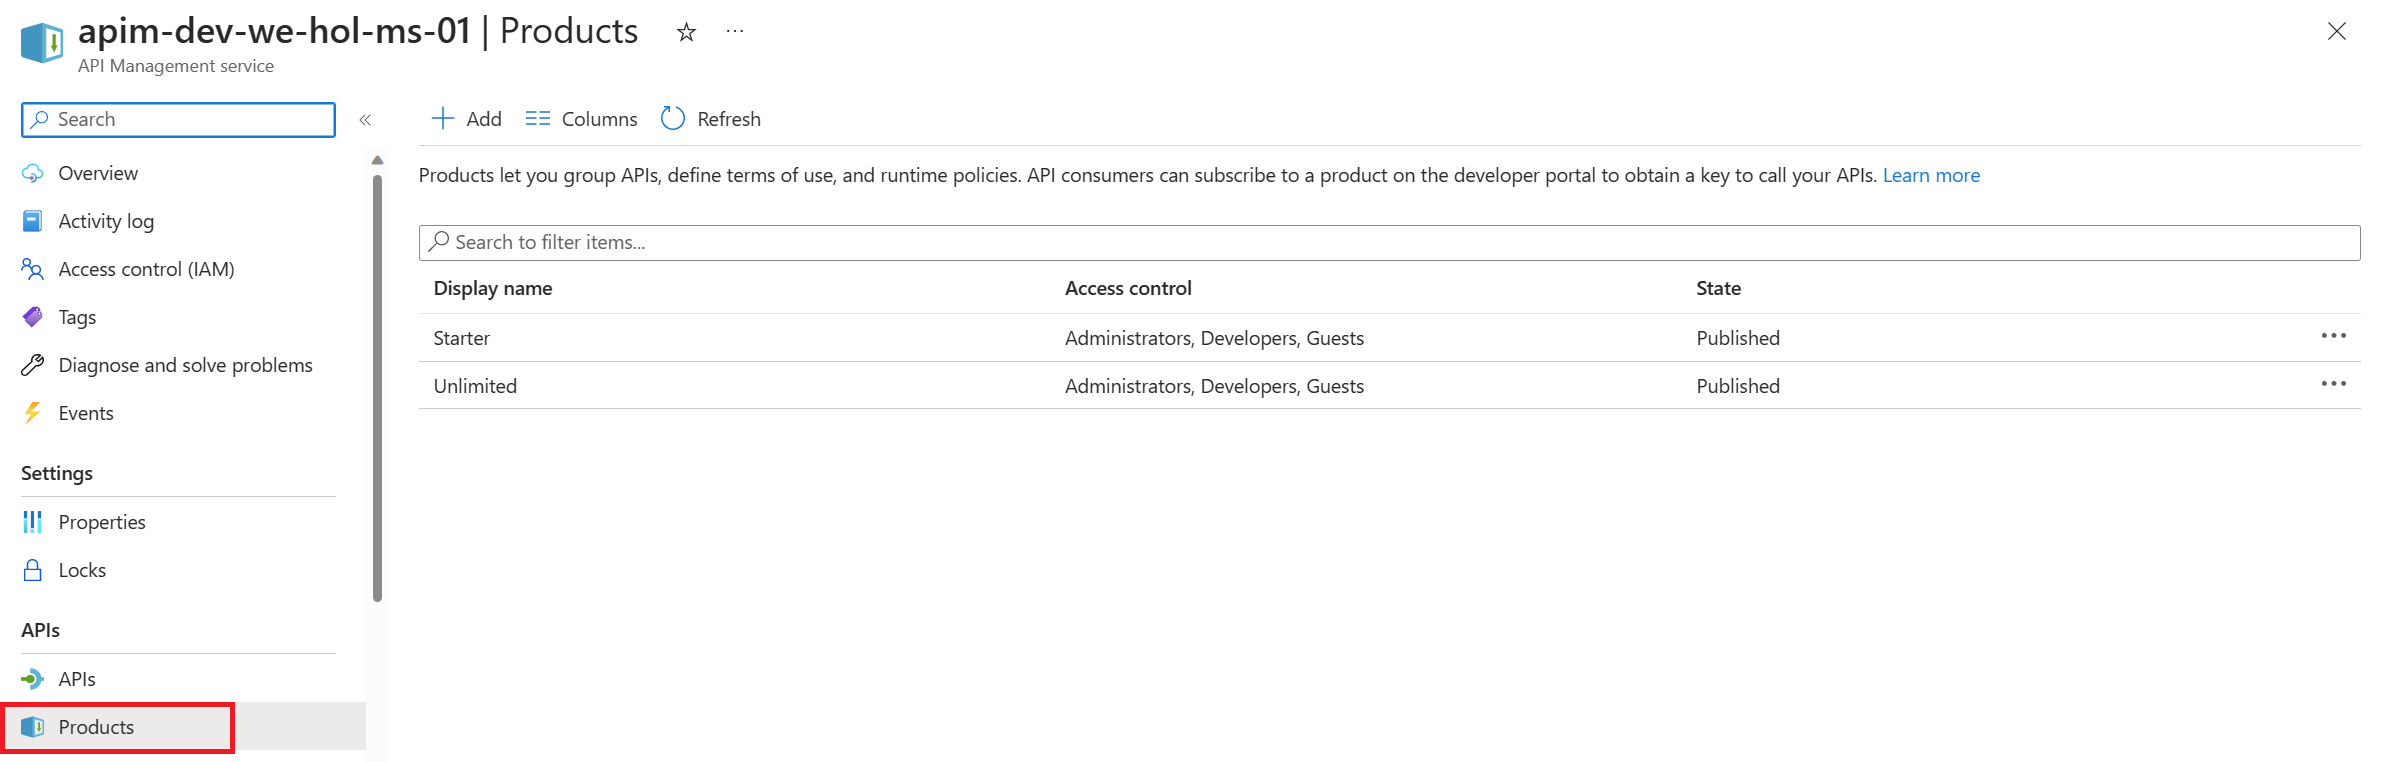
Gold Tier.

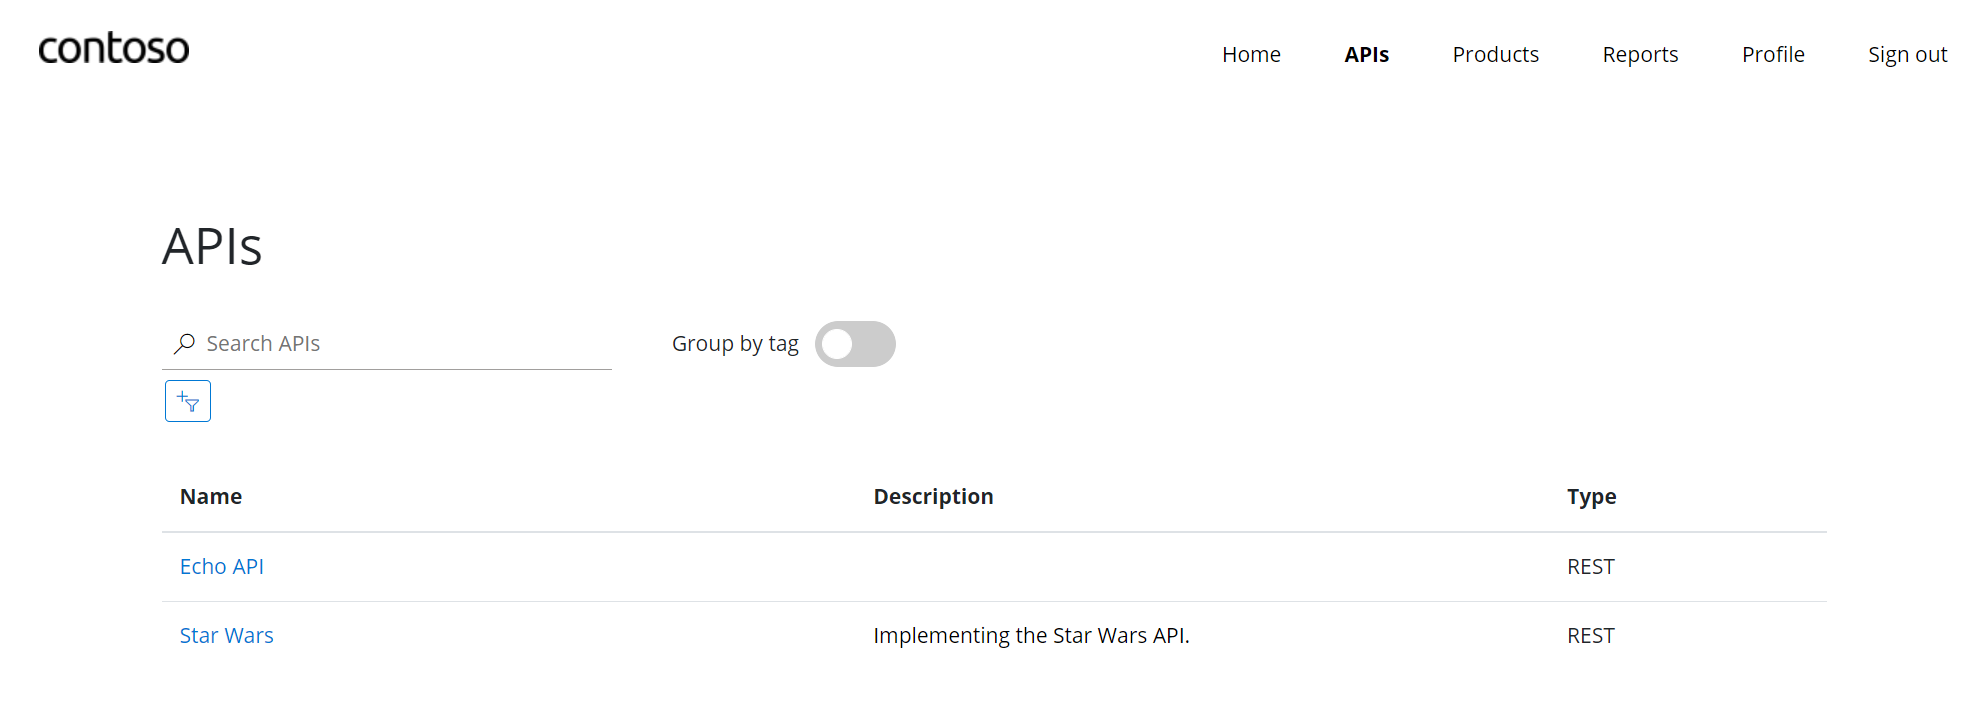
Exercise 2 – API Management
TABLE OF CONTENTS
Task 1: Add API from scratch
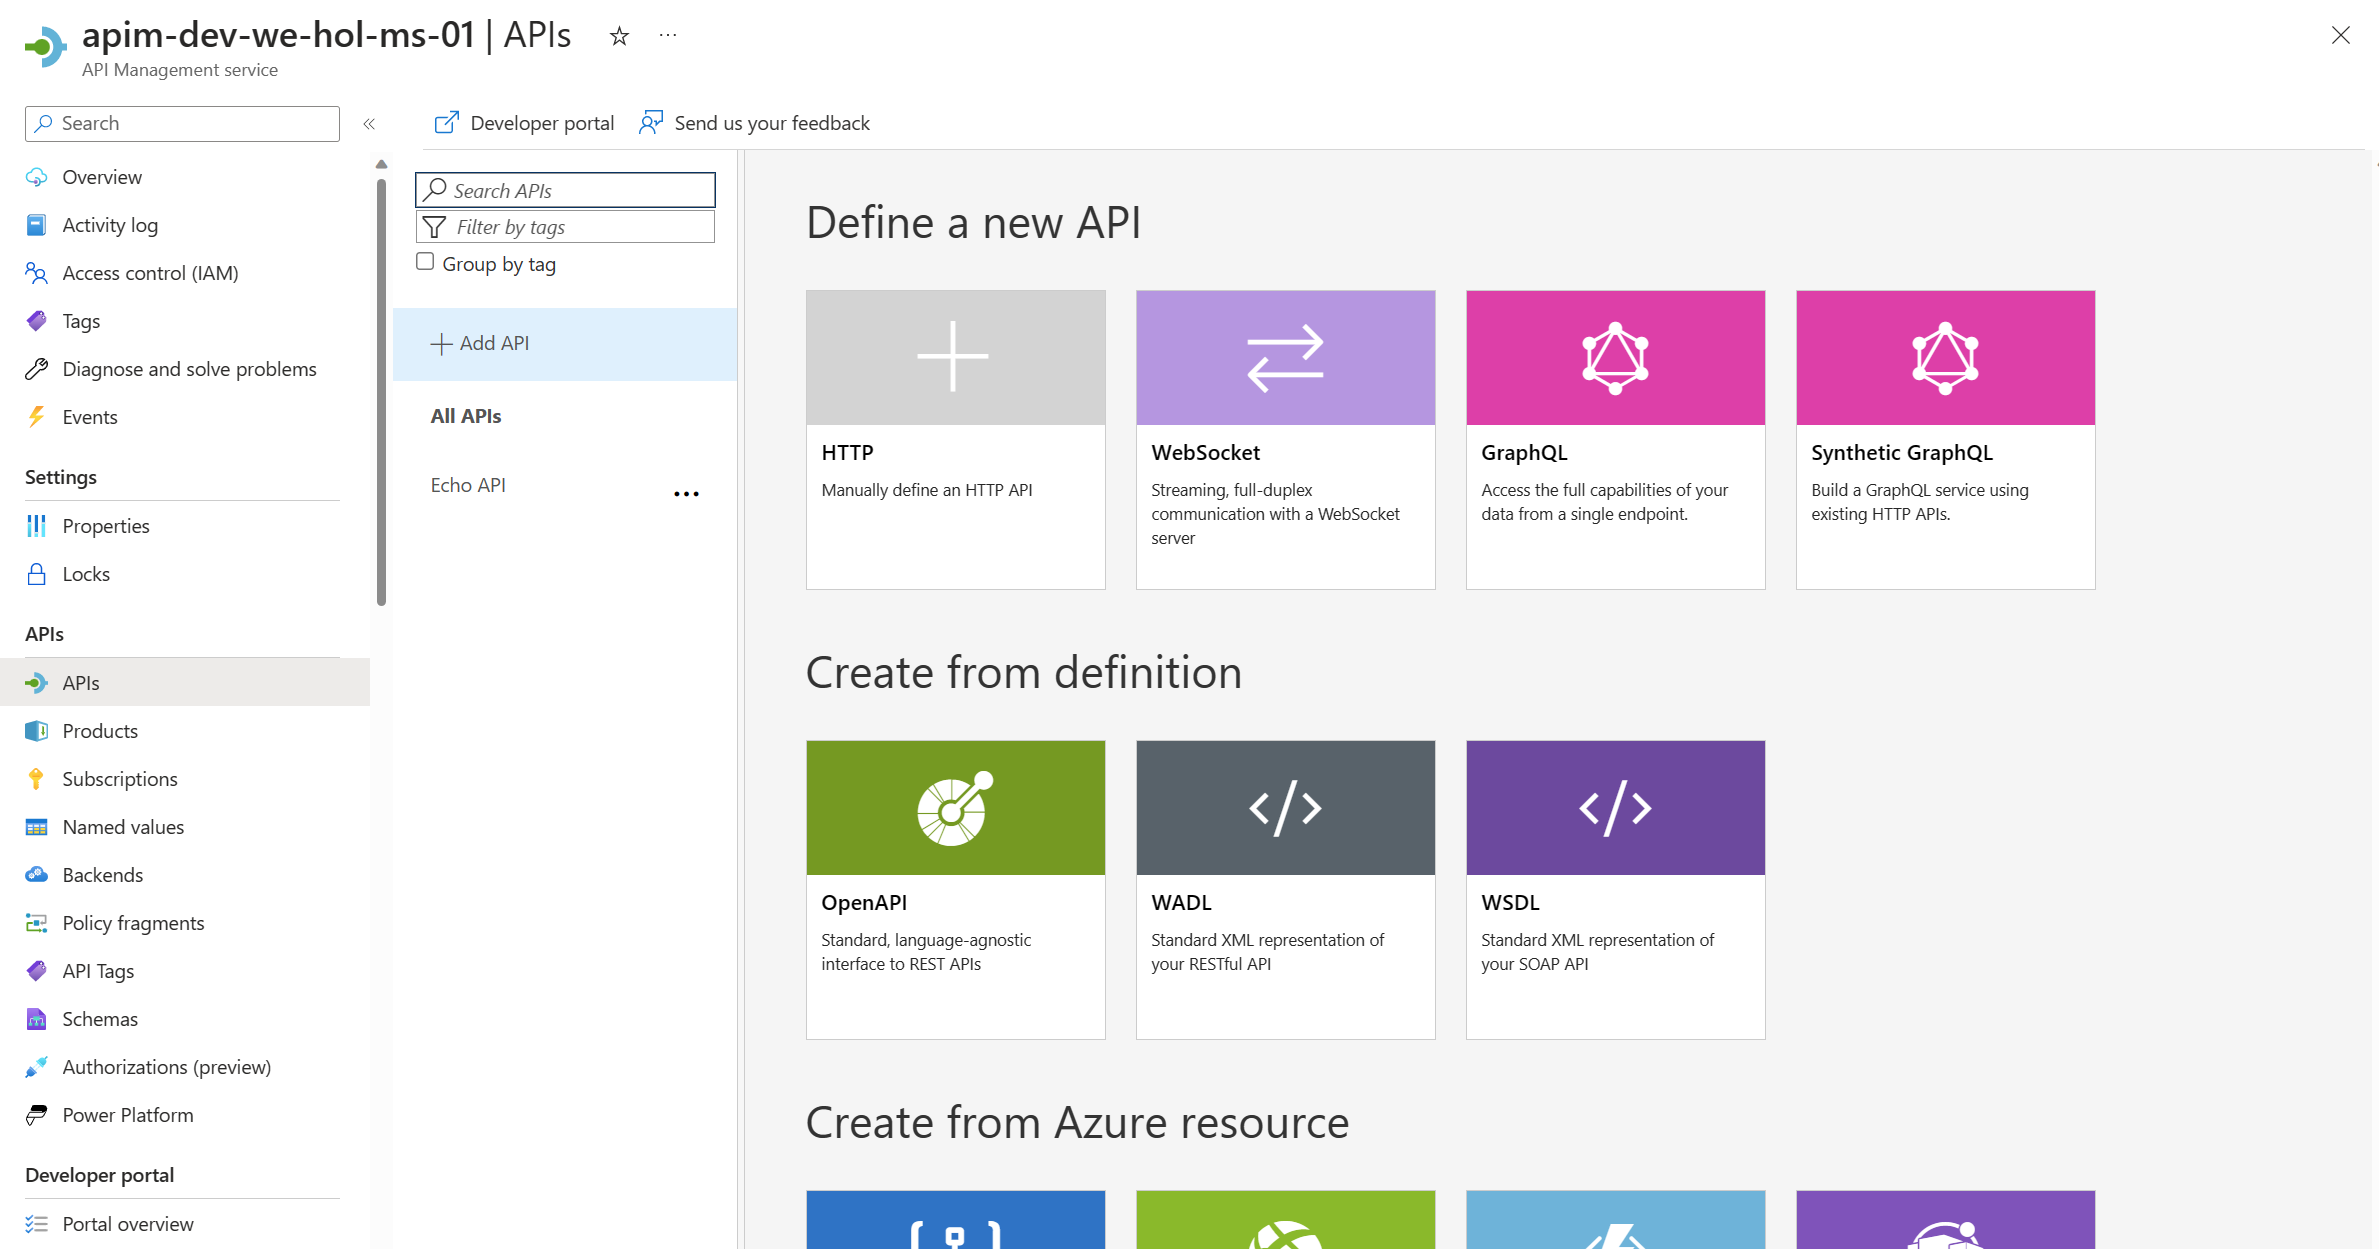
Add API from Scratch
2) Click on HTTP – Manually define an HTTP API.
3) Select the Full option in the Create an HTTP API dialog.
4) Enter Display name, Name, and Description.
5) Assign https://swapi.dev/api to the Web service URL.
6) Keep the URL scheme at HTTPS as we strive to enforce HTTPS only.
7) Set the API URL suffix to sw. This allows us to compartmentalize the APIM URLs for distinct APIs.
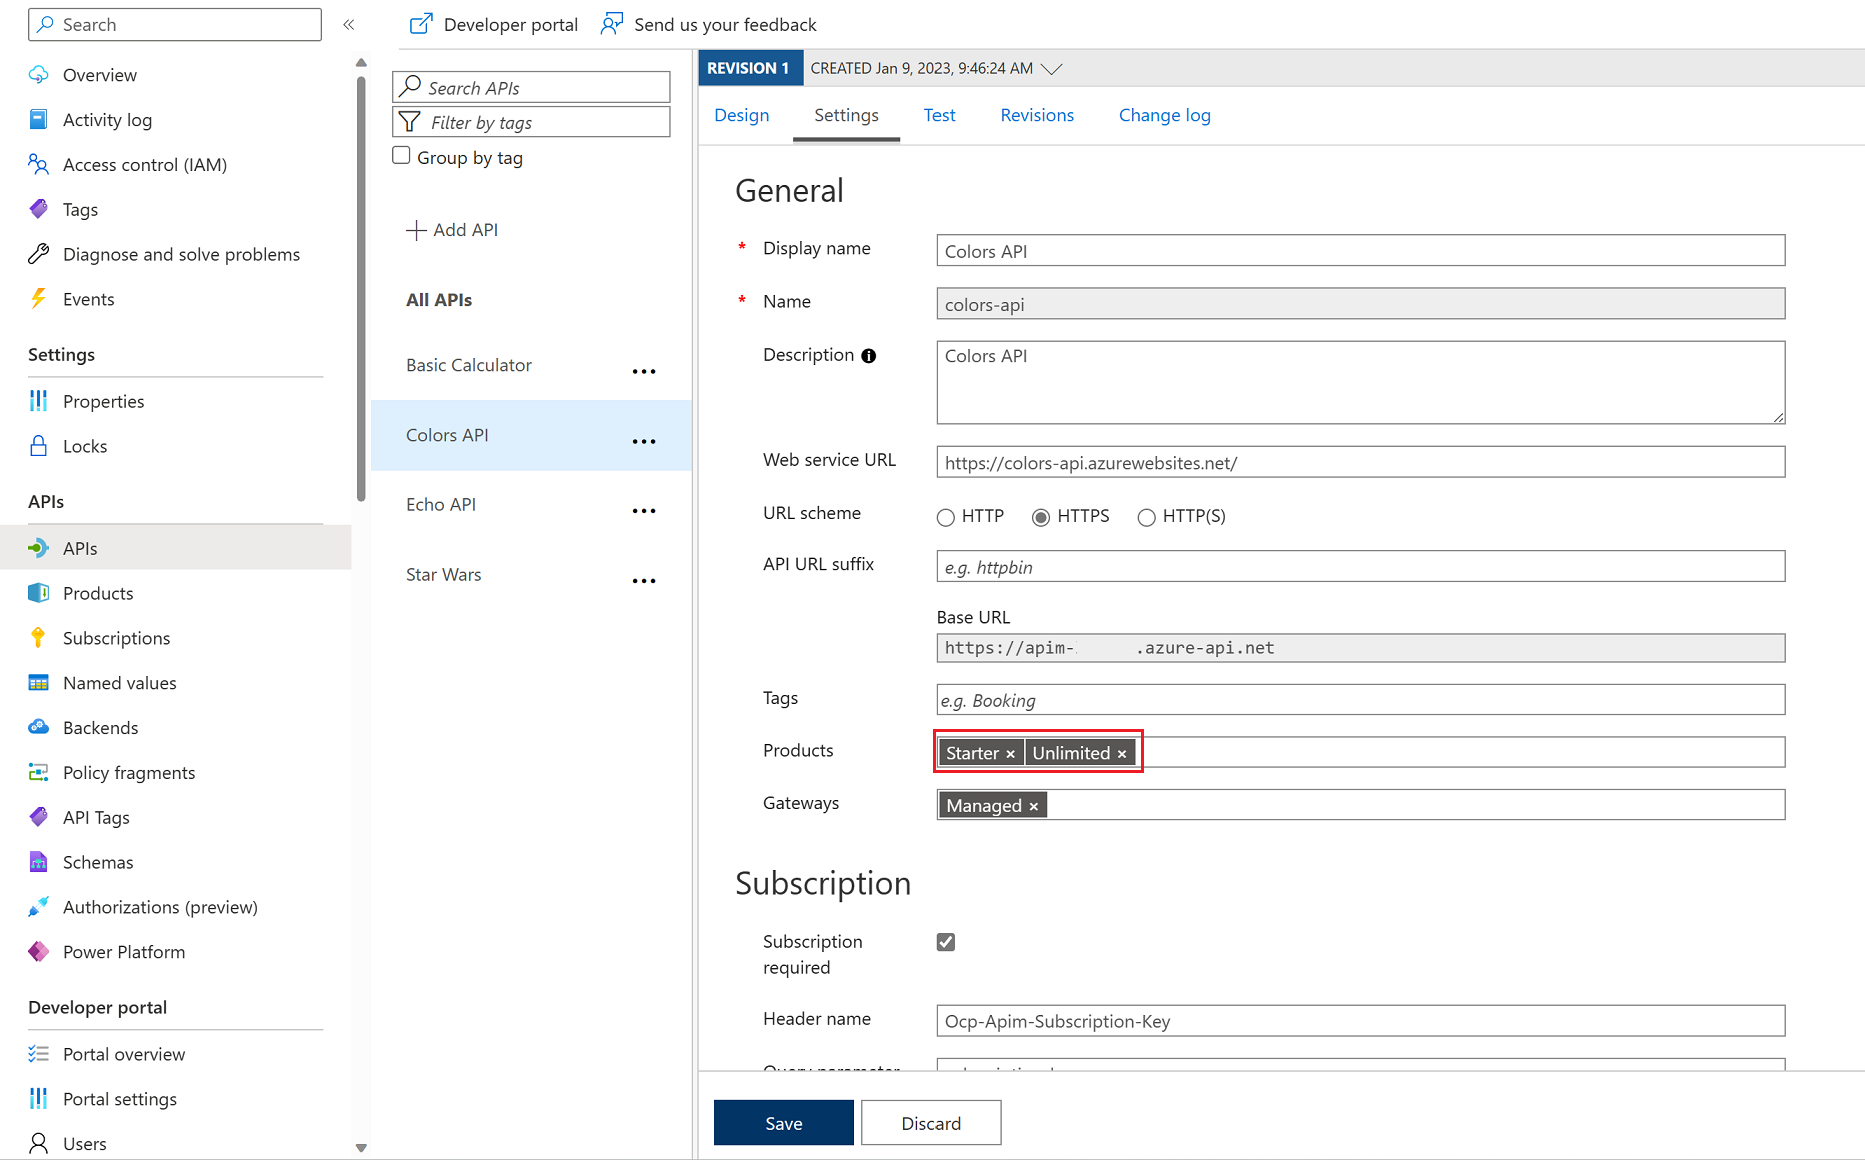
8) Assign Starter and Unlimited products.
9) Press Create.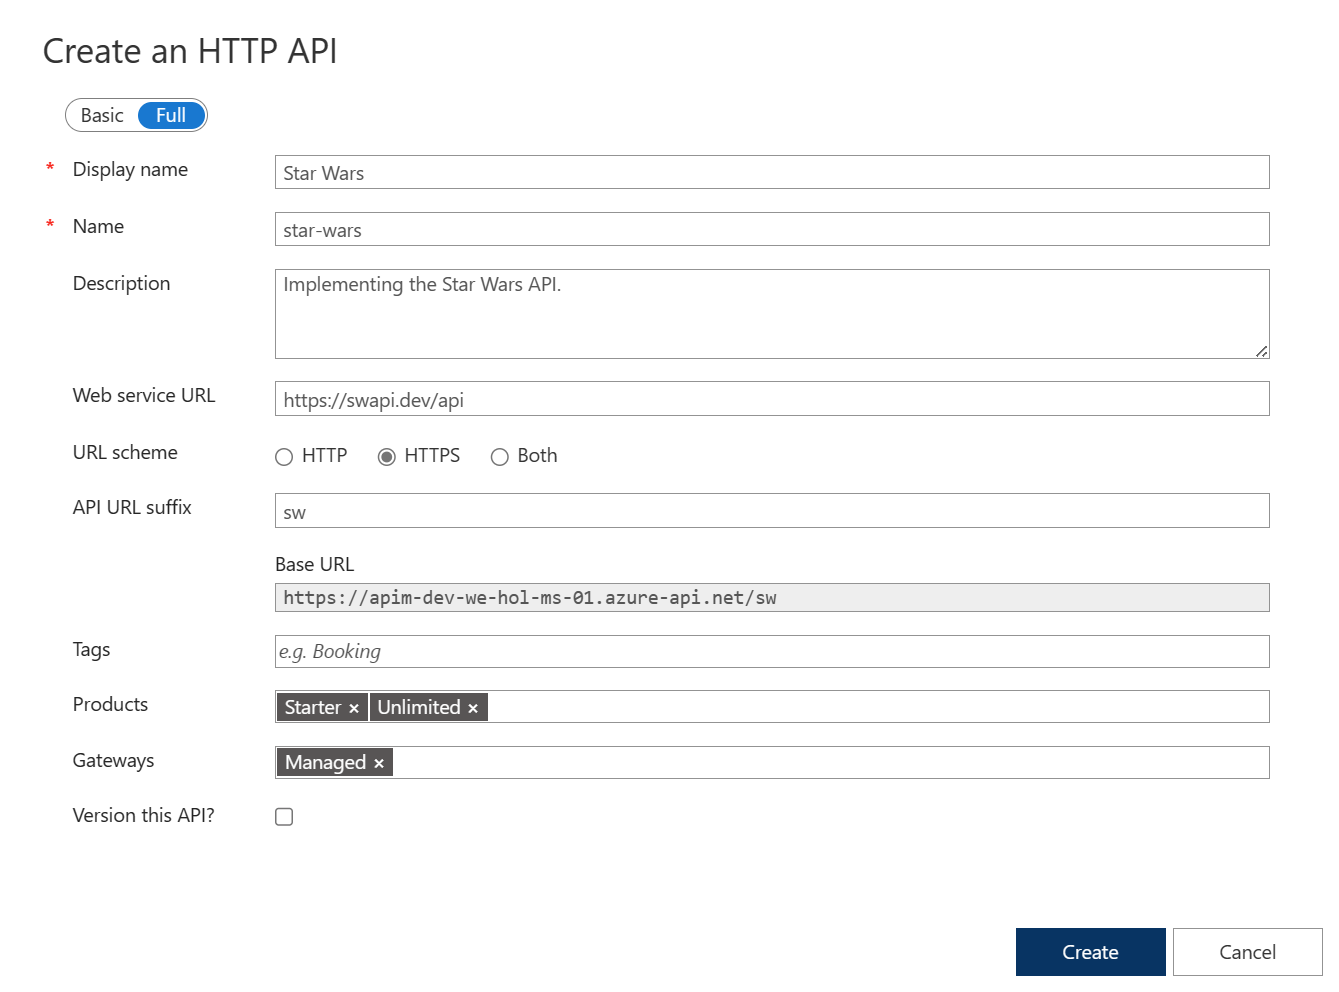
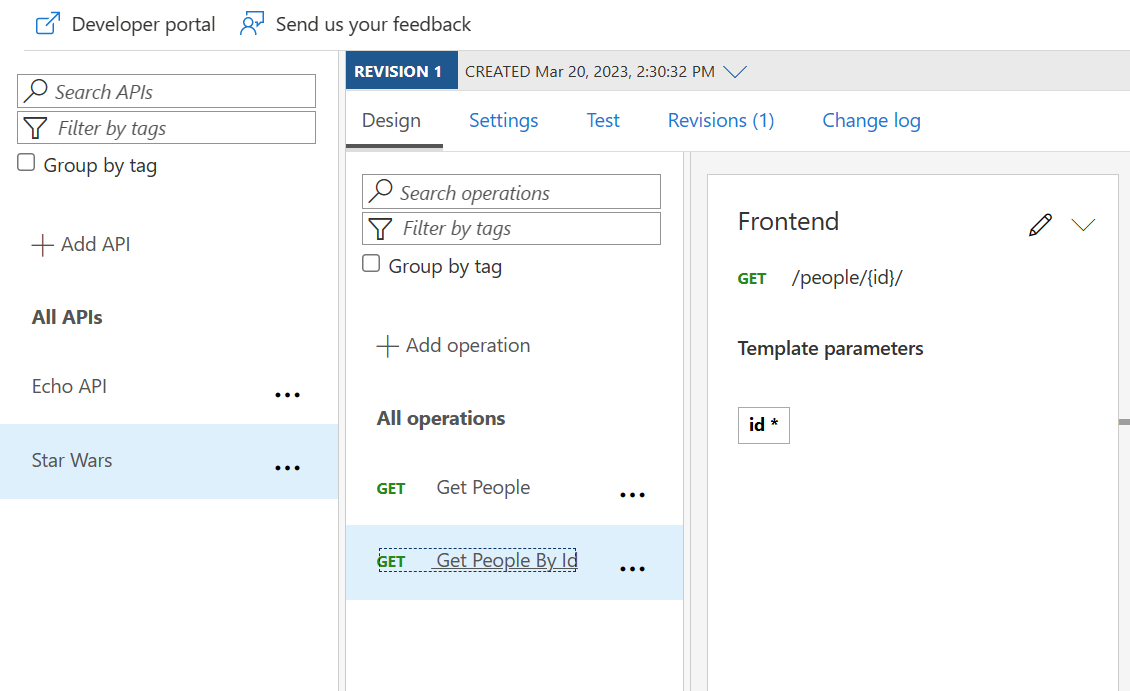
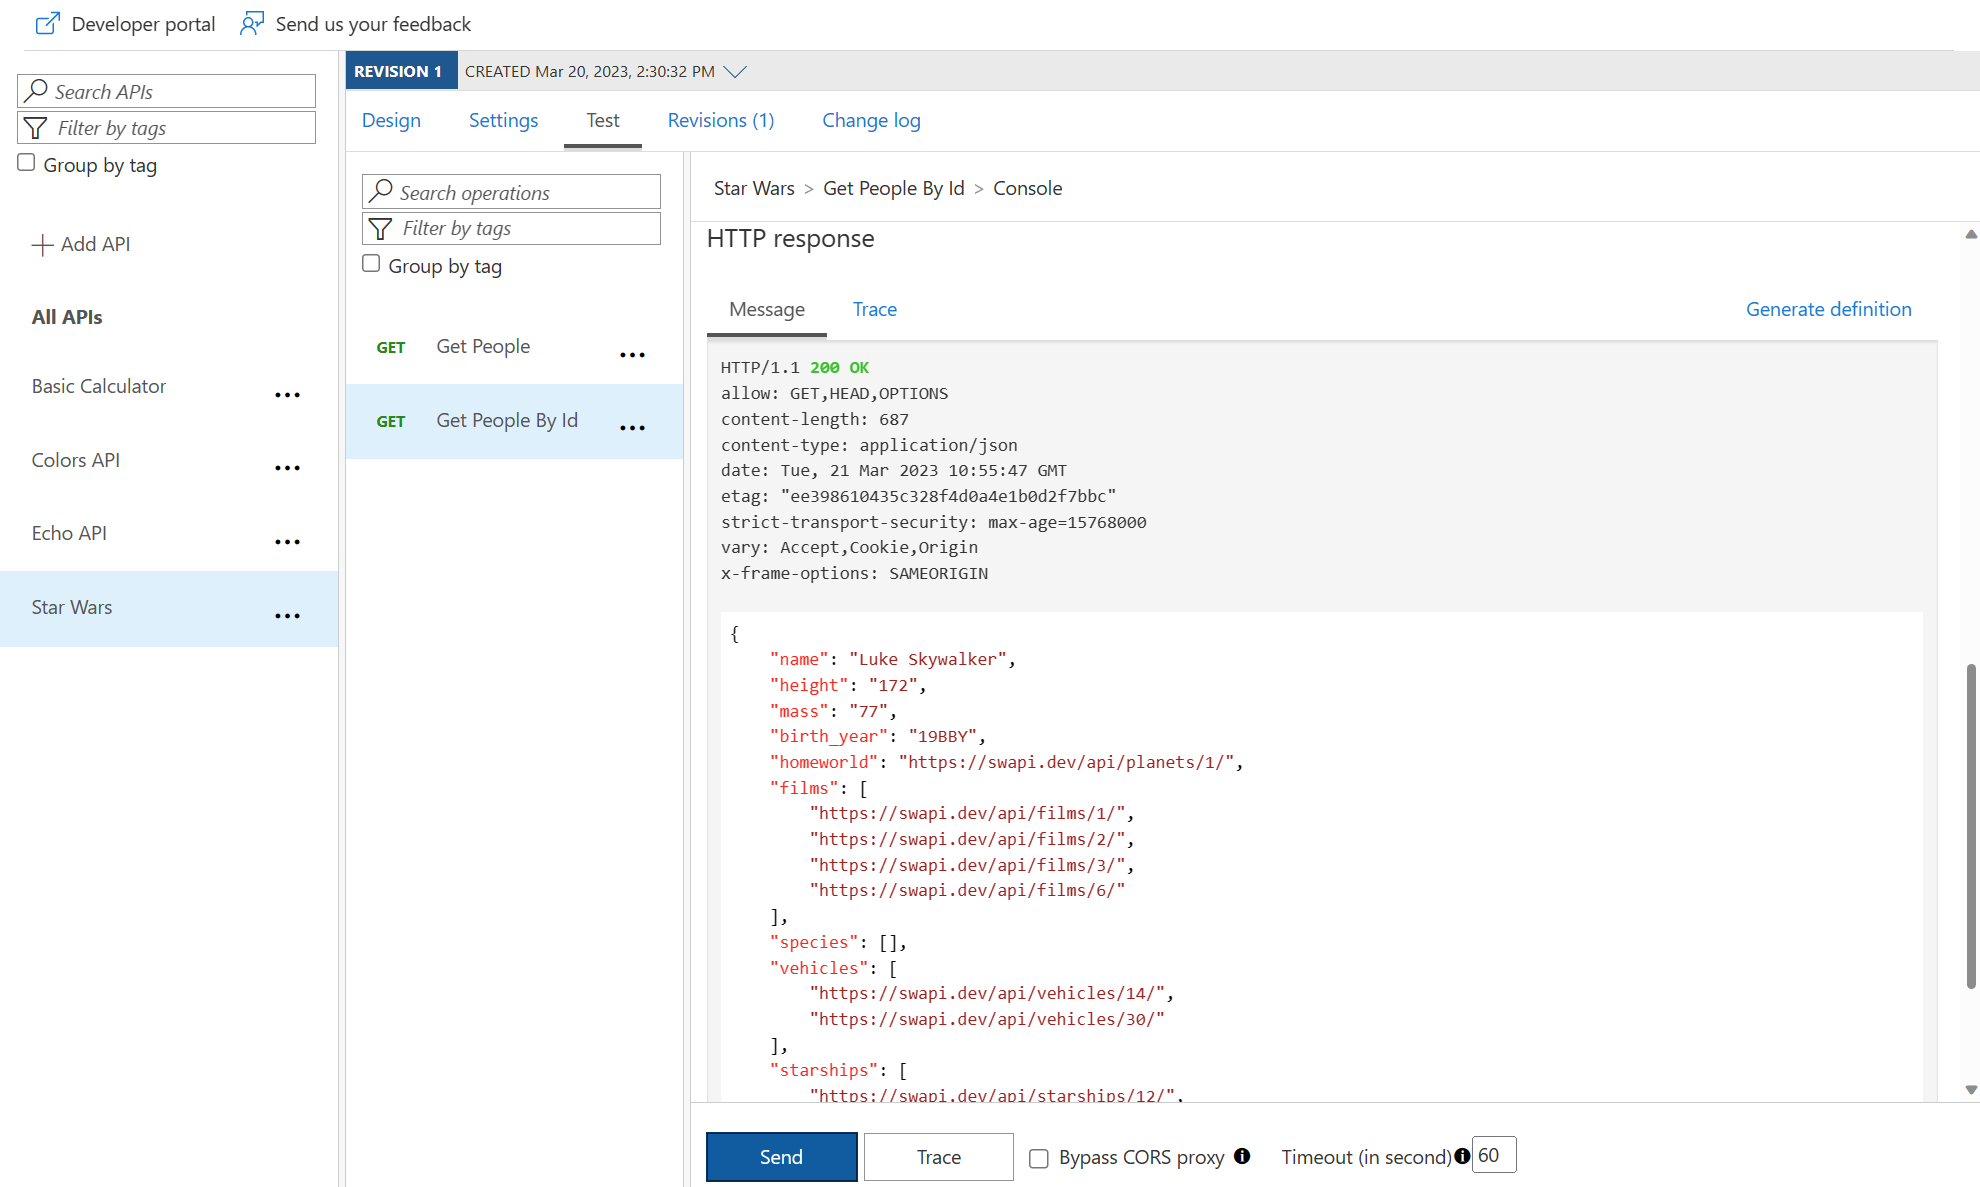
Access Star Wars API from Developer Portal
200 response.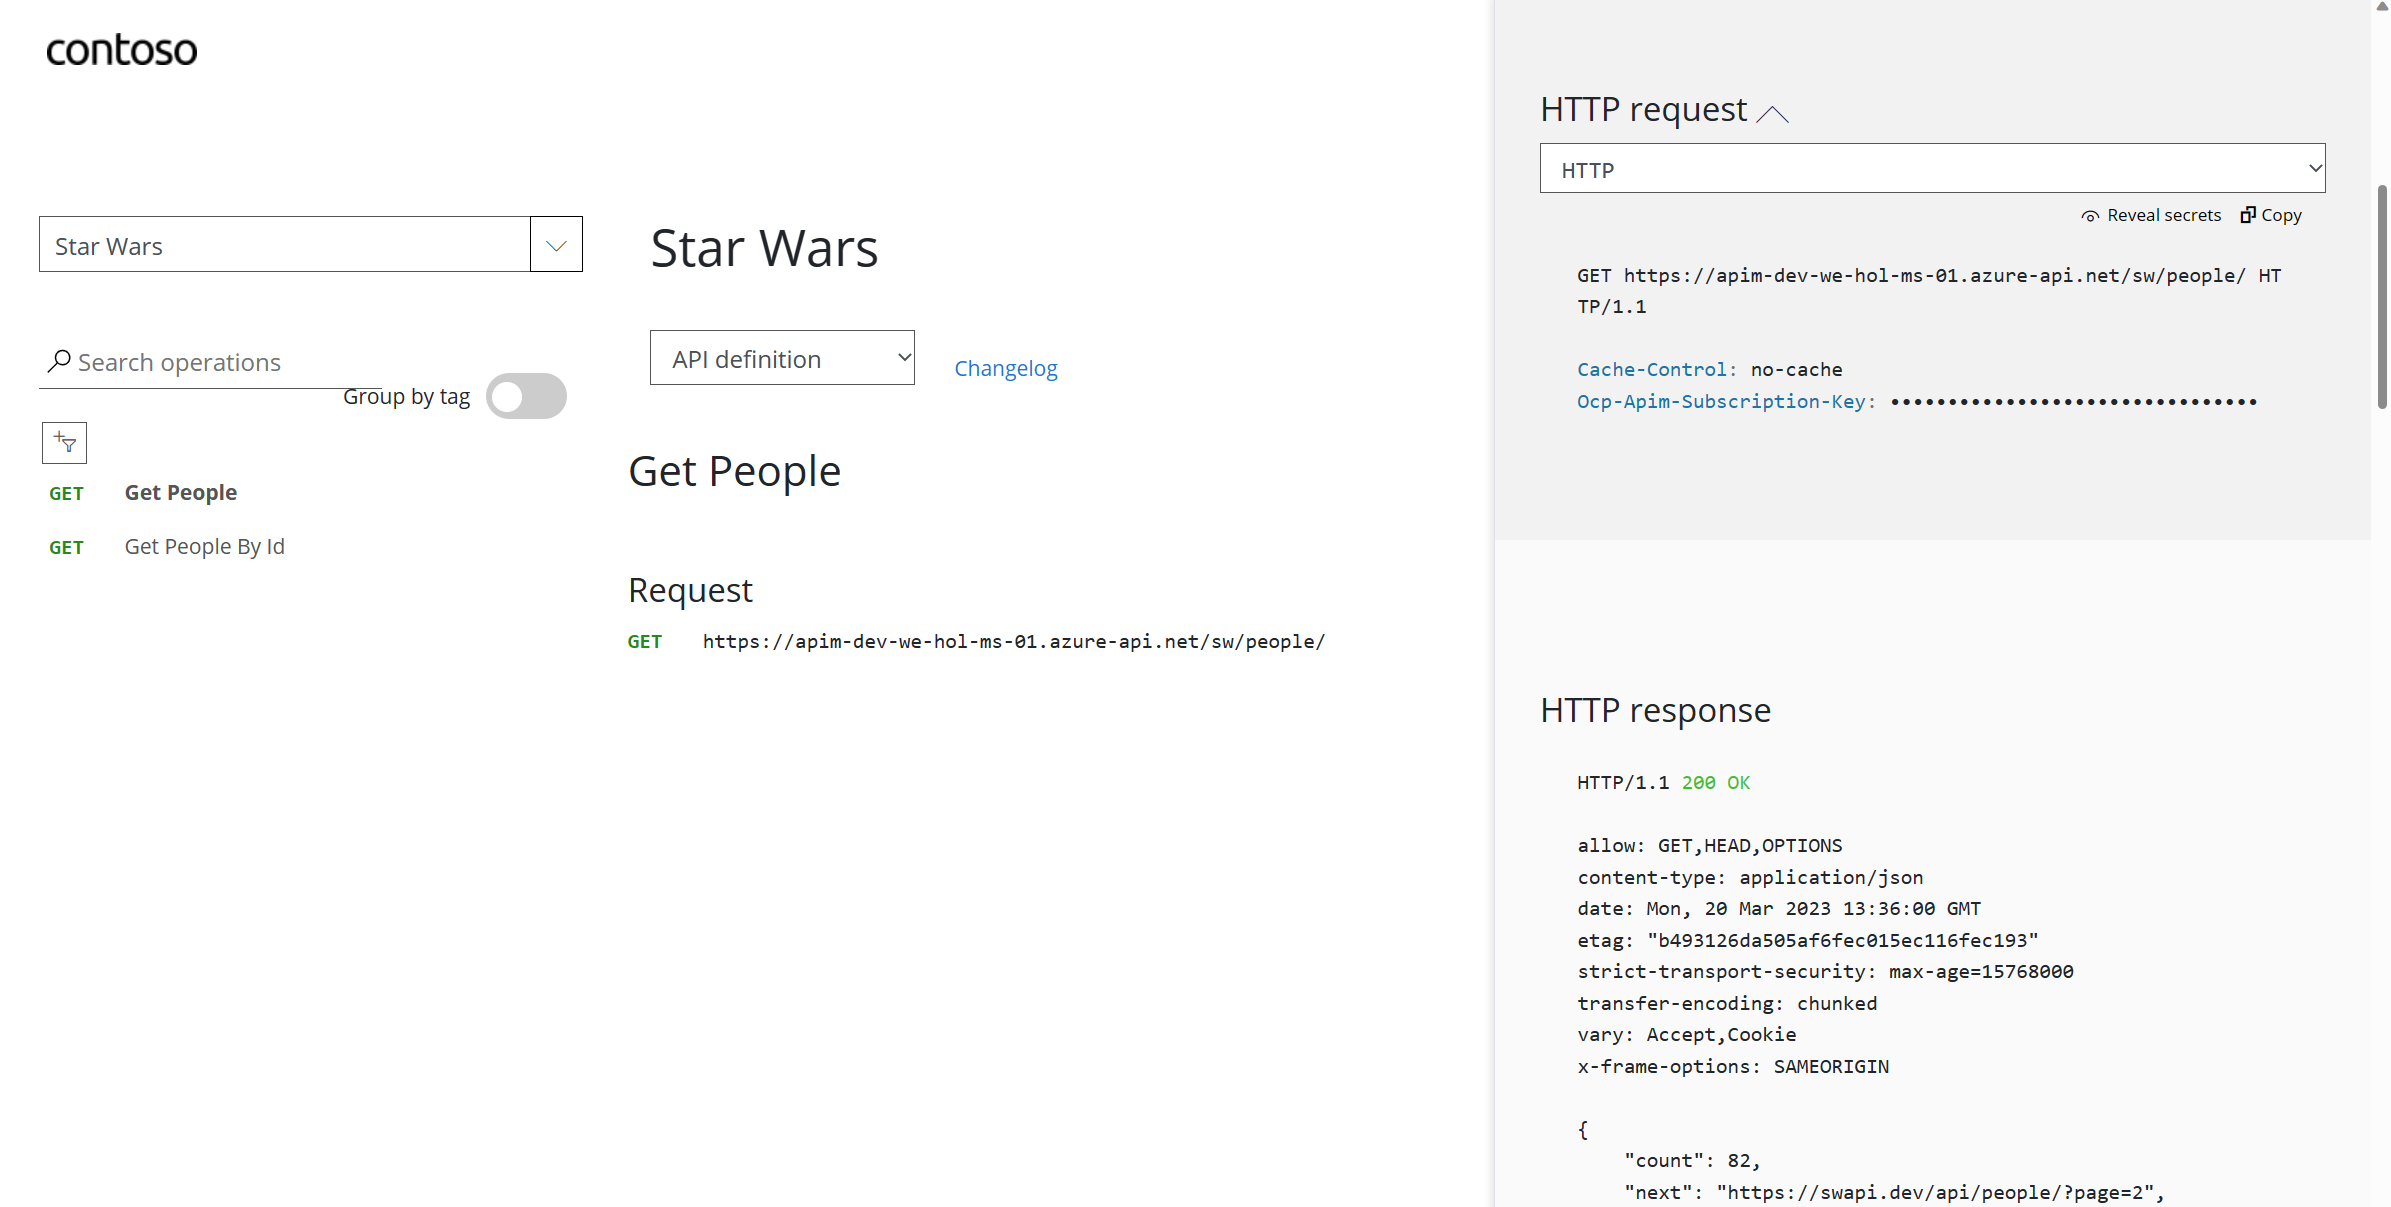
id = 2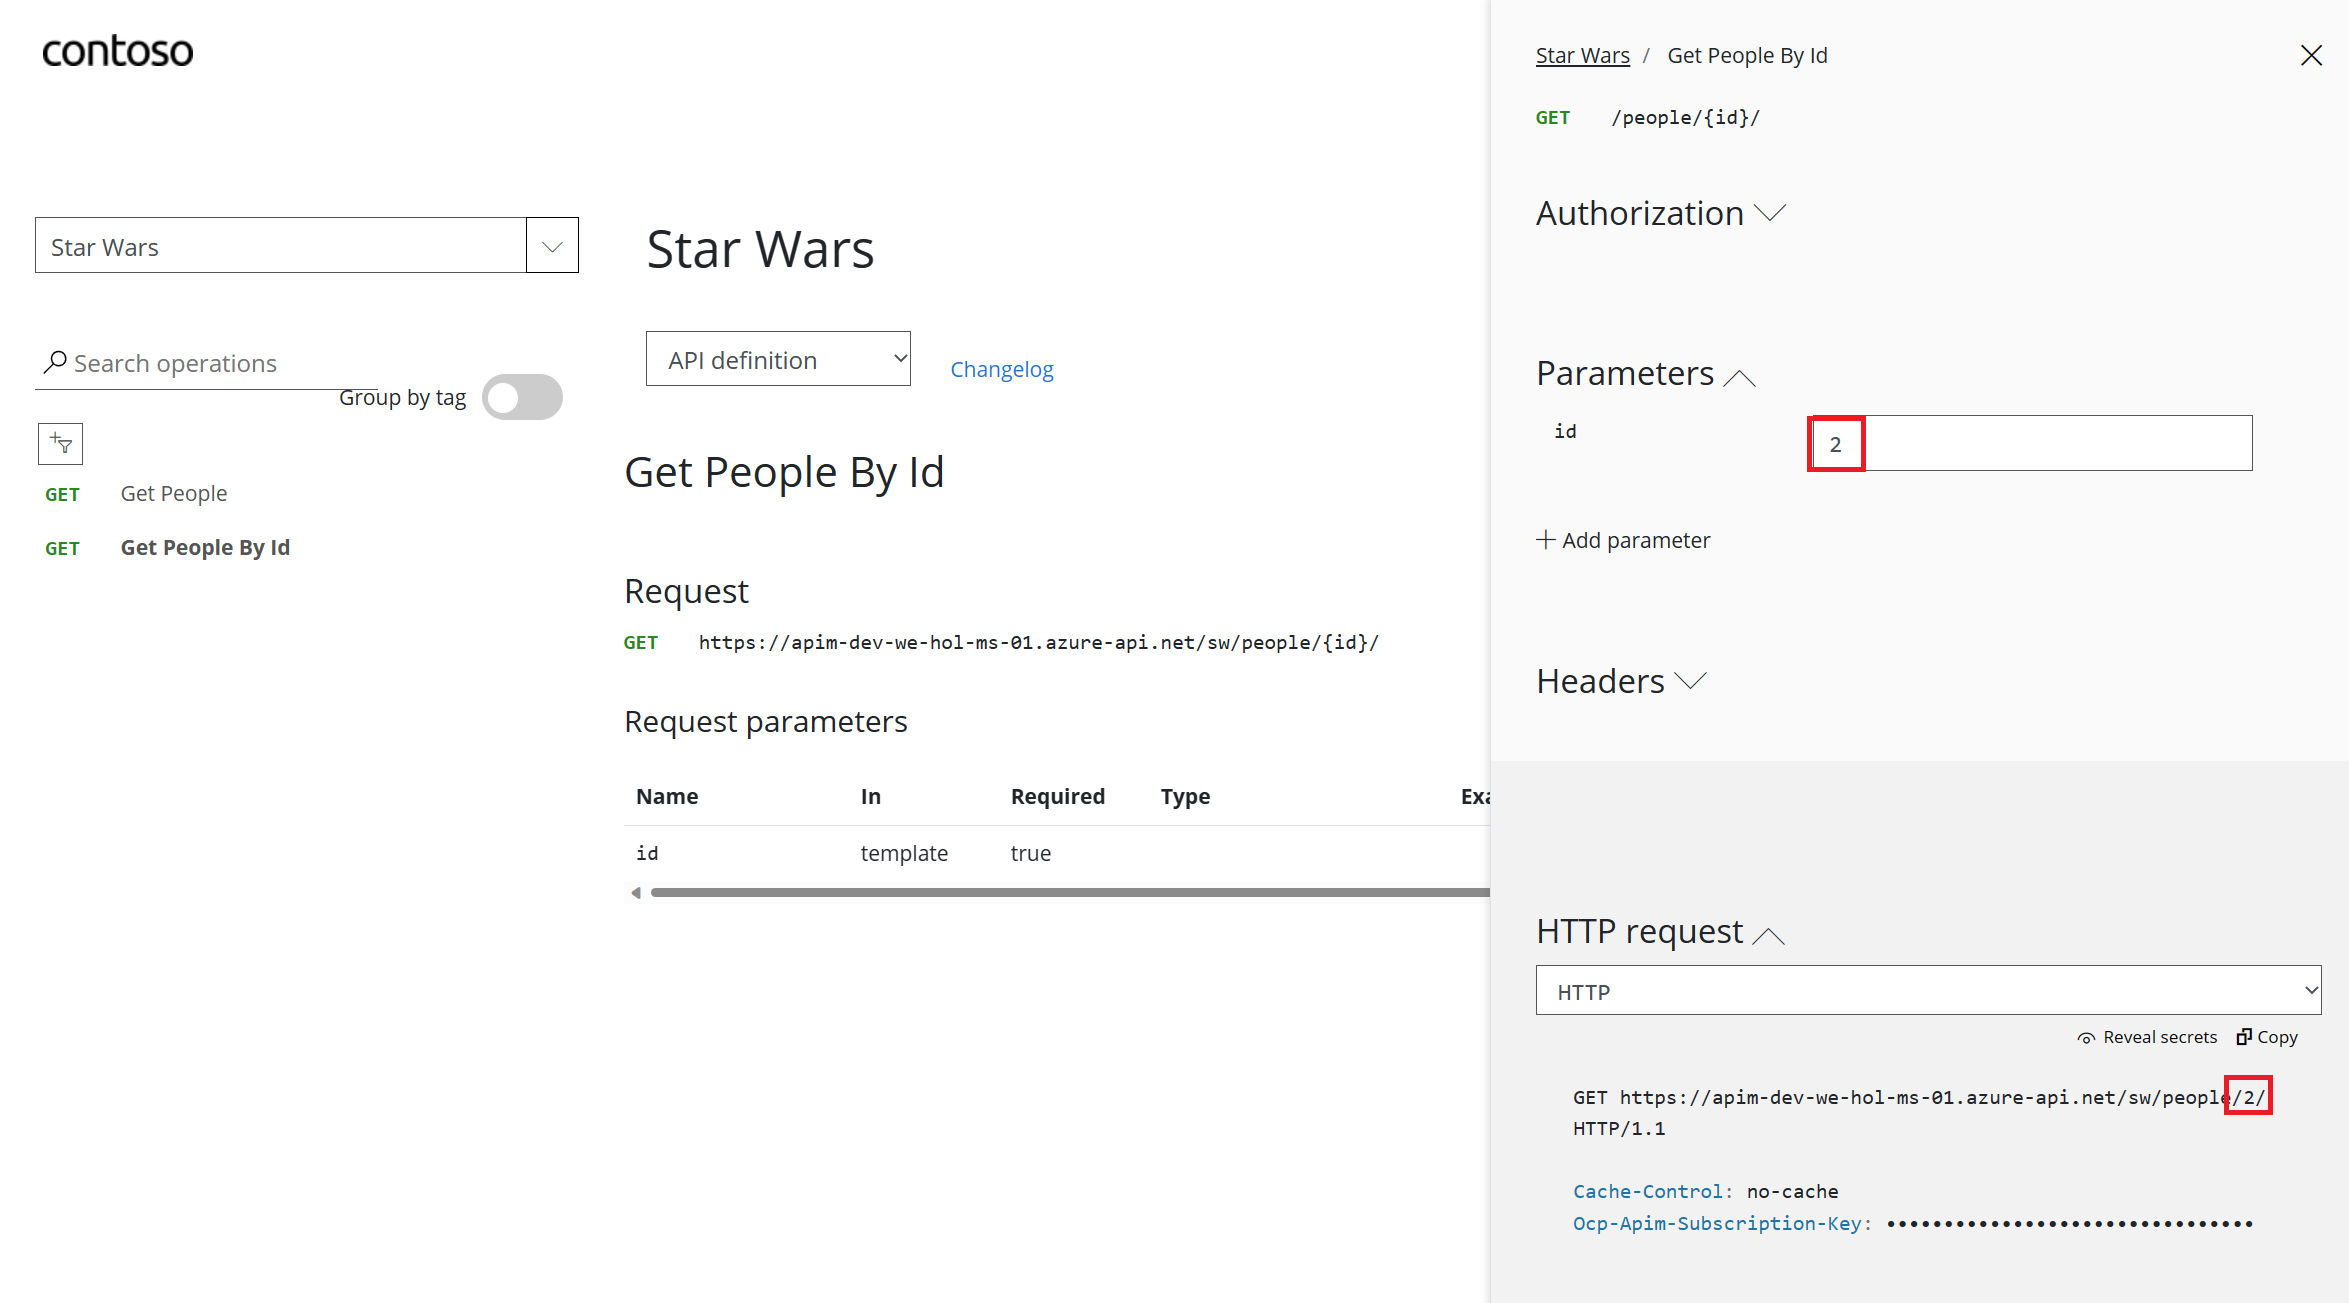
200 response with C-3PO’s details in the response body payload.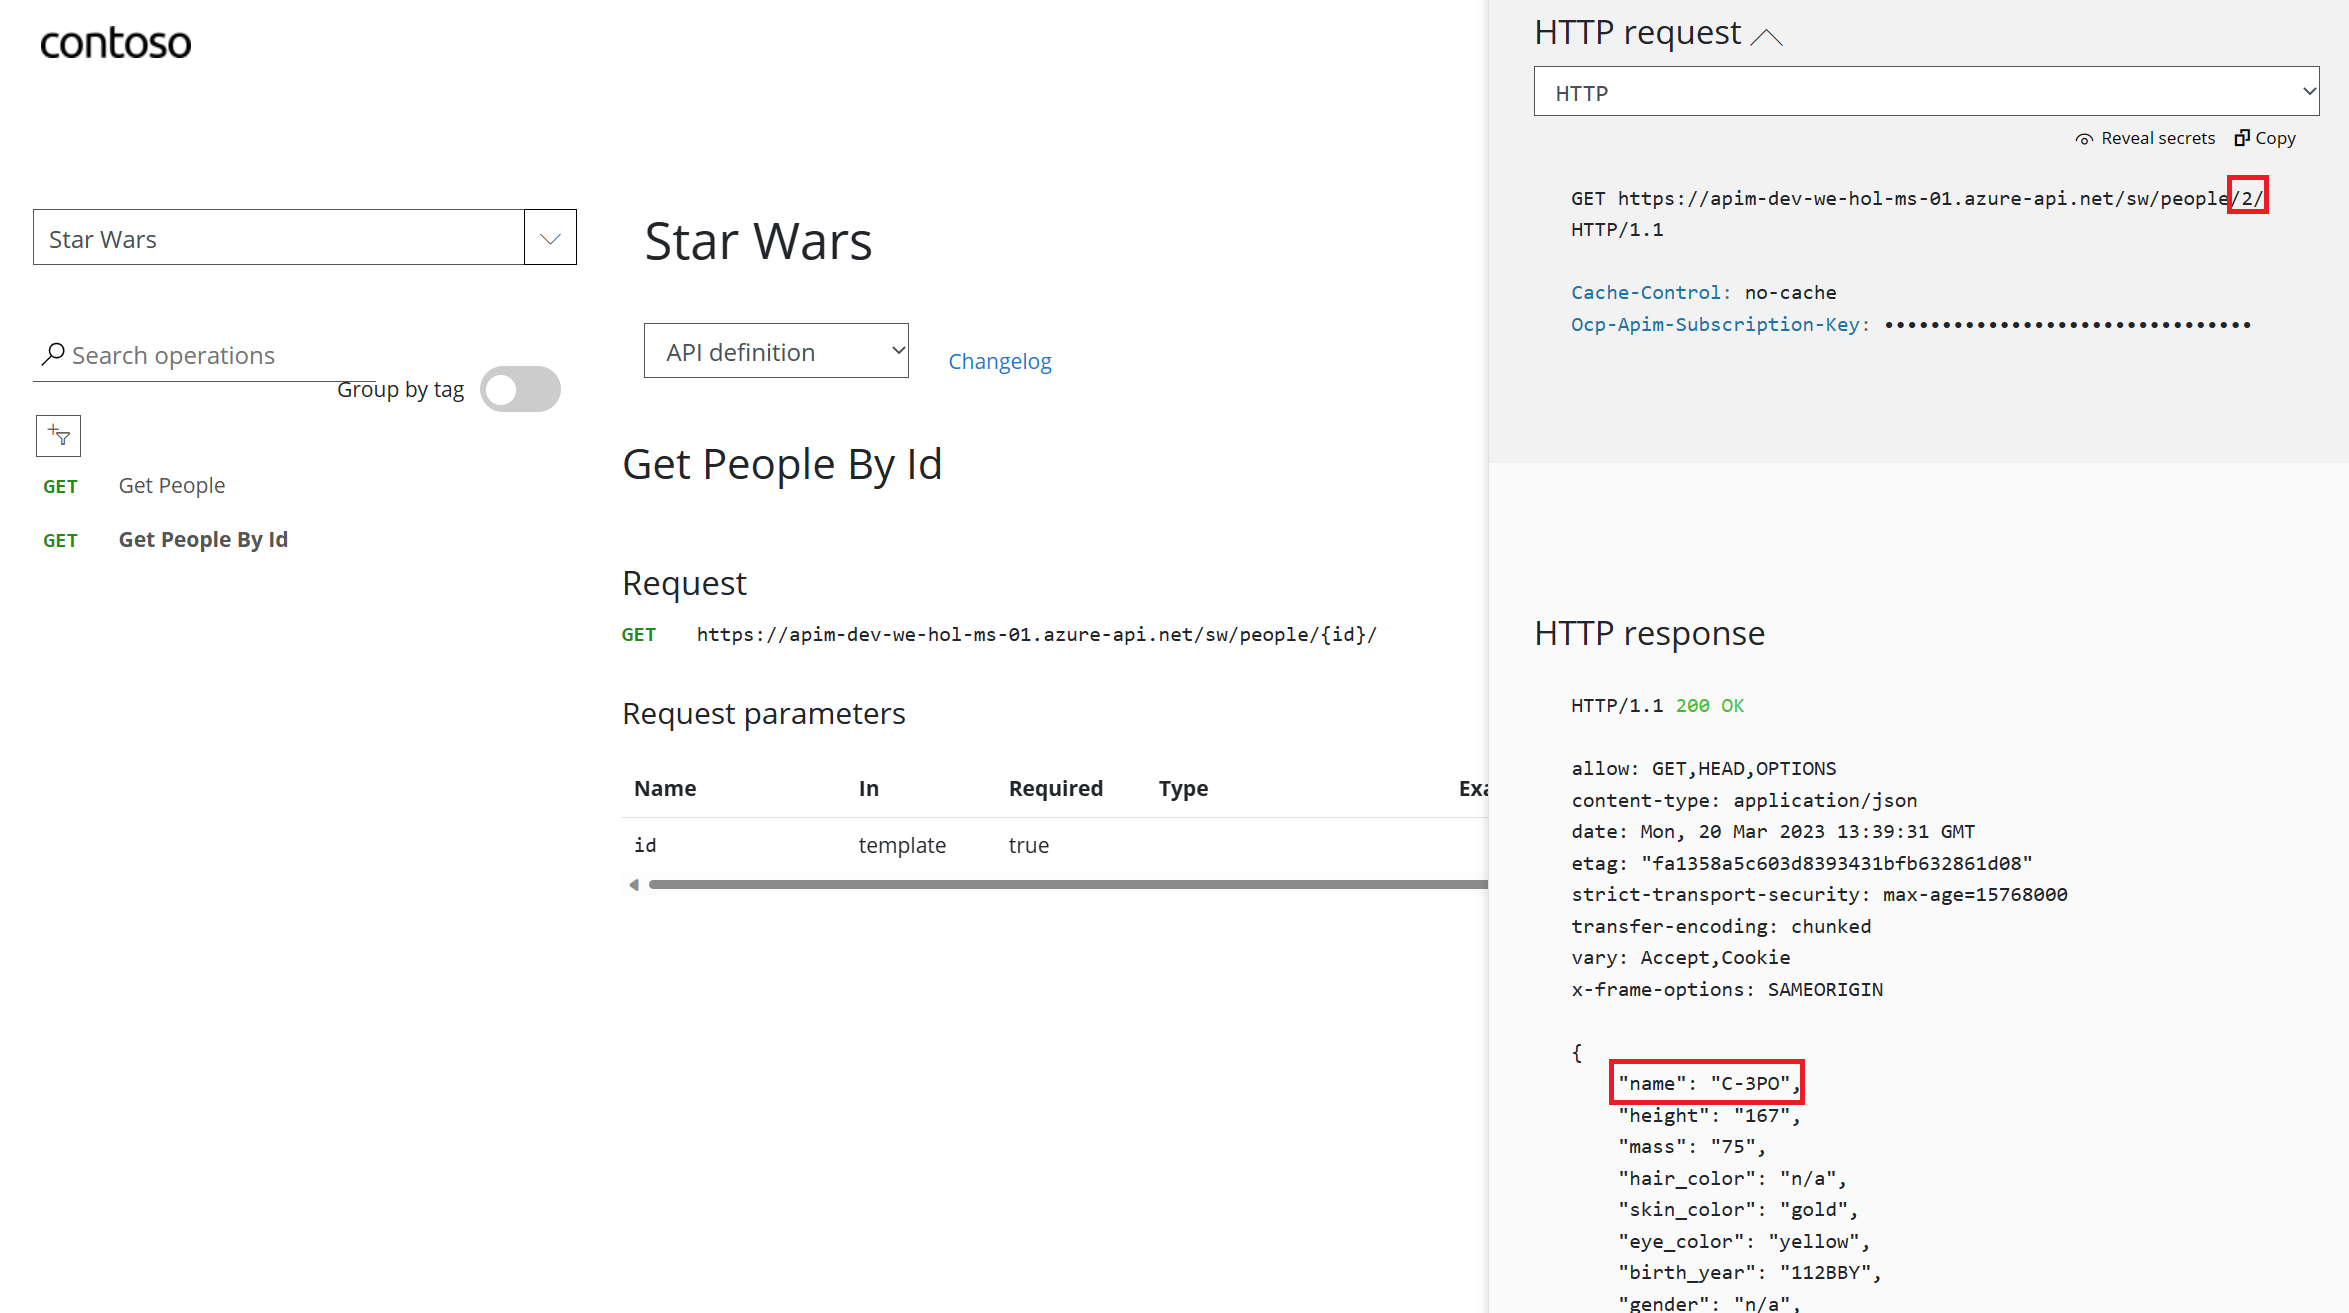
Task 2: Import API using swagger
Import API using OpenAPI
2) Under Create from definition select OpenAPI.
3) Select the Full option in the Create from OpenAPI specification dialog.
4) Enter http://calcapi.cloudapp.net/calcapi.json as the OpenAPI specification value. You should subsequently see Display name, Name, and Description populate.
> Note the intentional use of http instead of https as this backend does not presently support https.
5) While the backend service only runs on HTTP, we need to set URL scheme to Both to allow for APIM ingress to occur on HTTPS for callers such as the Developer Portal.
6) Set the API URL suffix to calc.
7) Assign Starter and Unlimited products.
8) Press Create.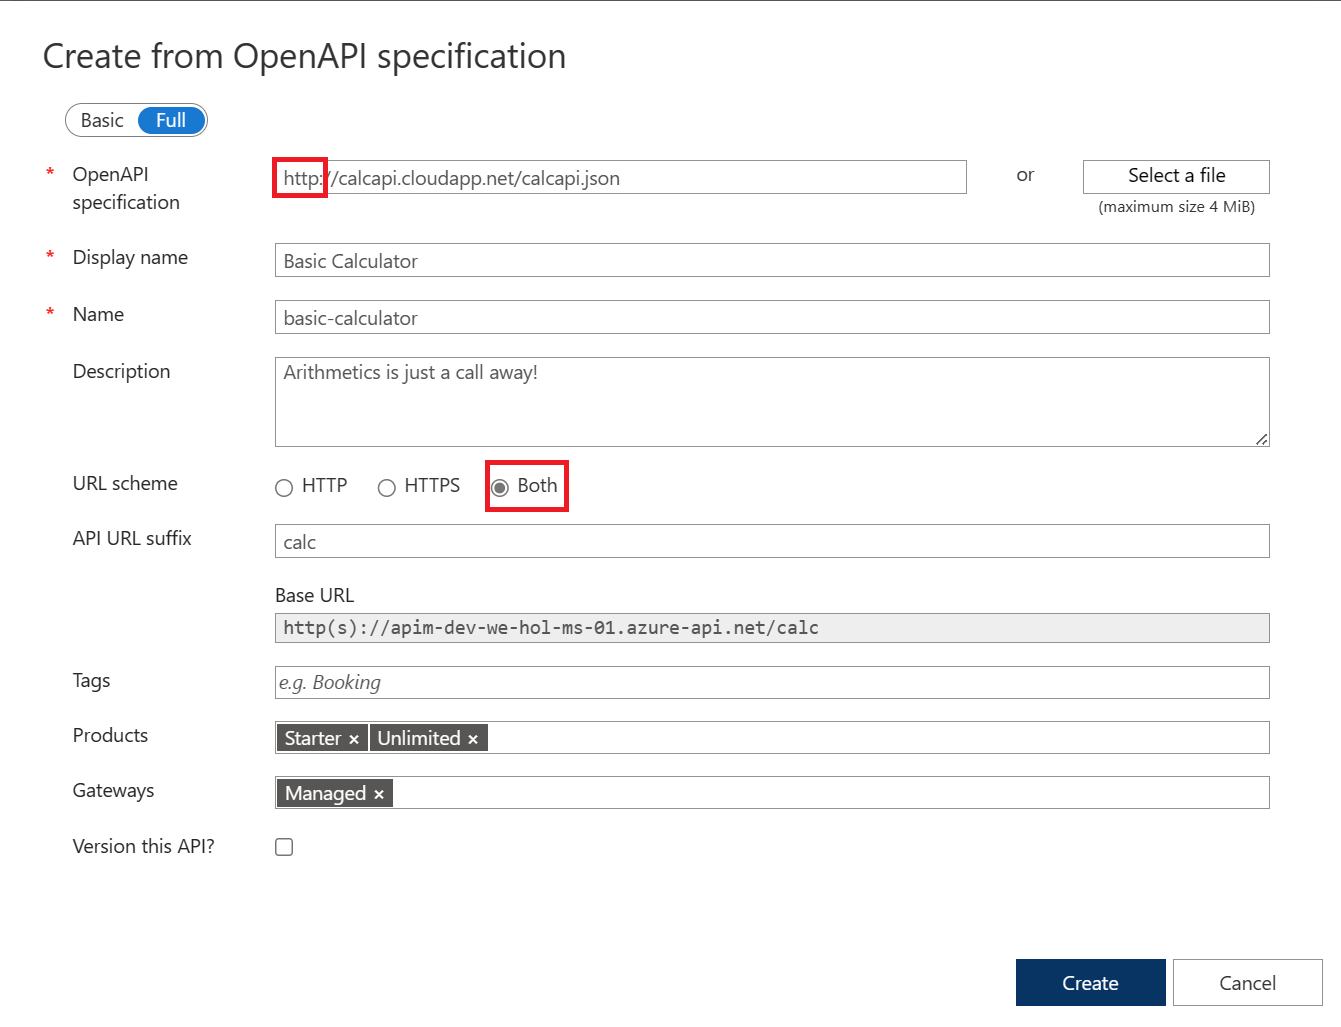
49 and 51 suffices. There’s presently an issue where defaults are shown in a dropdown. If you wanted to change the values, add new a and b parameters and values, then remove the dropdown values.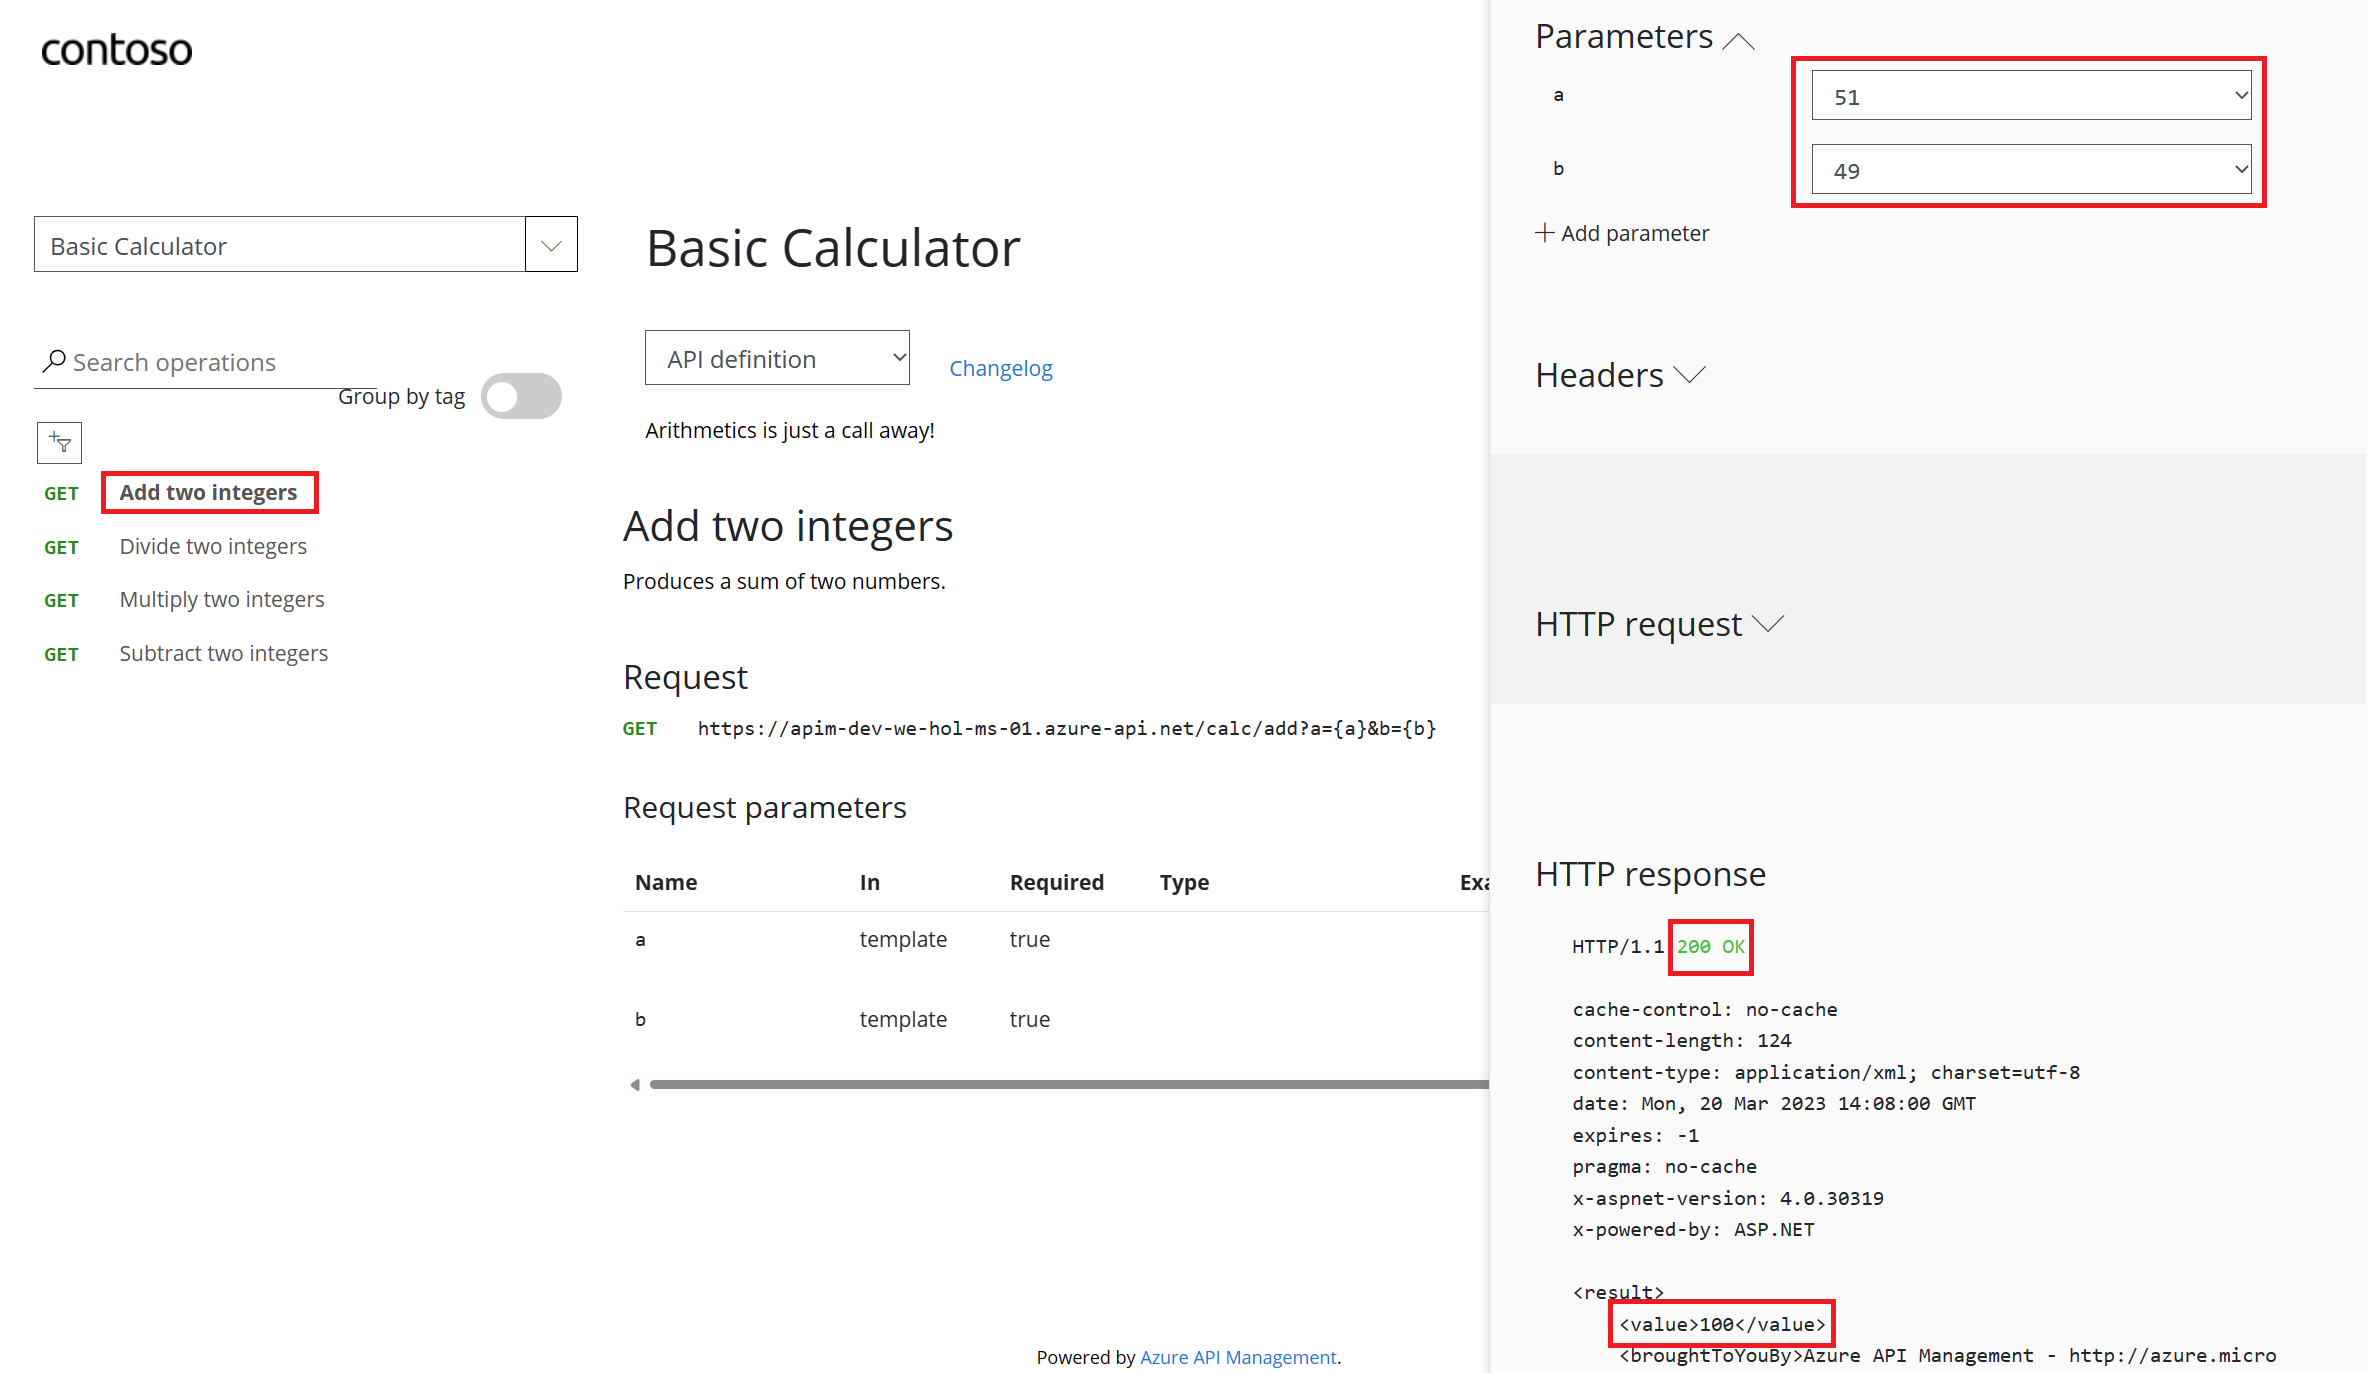
Troubleshooting
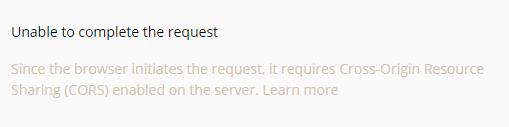
Unable to complete the request
Task 3: Calling APIs
Calling API and testing Subscription Keys

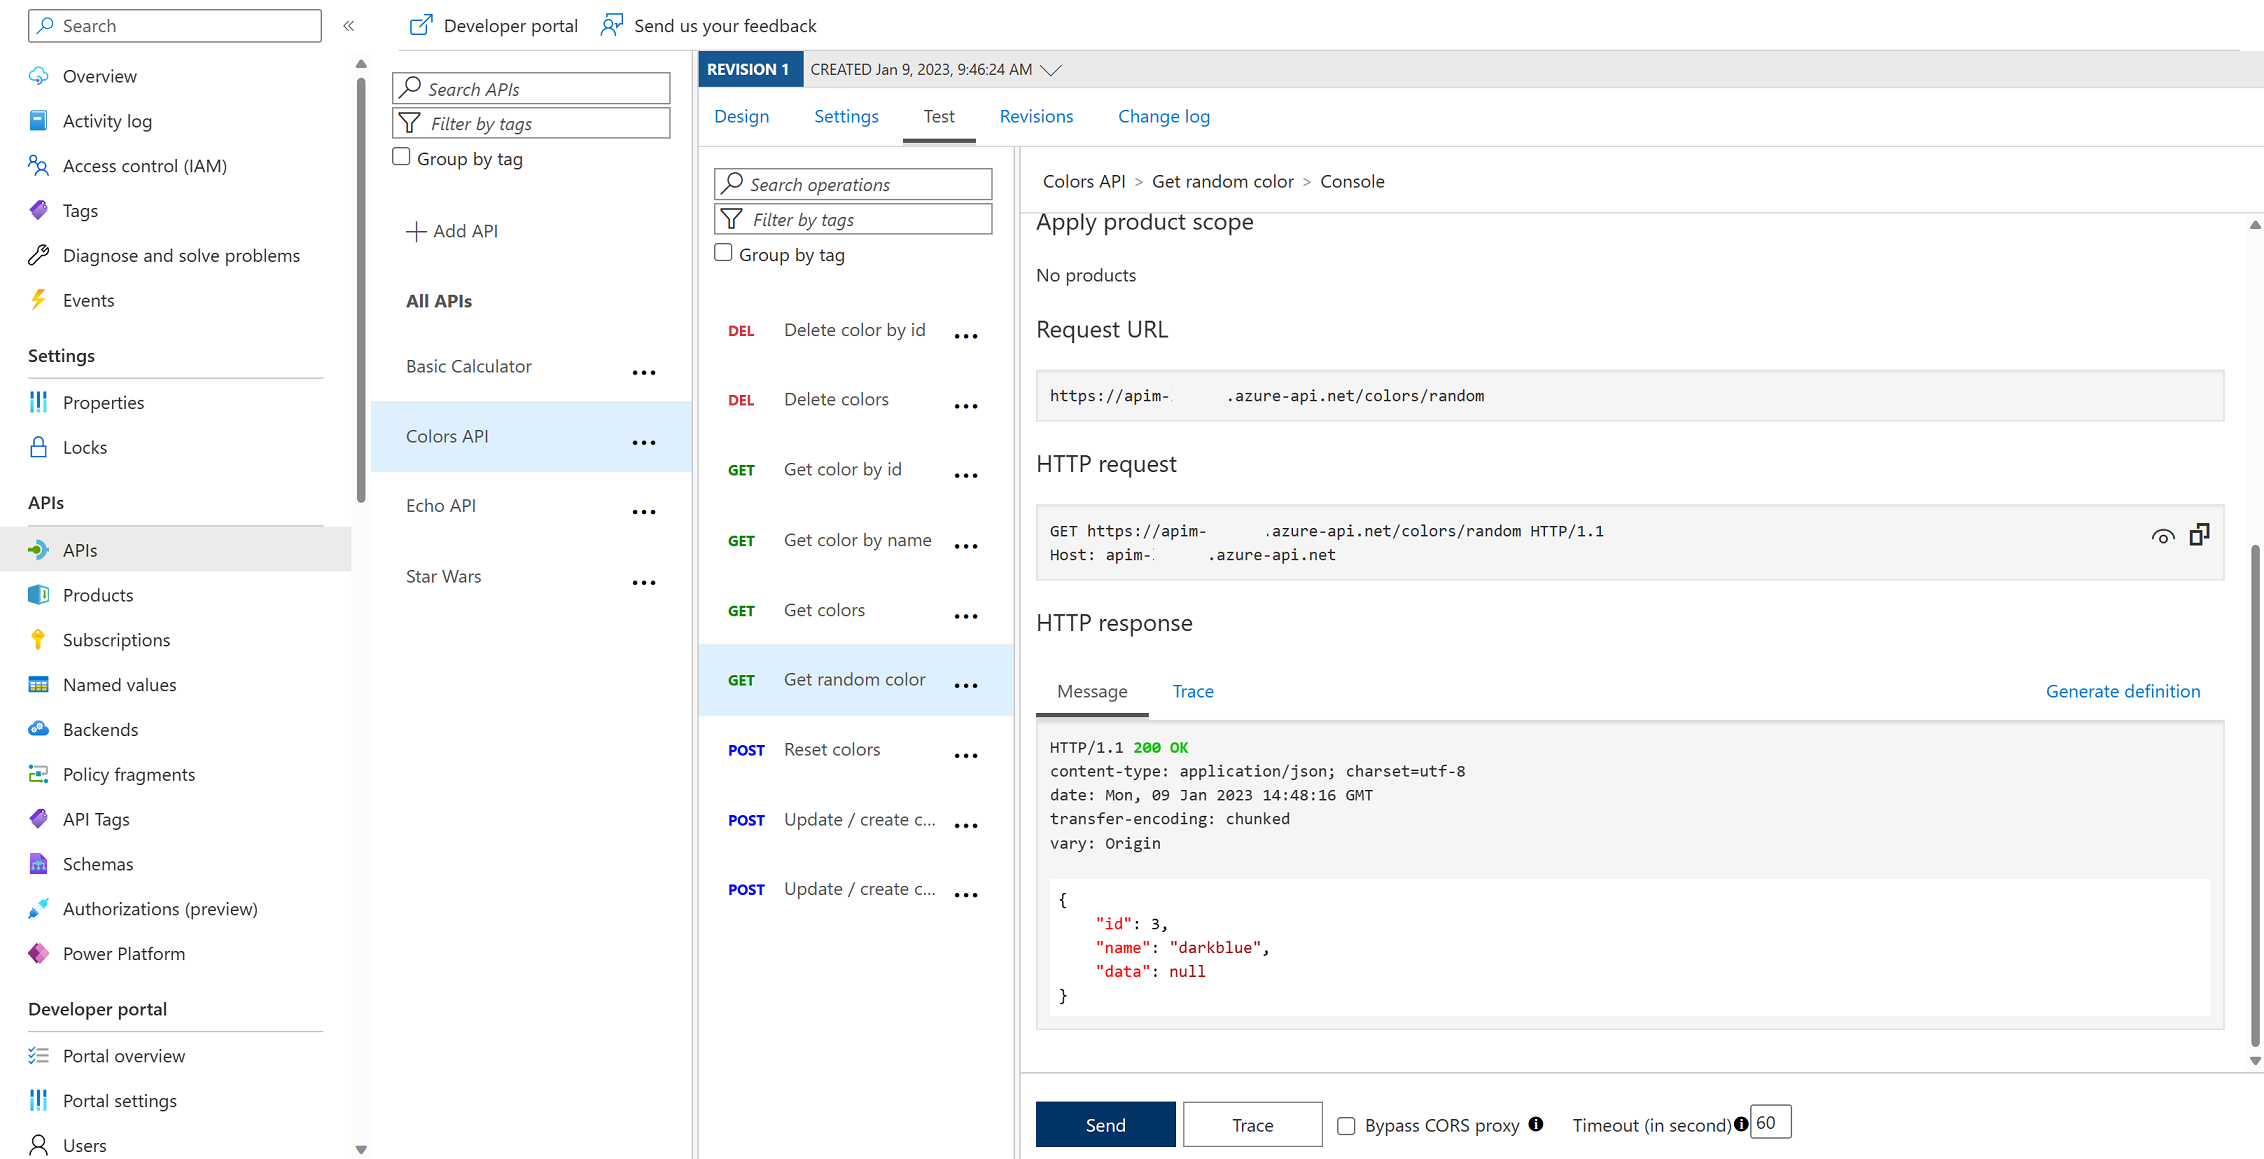
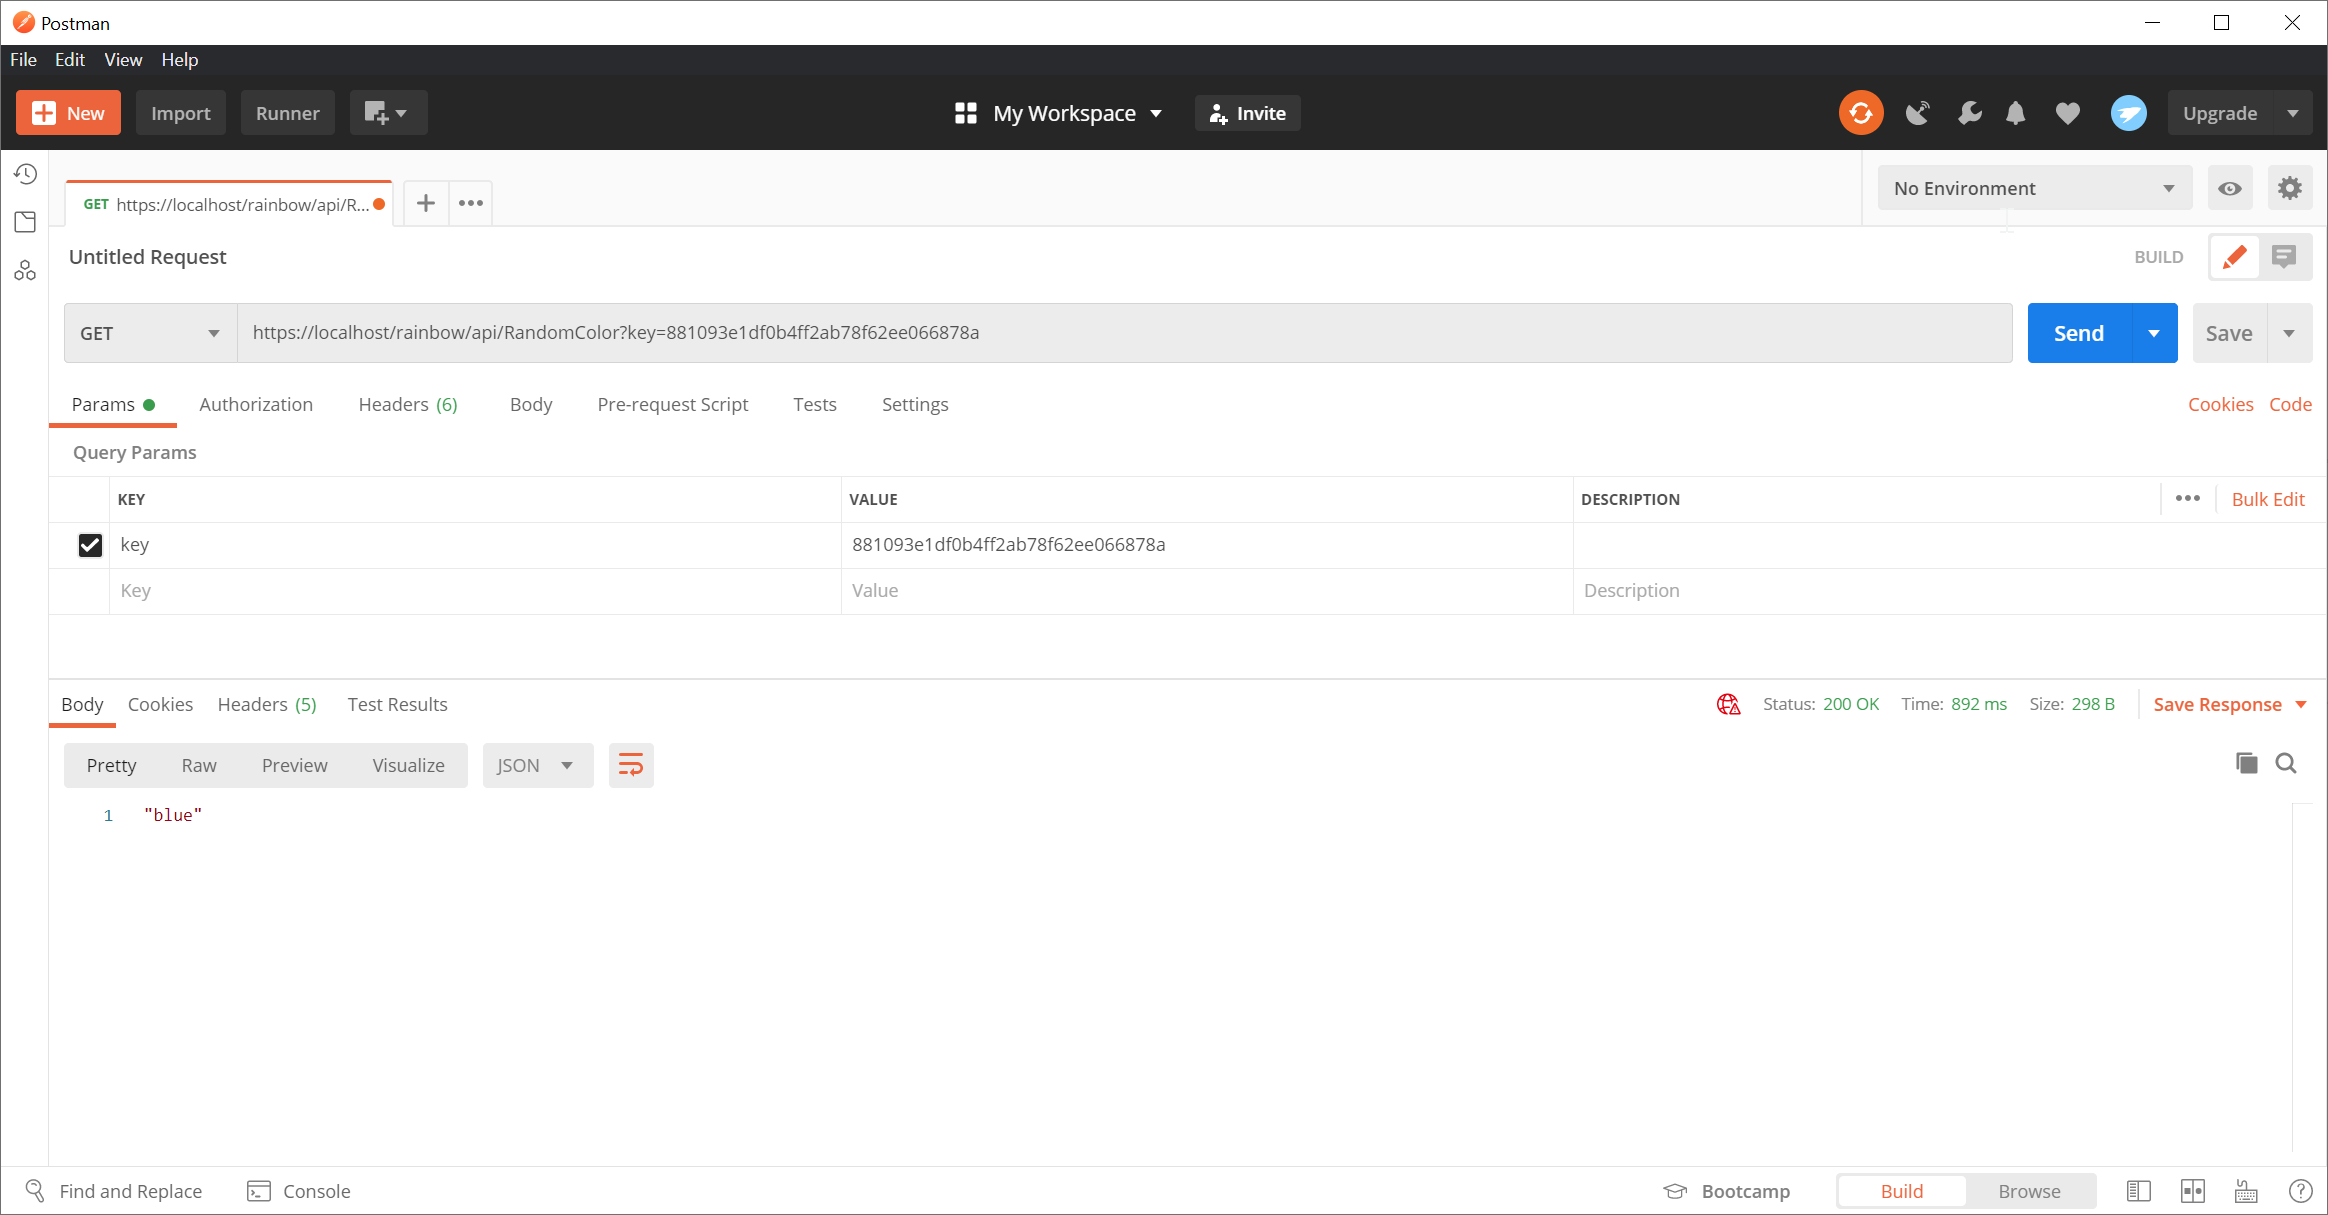
200 response and the returned random color.

Rate limit

APIs, then select the All APIs option.Inbound processing area you will see the cors policy, which we added in part 2 by pressing the Enable Cors button.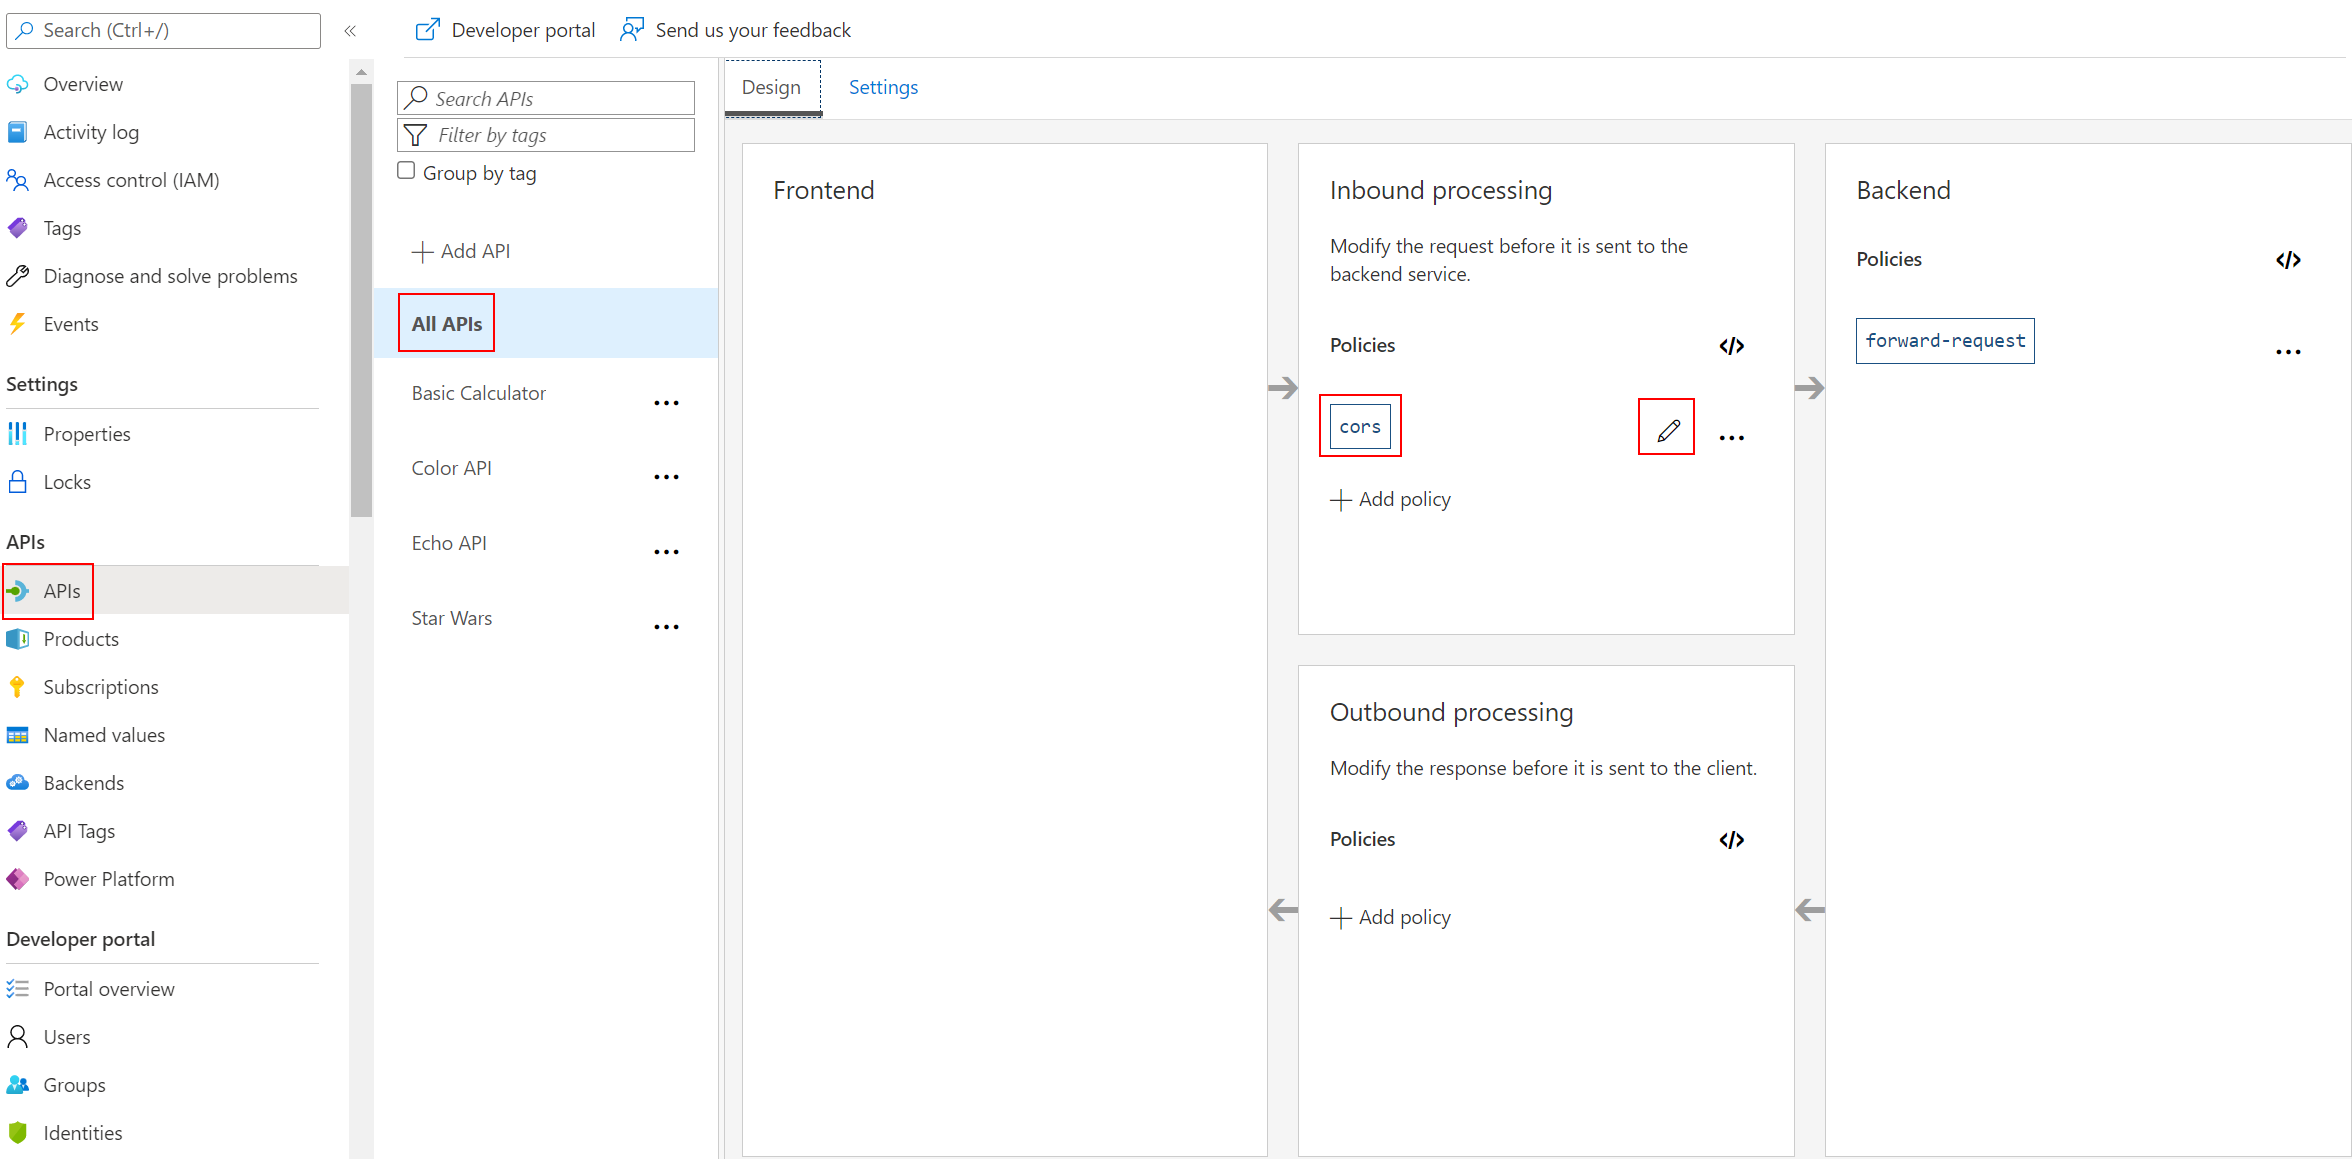
https://markcolorweb.azurewebsites.net or the * for all domains. Press Add allowed origin, enter the URL, then press Save.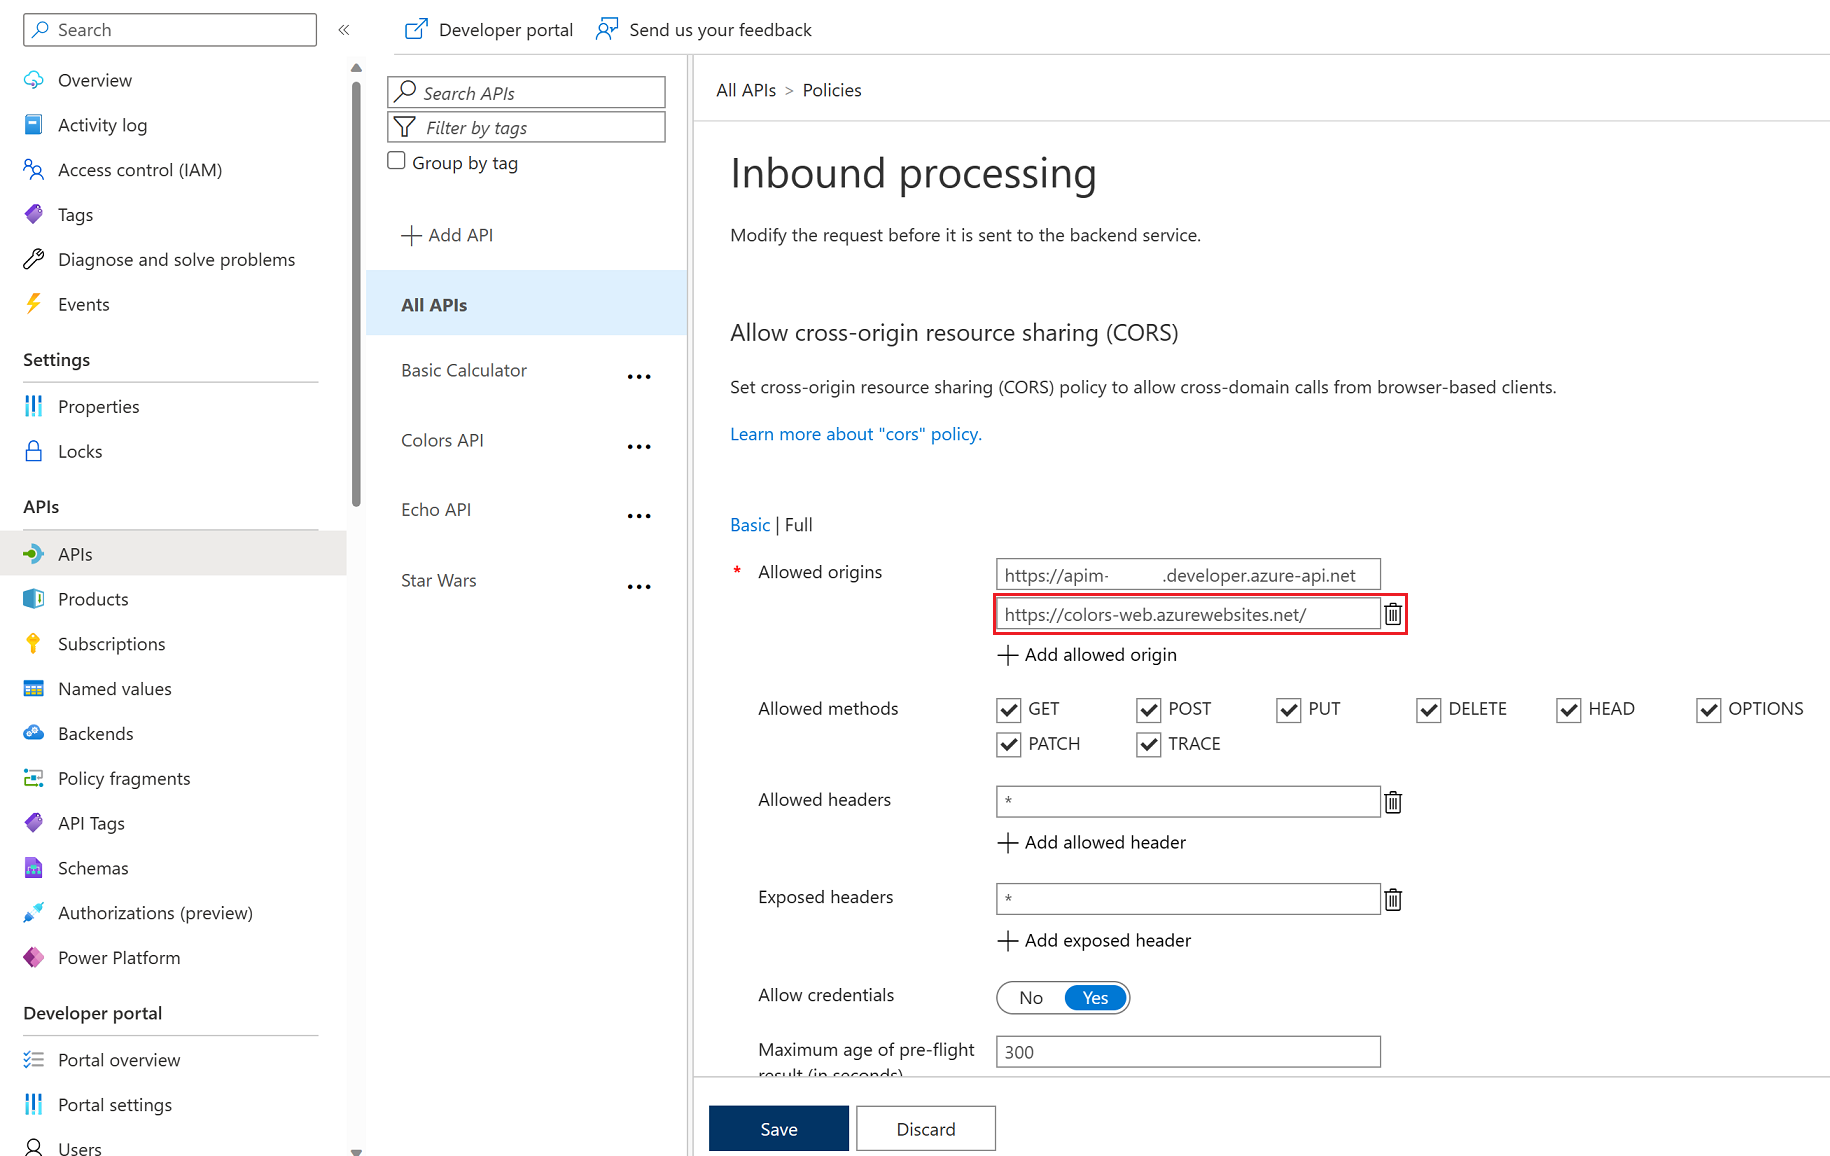

https://YOURAPIM.azure-api.net/color/api/RandomColor?key=
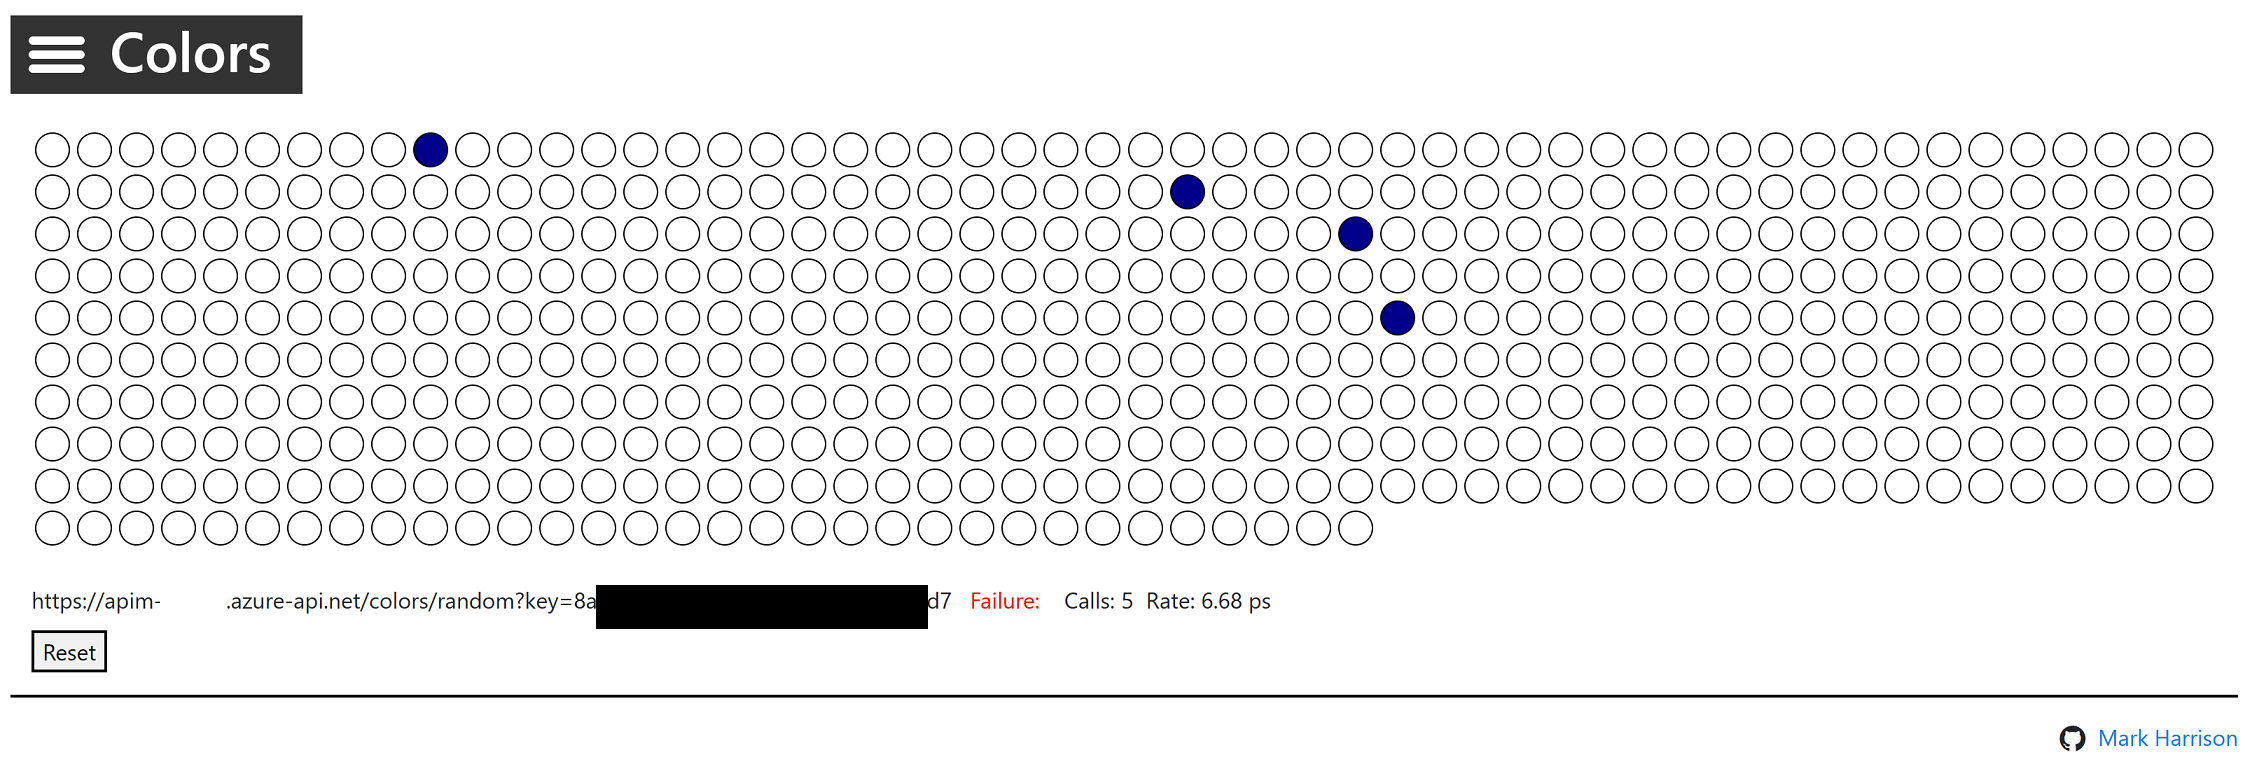
{ "statusCode": 429, "message": "Rate limit is exceeded. Try again in 40 seconds." }
Exercise 3: Policy Expressions
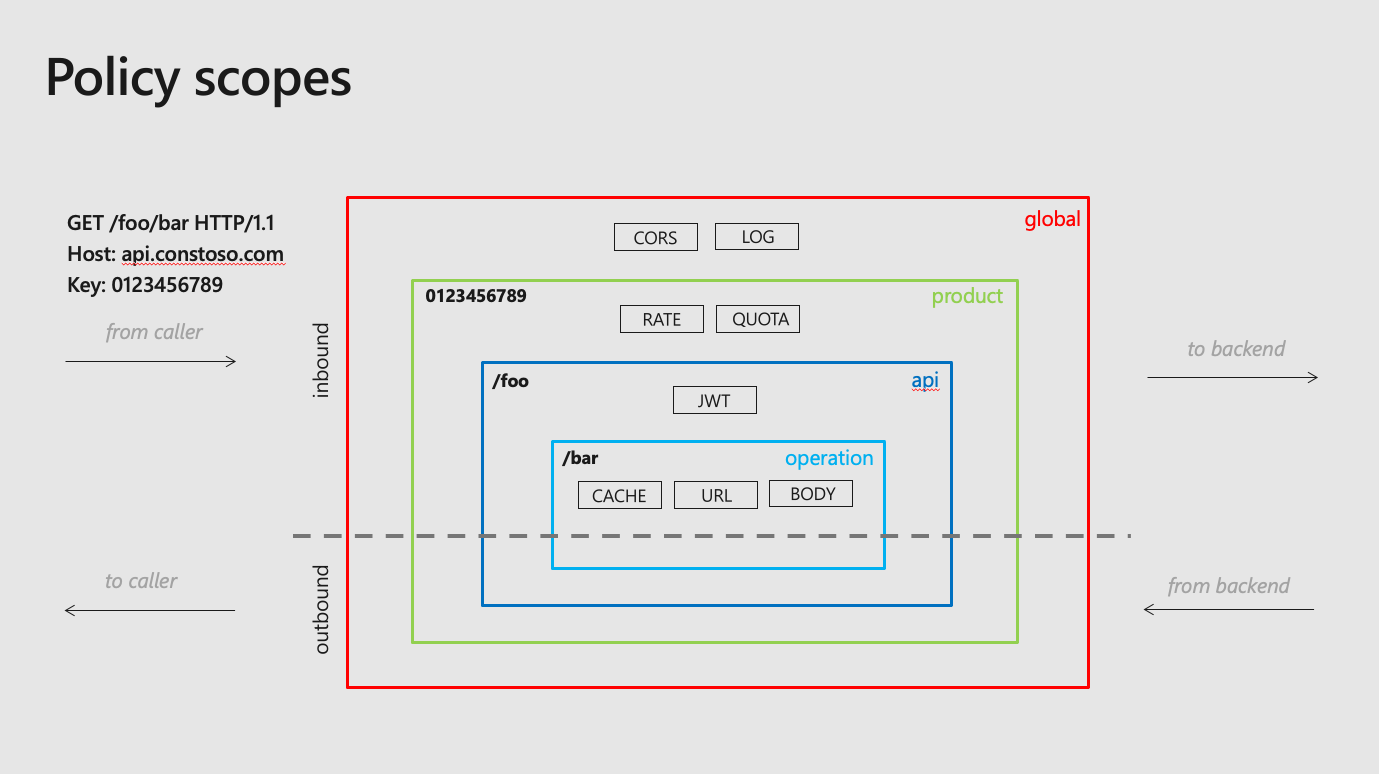
TABLE OF CONTENTS
Task 1: Getting Started
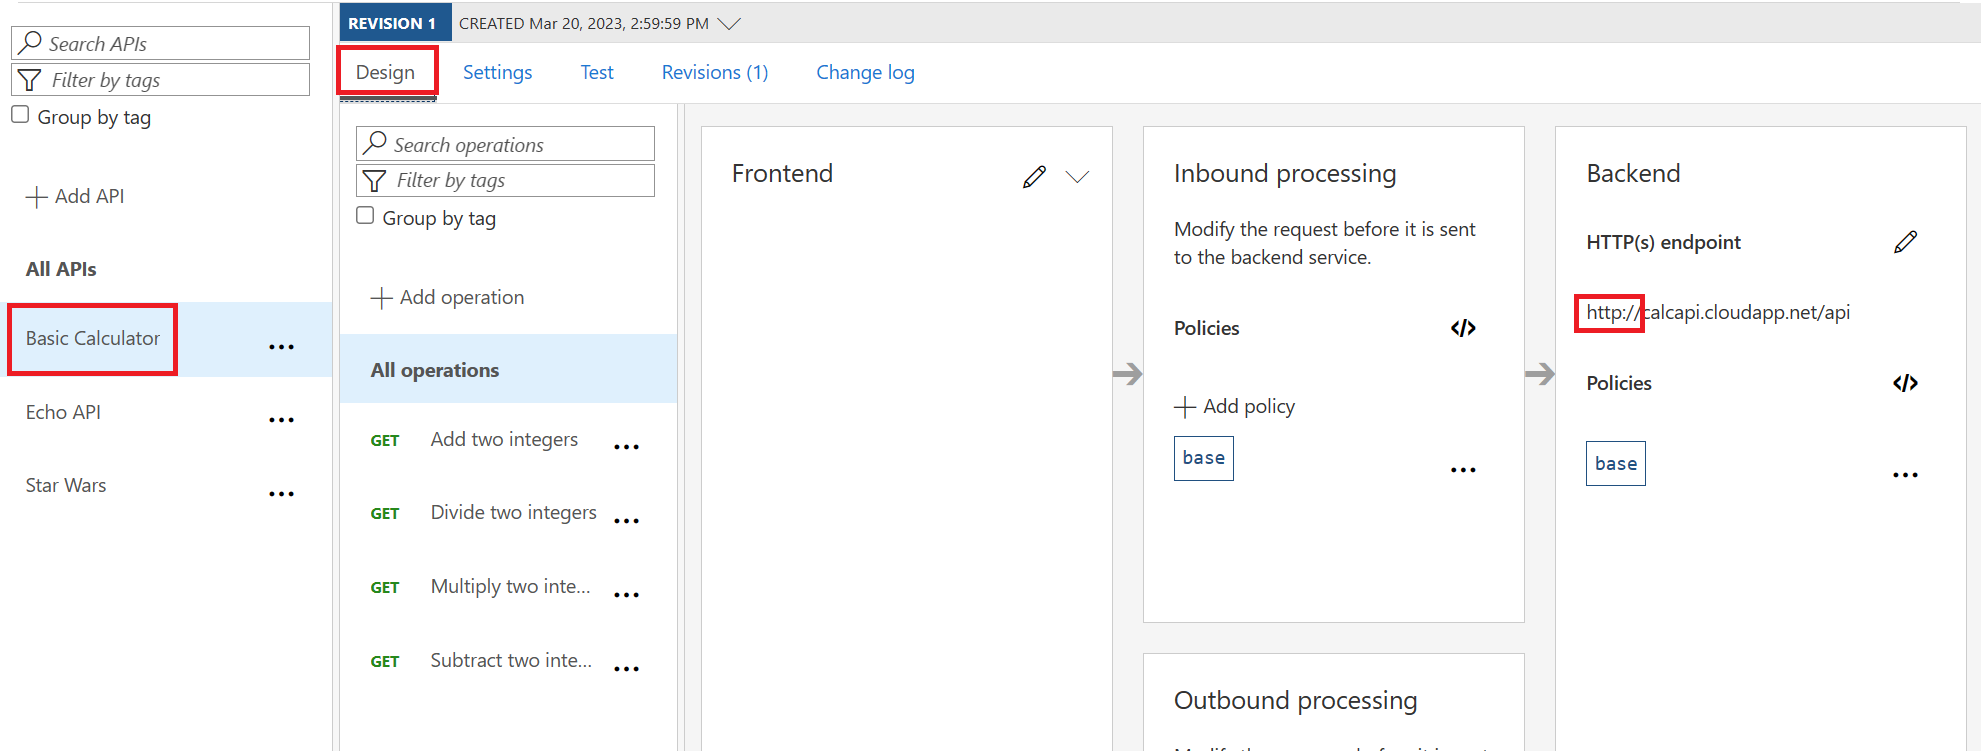
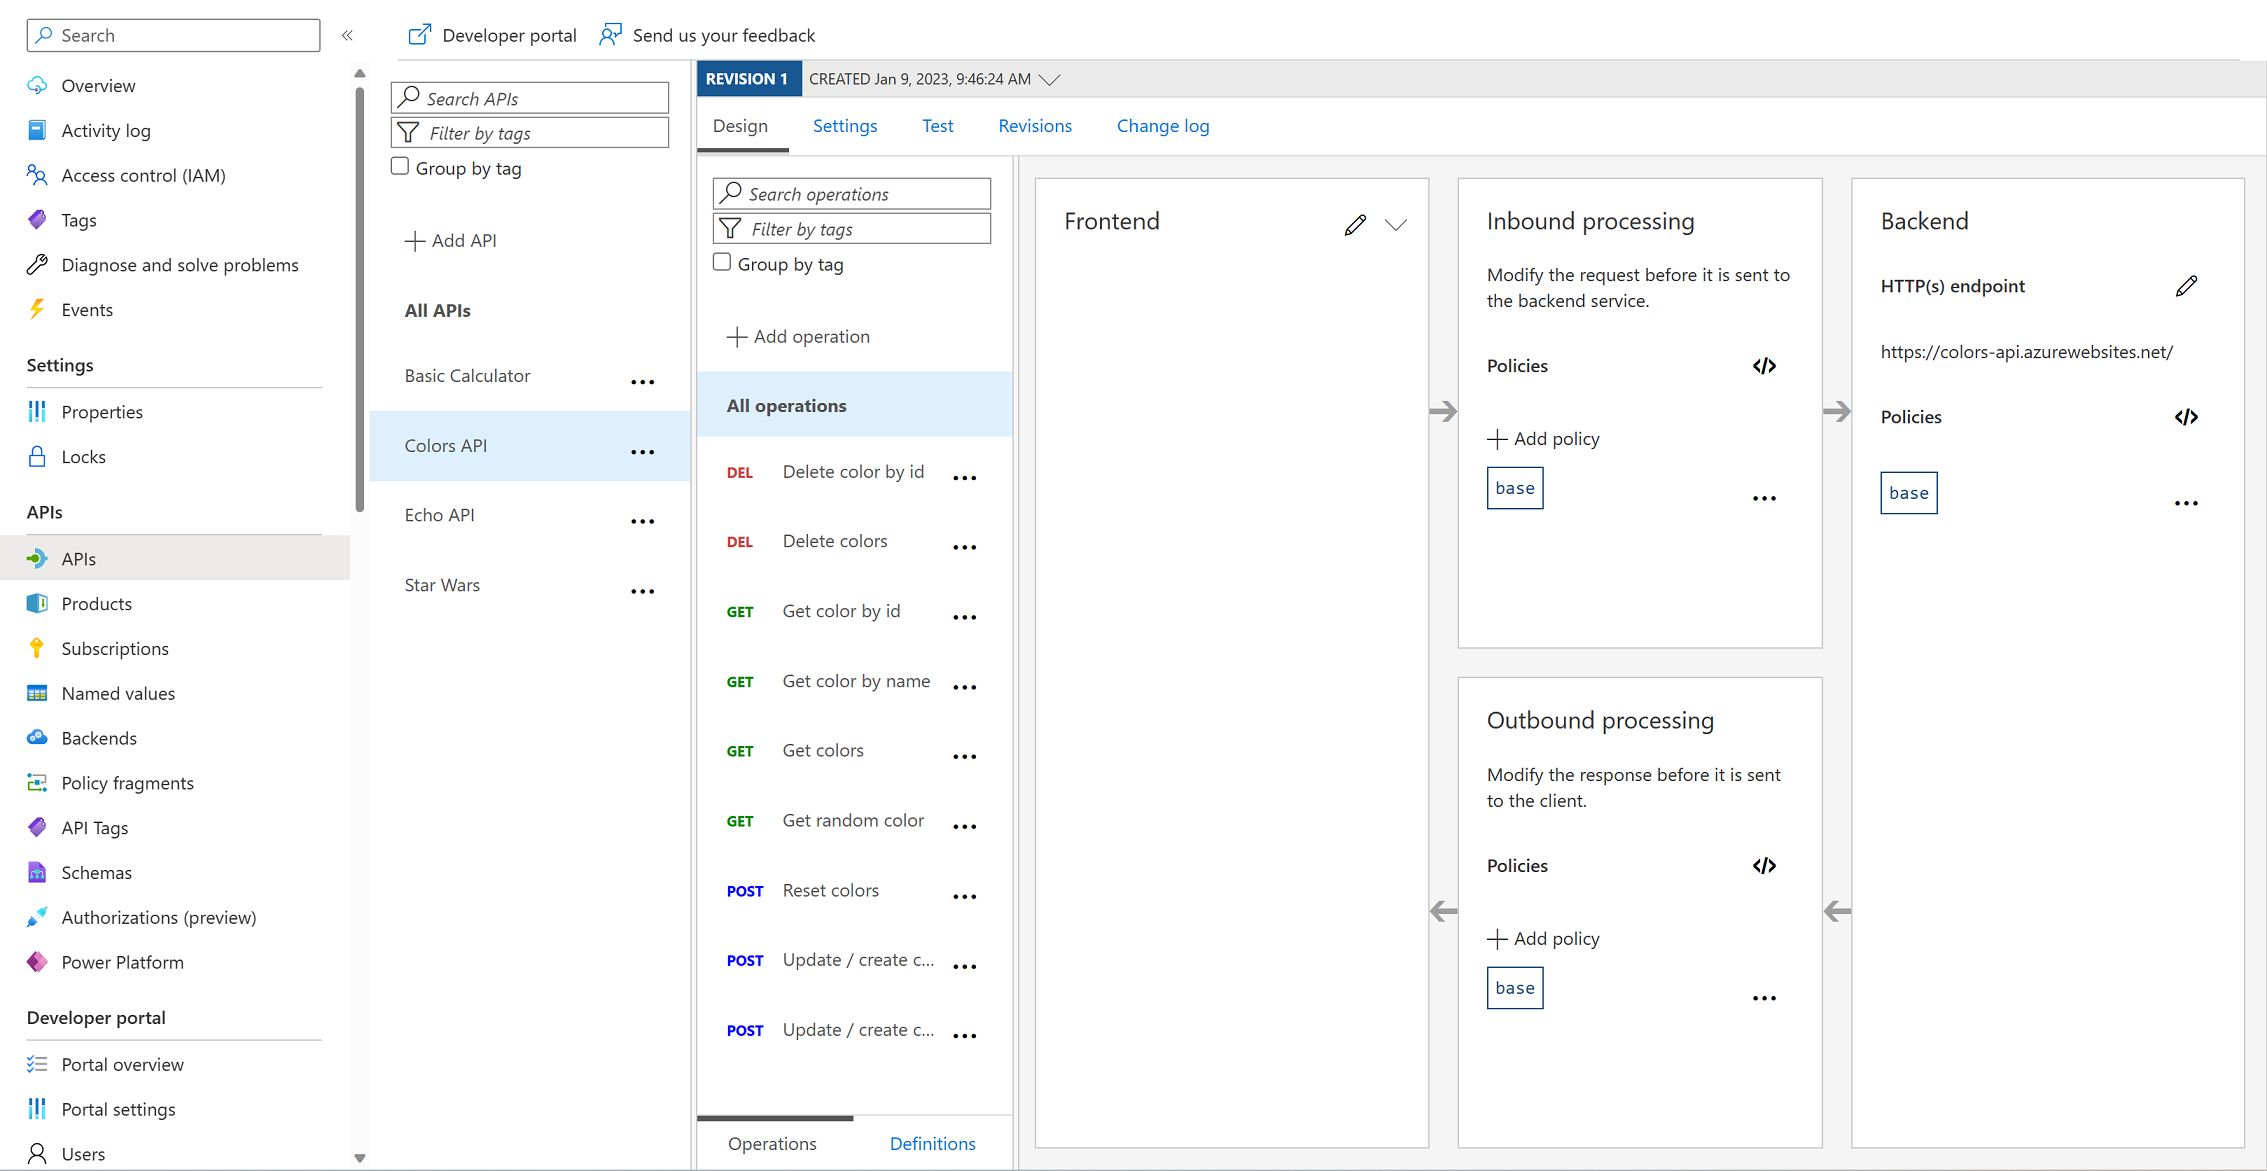
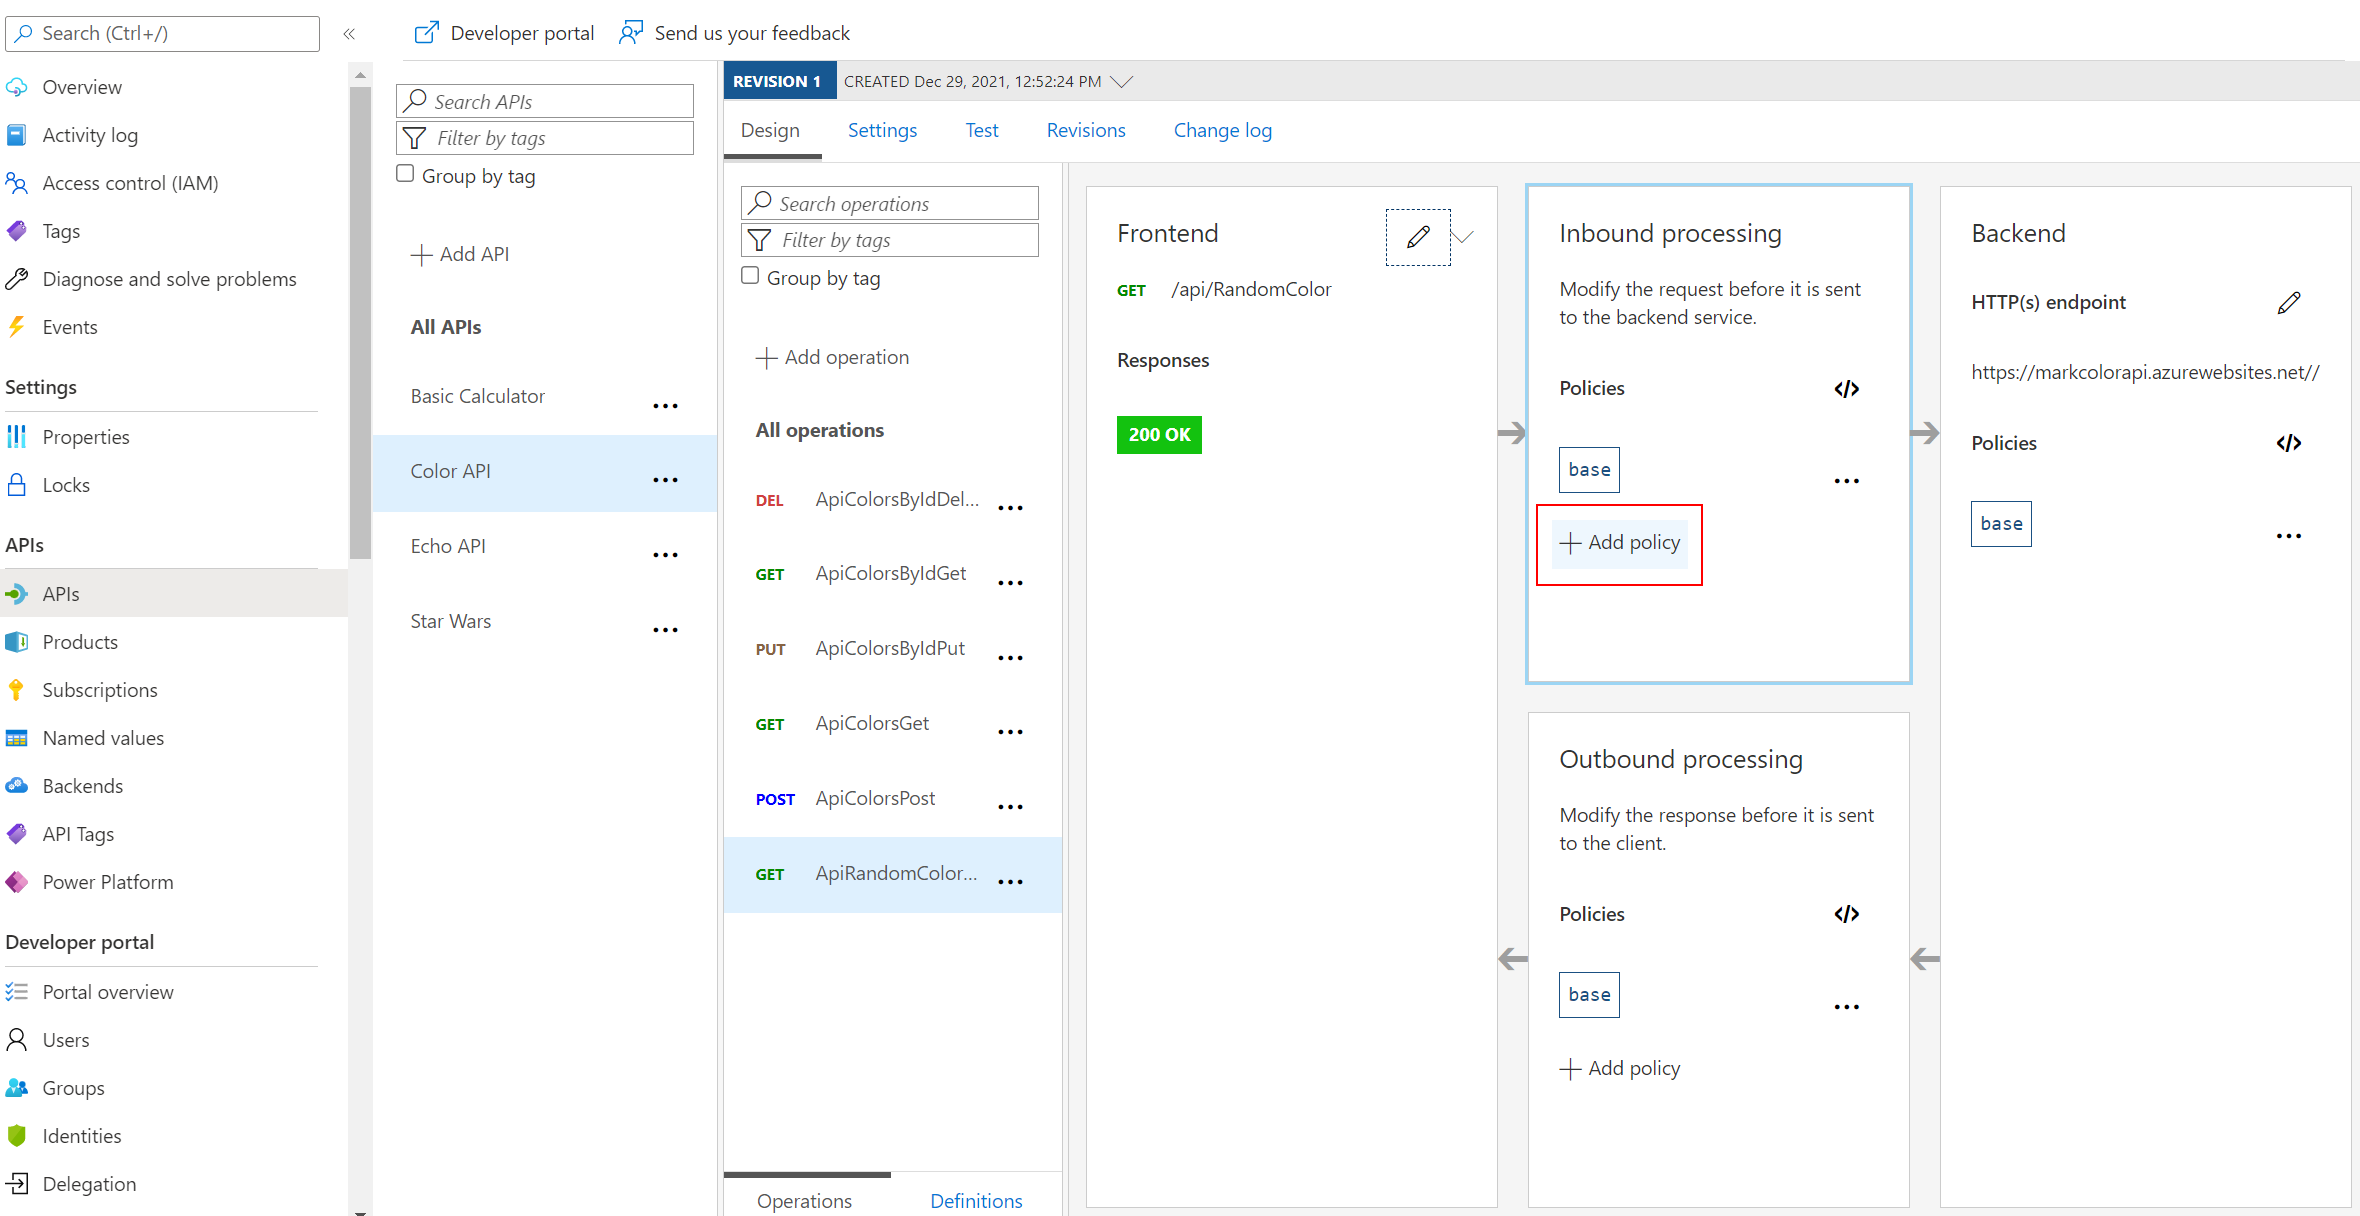
Getting Started – Frontend/Inbound/Outbound/Backend
</> code brackets to edit the underlying XML. The configuration can be scoped to the API (All operations) or to an individual operation.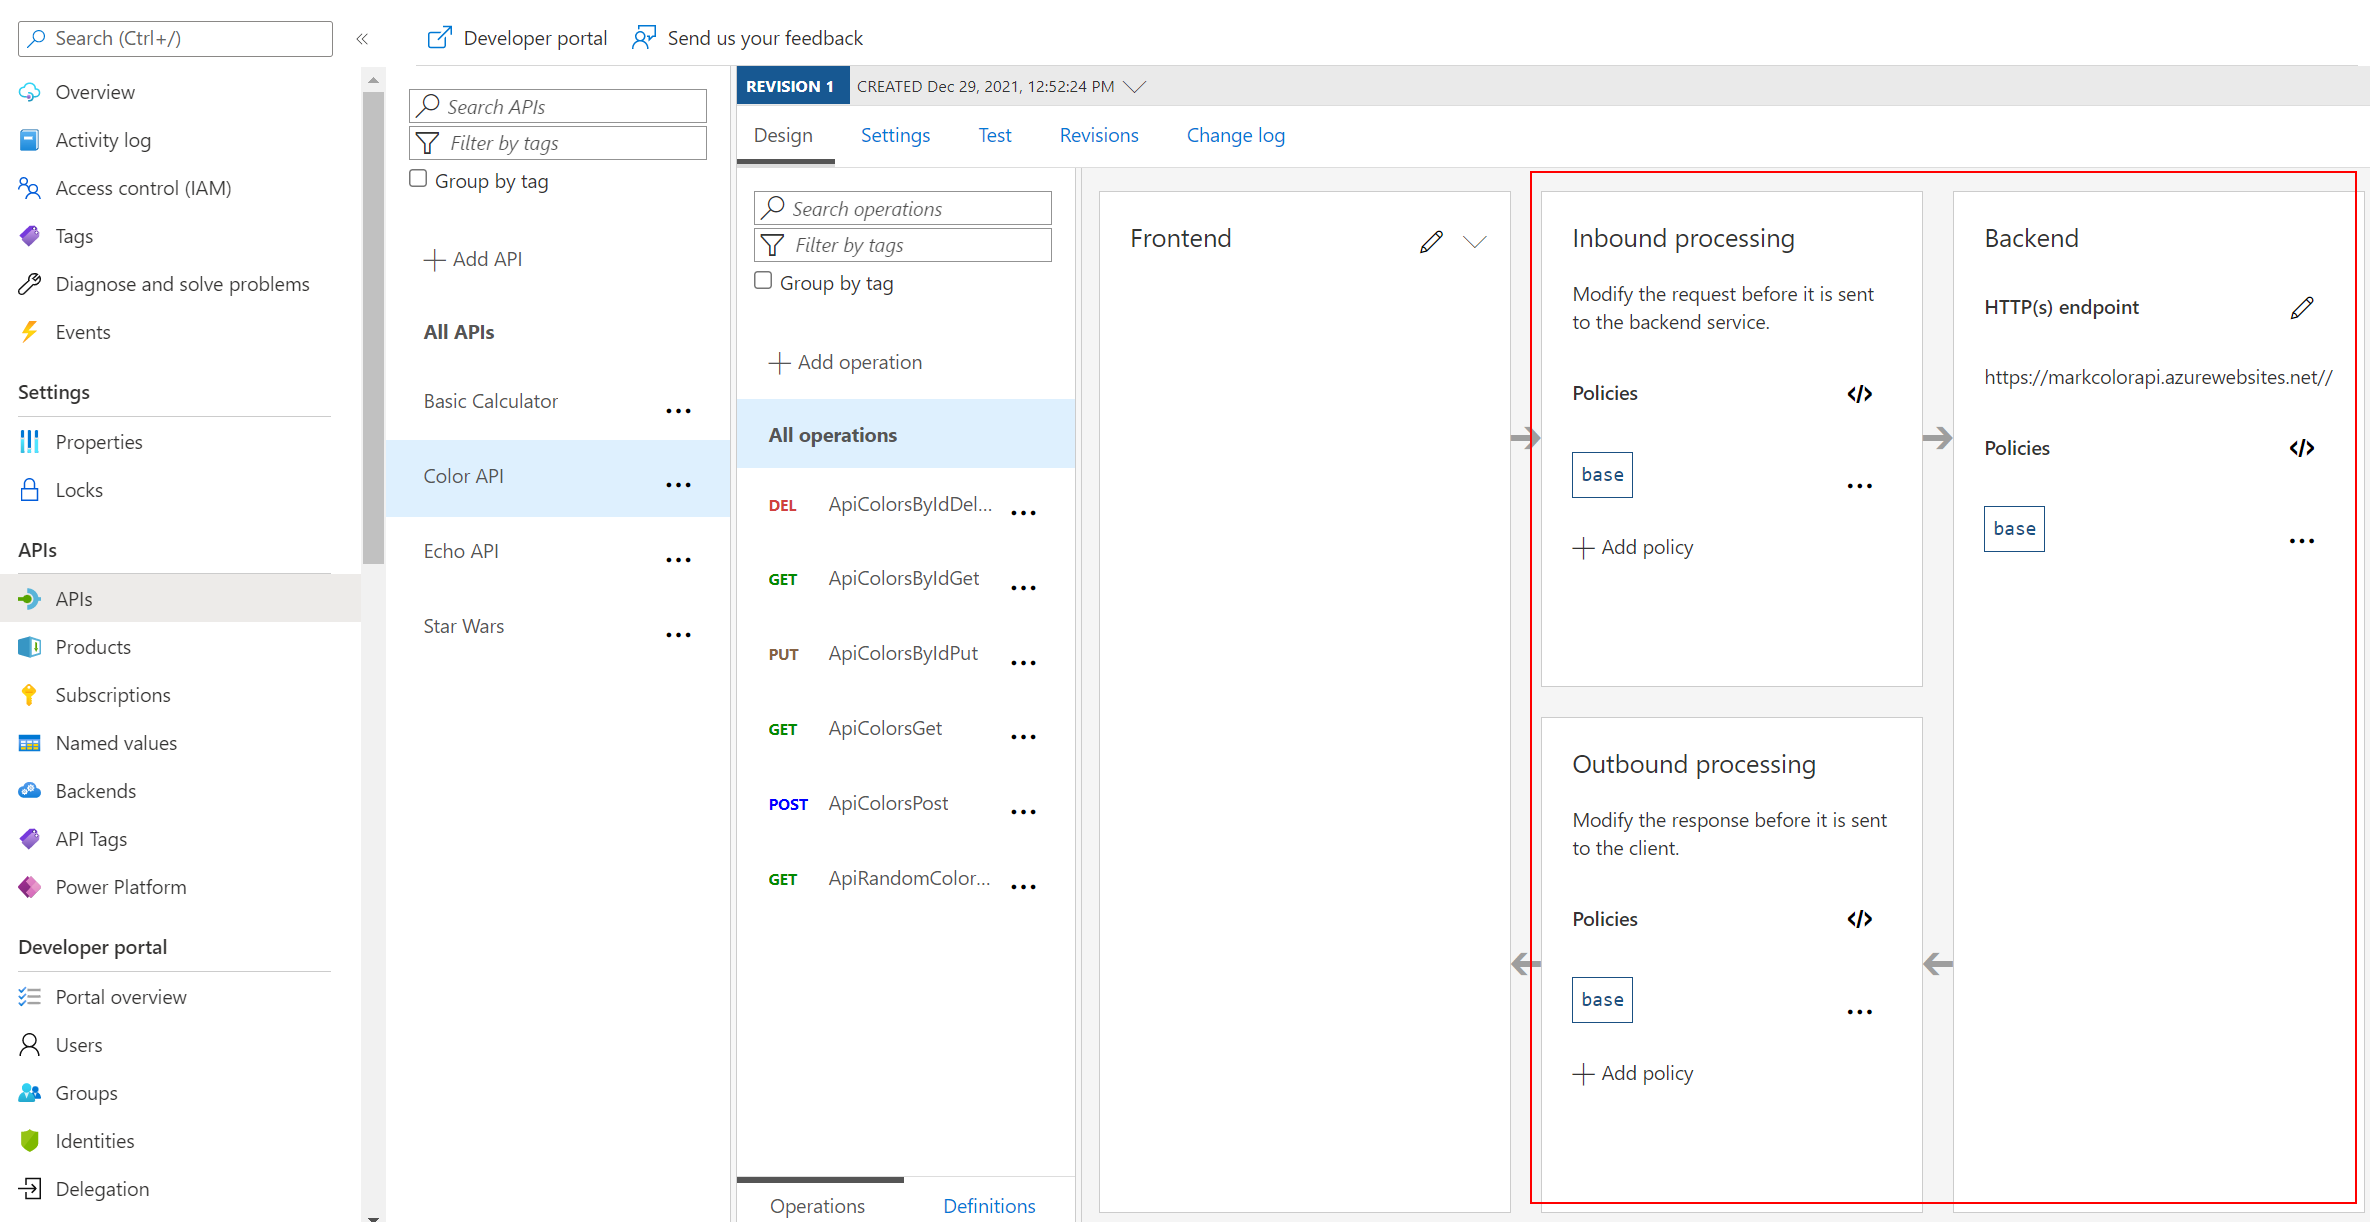

Task 2: CORS Policy
Cross-origin resource sharing (CORS)
        <cors allow-credentials="true">

                https://apim-sk-12212021.developer.azure-api.net
                https://markcolorweb.azurewebsites.net

            <allowed-methods preflight-result-max-age="300">
                *
*
*
        <forward-request />

    <outbound />
    <on-error />
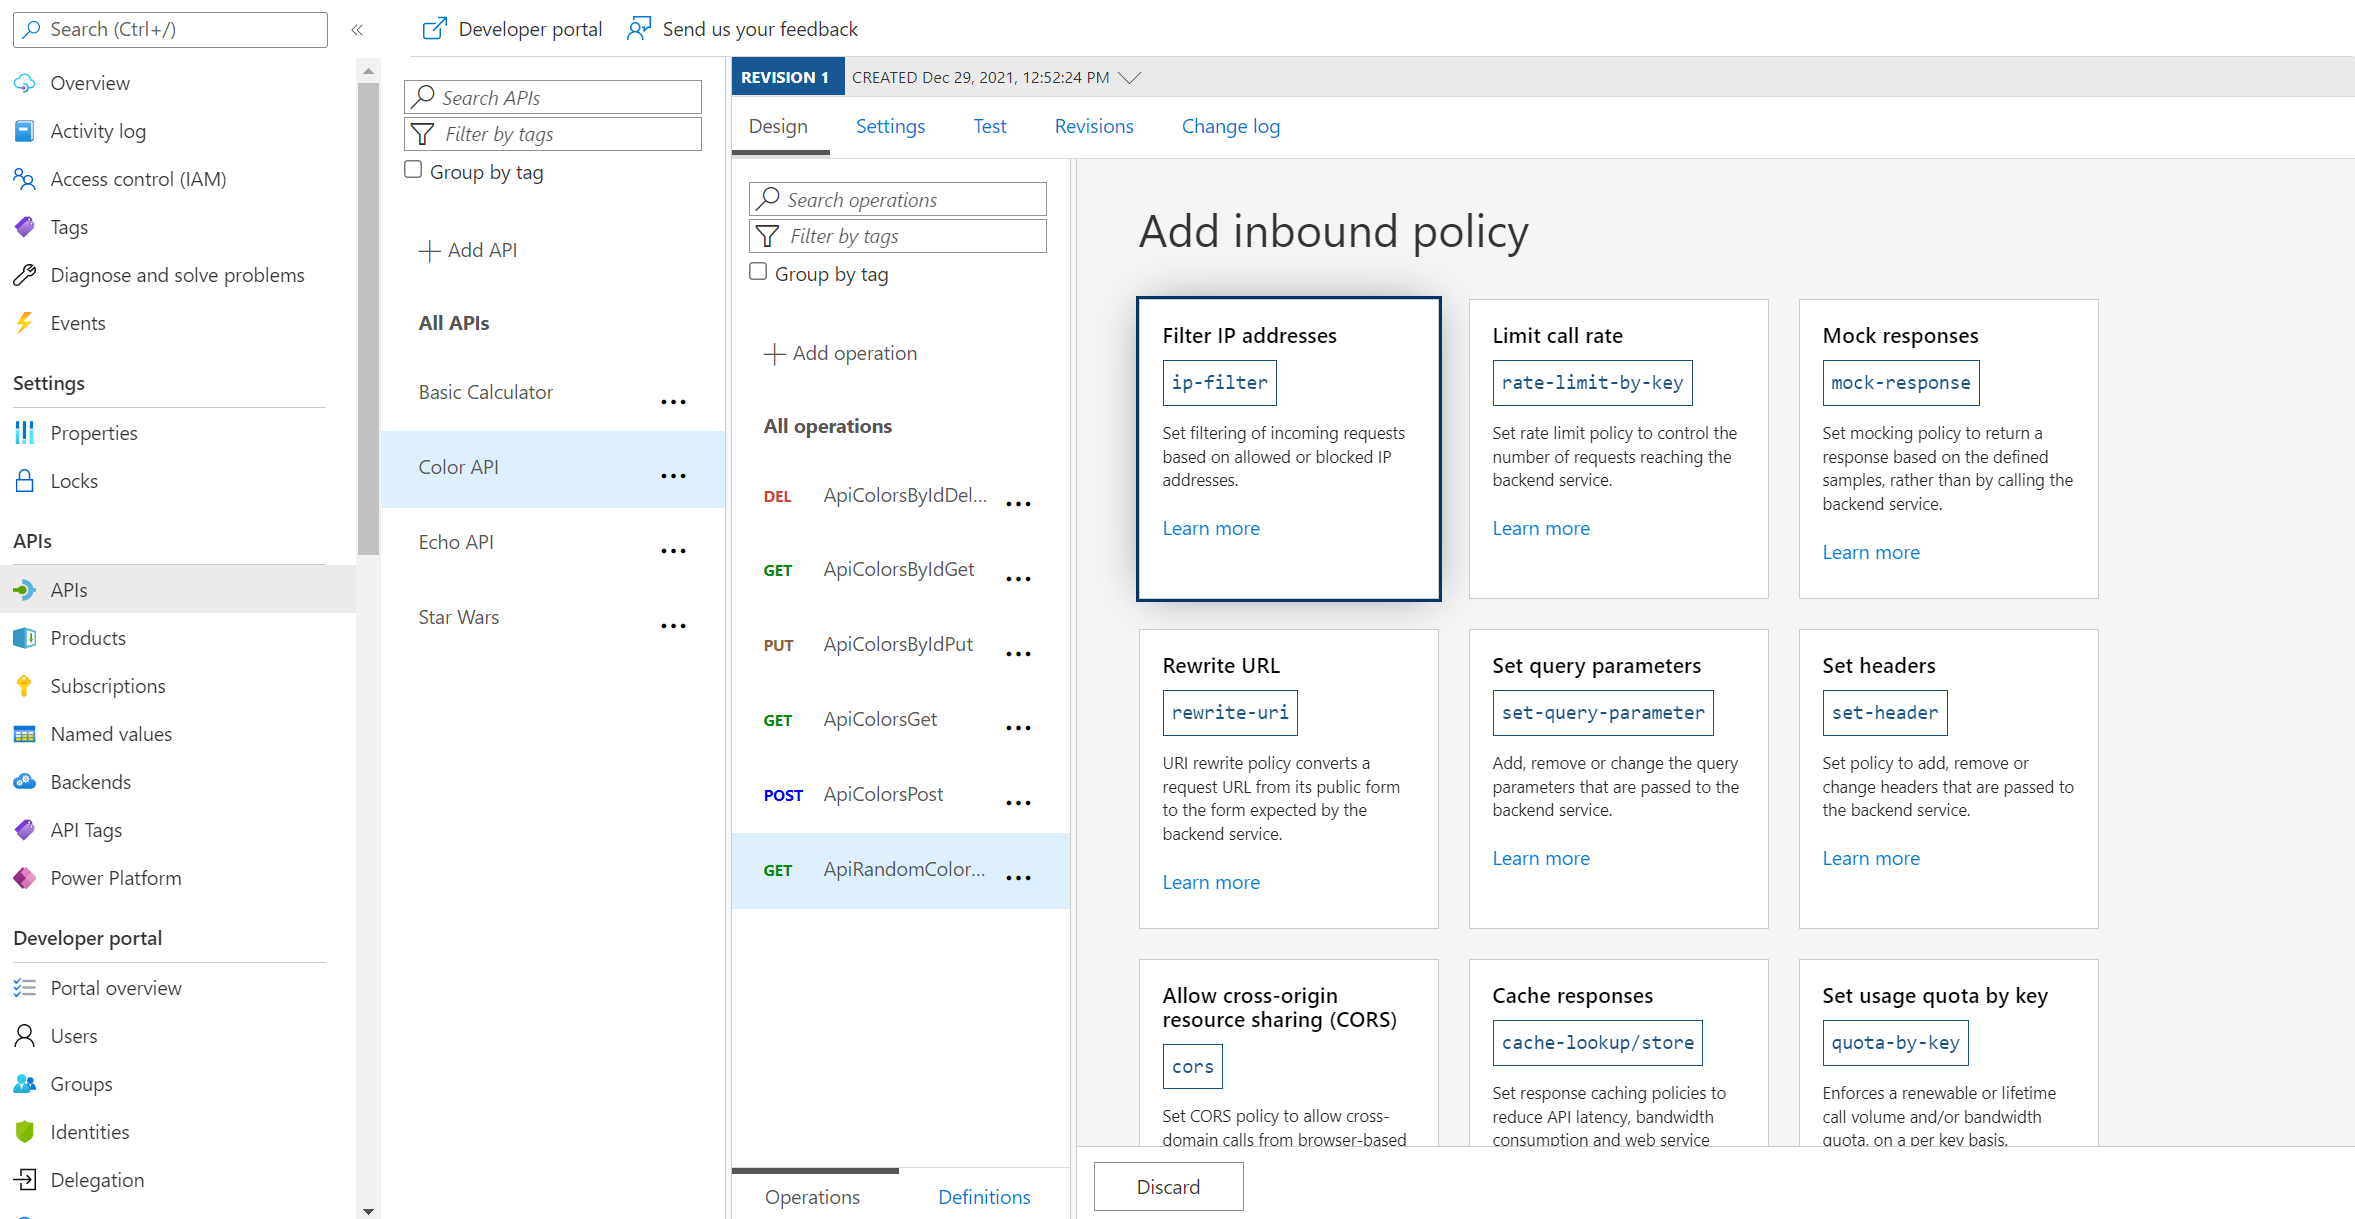
Task 3: Caching Policy
Caching
ApiRandomColor GET:
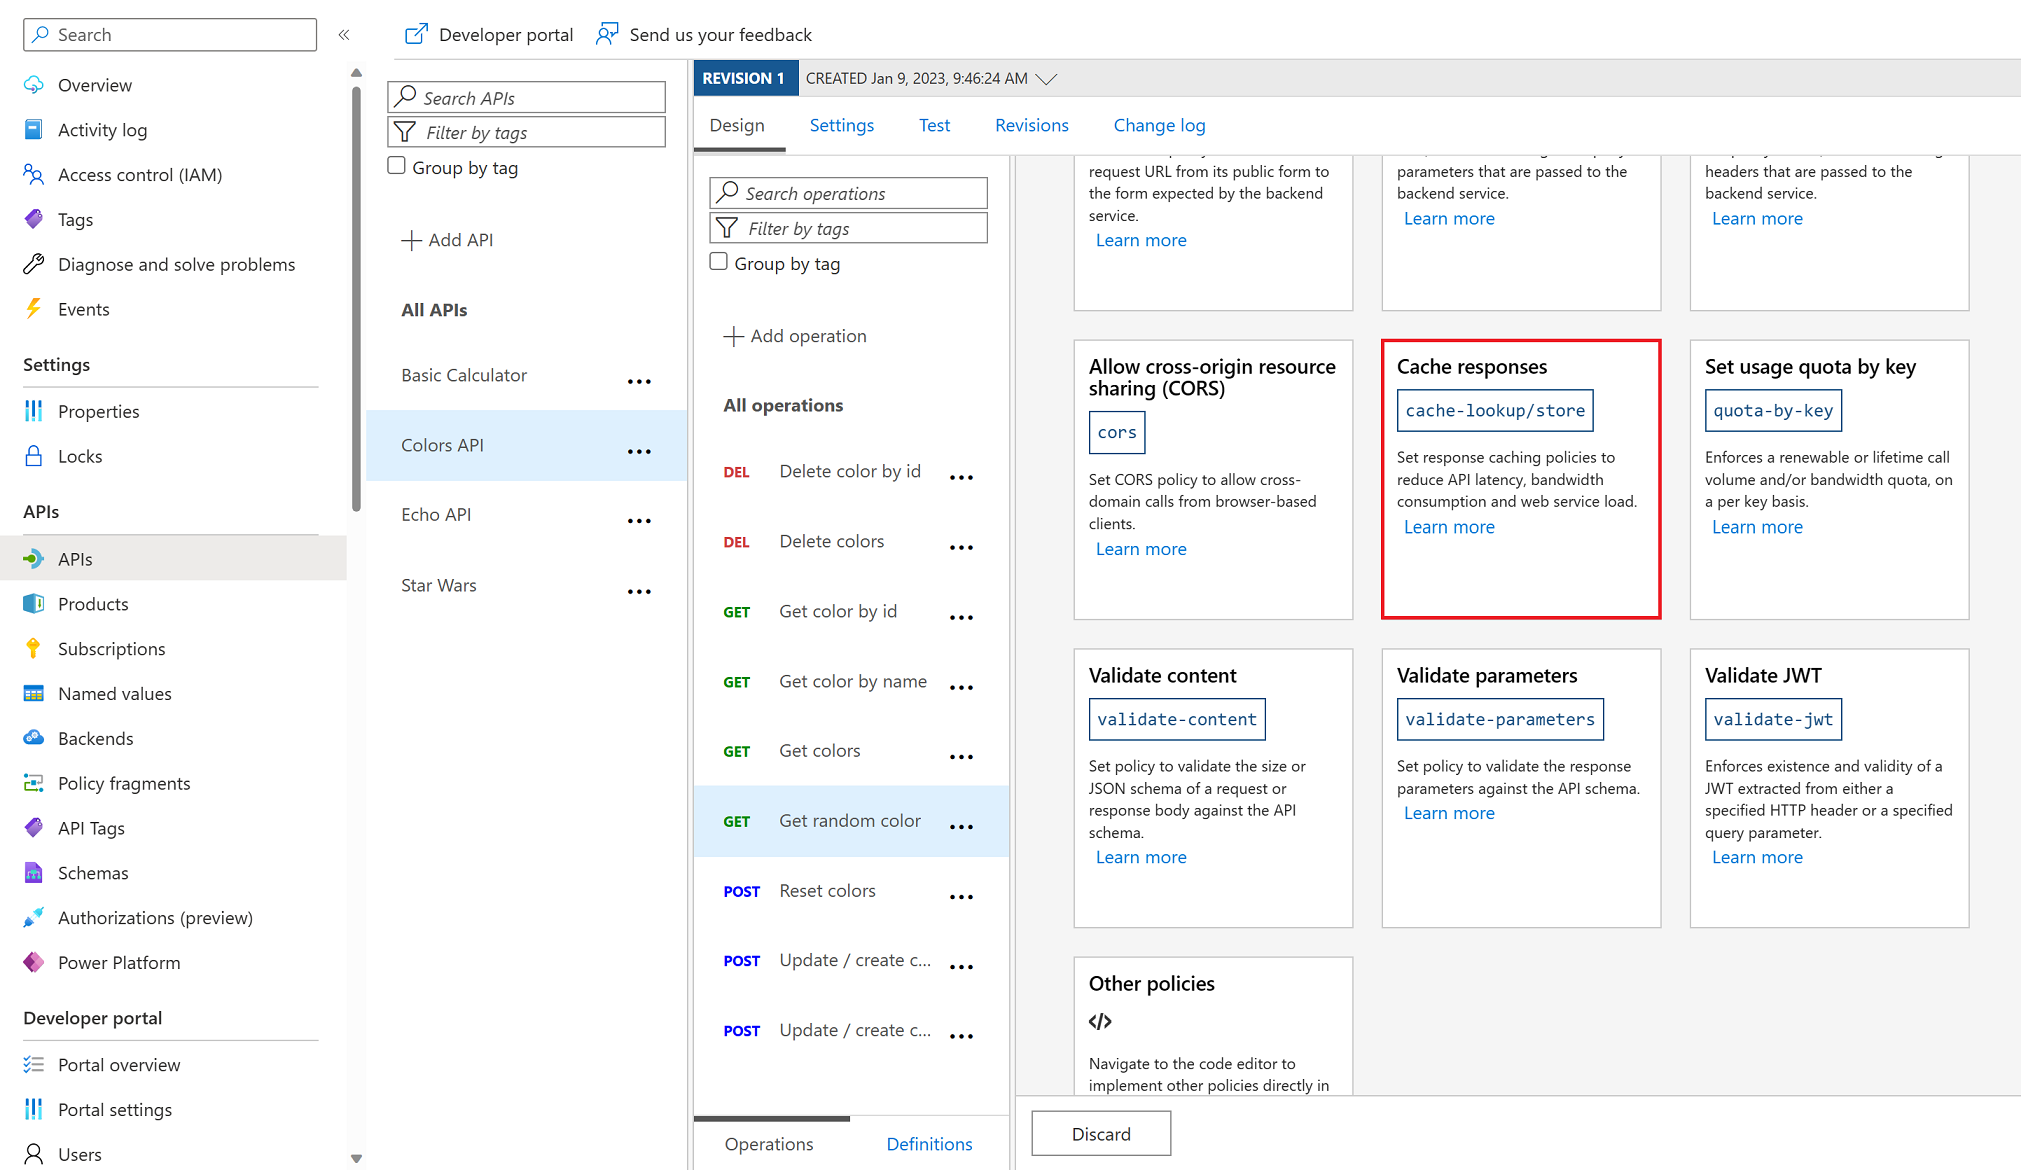
15 seconds.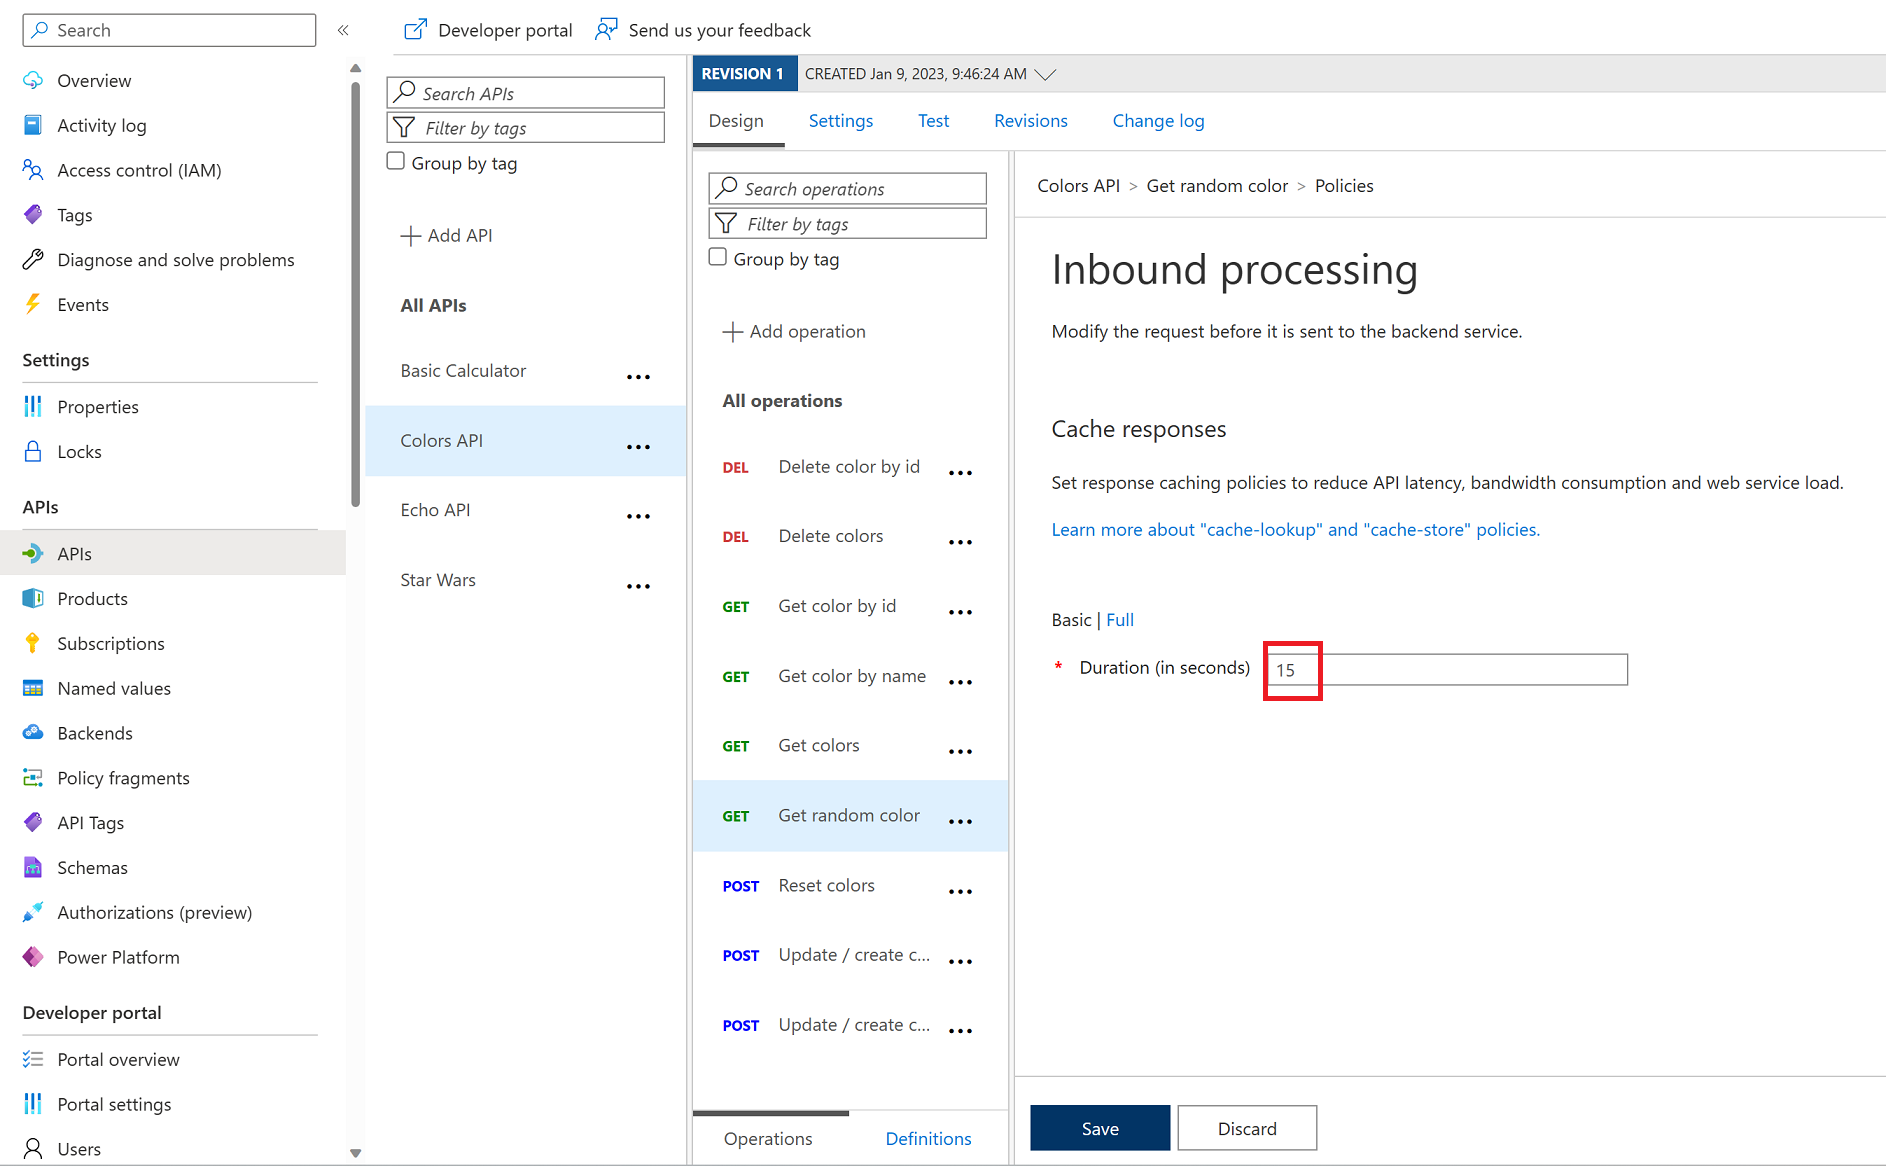
        <base />
        <cache-lookup vary-by-developer="false" vary-by-developer-groups="false" downstream-caching-type="none" />


        <base />


        <base />
        <cache-store duration="15" />


        <base />
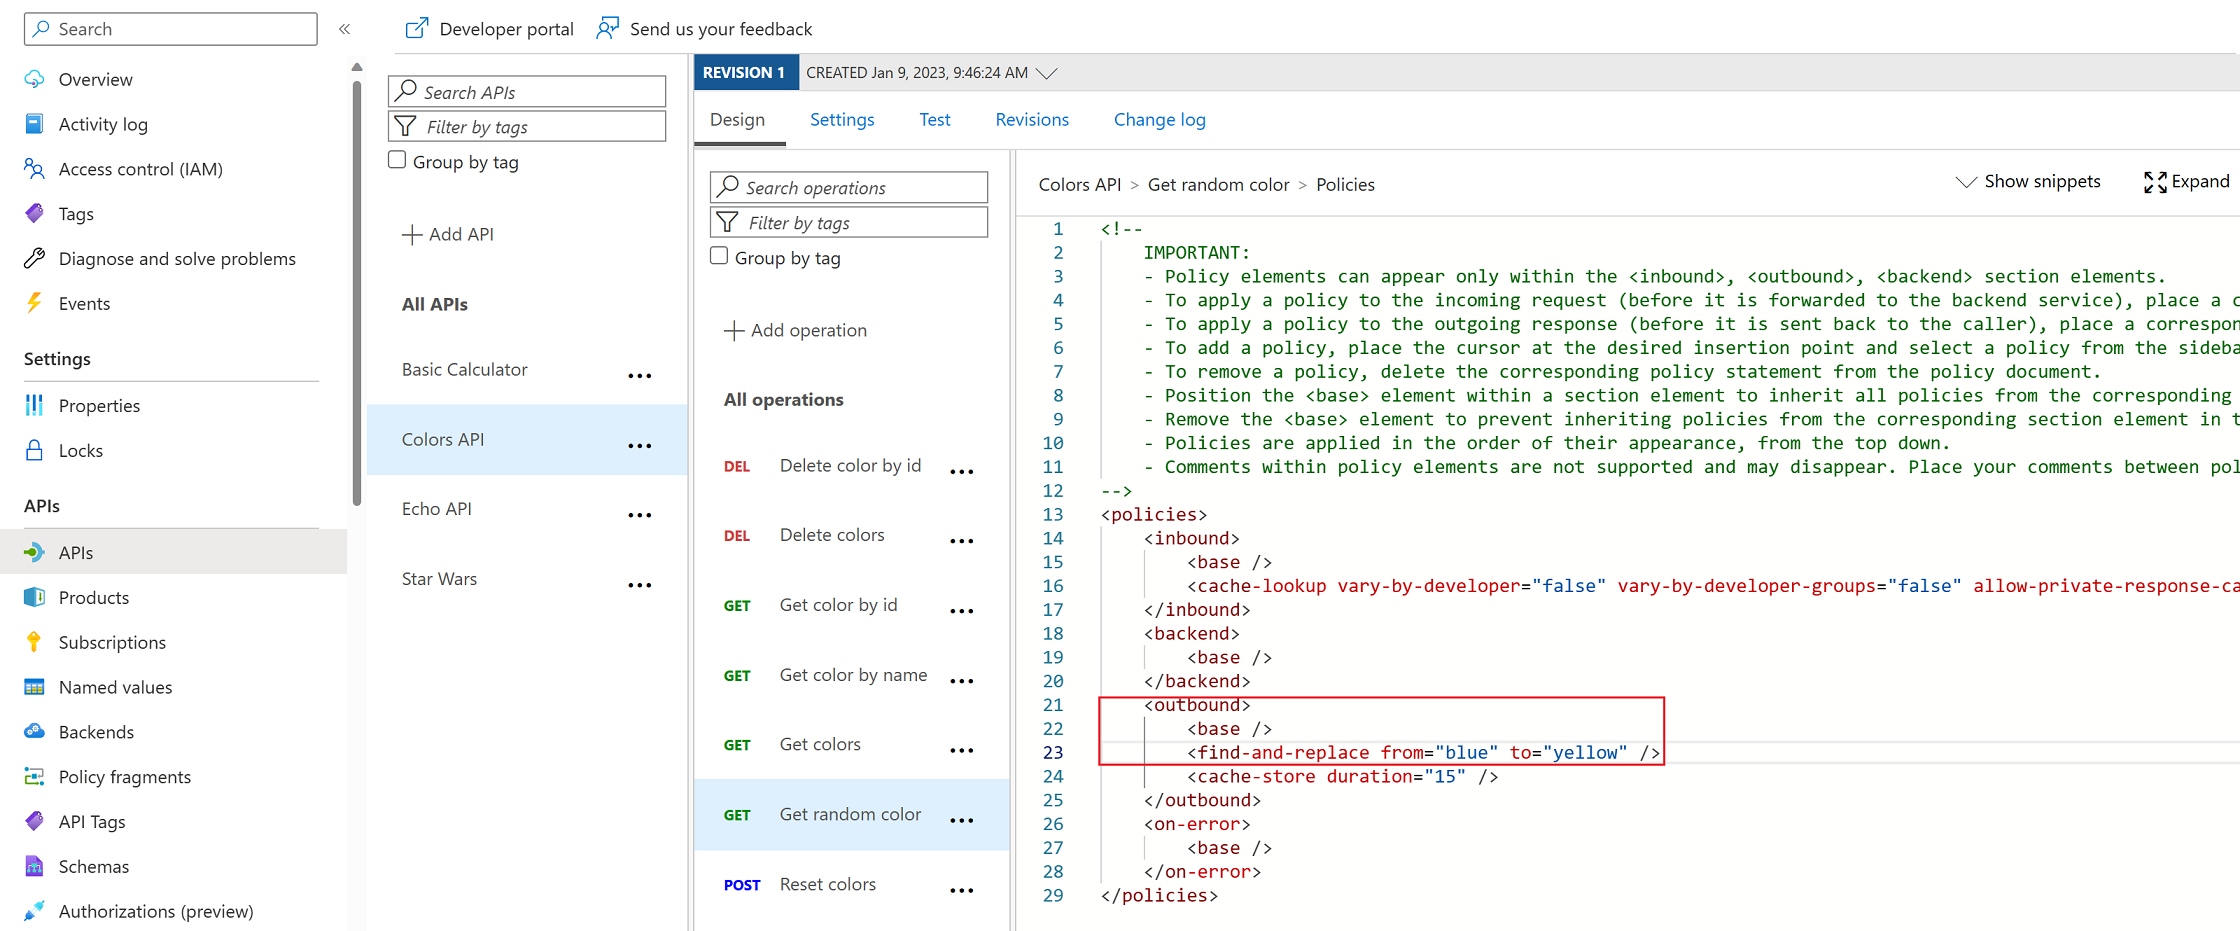
Task 4: Transformation Policy
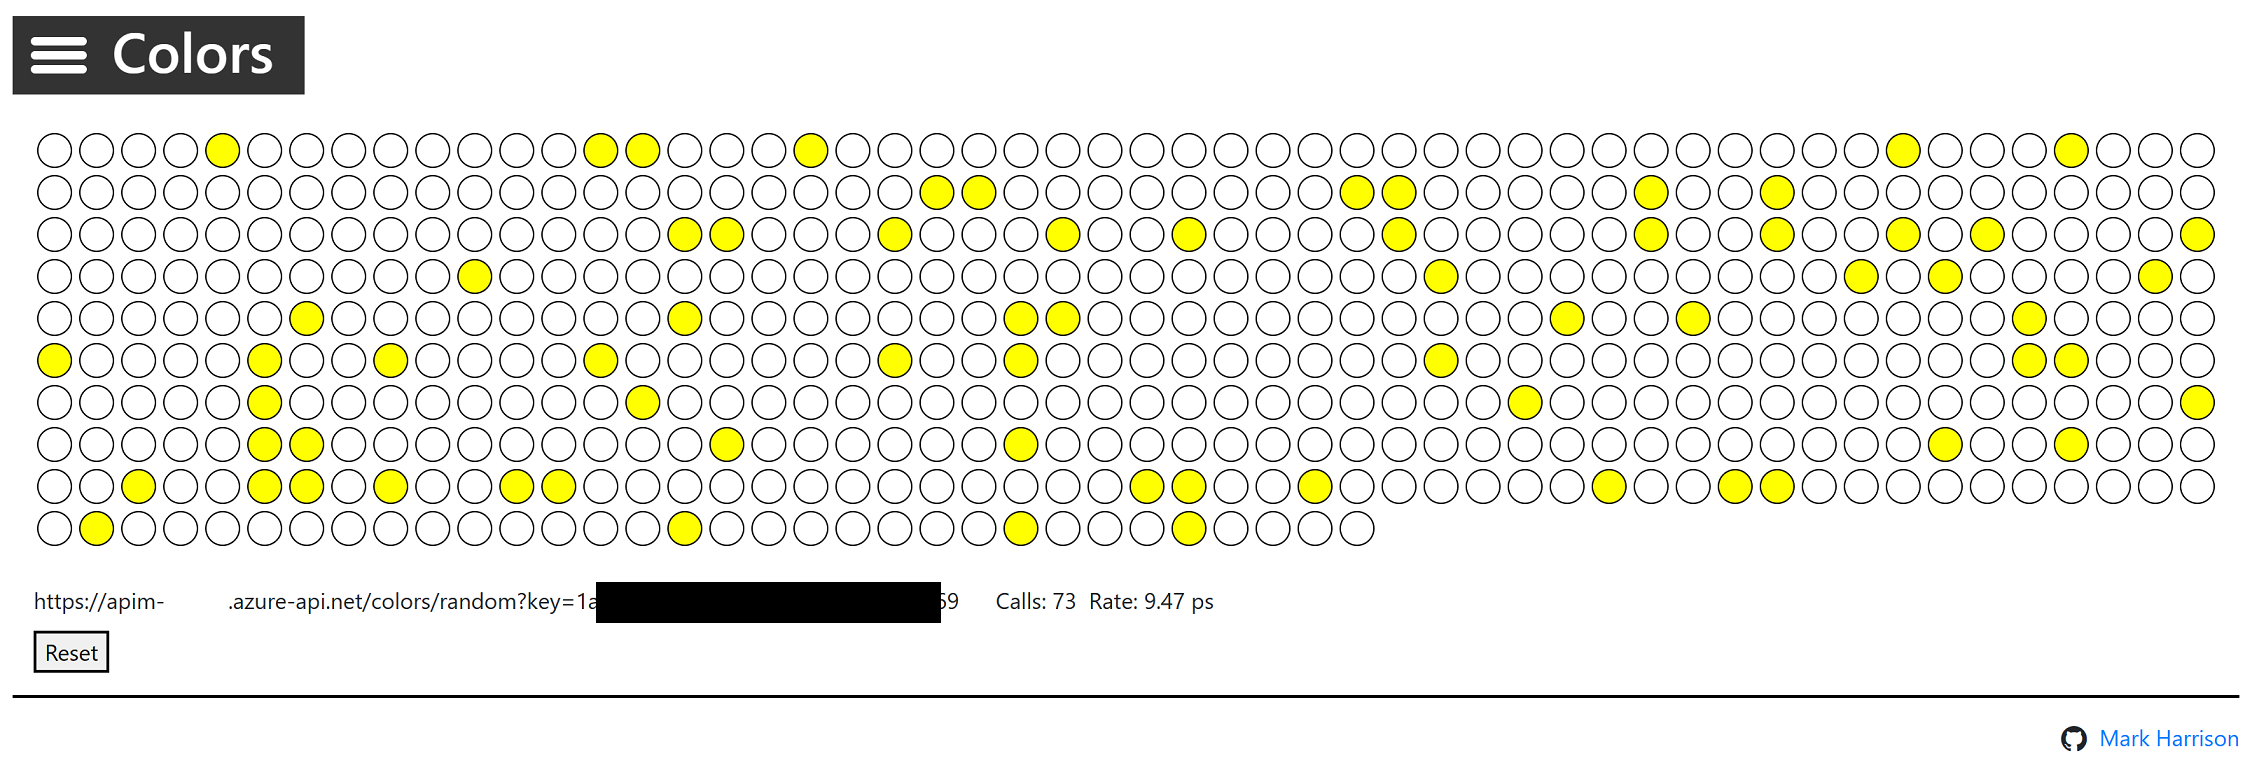
Color API
Transformation – replace string
ApiRandomColorGet operation. element in the section.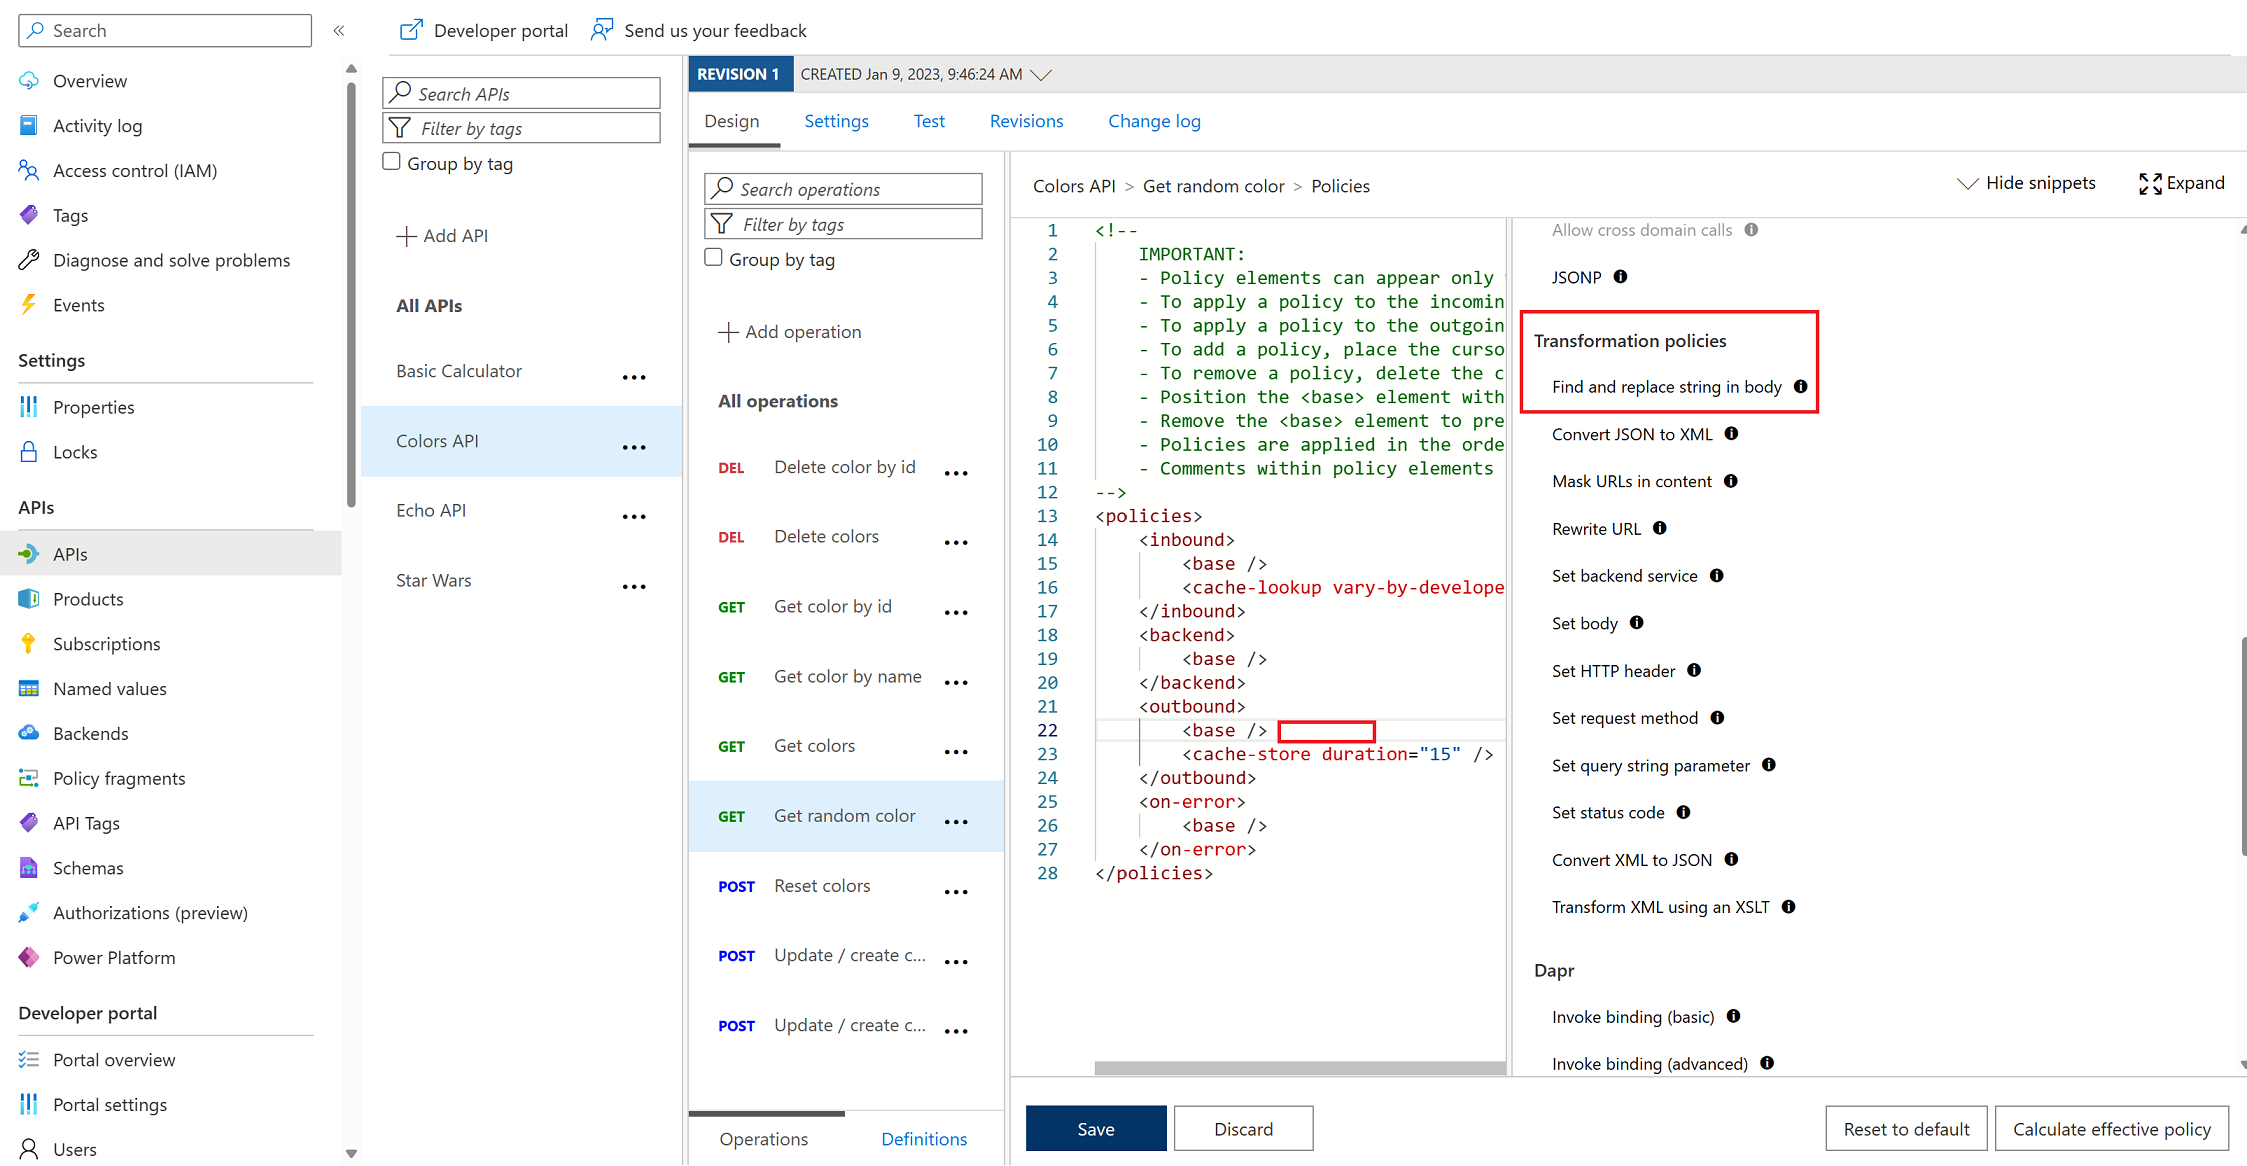
from and to values accordingly:
    <base />
    <find-and-replace from="blue" to="yellow" />
    <cache-store duration="15" />
Star Wars API
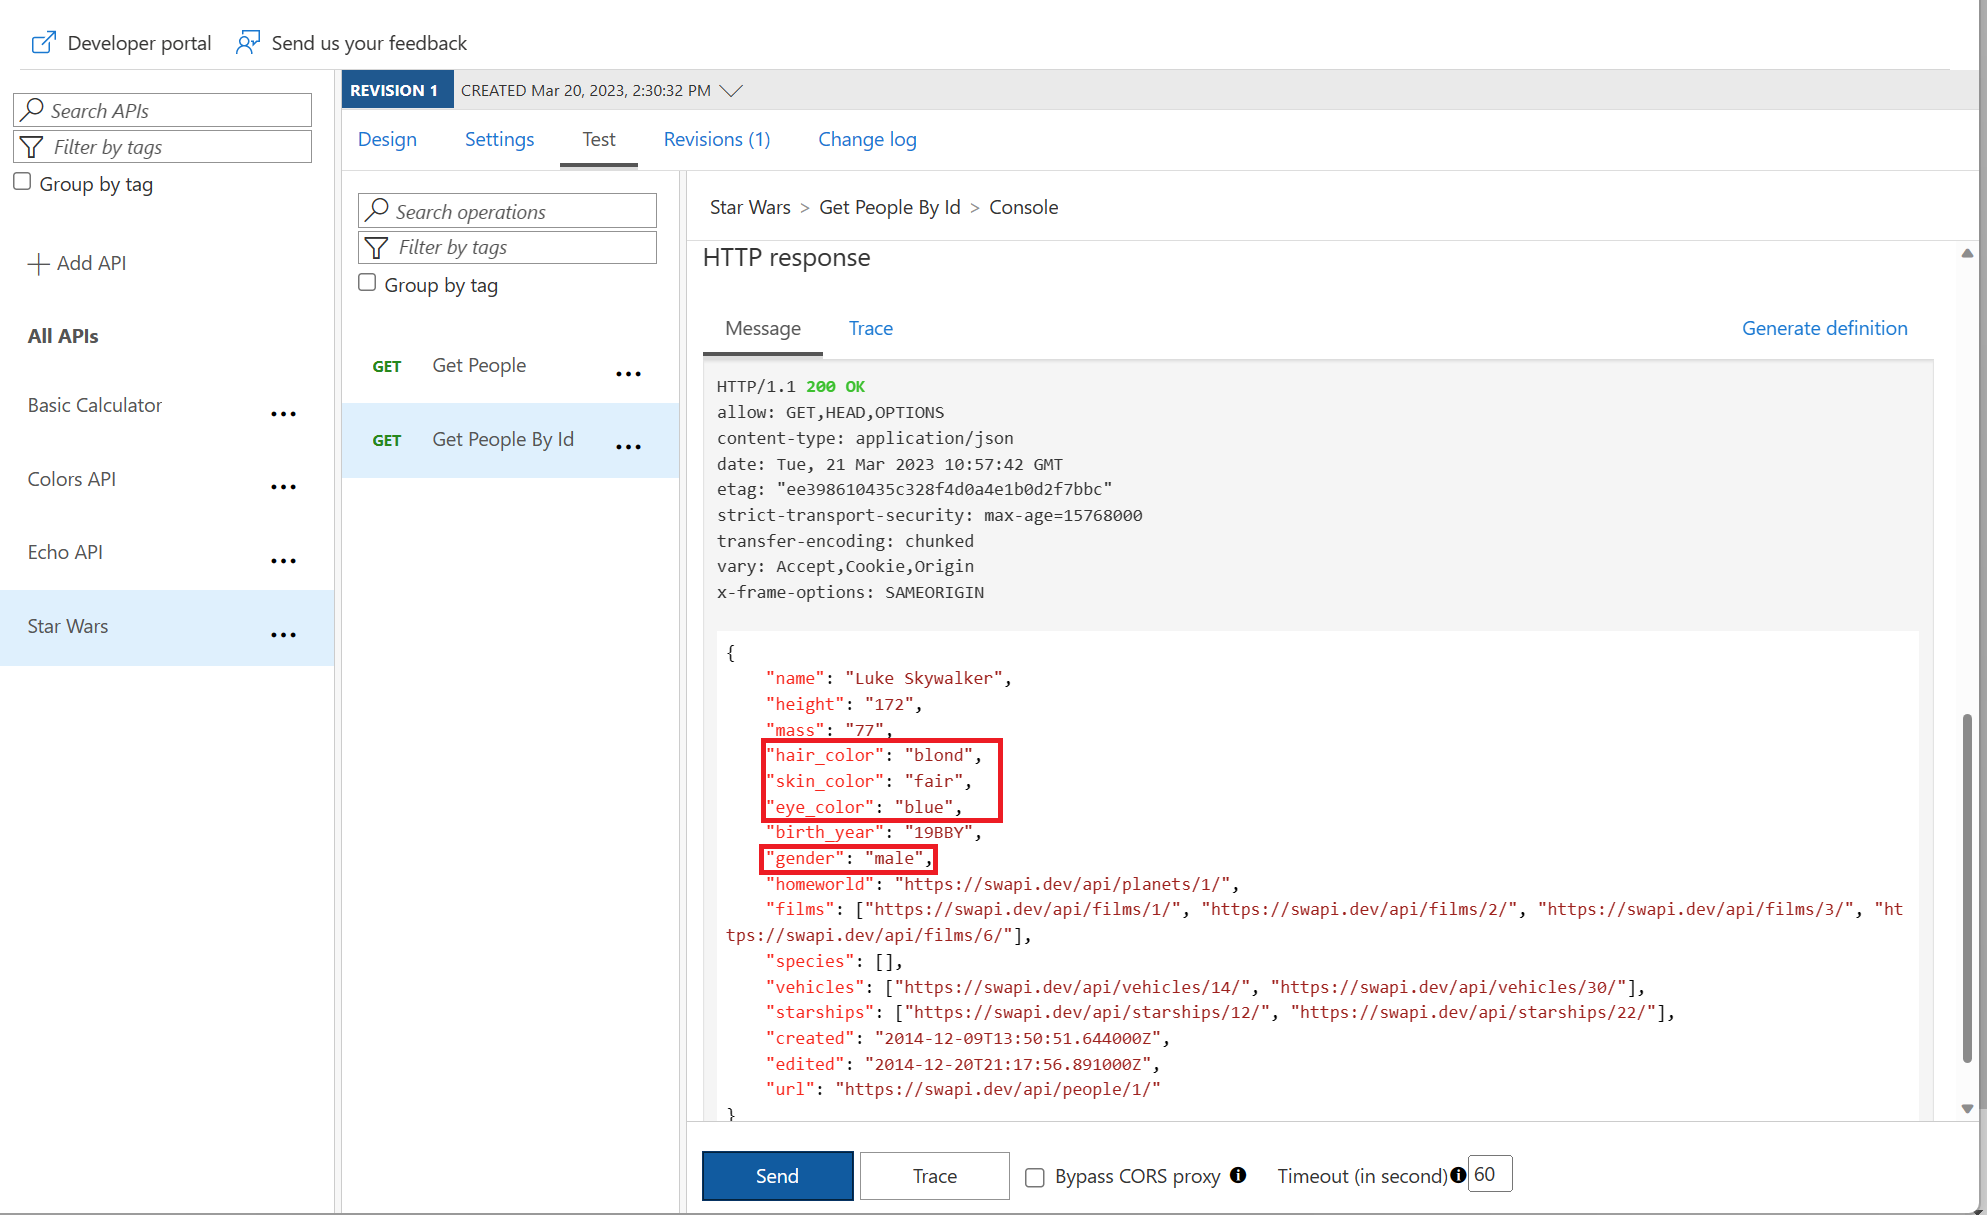
Transformation – conditional
Response and Product below.
Note that the inbound Accept-Encoding header is set to deflate to ensure that the response body is not encoded as that causes the JSON parsing to fail.
        <base />
        <set-header name="Accept-Encoding" exists-action="override">
            deflate


        <base />


        <base />

                <when condition="@(context.Response.StatusCode == 200 && context.Product.Name.Equals("Starter"))">
                    @{
                            var response = context.Response.Body.As();

                            foreach (var key in new [] {"hair_color", "skin_color", "eye_color", "gender"}) {
                                response.Property(key).Remove();
                            }

                            return response.ToString();
                        }


        <base />
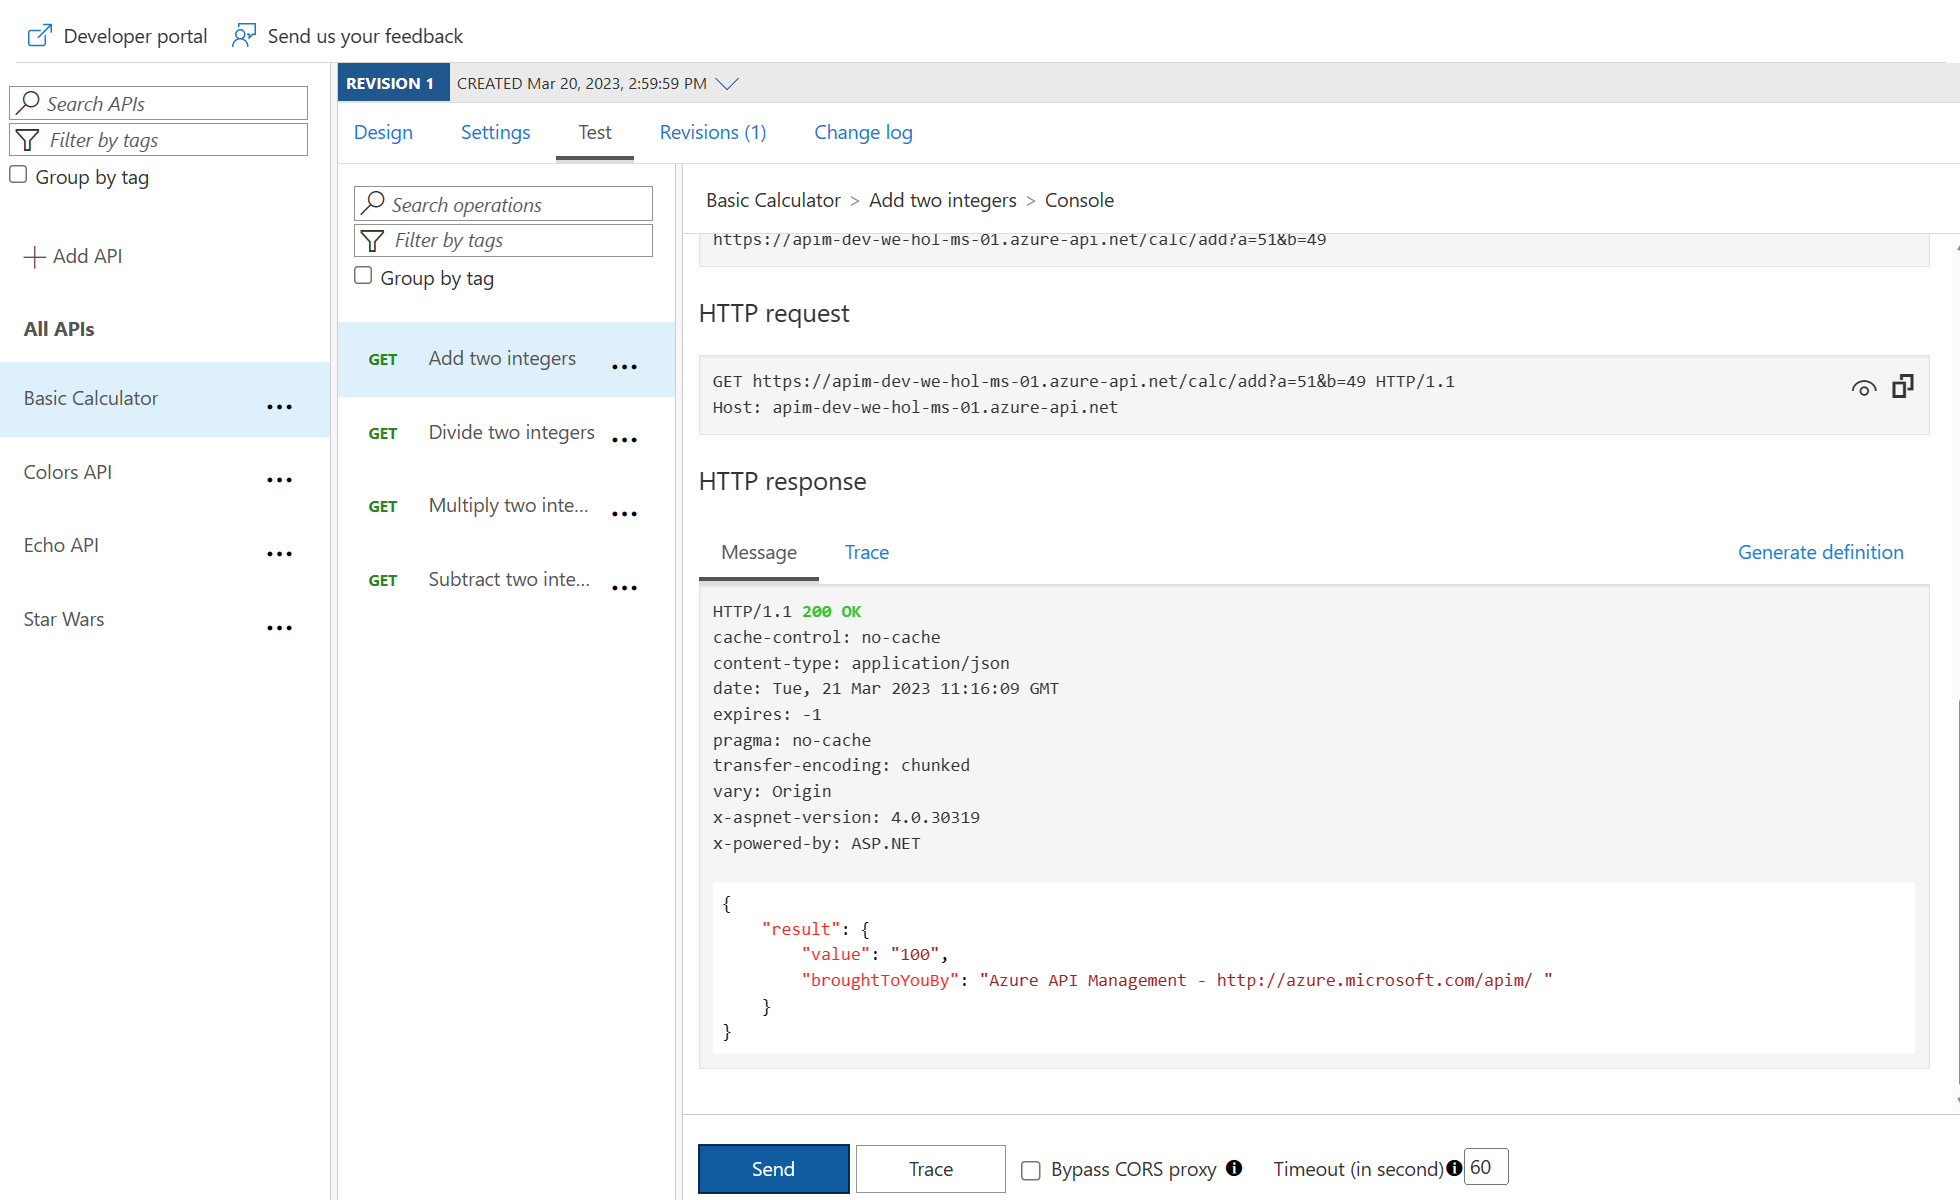
Calculator API
Transformation – XML to JSON
    <base />
    <xml-to-json kind="direct" apply="always" consider-accept-header="false" />
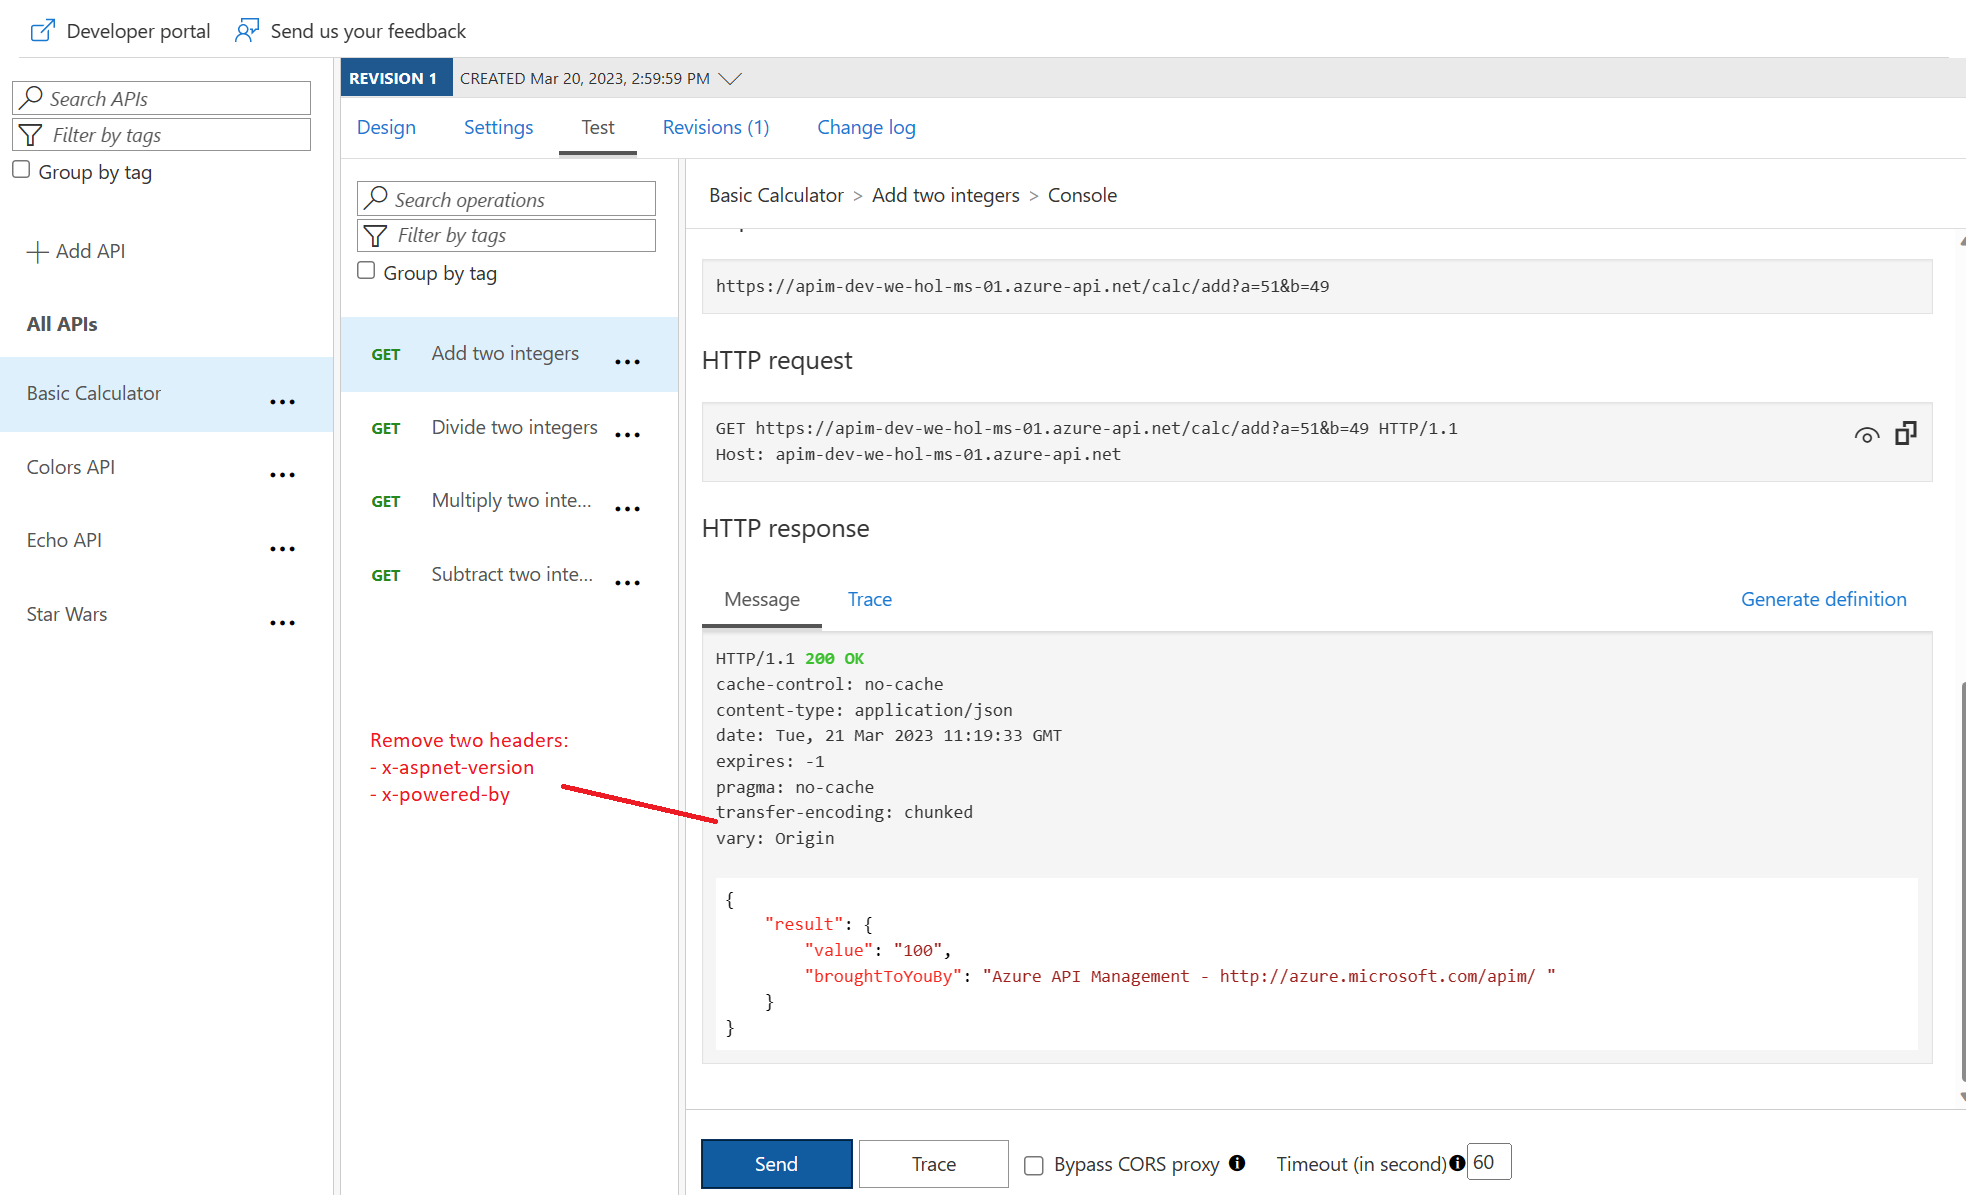
Delete response headers
    <base />
    <xml-to-json kind="direct" apply="always" consider-accept-header="false" />
    <set-header name="x-aspnet-version" exists-action="delete" />
    <set-header name="x-powered-by" exists-action="delete" />
Amend what’s passed to the backend
    <base />
    <set-query-parameter name="x-product-name" exists-action="override">
        @(context.Product.Name)

    <set-header name="x-request-context-data" exists-action="override">
        @(context.Deployment.Region)


Task 5: Named Values
Calculator API
Named Values collection
string constants across all API configurations and policies. Values can be expressions, secrets (encrypted by APIM), or Key Vault, which links to a corresponding secret in Azure Key Vault.Named values blade in the resource menu and press + Add.@(DateTime.Now.ToString())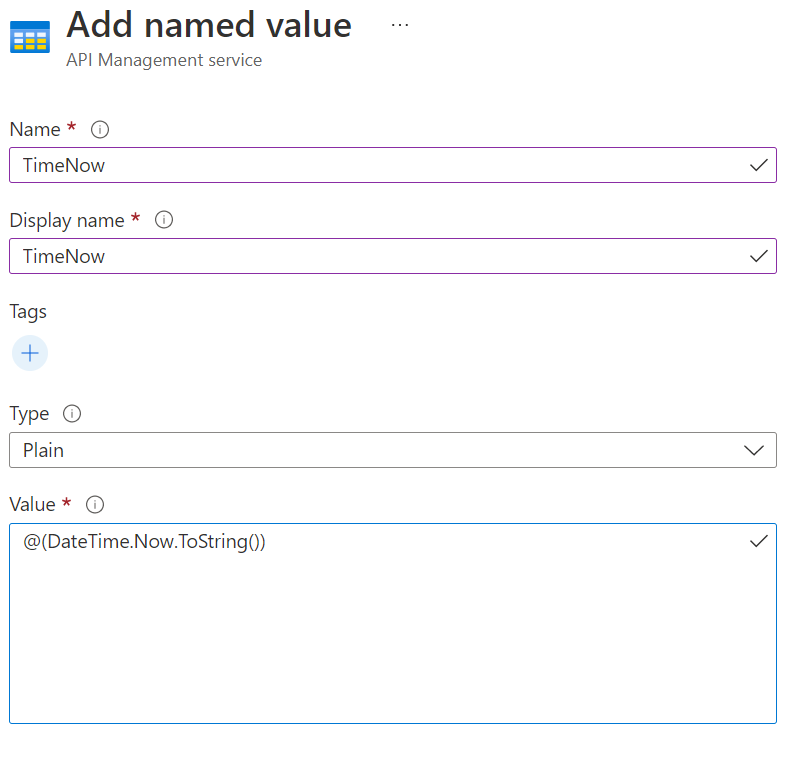
set-header policy by clicking on the pencil icon.{{TimeNow}}
    <base />
    <set-query-parameter name="x-product-name" exists-action="override">
        @(context.Product.Name)

    <set-header name="x-request-context-data" exists-action="override">
        @(context.Deployment.Region)

    <set-header name="x-request-received-time" exists-action="override">
        {{TimeNow}}
{
"name": "x-request-received-time",
"value": "12/30/2021 6:10:47 PM"
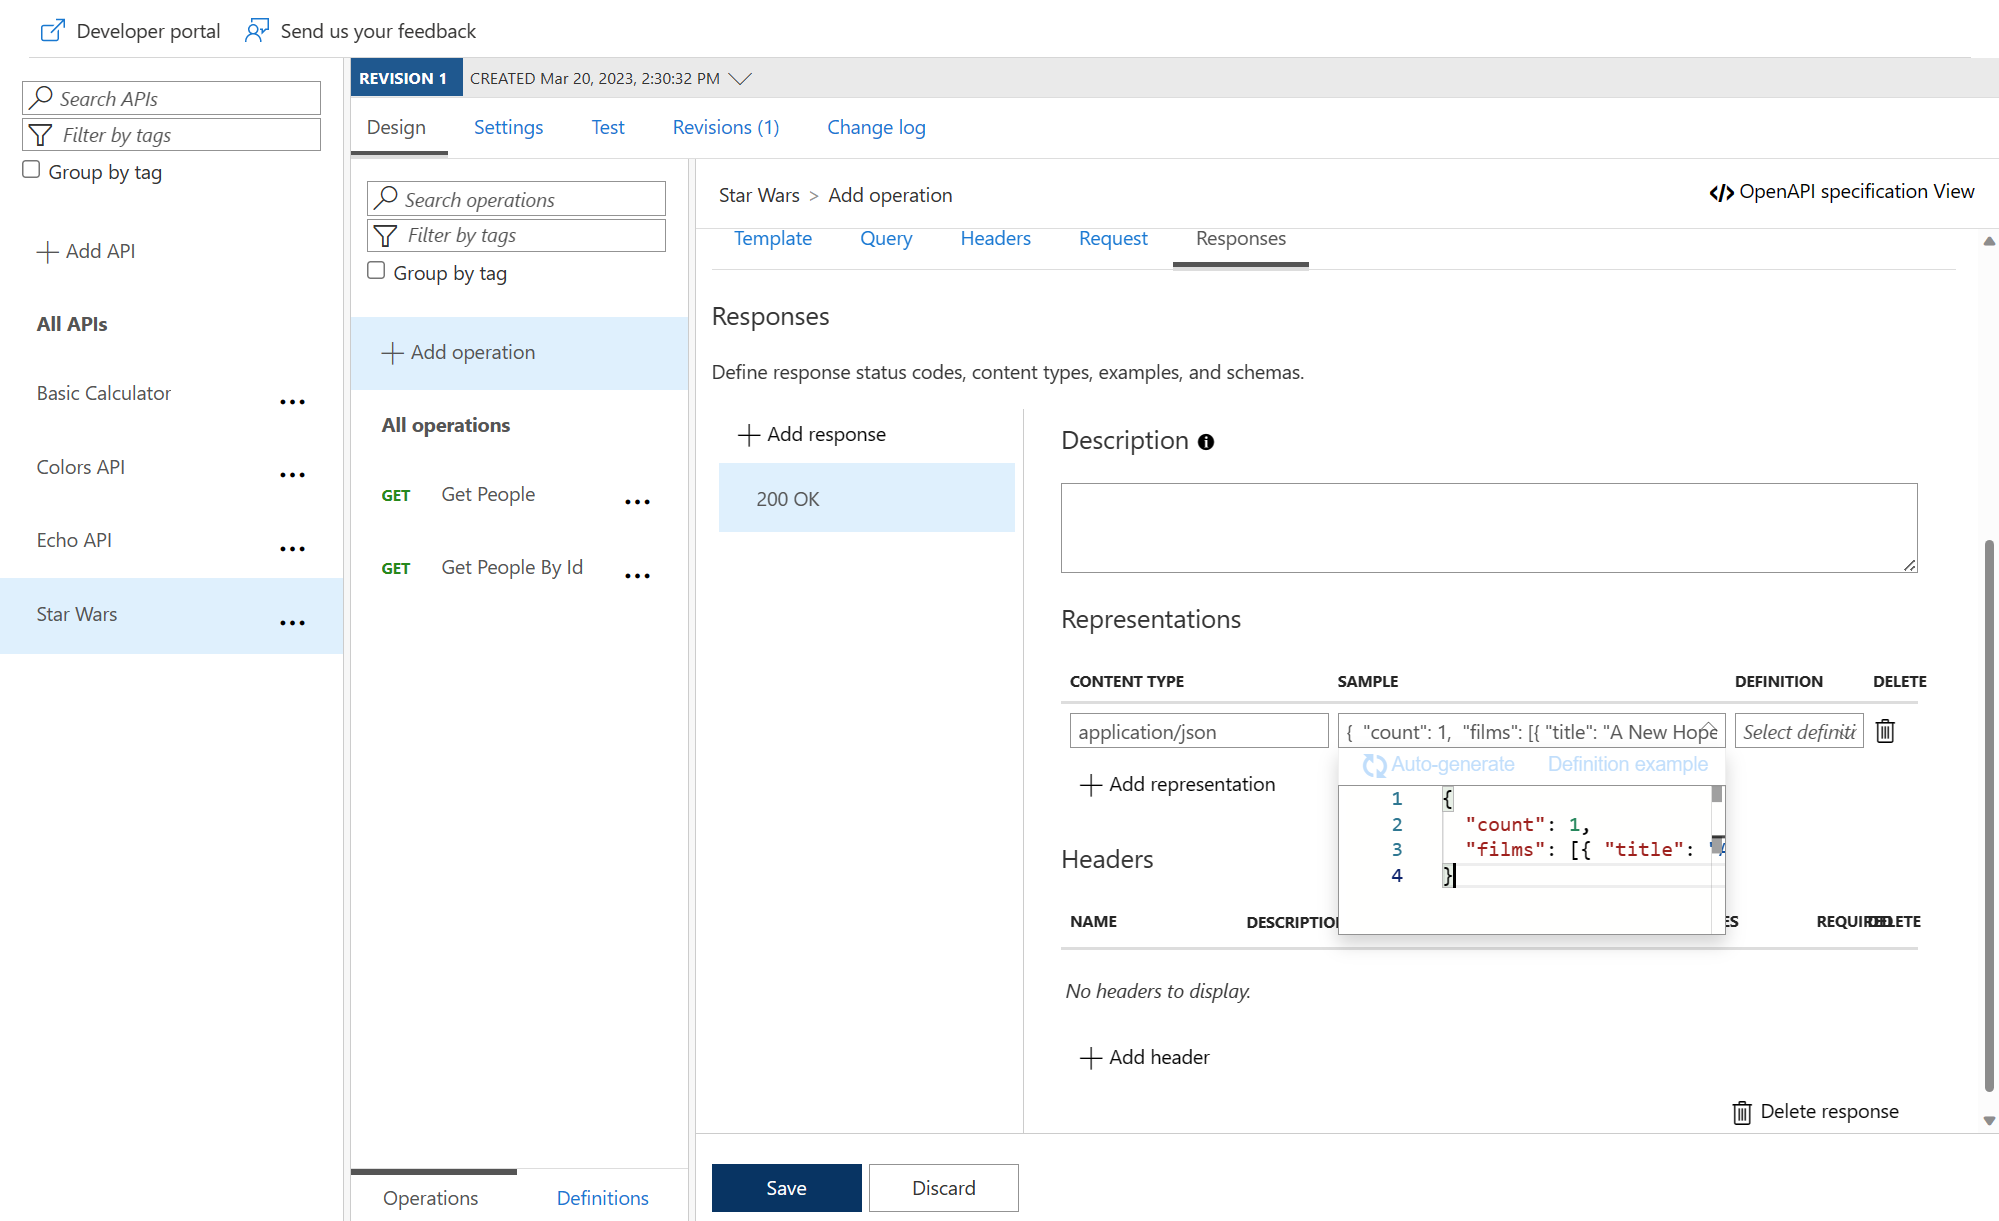
}Task 6: Mock Policy
Star Wars API
Mock responses
200 OK with a representation with content type application/json and this sample data:{
"count": 1,
"films": [{ "title": "A New Hope", "release-date": "05/25/1977" }]
}
    <base />
    <mock-response status-code="200" content-type="application/json" />
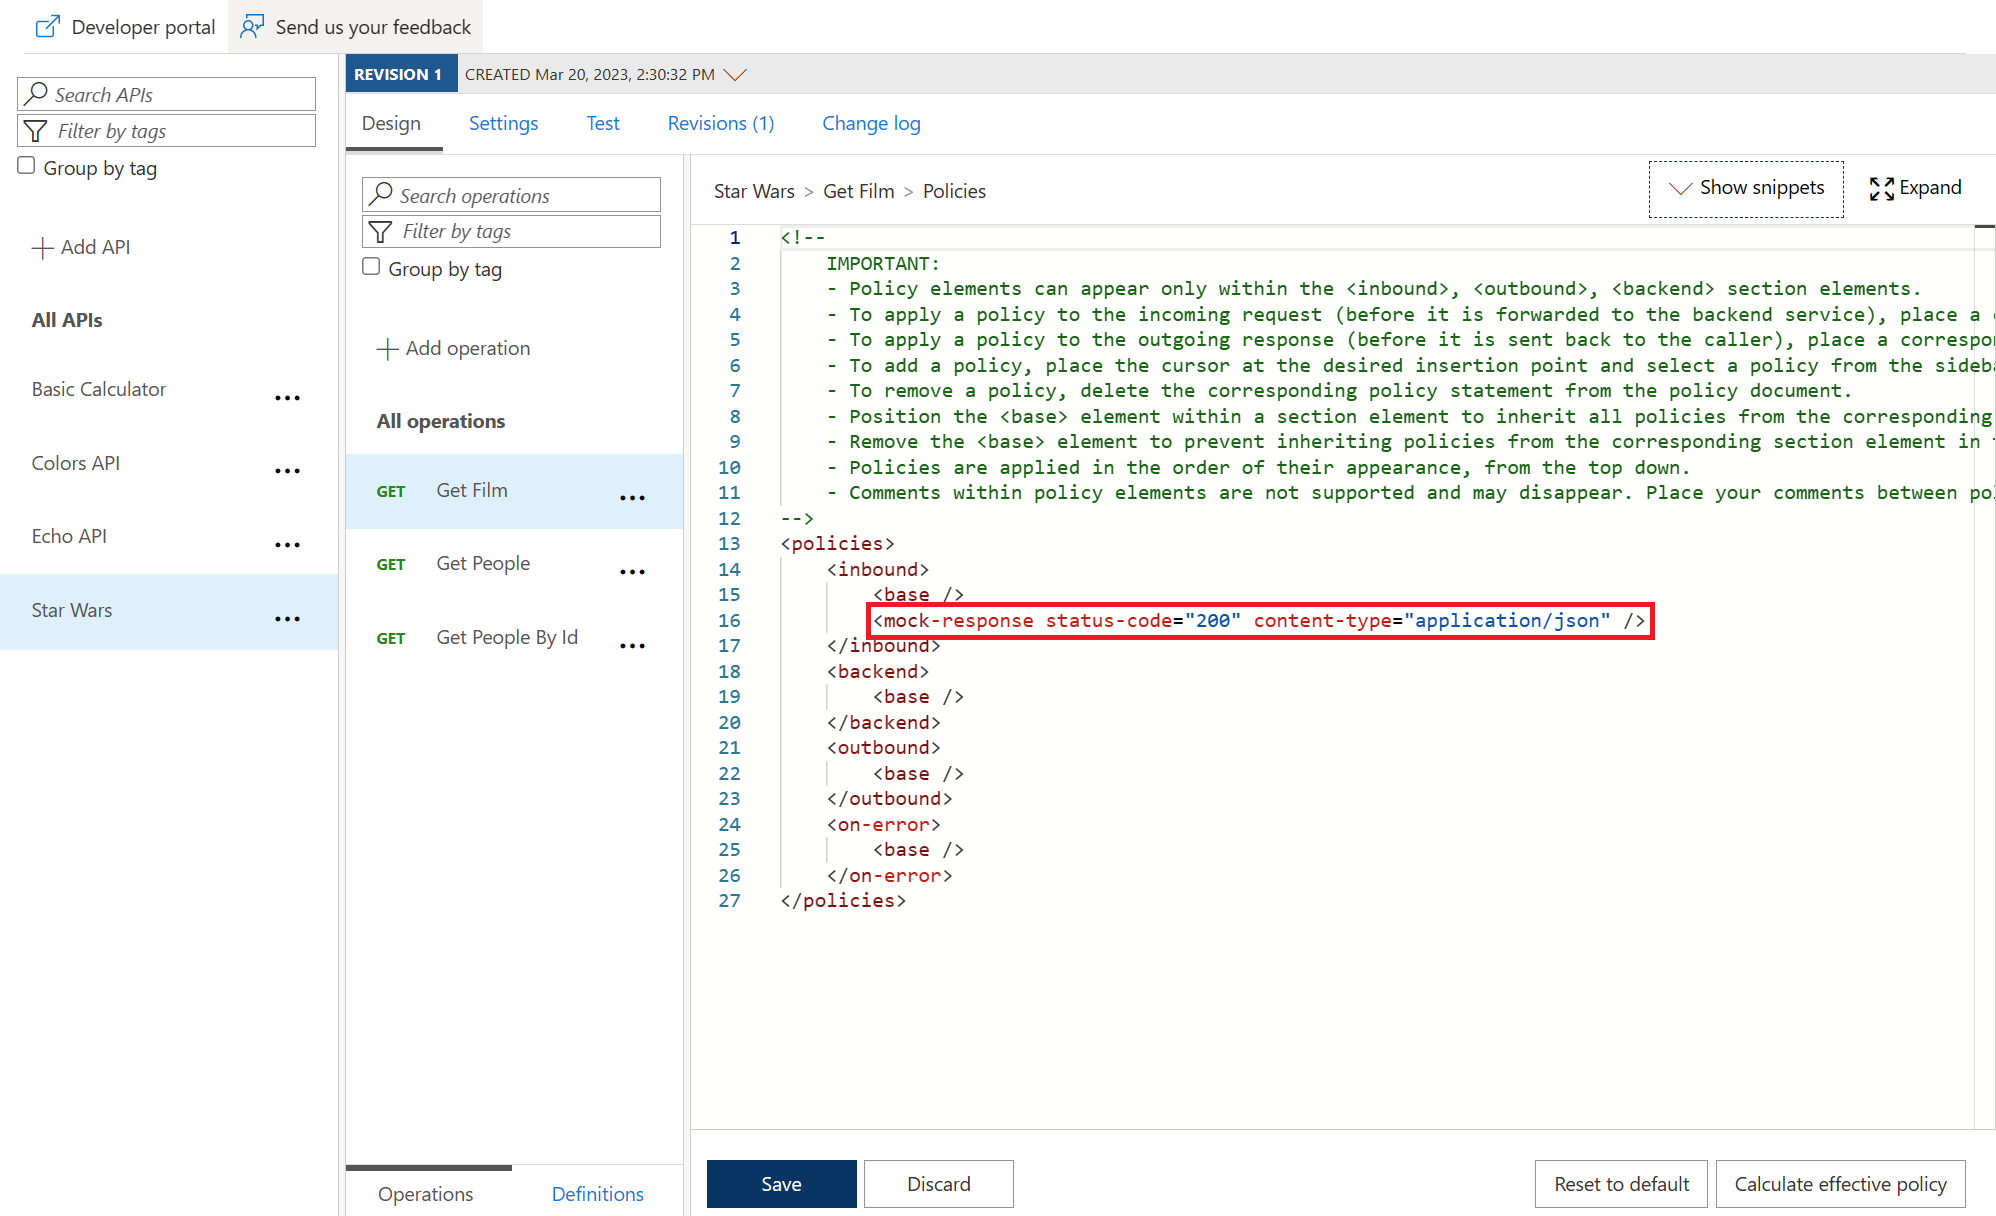
200 success with the mocked film data.
Task 7: Send One Way Policy
Calculator API
Send-One-Way-Request Setup
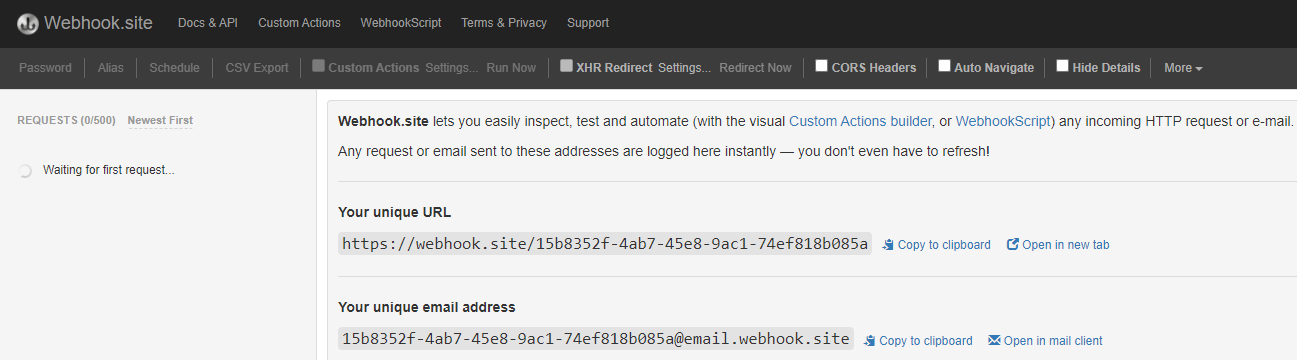
with your webhook target URL. You will identify the URL in either example below.send-one-way-request policy to Outbound processing and replace the webhook and payload as required. For demo purposes we are going to use the payload for a Teams message (even for Webhook.site) and also send the message on every successful request.
  <base />

    <when condition="@(context.Response.StatusCode == 200)">
      <send-one-way-request mode="new">

          https://enter-your-webhook-url

        POST
        @{
          return new JObject(
            new JProperty("@type","MessageCard"),
            new JProperty("@context", "http://schema.org/extensions"),
            new JProperty("summary","Summary"),
            new JProperty("themeColor", "0075FF"),
            new JProperty("sections",
              new JArray (
                new JObject (
                  new JProperty("text", "Hello!")
                )
              )
            )
          ).ToString();
        }
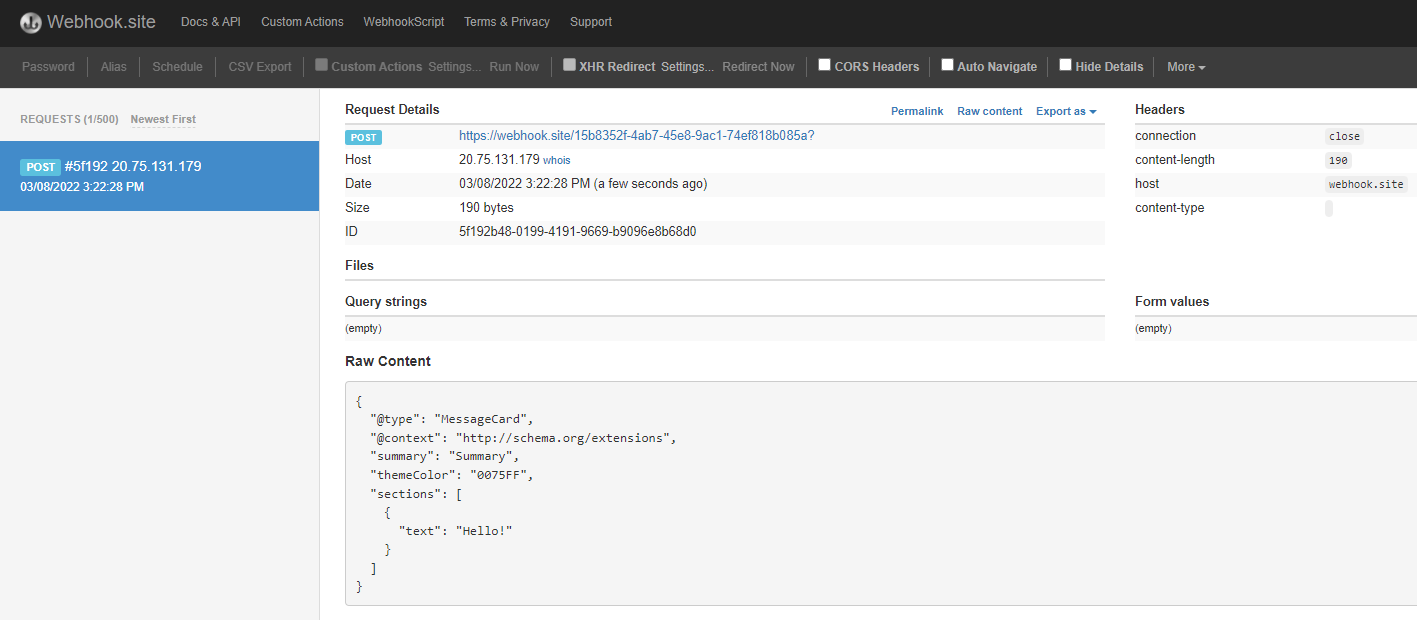
Send a message to Webhook.site
property in the send-one-way-request policy.200 success response.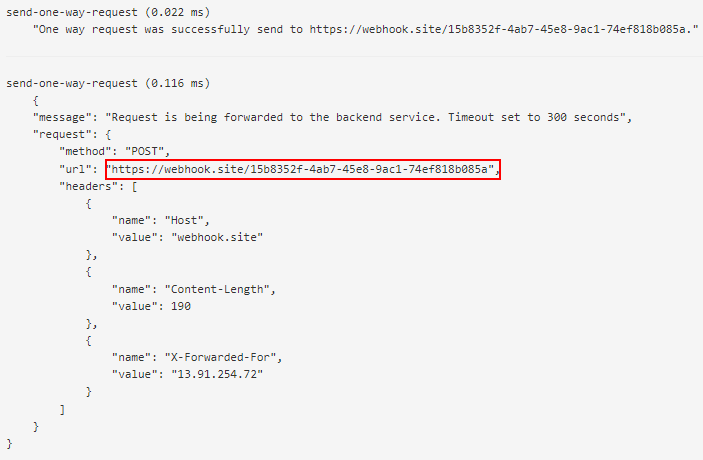
Send a message to Microsoft Teams channel


200 success response.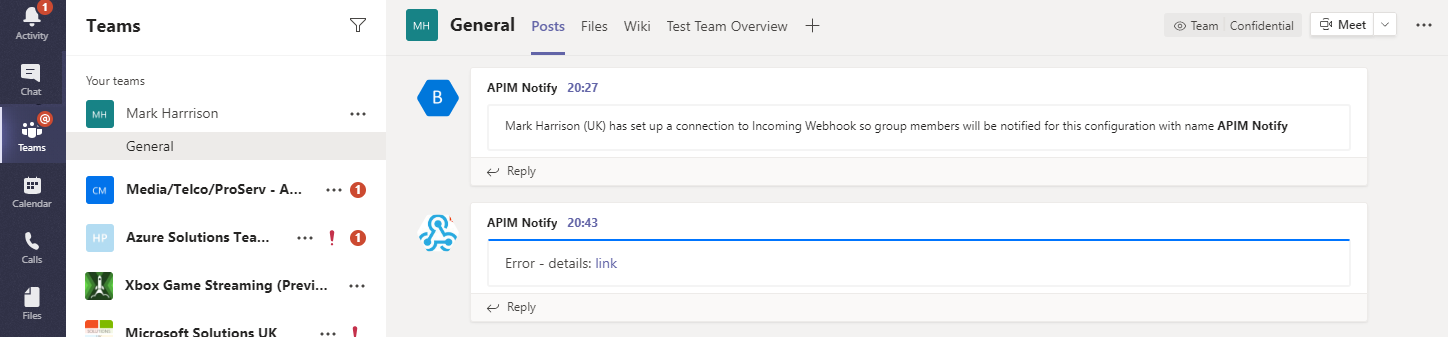
Task 8: Abort processing Policy
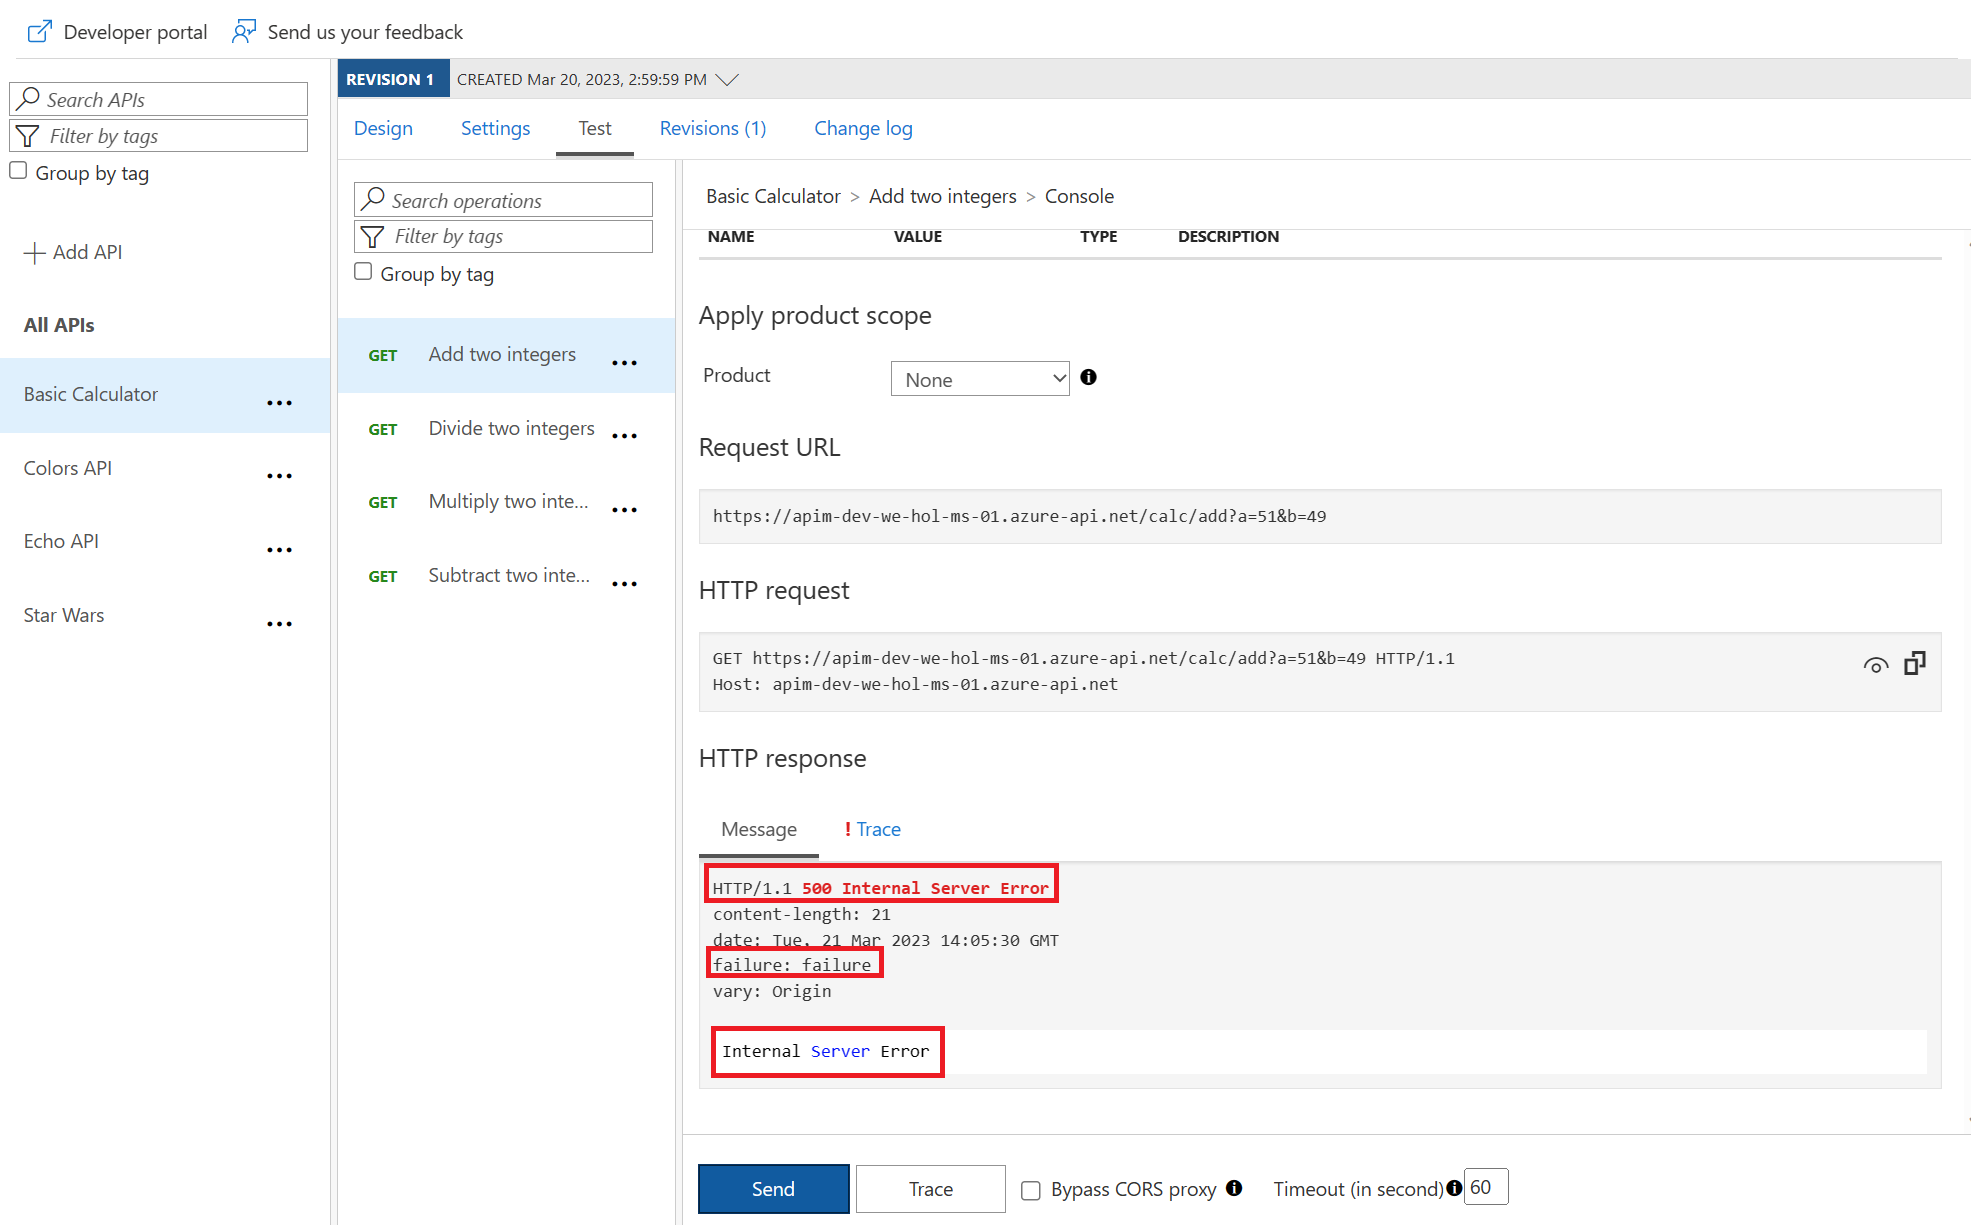
Calculator API
Aborting the processing
return-response policies short-circuits the request and yields a response that often does not originate from the backend. Consider what general situations may make sense without shifting too much business logic into APIM.
    <base />

        <when condition="@(true)">
            <return-response response-variable-name="existing response variable">
                <set-status code="500" reason="Internal Server Error" />
                <set-header name="failure" exists-action="override">
                    failure

                Internal Server Error
Clean Up
logic above to let all requests flow again, then save the changes.Exercise 4: Versions and Revisions
v1, v2, etc.) through a versioning scheme such as a version path in the URL, a header, or a query string. Multiple versions can and may often be active at the same time to provide continued service while breaking changes may be introduced in newer versions.TABLE OF CONTENTS
Task 1: Versios
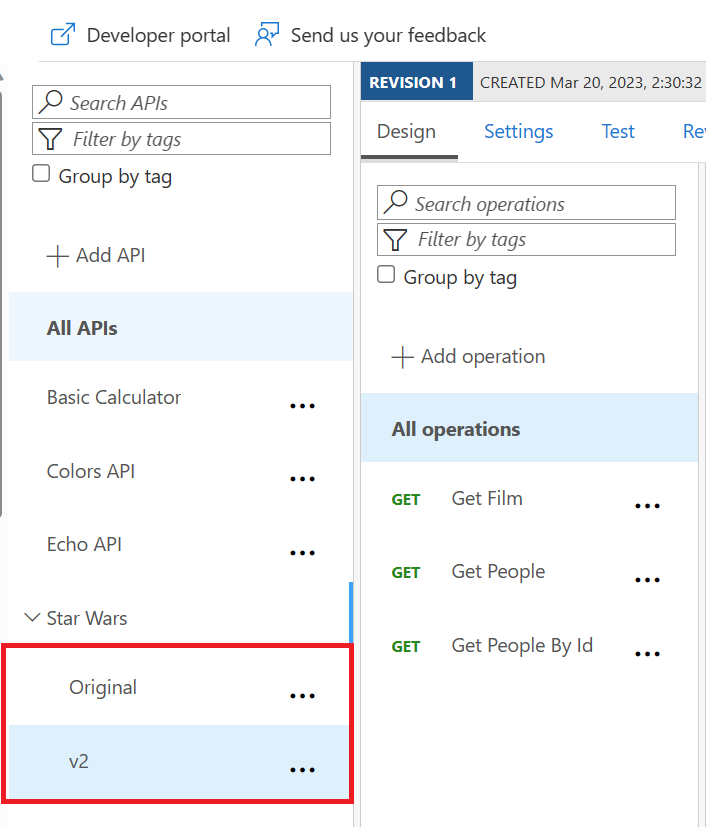
Version
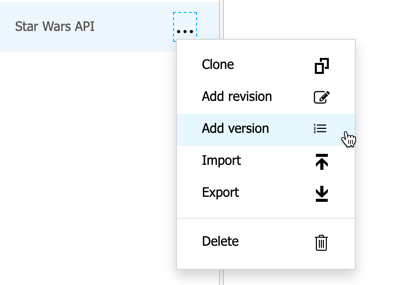
v1 or similar identifier.Add a new version
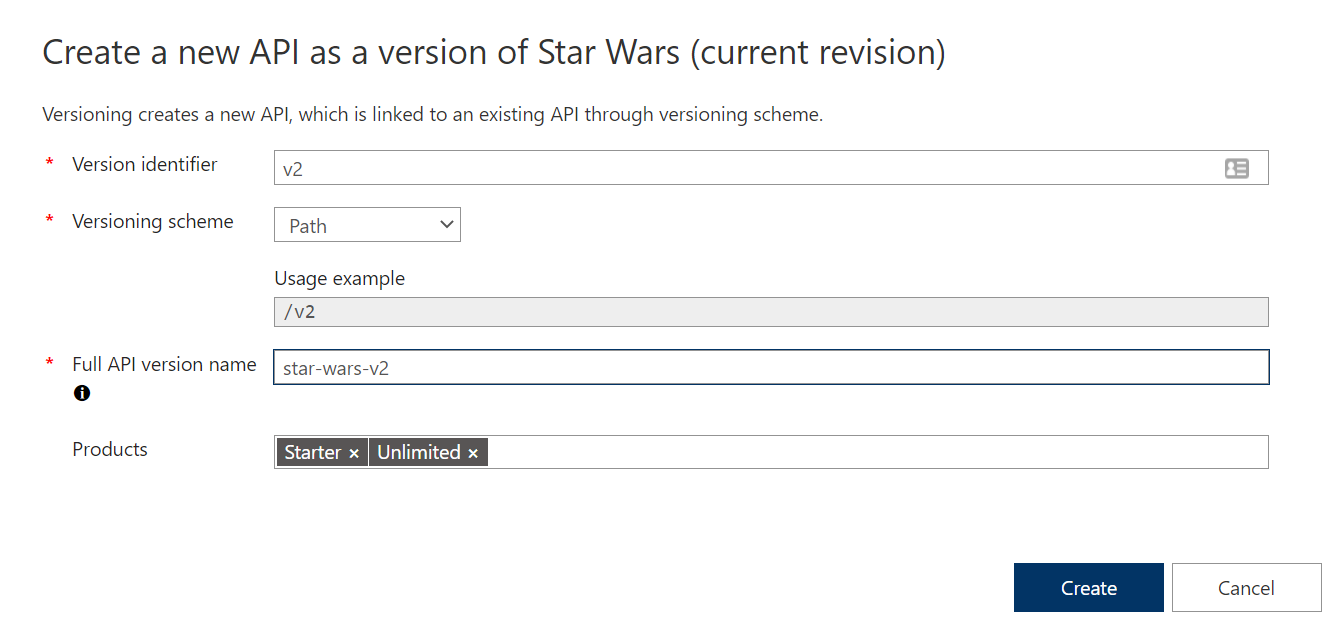
Test the new version
v2 version of the Star Wars API.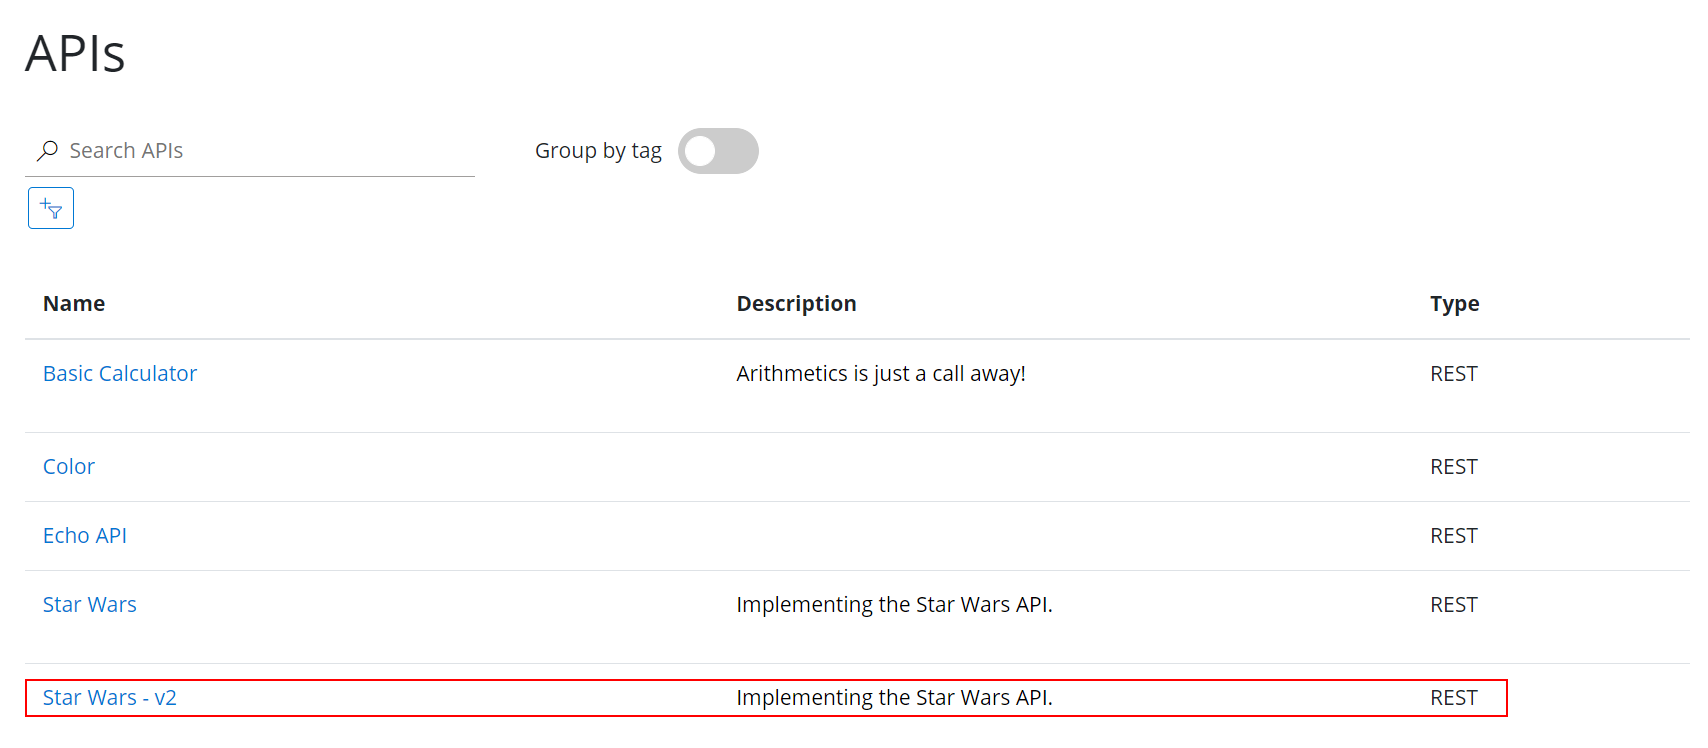
v2 in the path.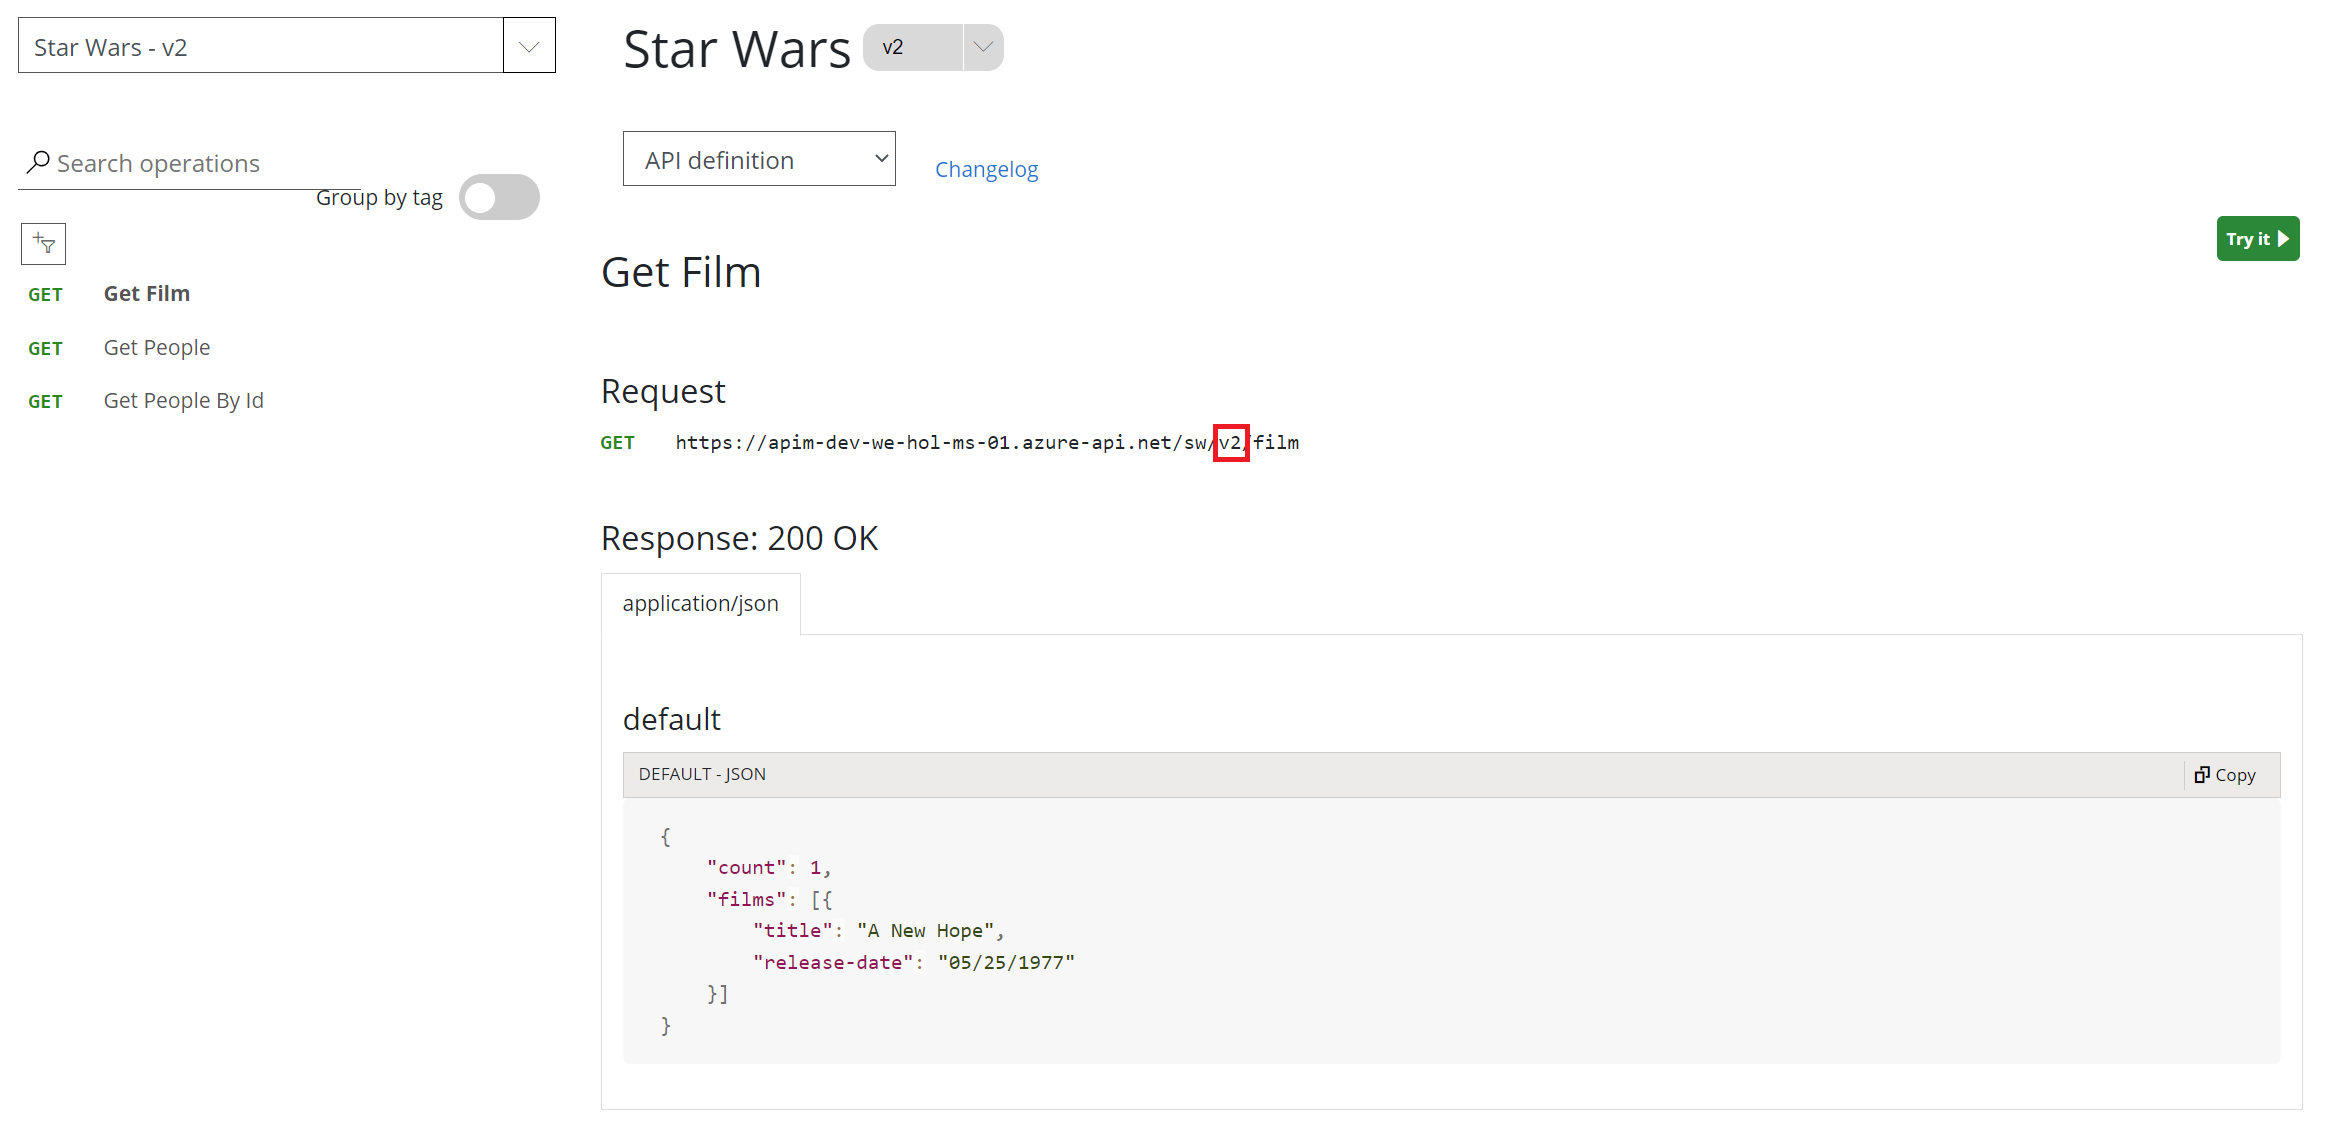
GetPeople operation.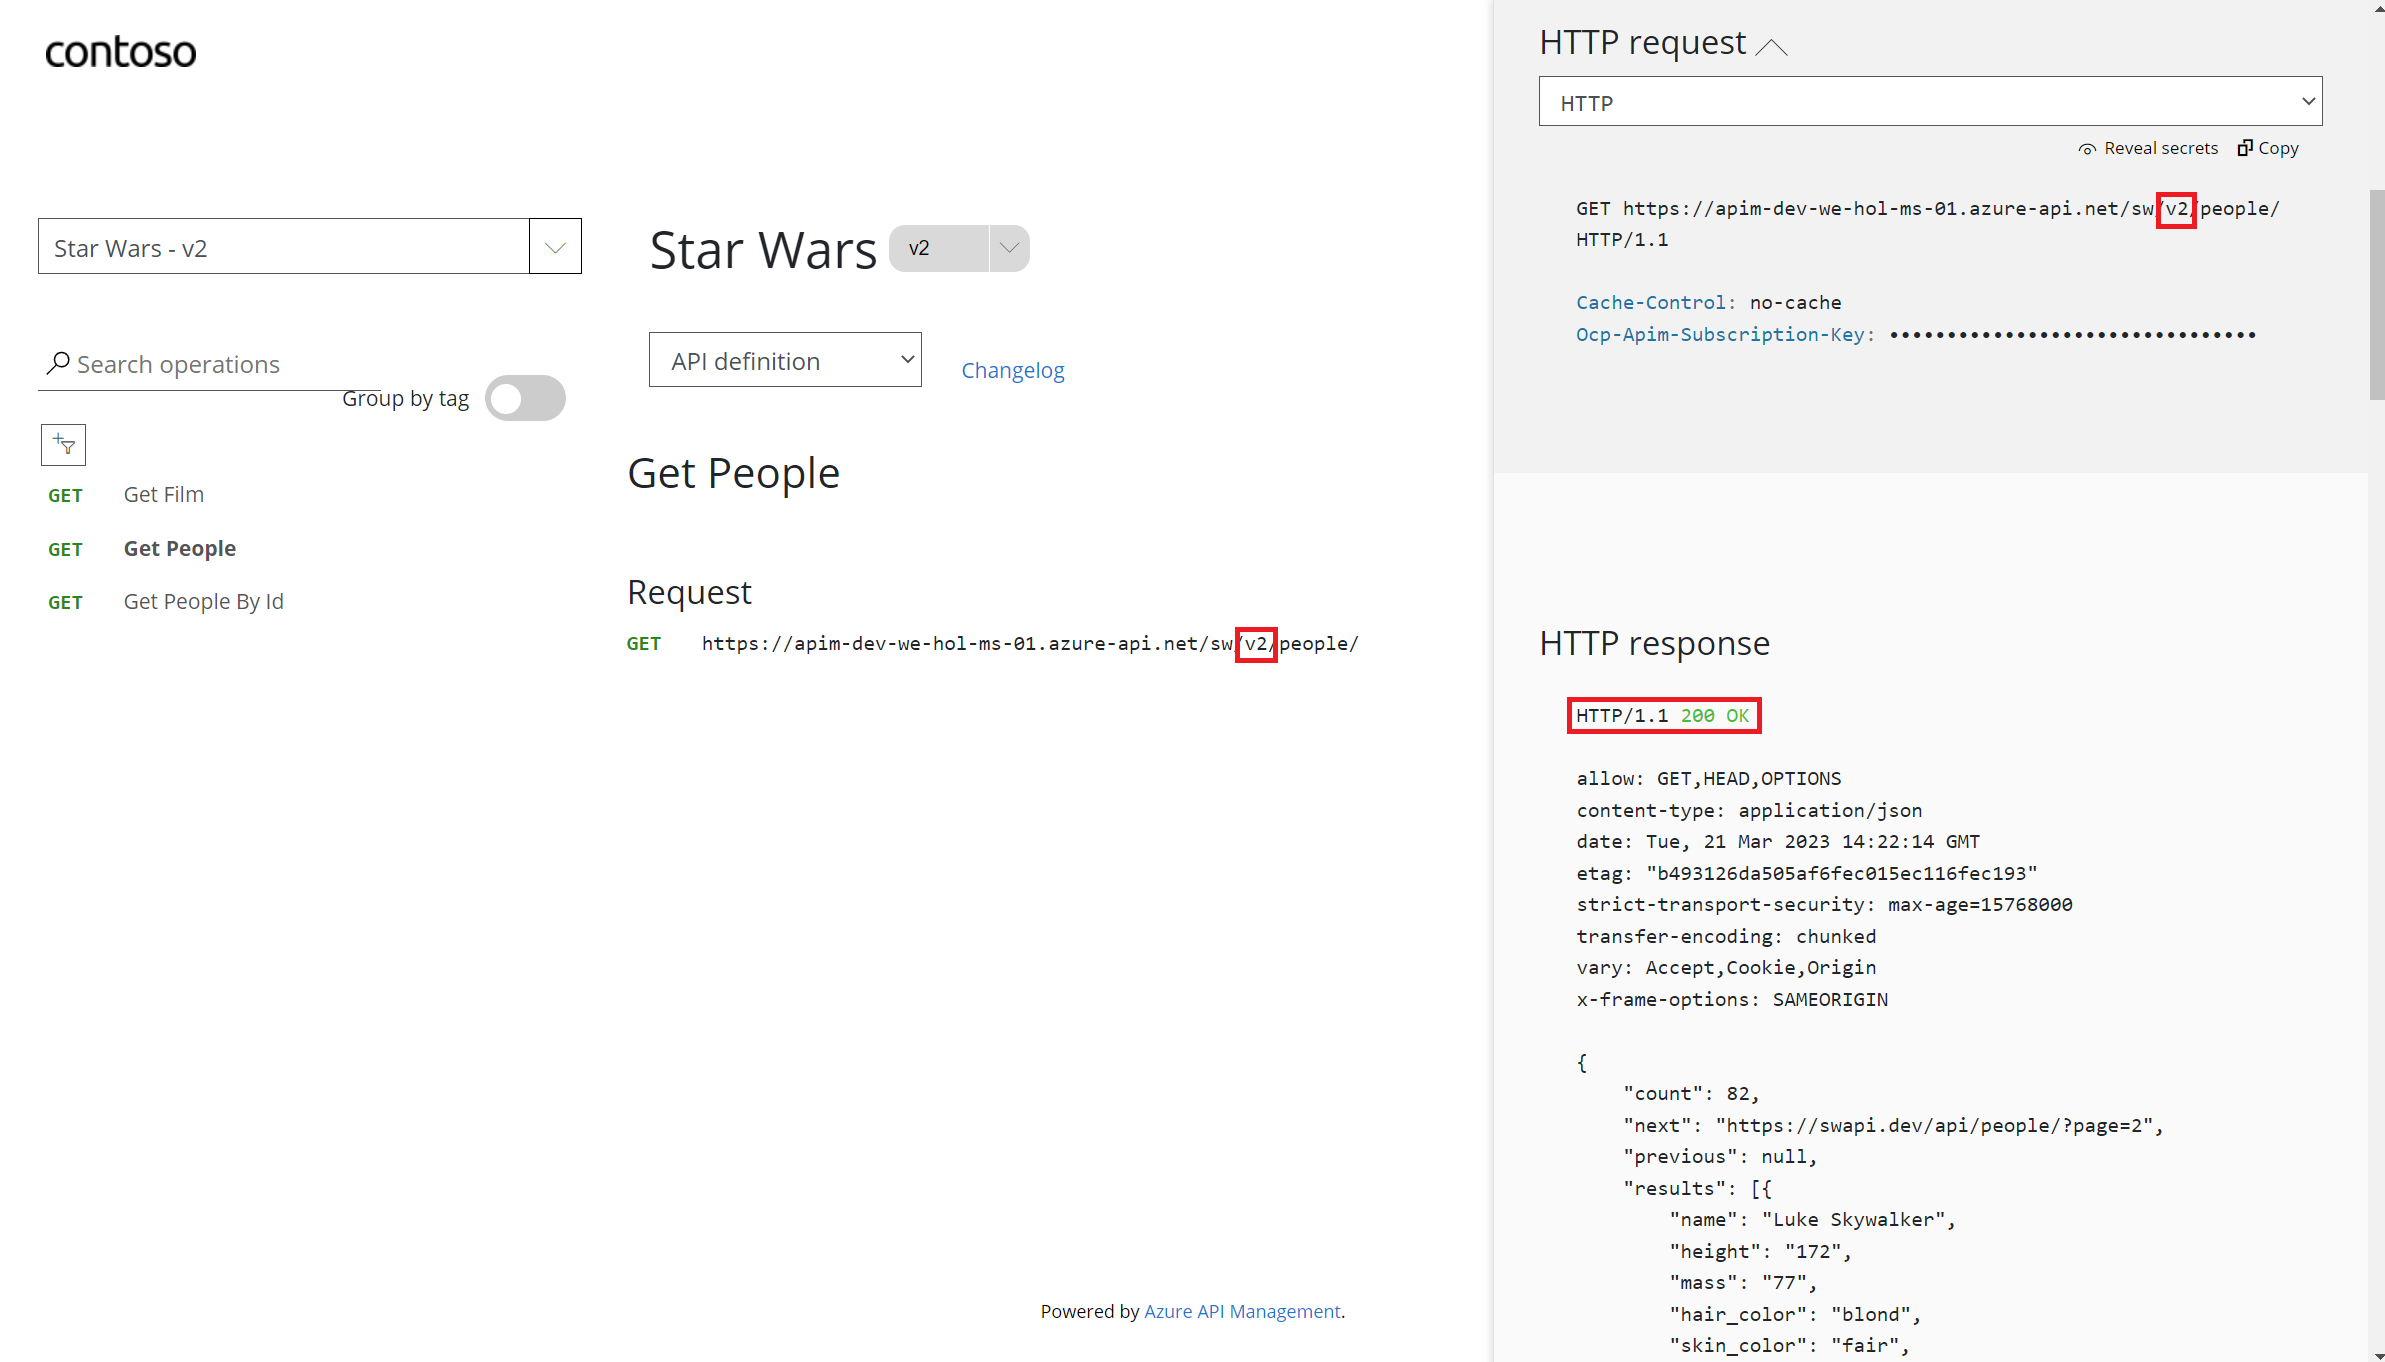
What Versions Enable
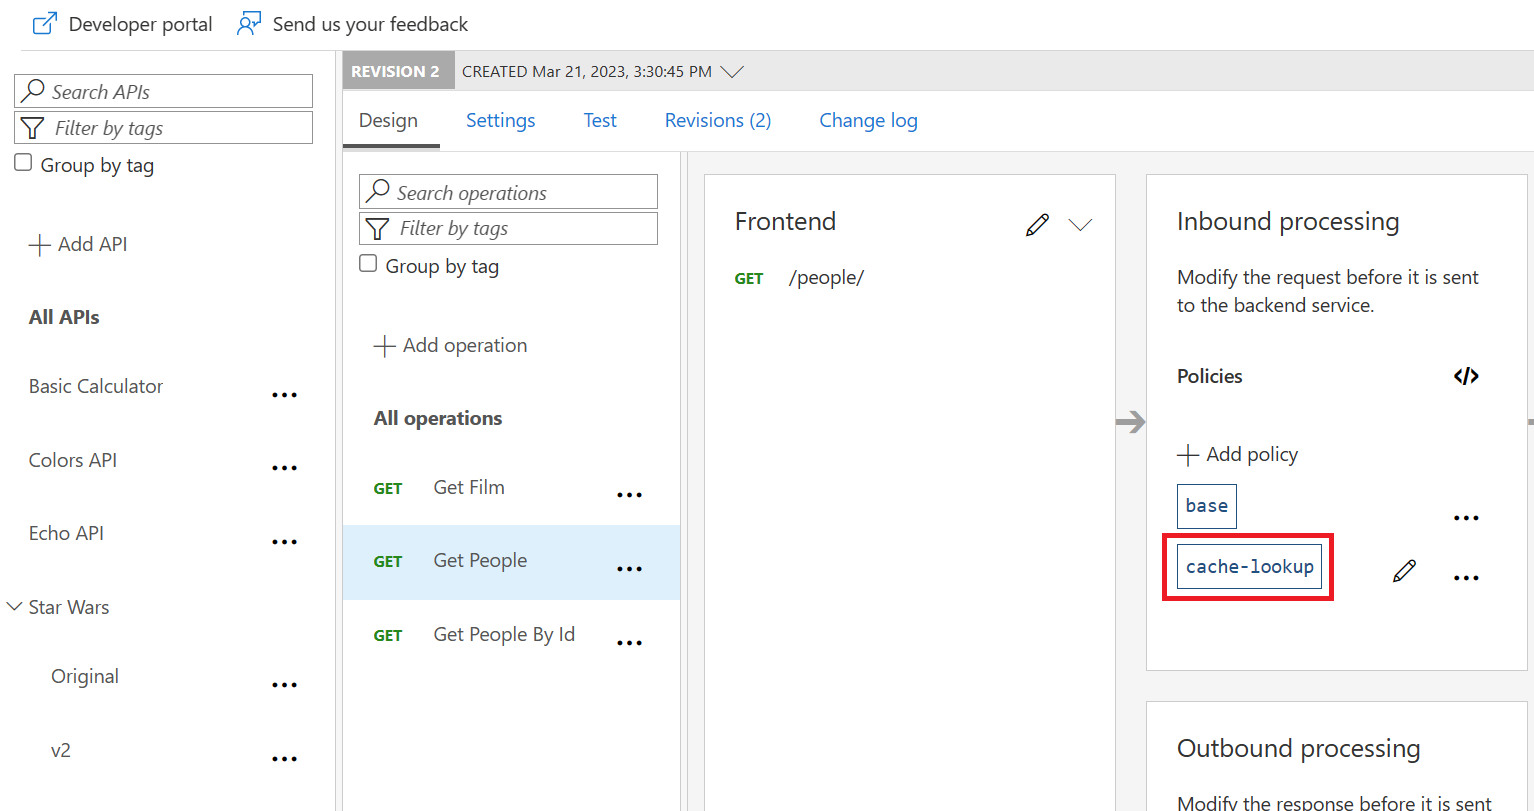
Task 2: Revision
Revisions
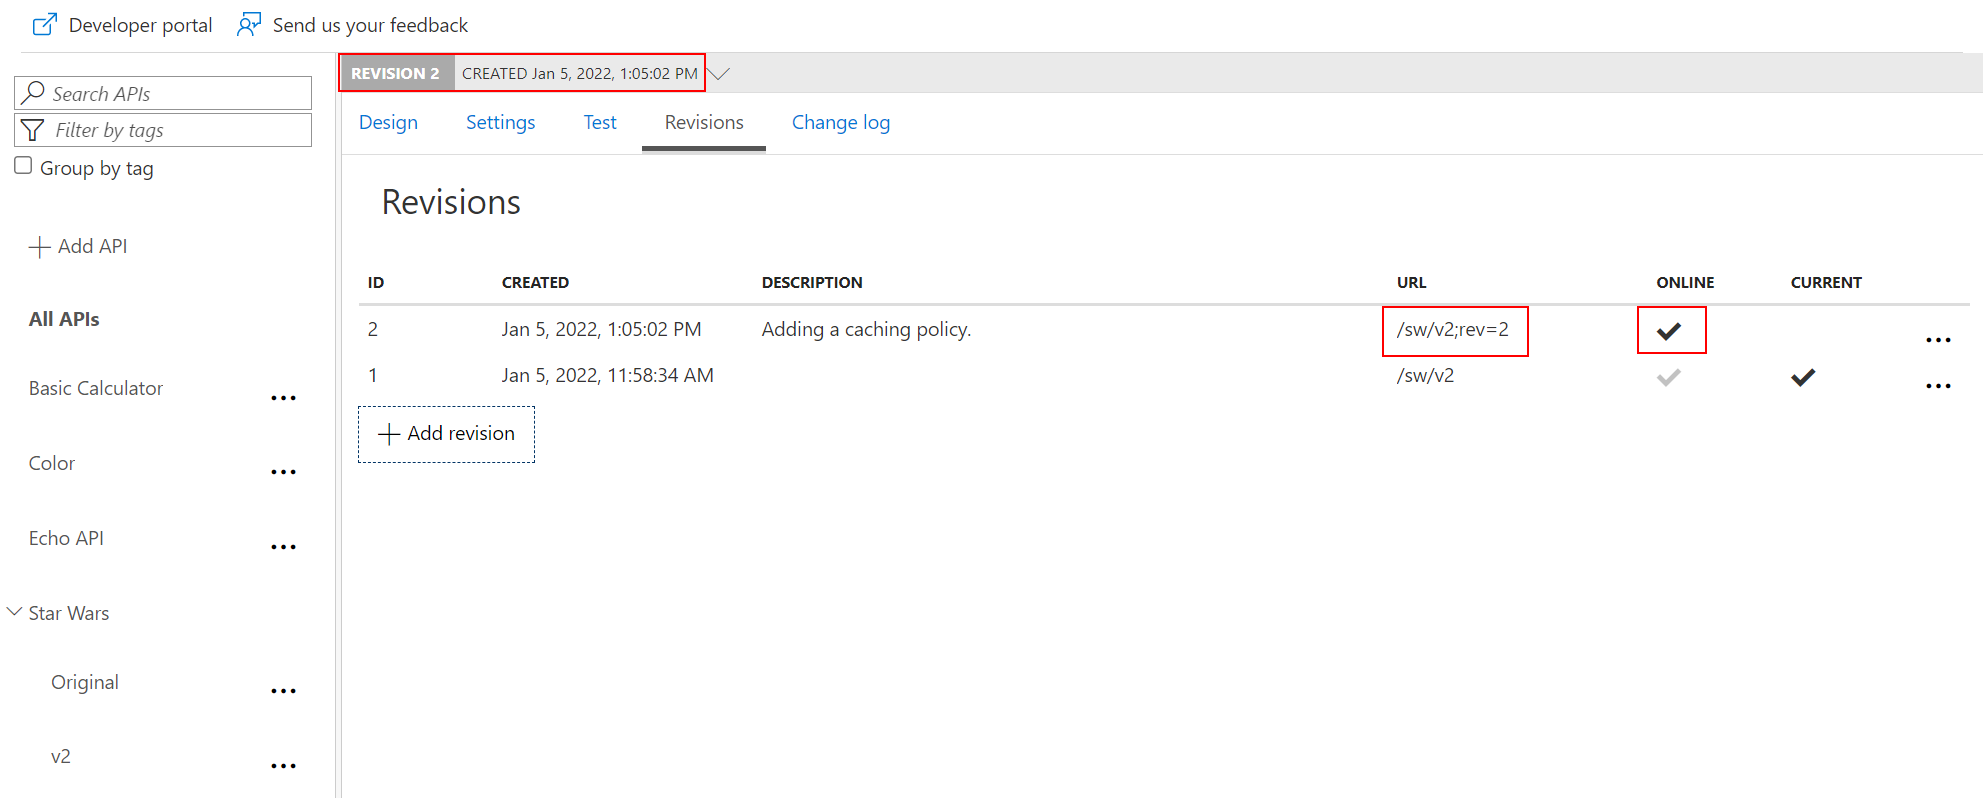
Add a new revision
Adding a caching policy.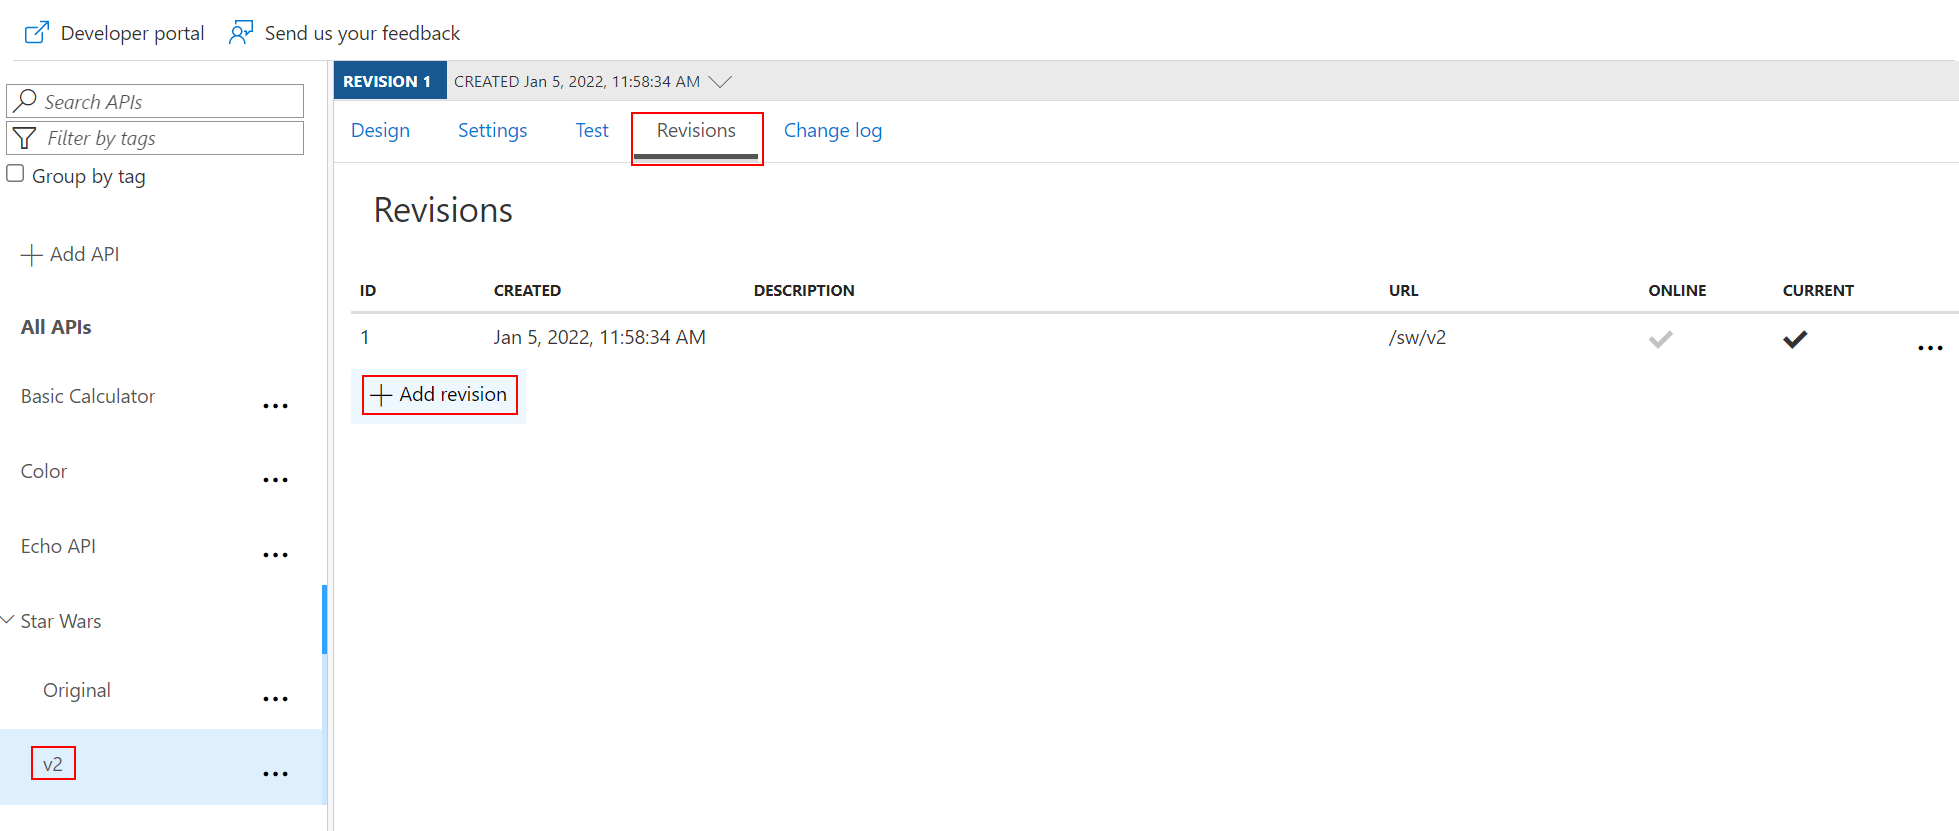

Add caching
GetPeople operation.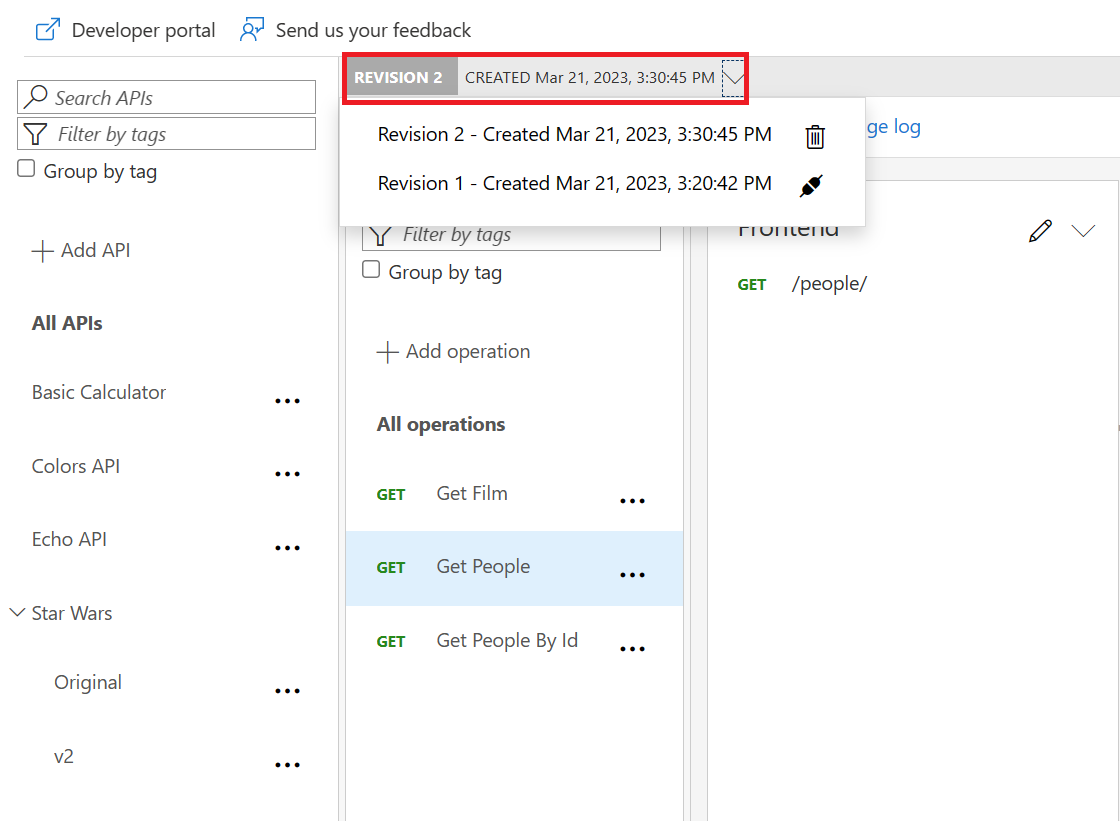
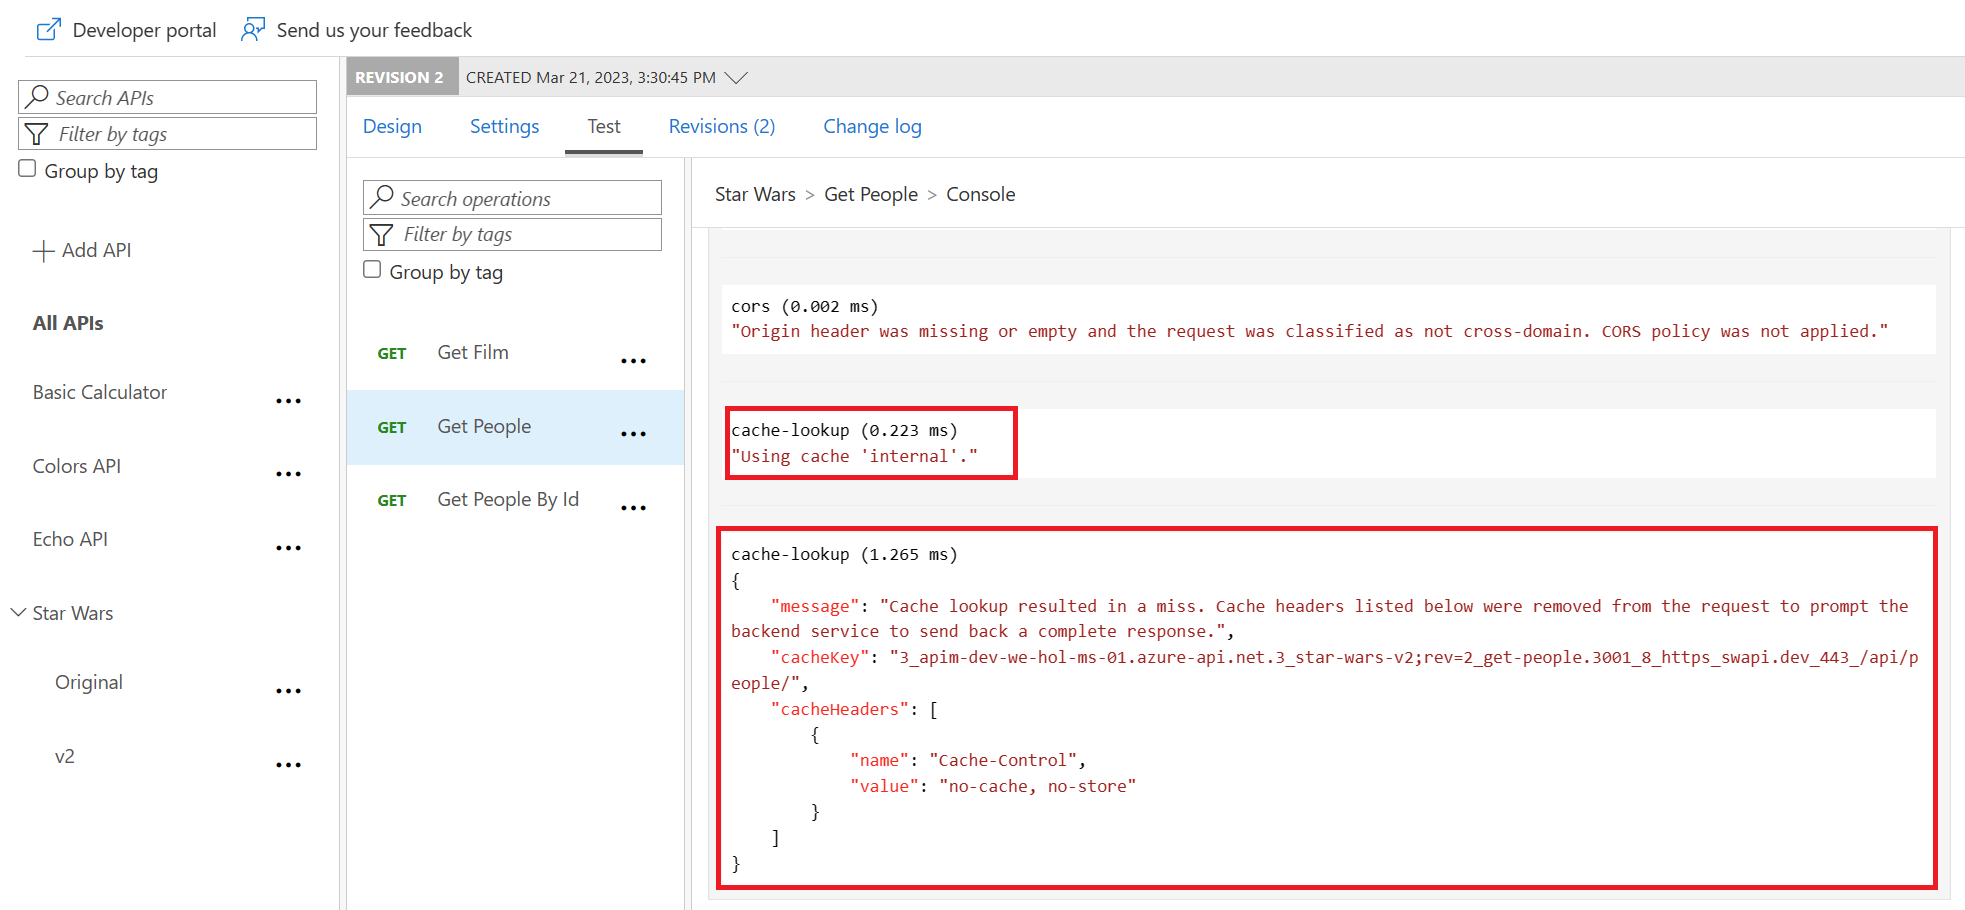
Test the new revision
GetPeople operation.
The request URL should look similar to: https://.azure-api.net/sw/v2;rev=2/people/.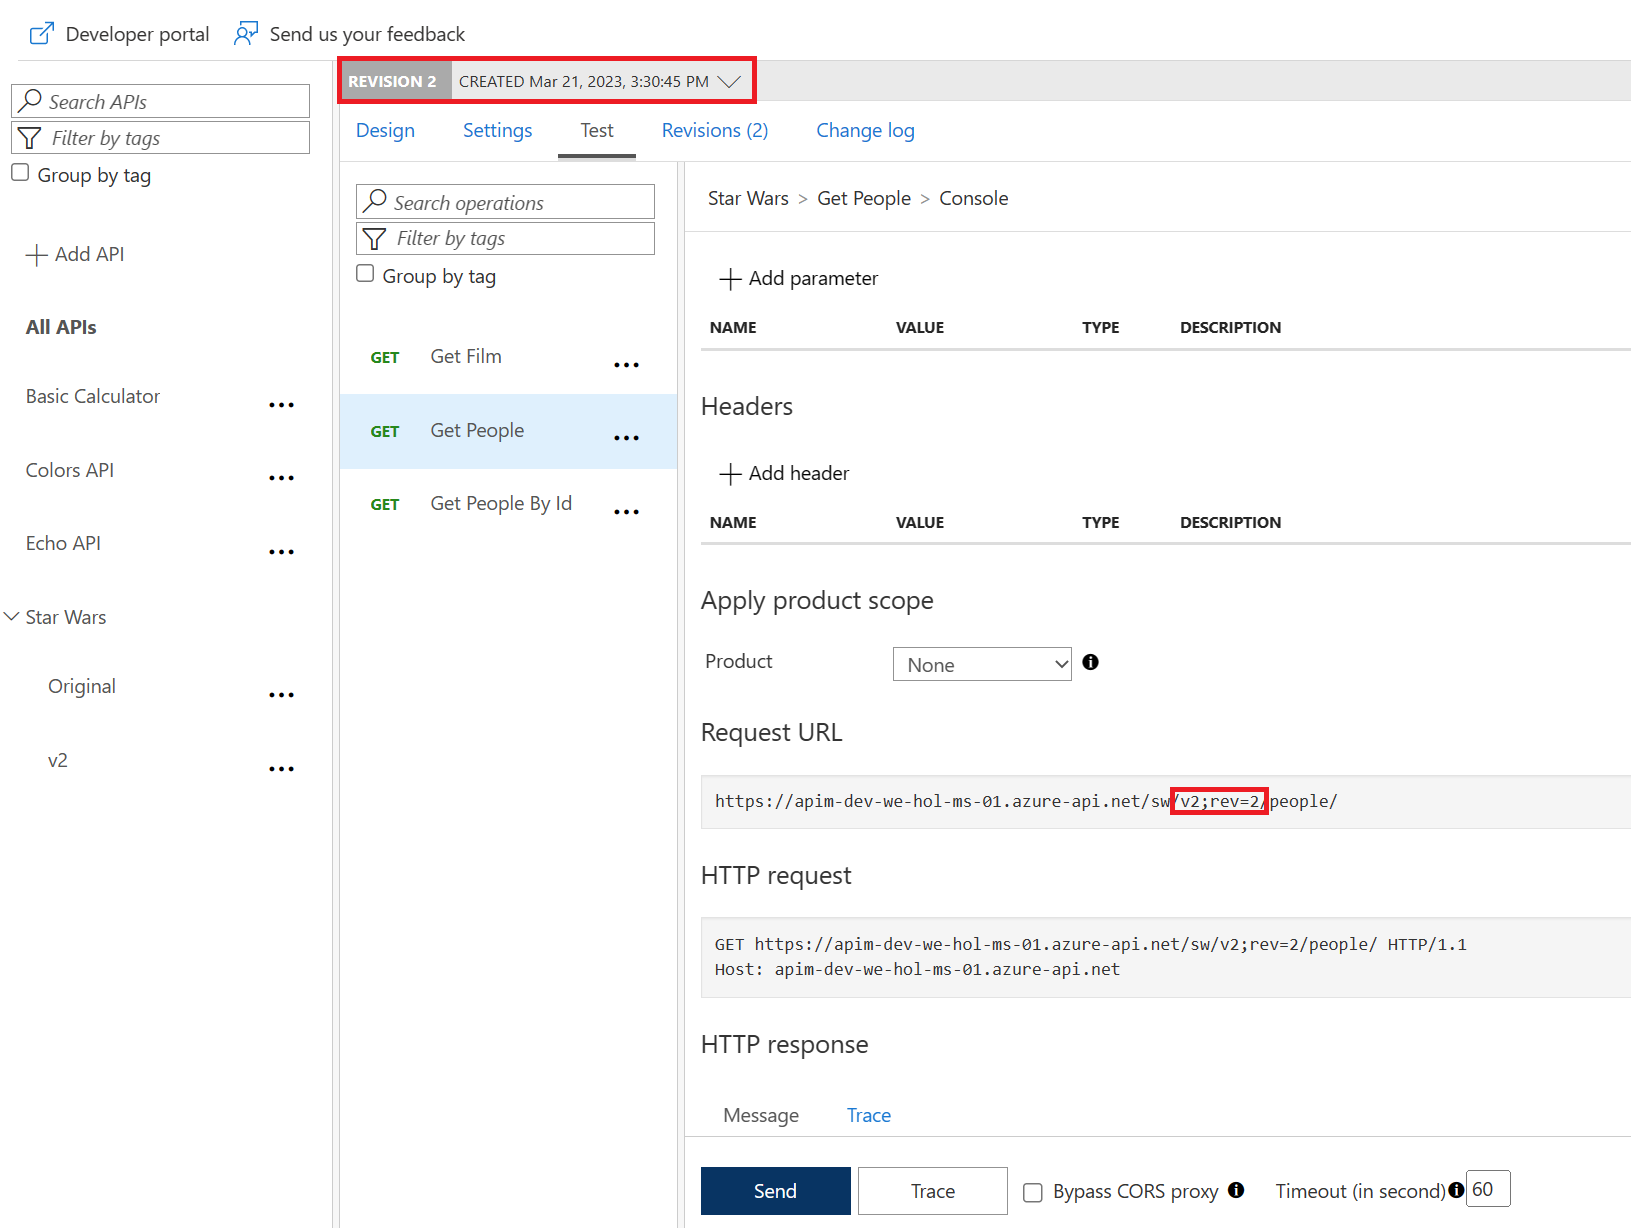
Make current revision
rev2 the current revision.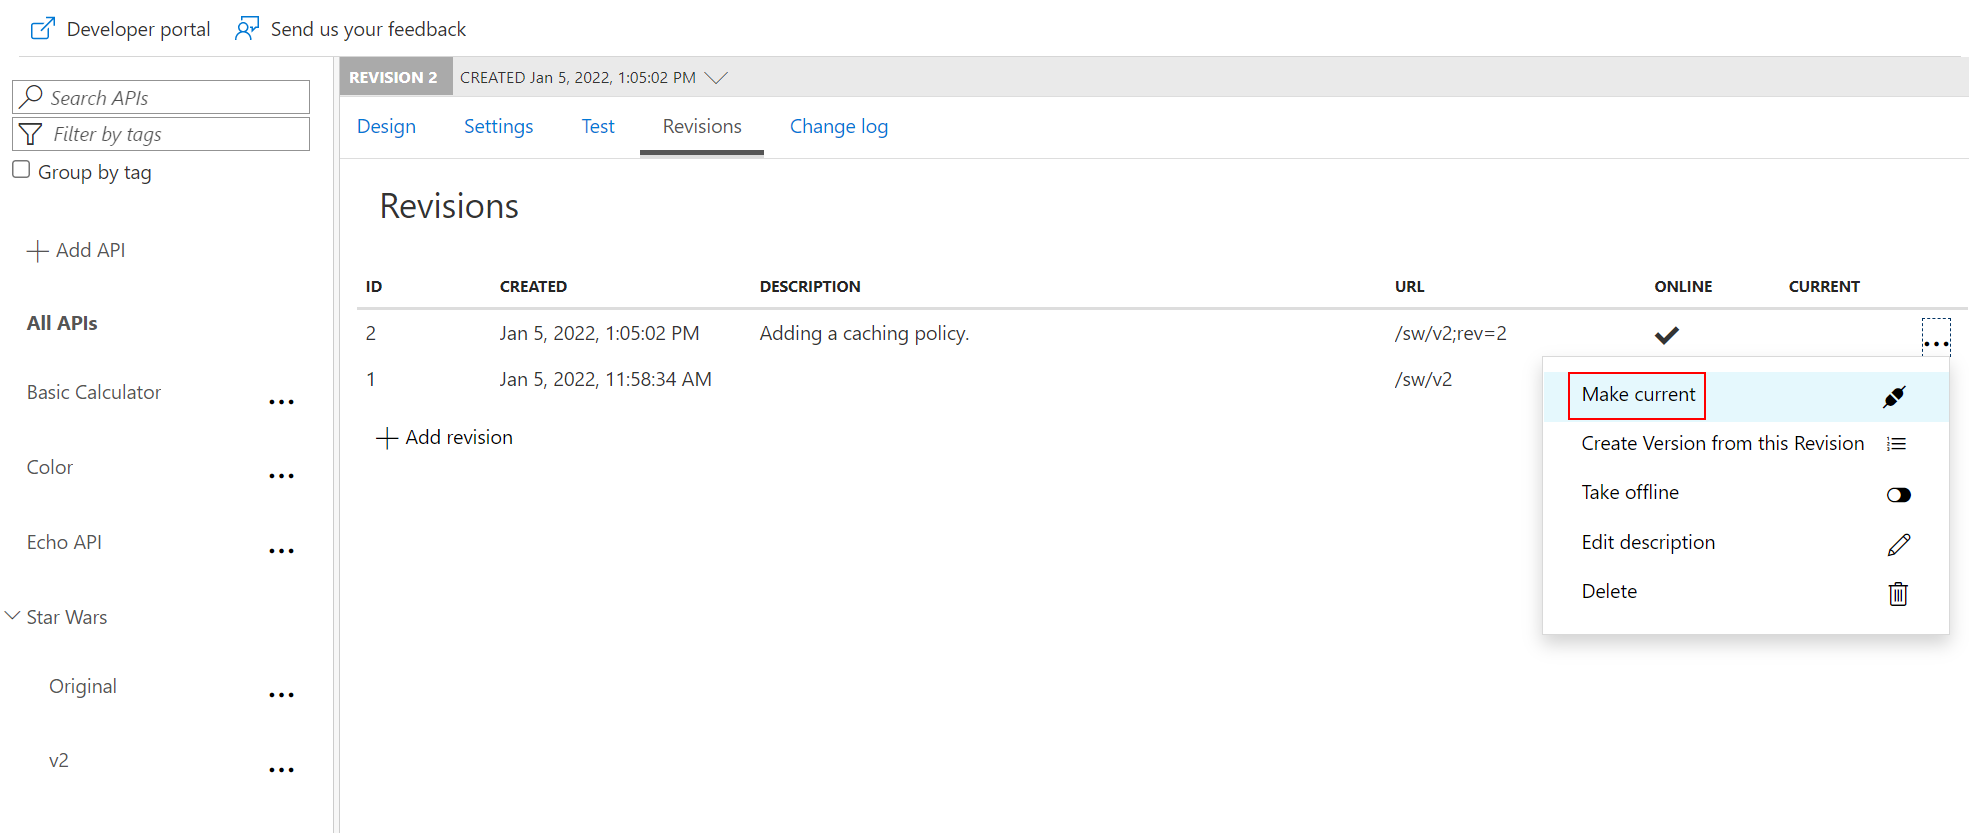
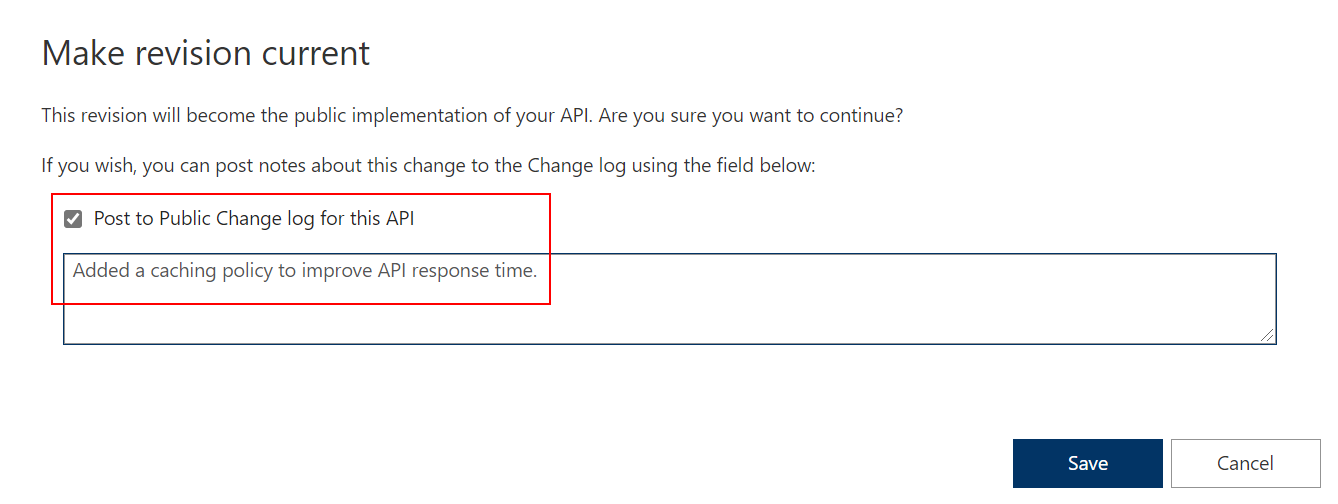
rev qualifier.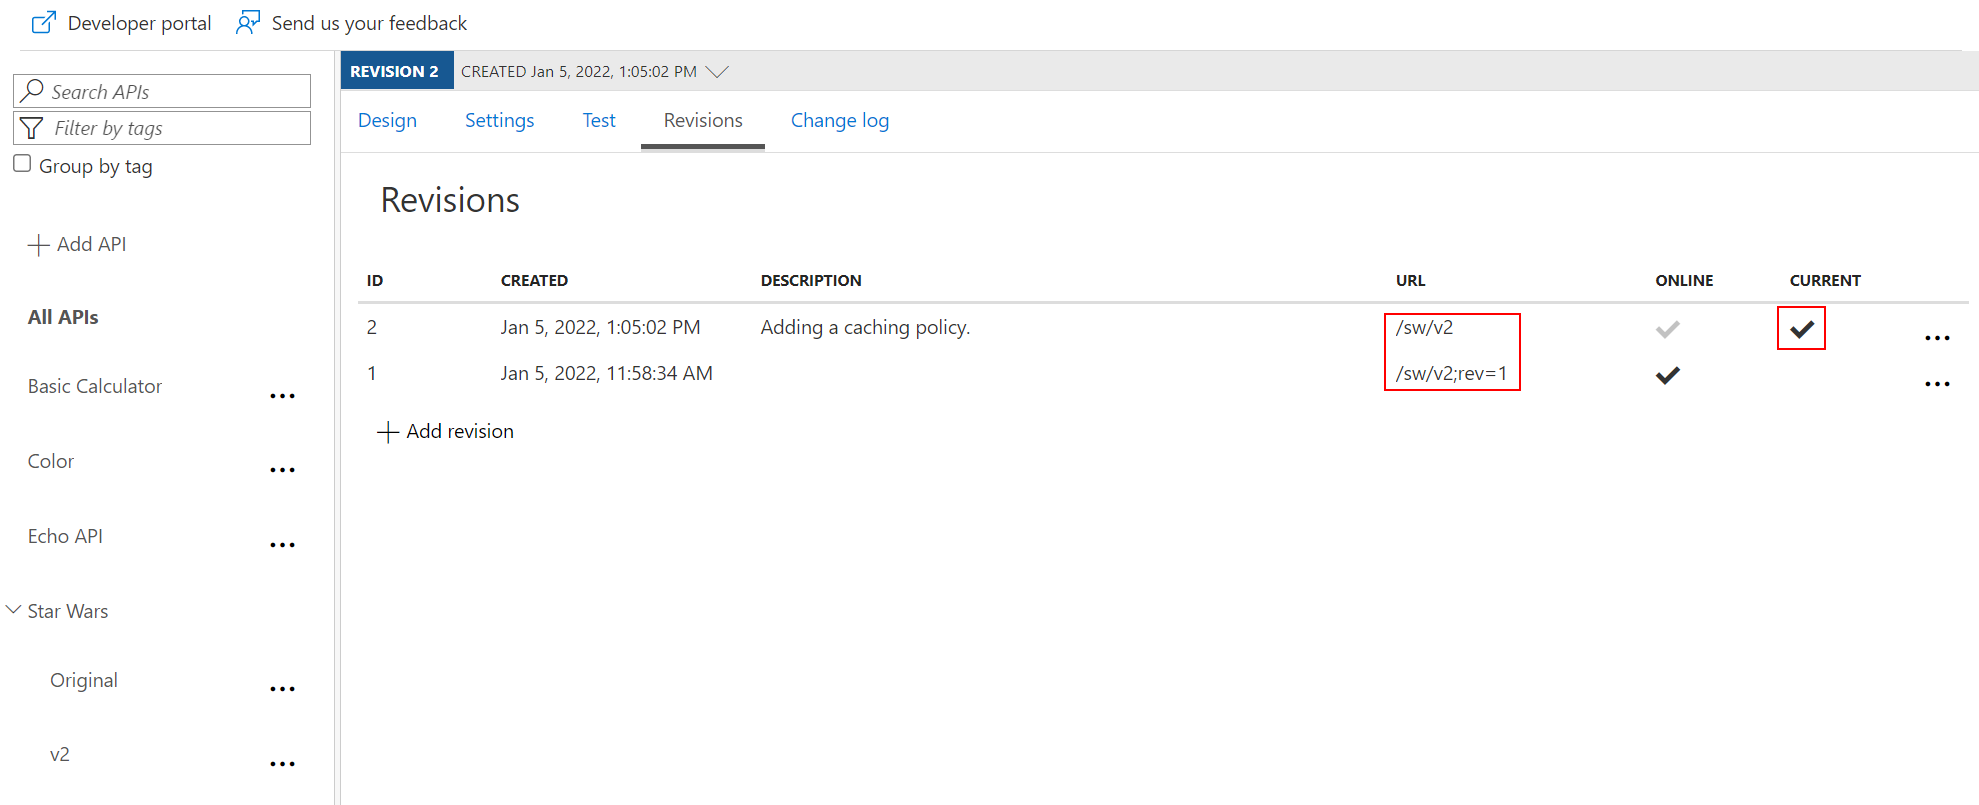
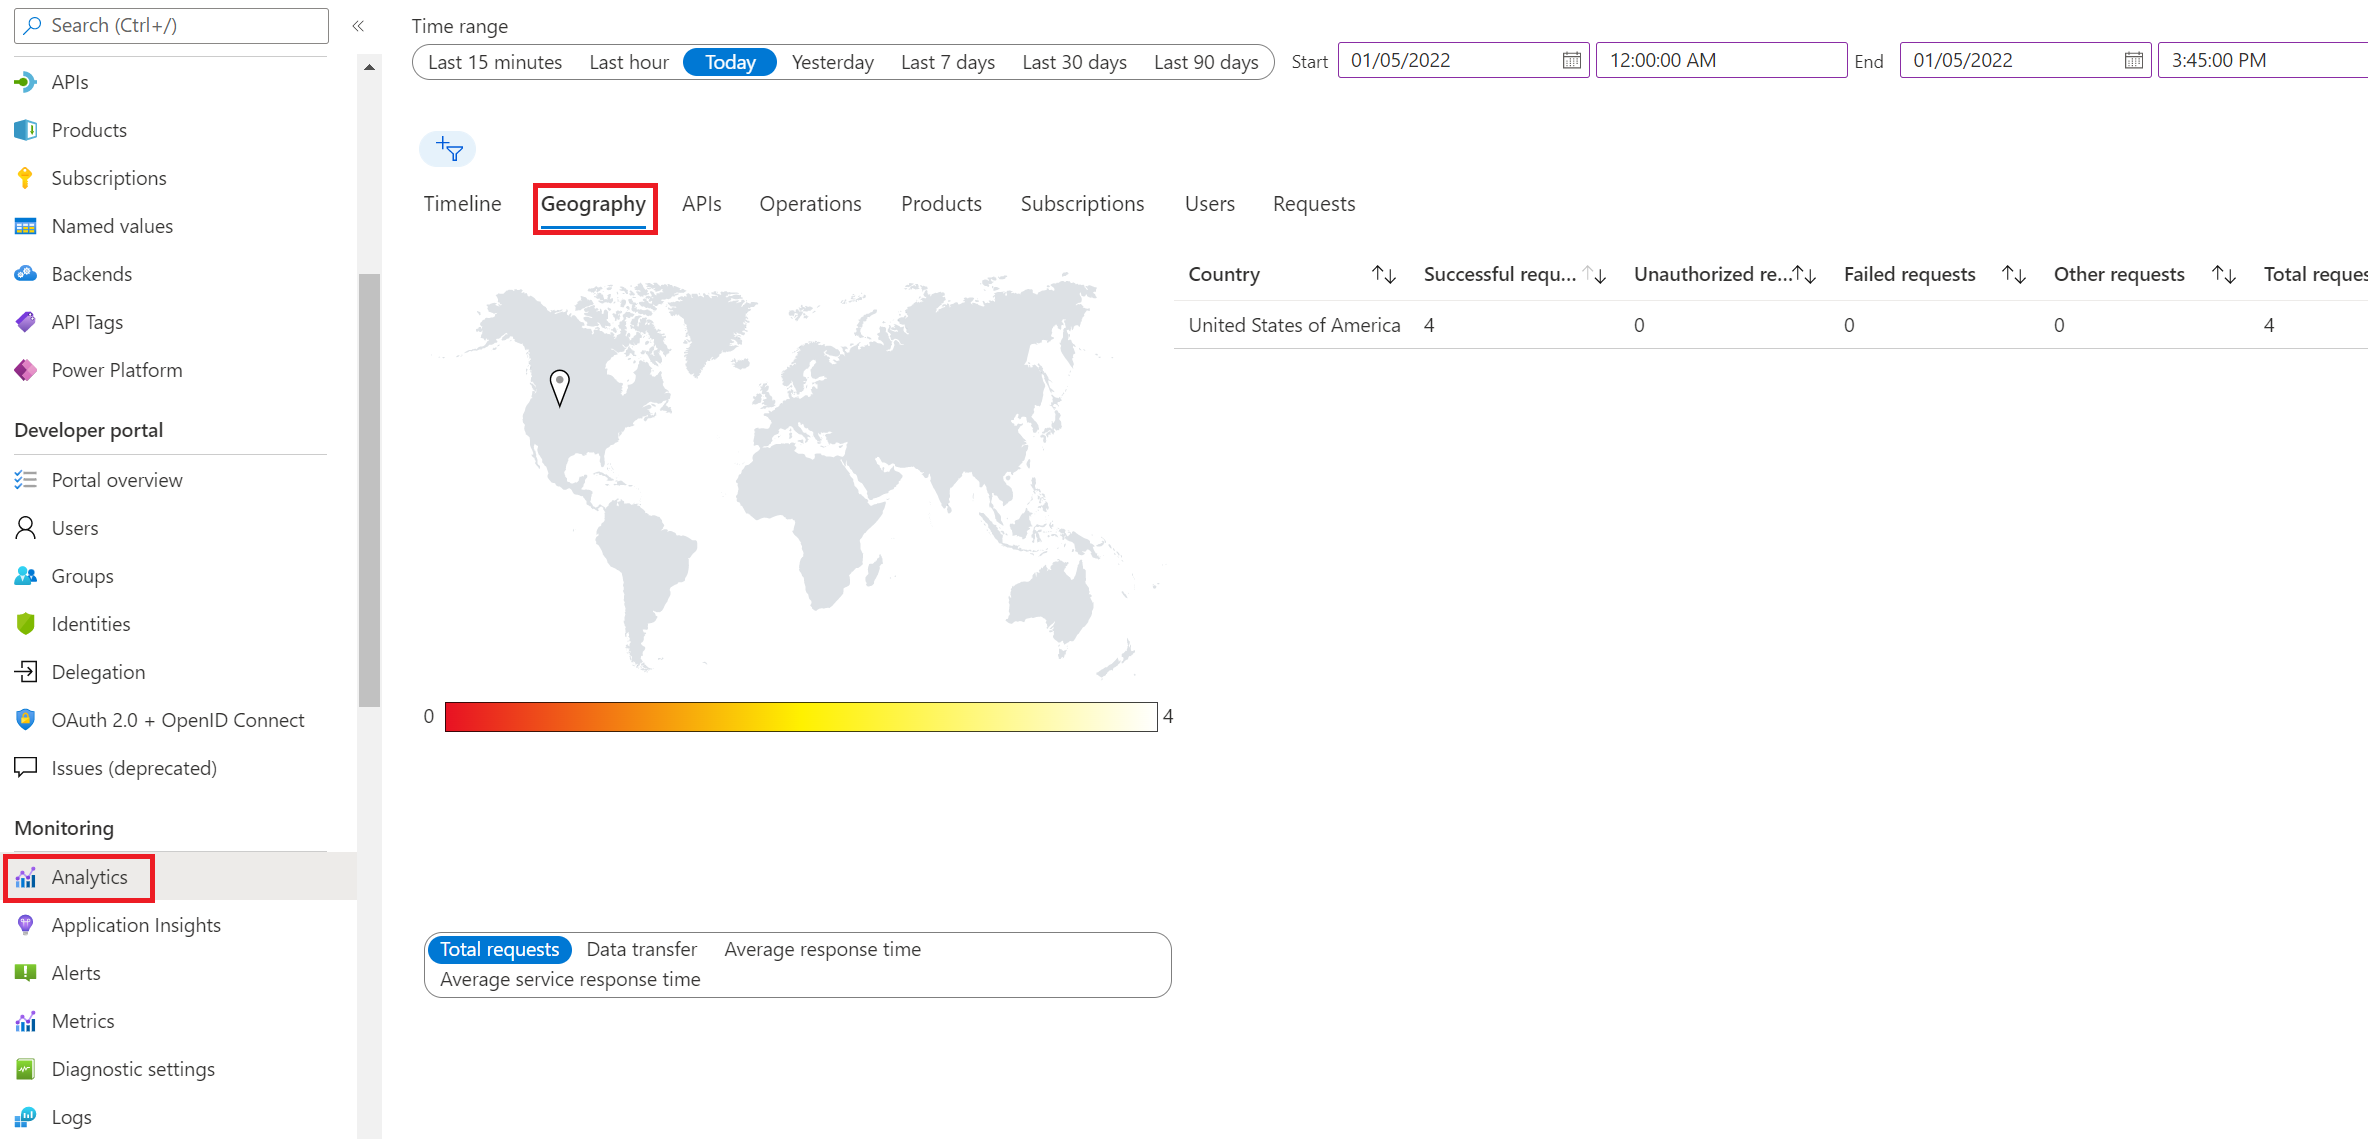
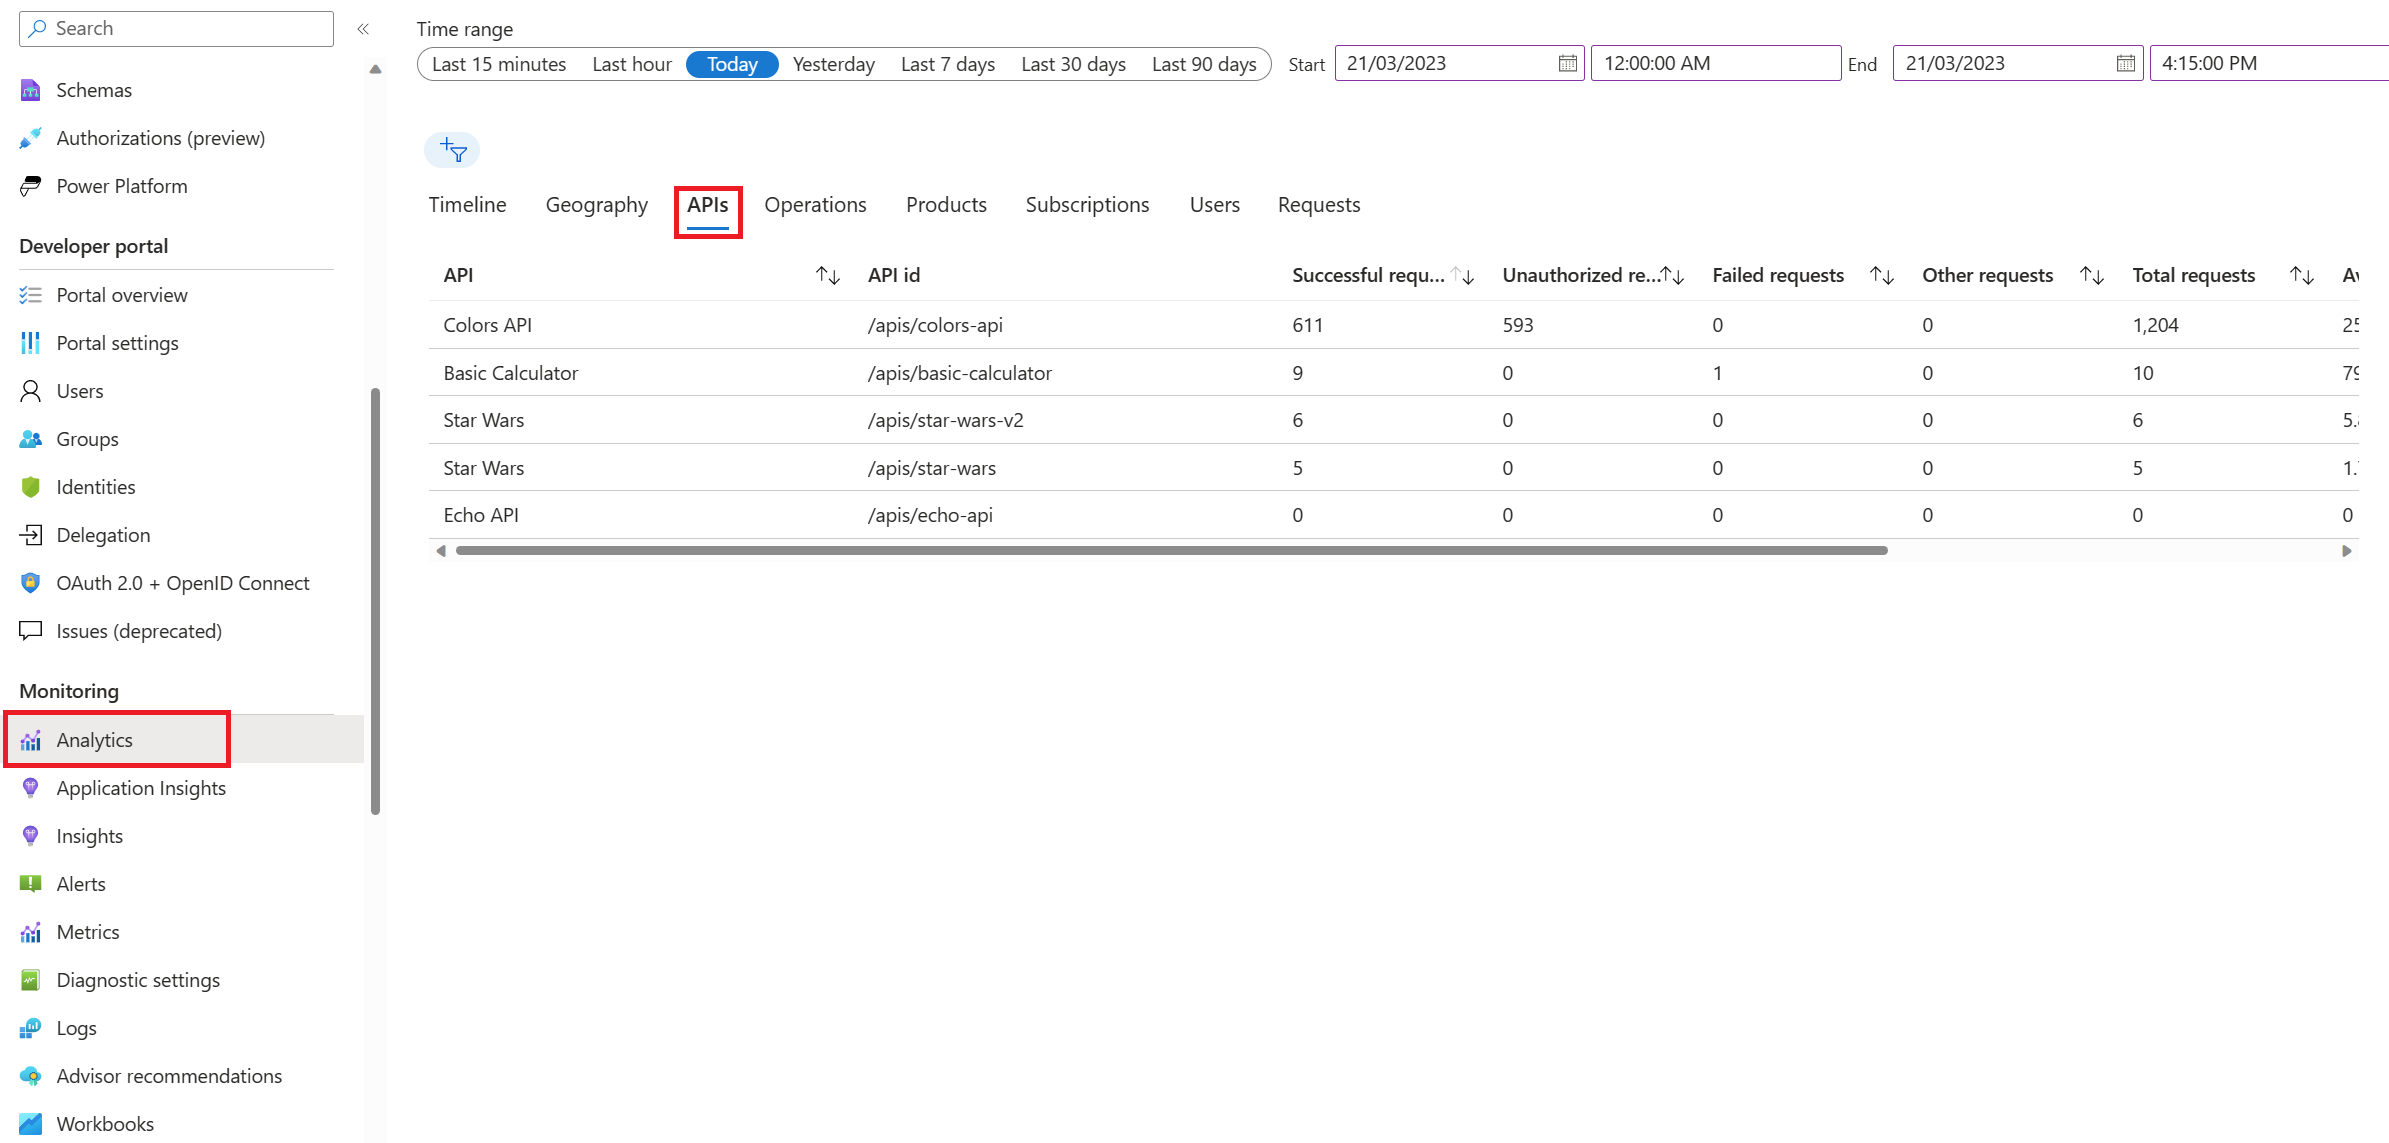
Exercise 5: Analytics and Monitoring
TABLE OF CONTENTS
Task 1: Basic Monitoring with Azure Monitor

Task 2: Application Insights
How to integrate Azure API Management with Azure Application Insights
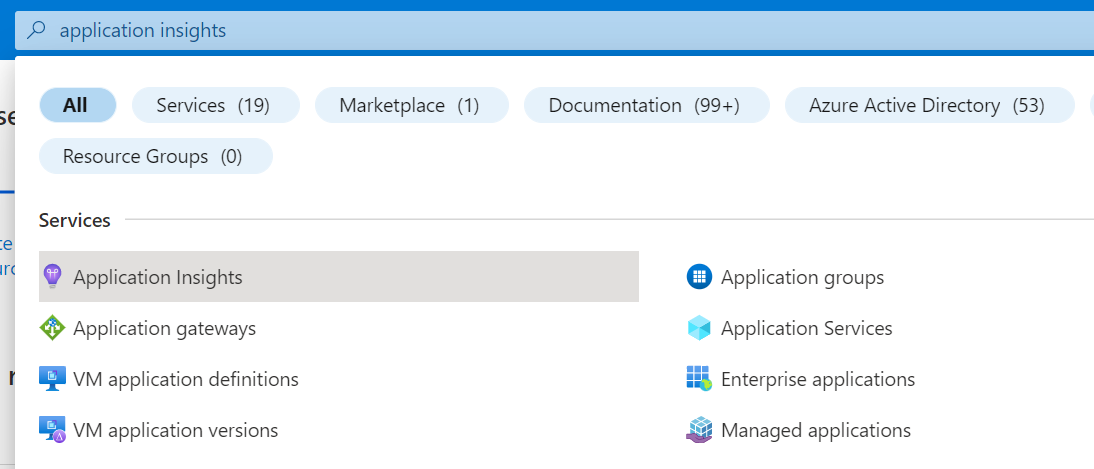
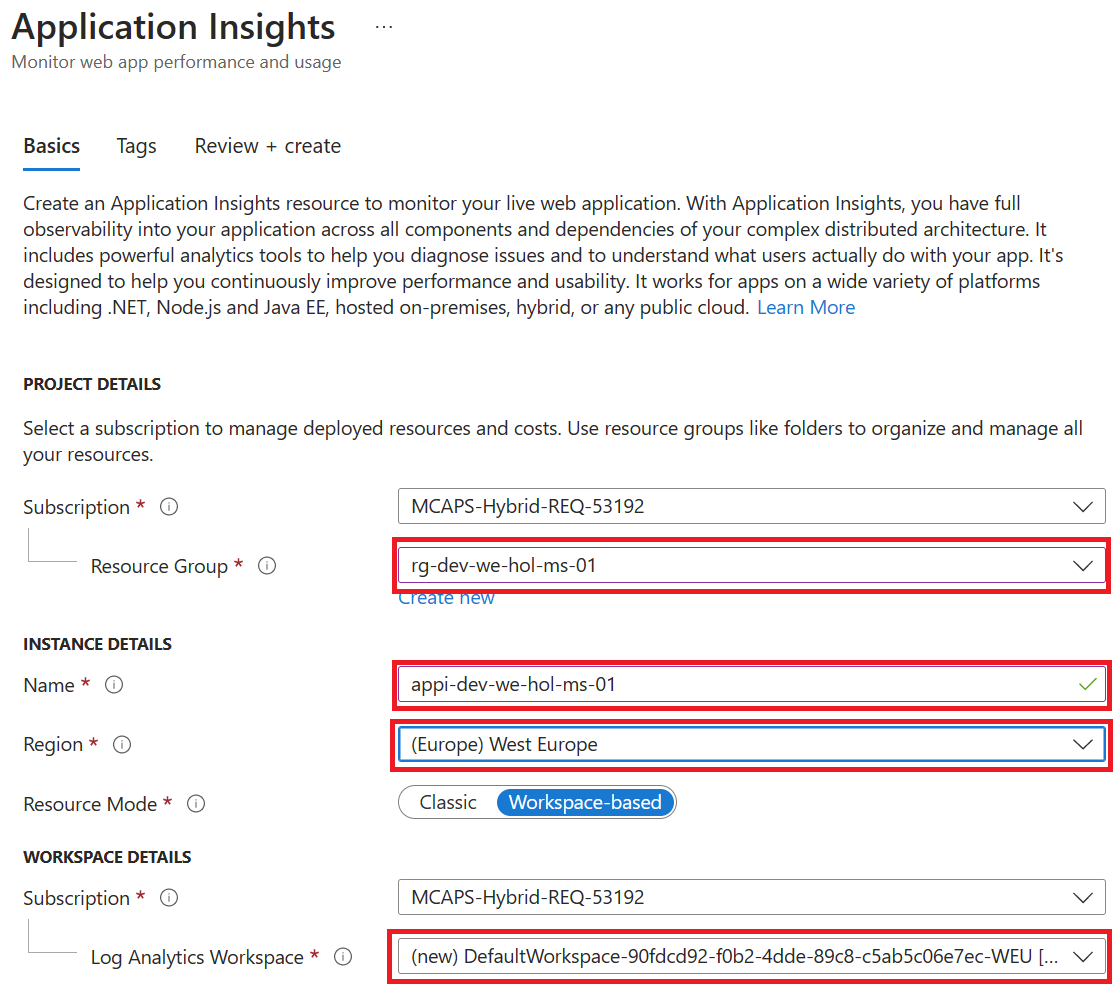
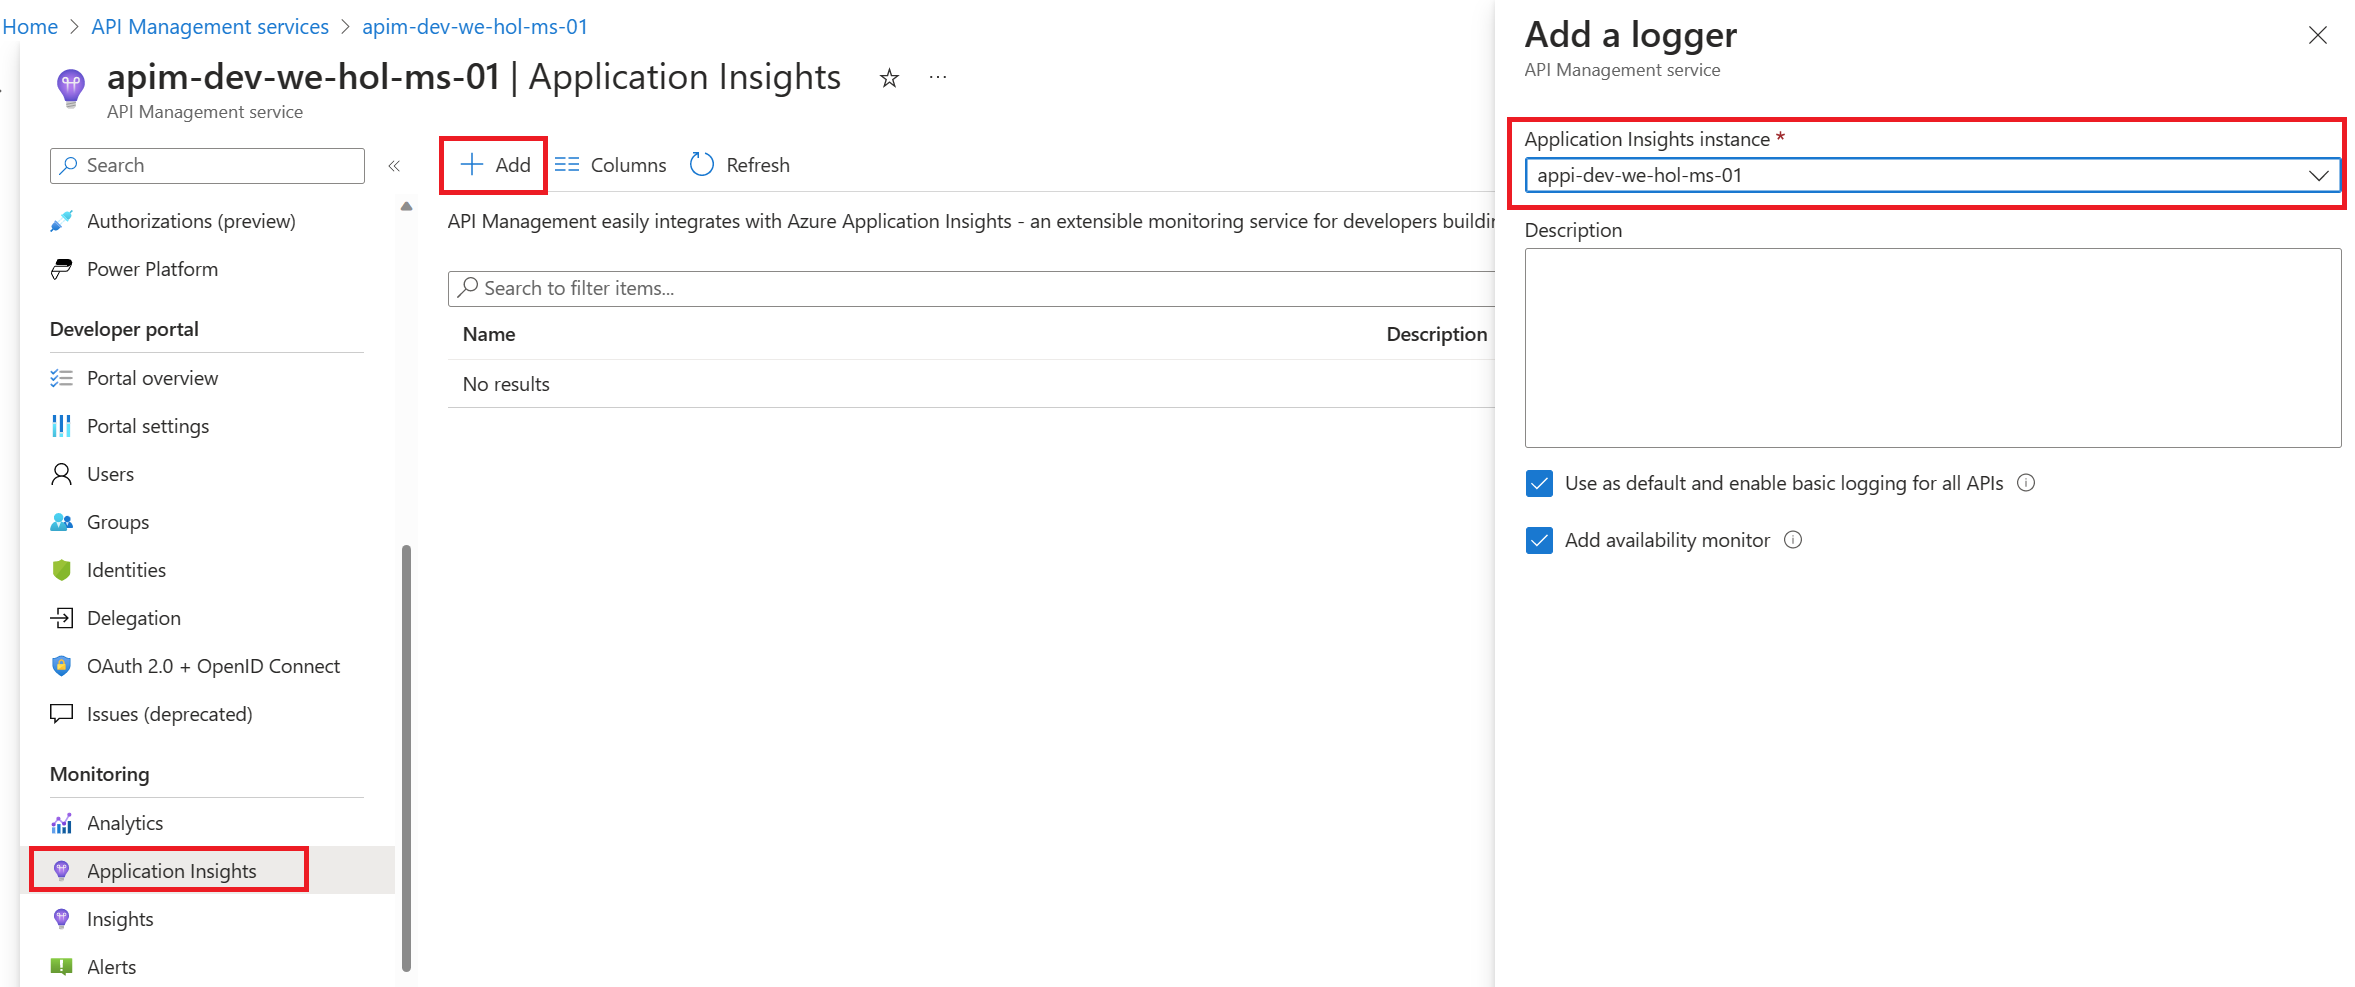
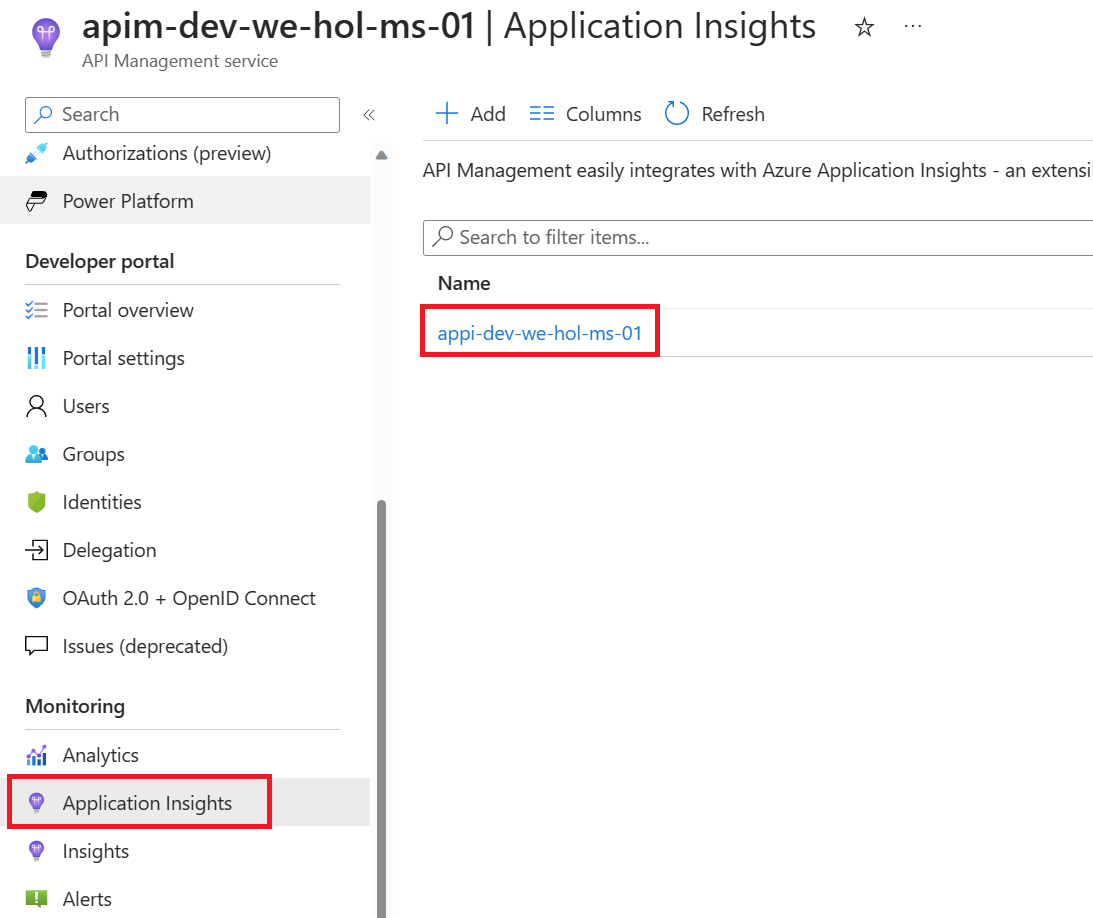
Create an Azure Application Insights instance
Create a connection between Azure Application Insights and Azure API Management service instance
Enable Application Insights logging for your API
What data is added to Azure Application Insights
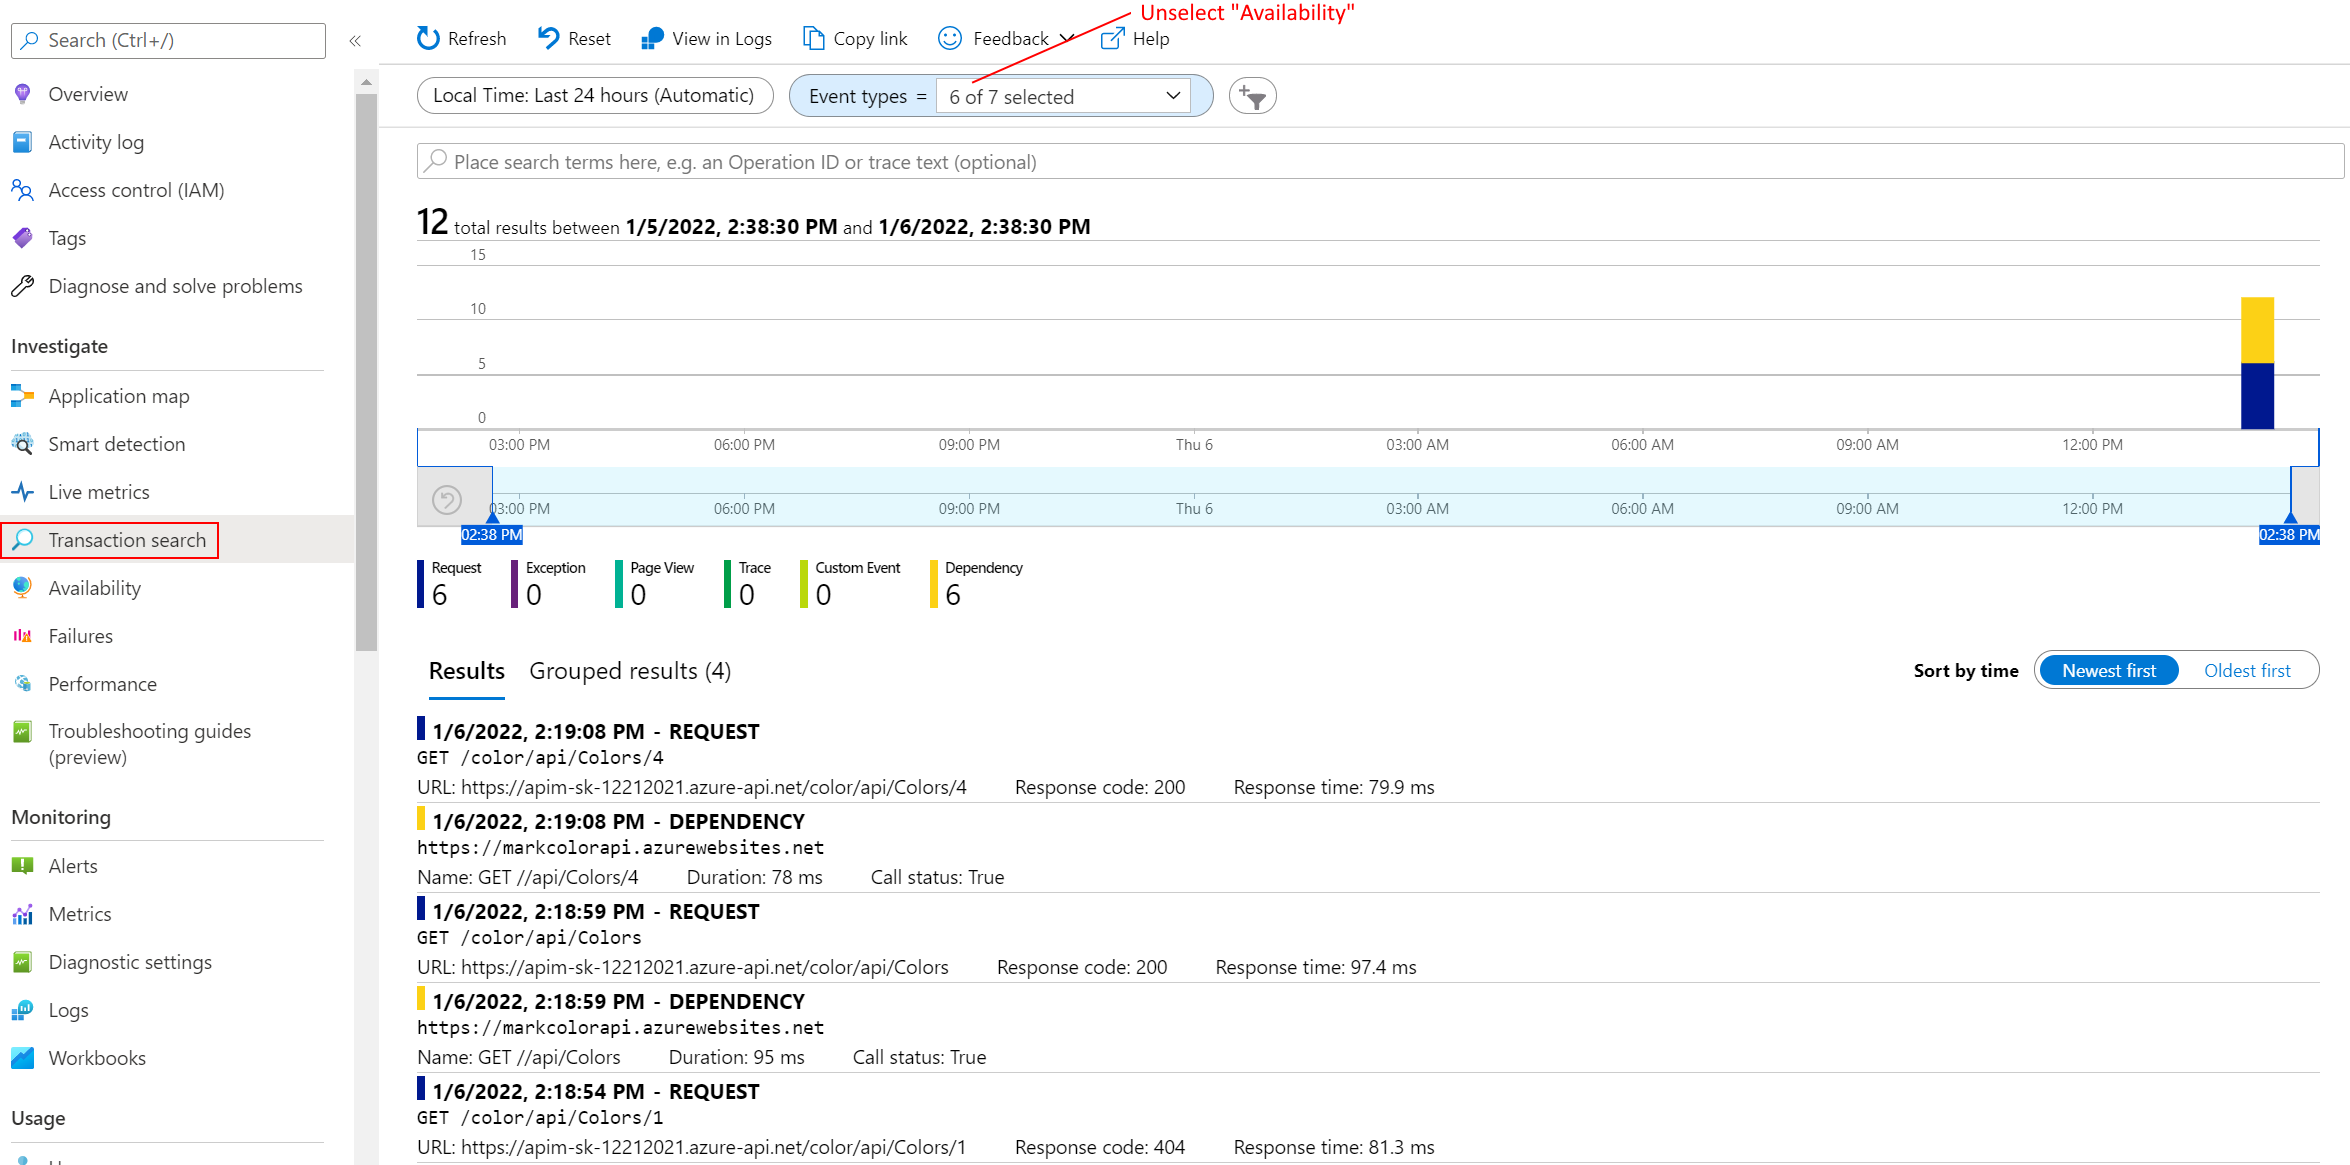
Generating Test Requests
Viewing Azure Application Insights Data
Performance implications and log sampling
Task 3: Logging with Event Hub
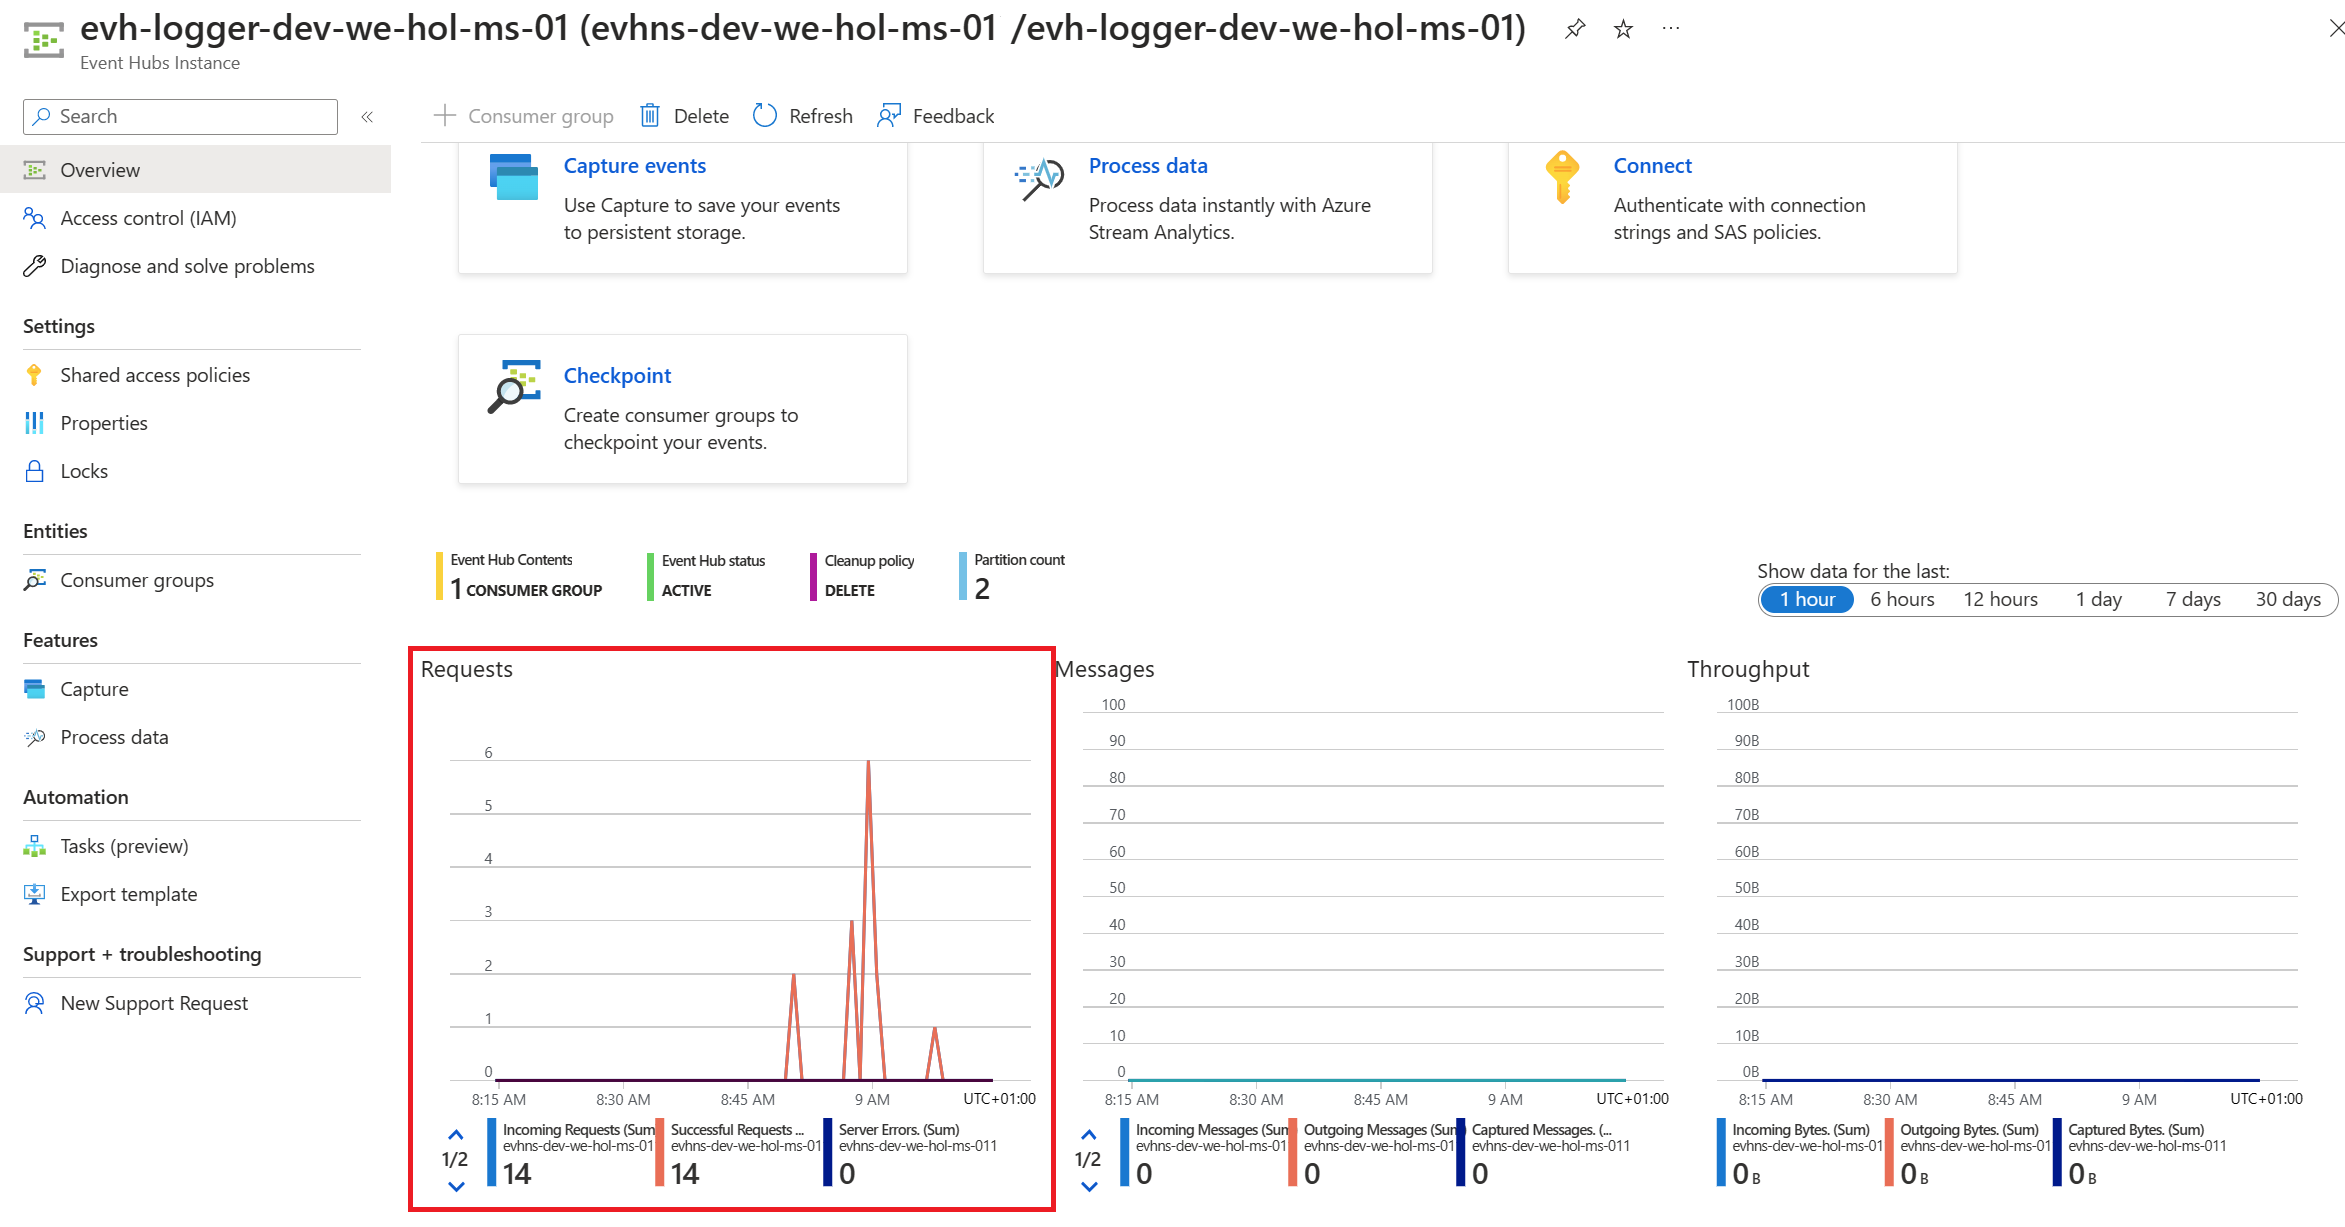
Event Hub Overview
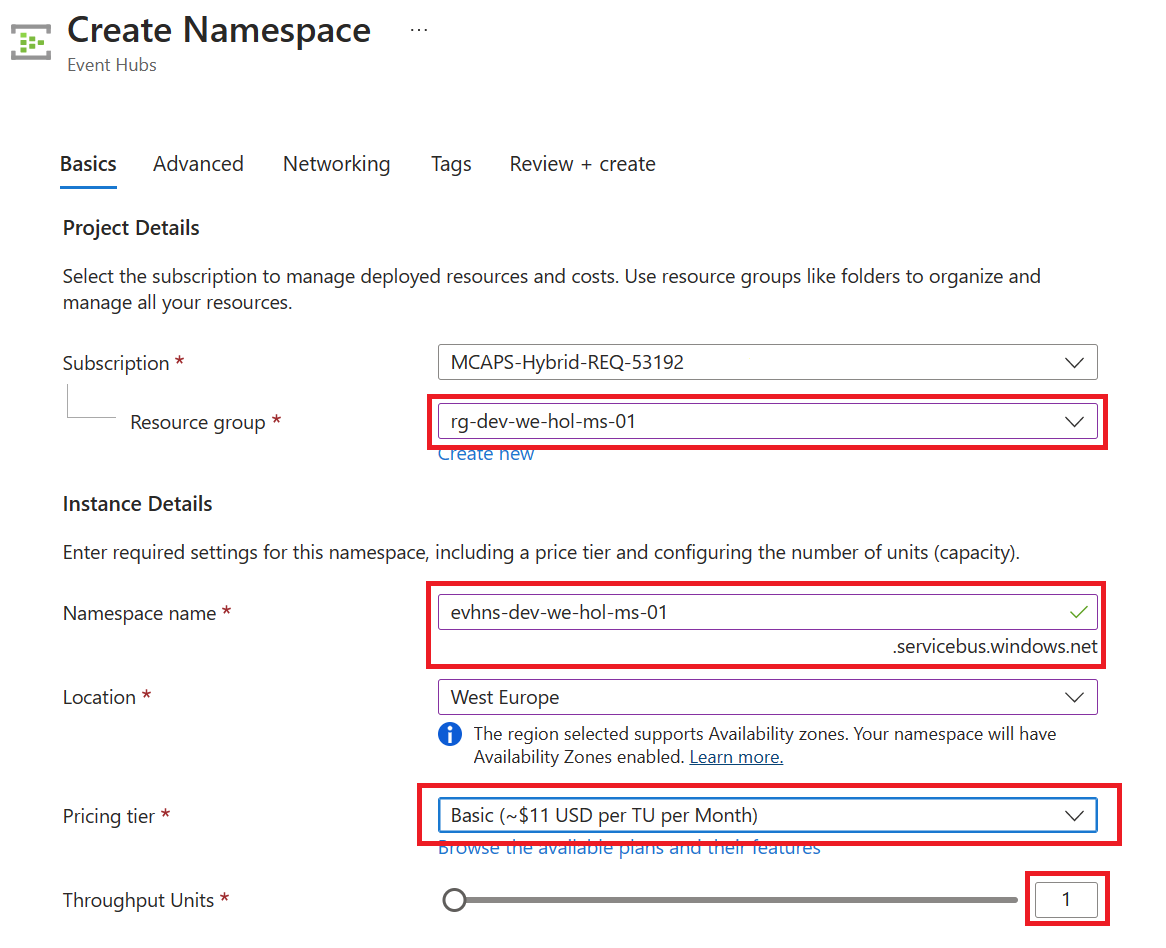
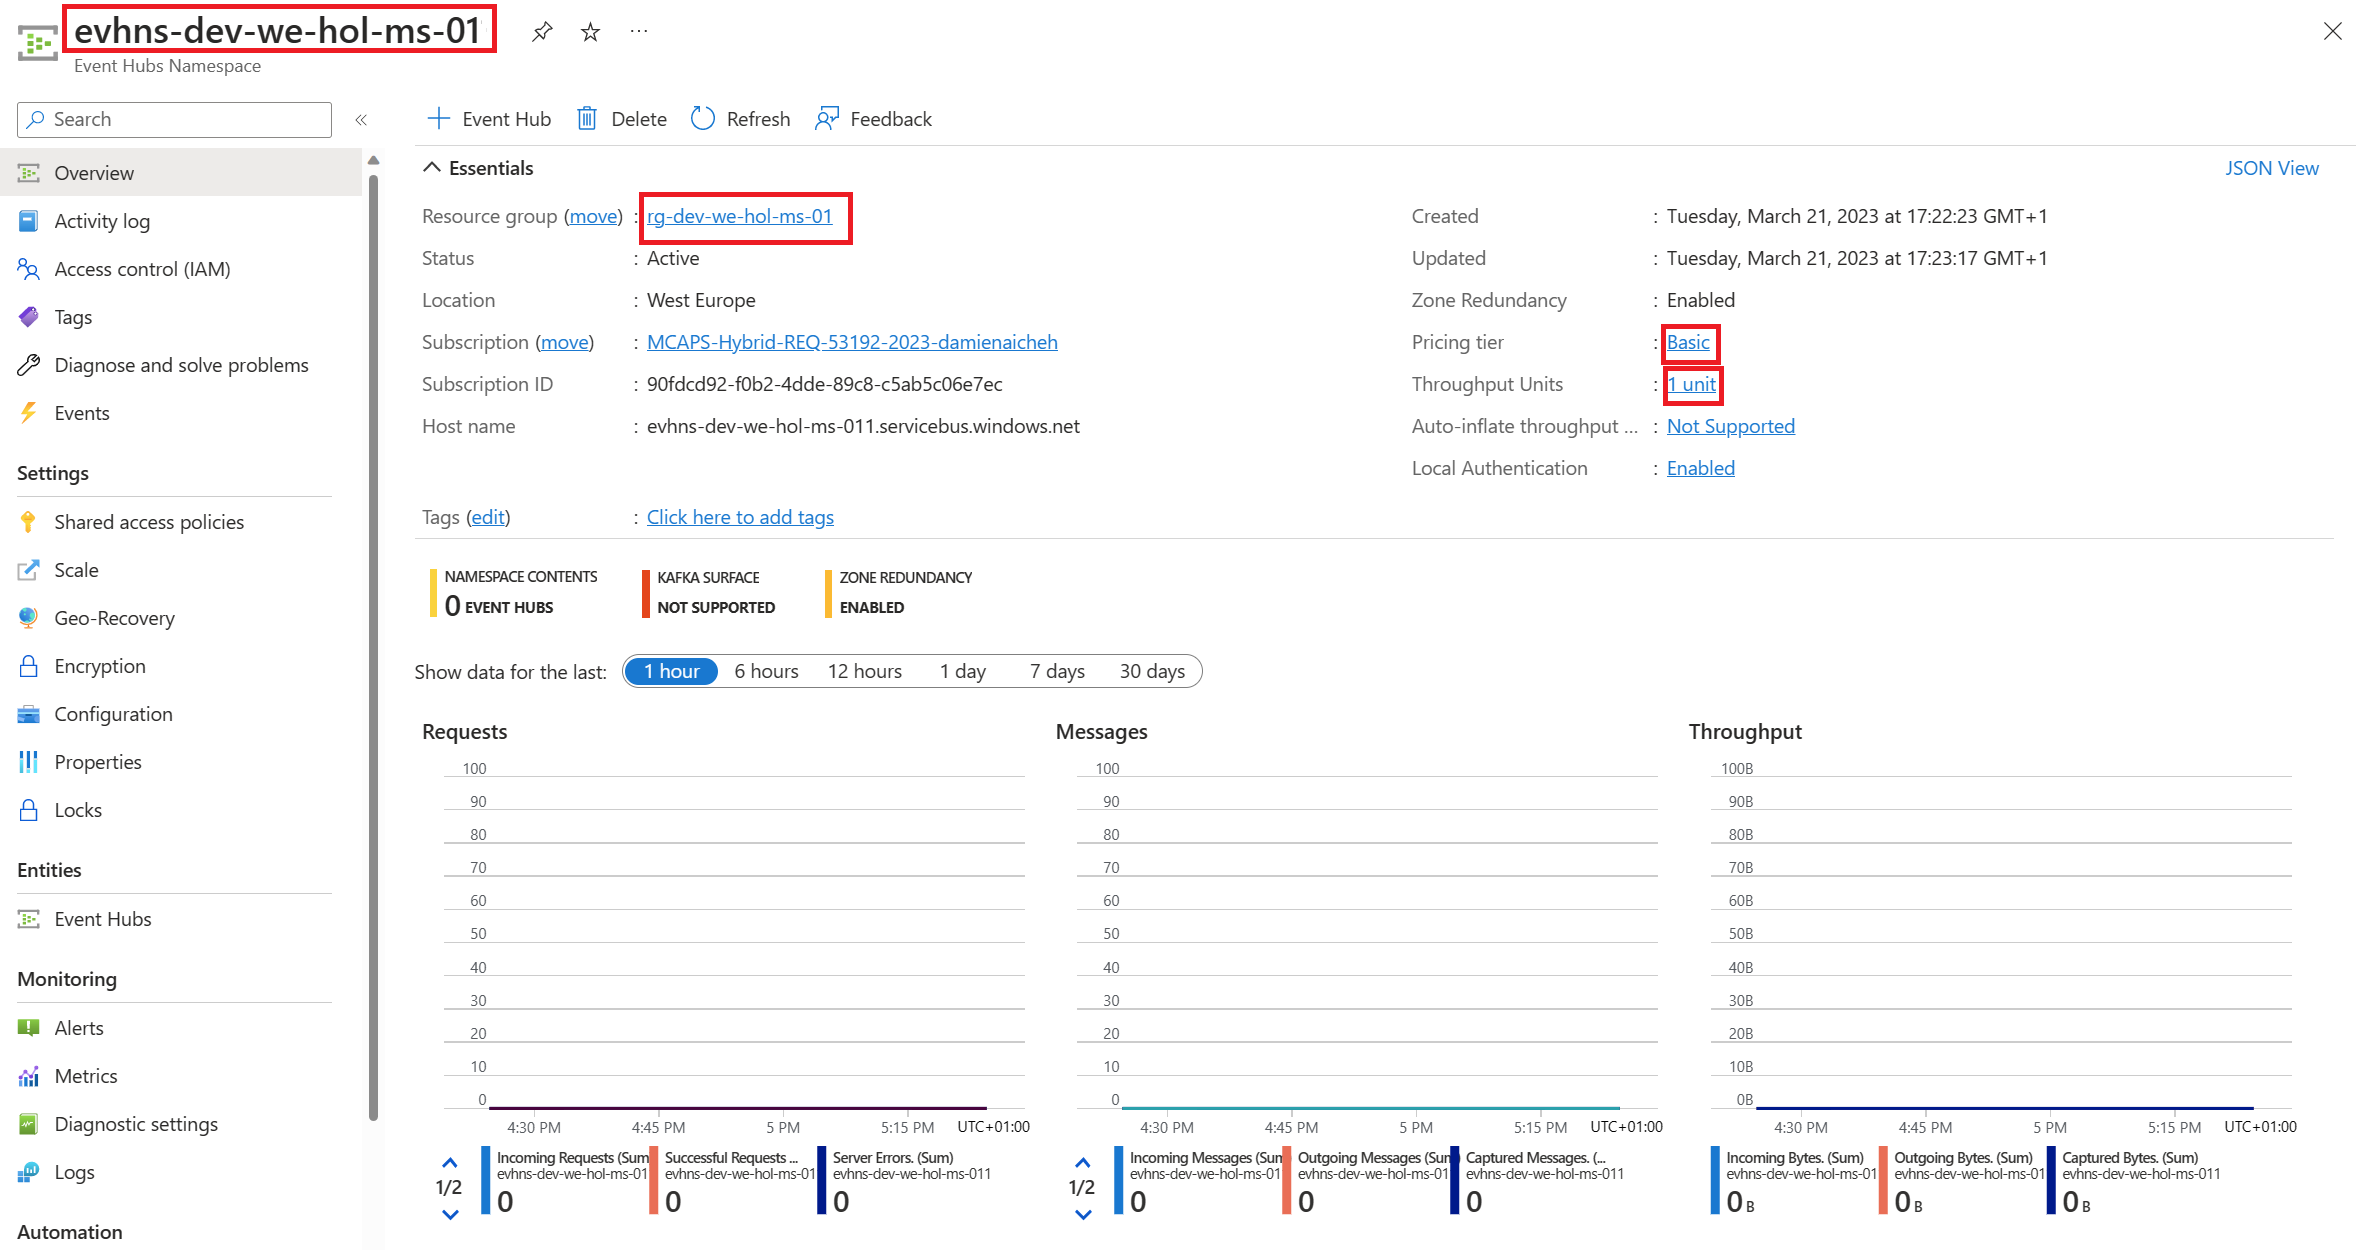
Create an Event Hubs namespace
If you cannot find it there, please try the same Event Hubs term in the top search bar.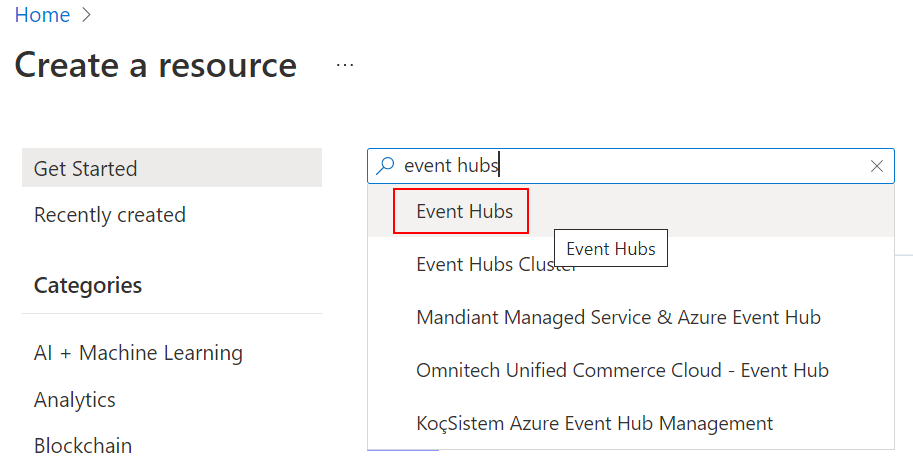

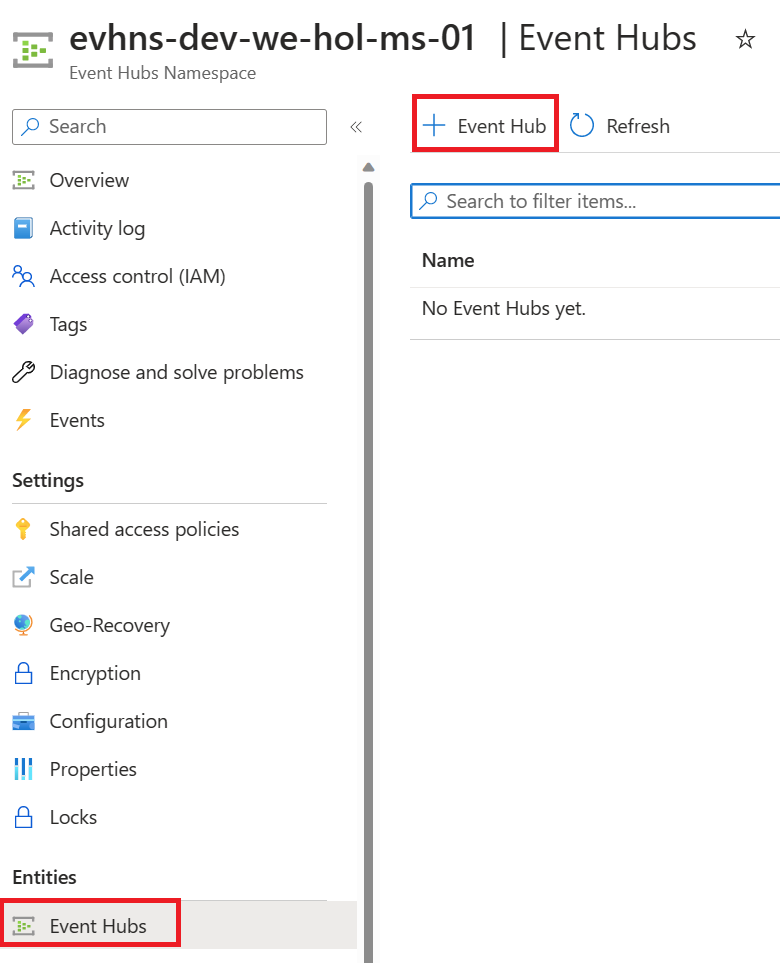
Create an Event Hub


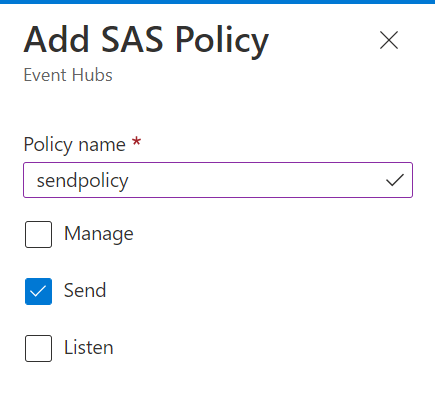
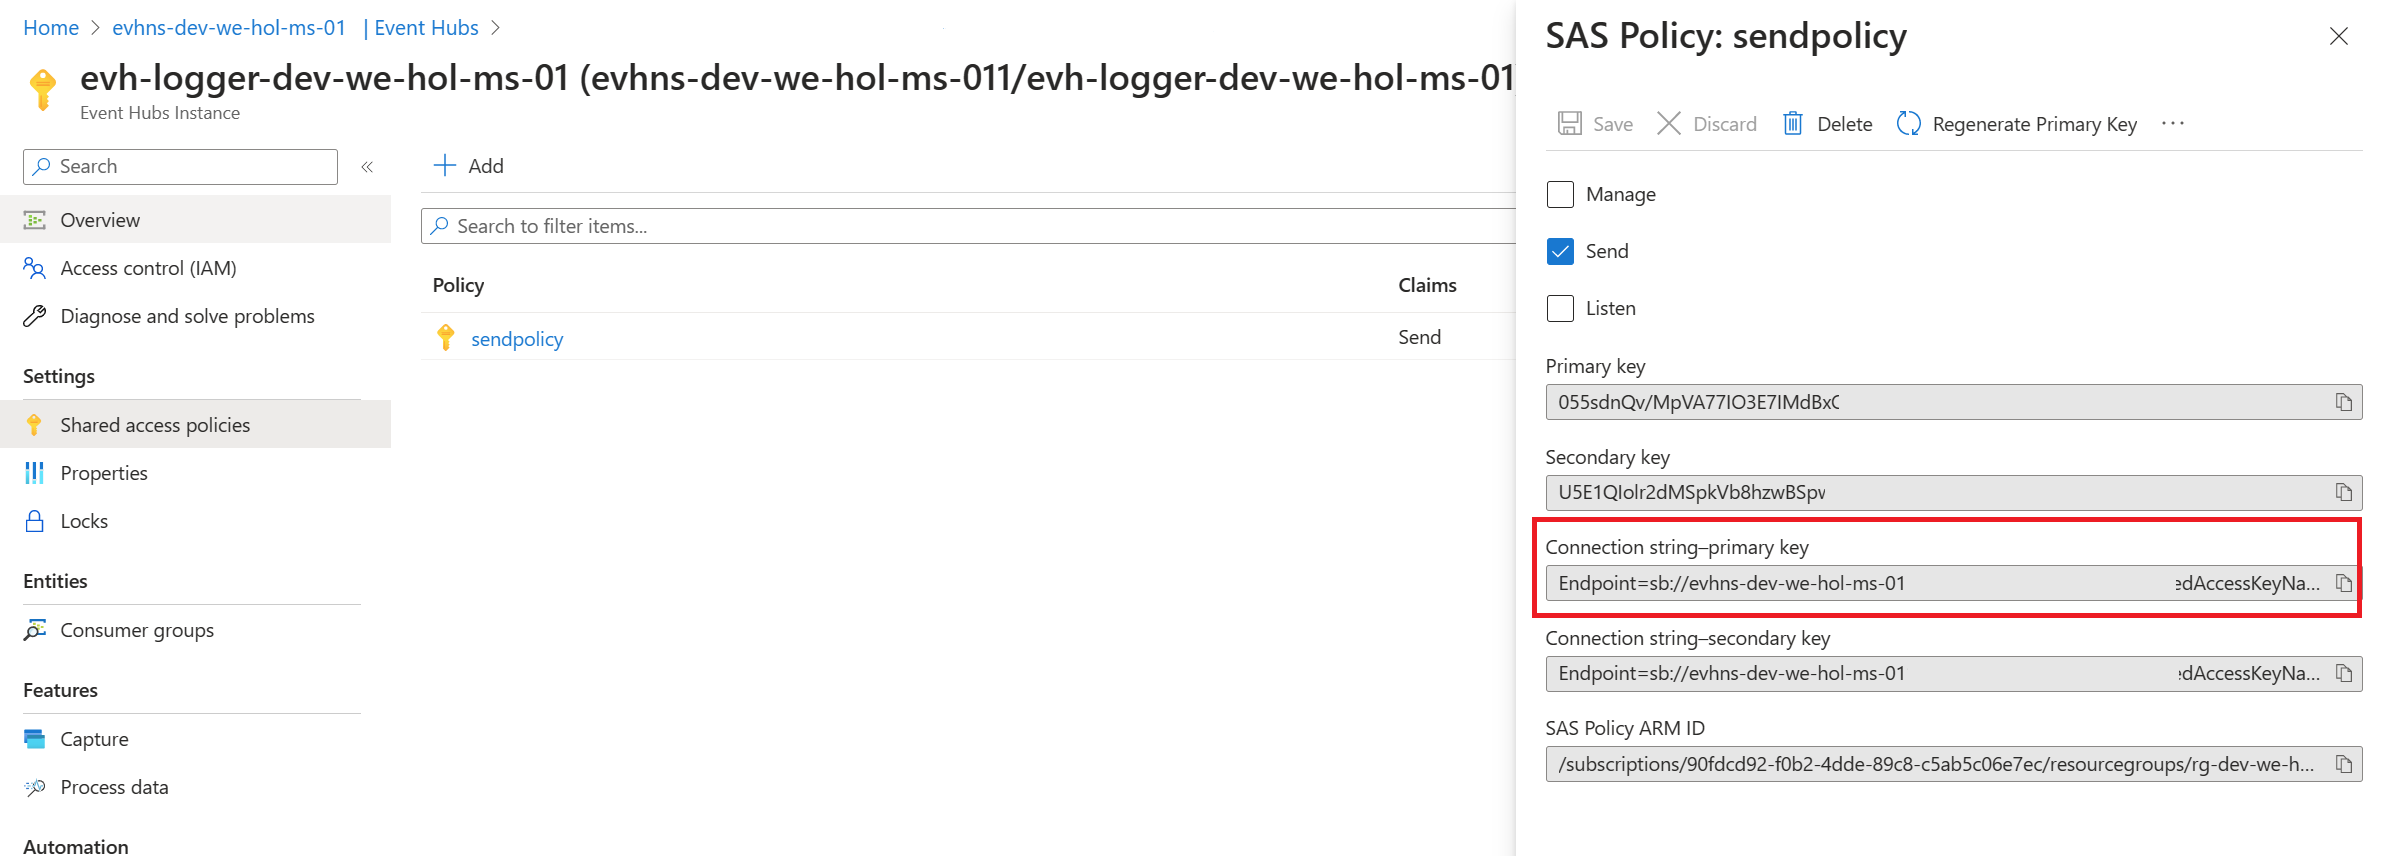
Create Access to the Event Hub

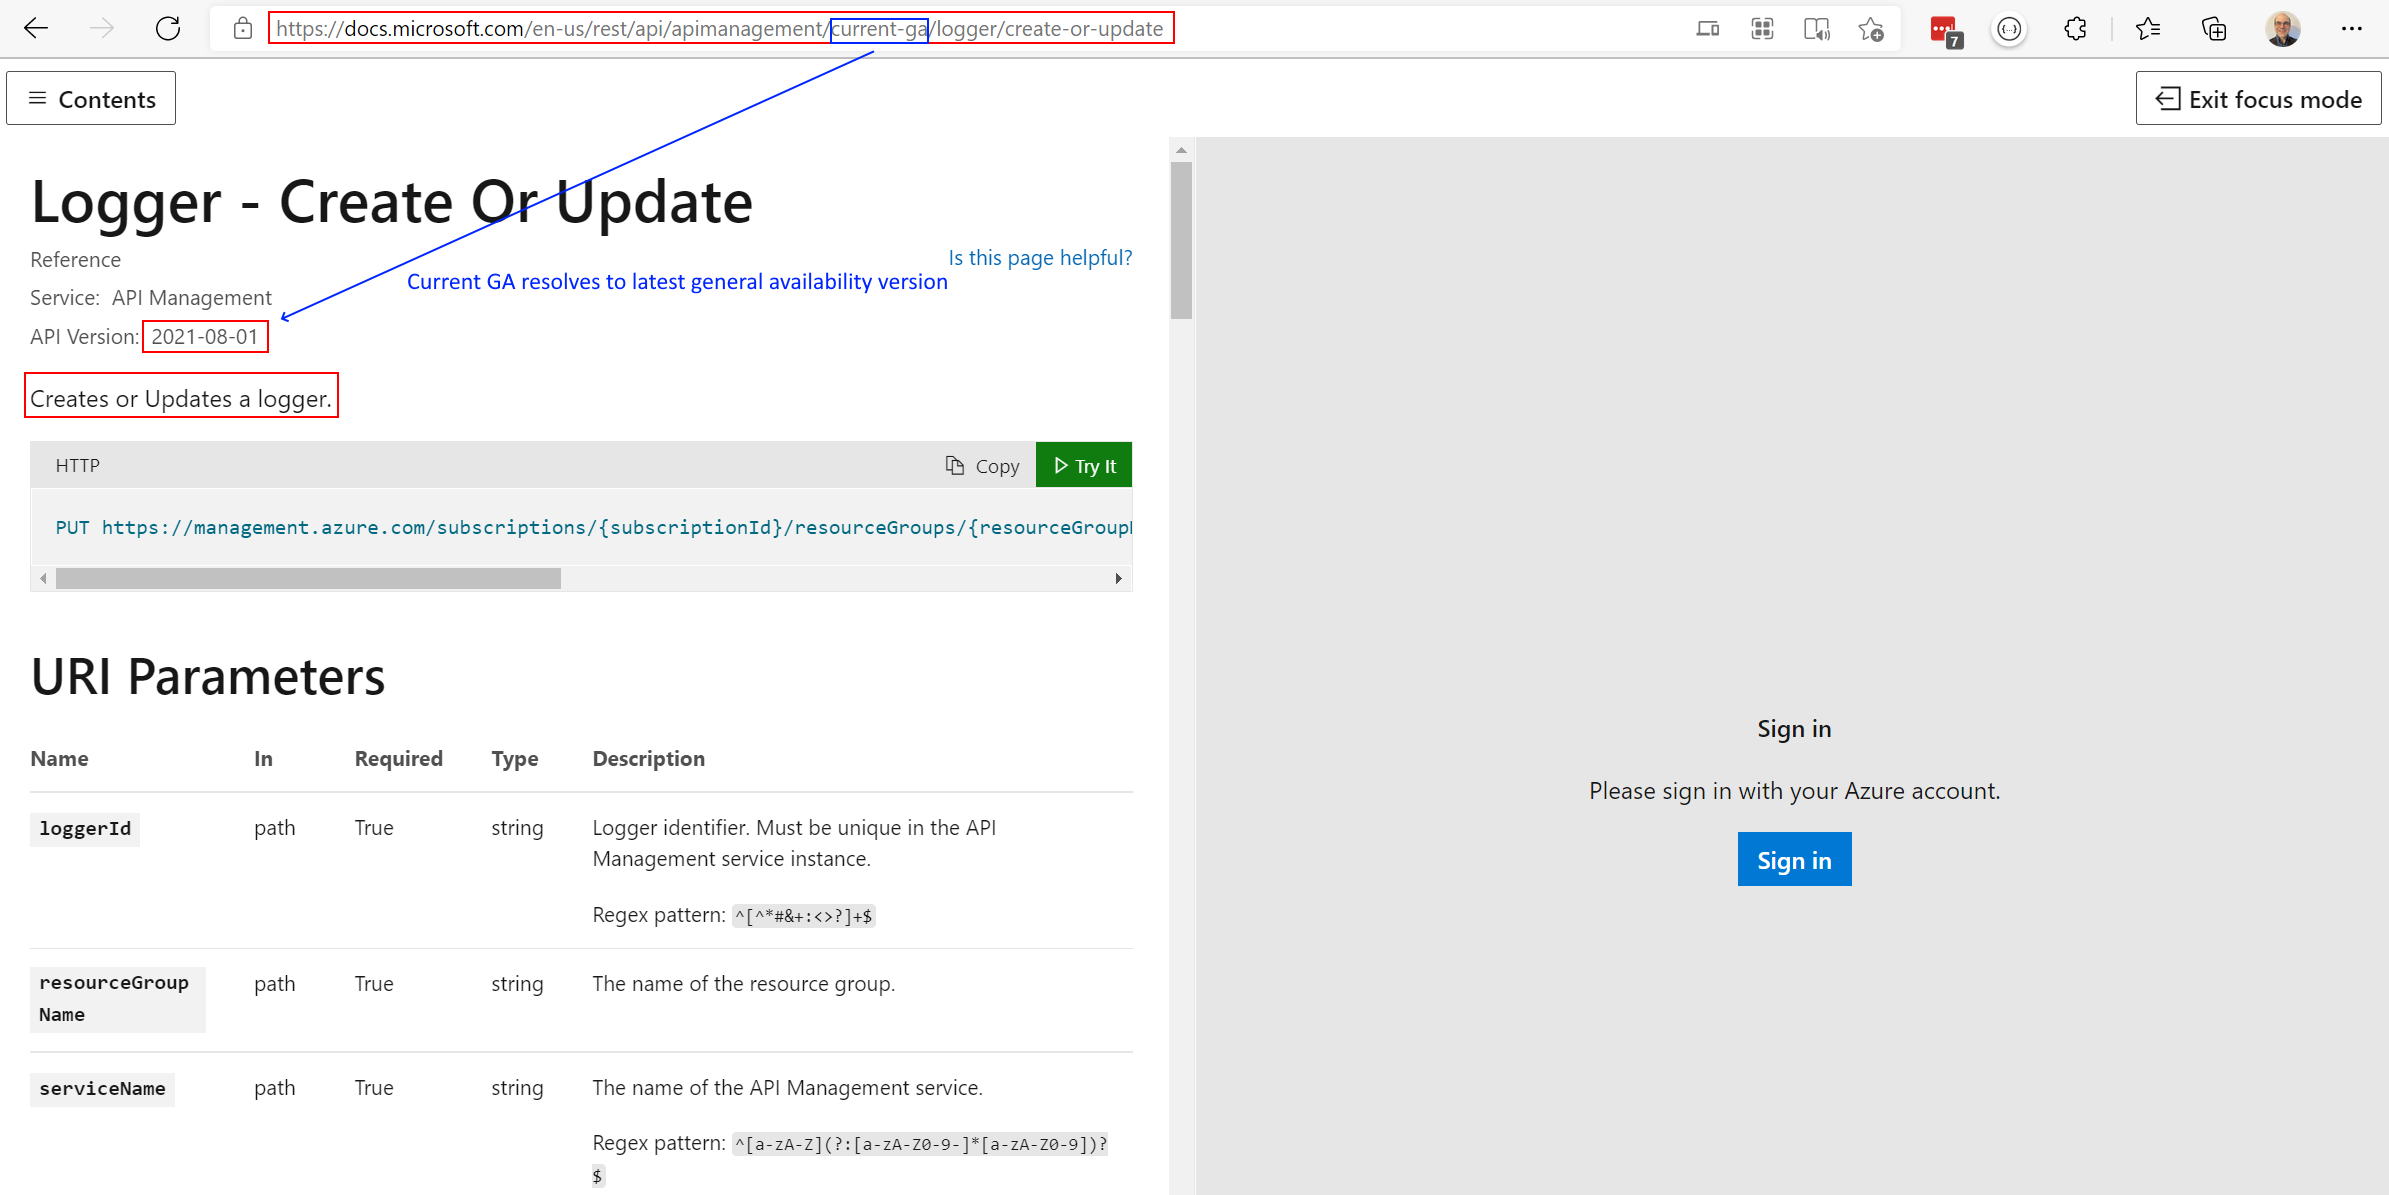
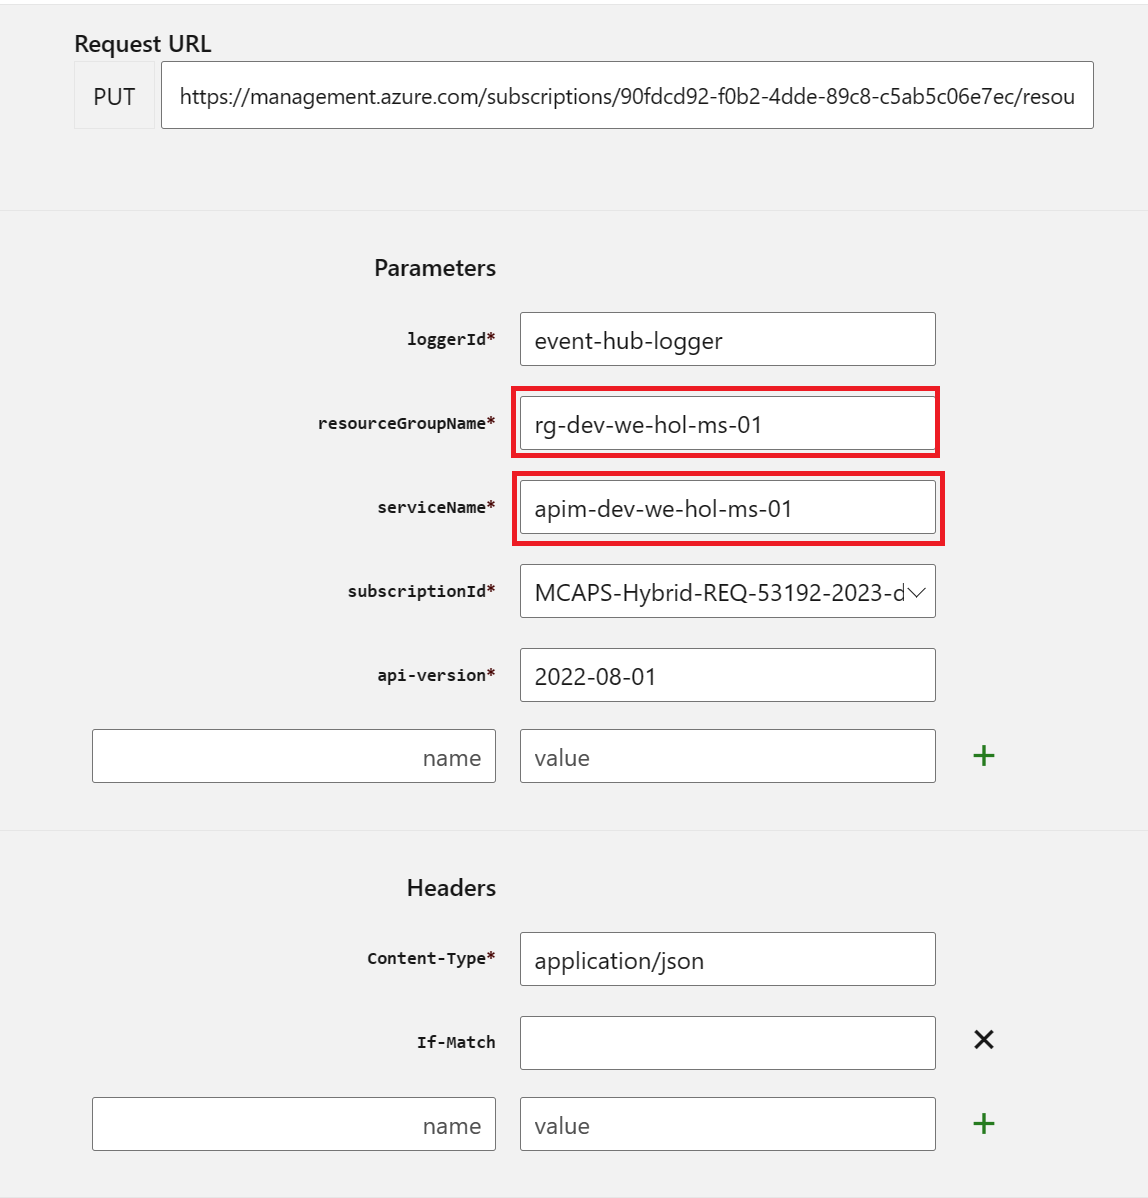
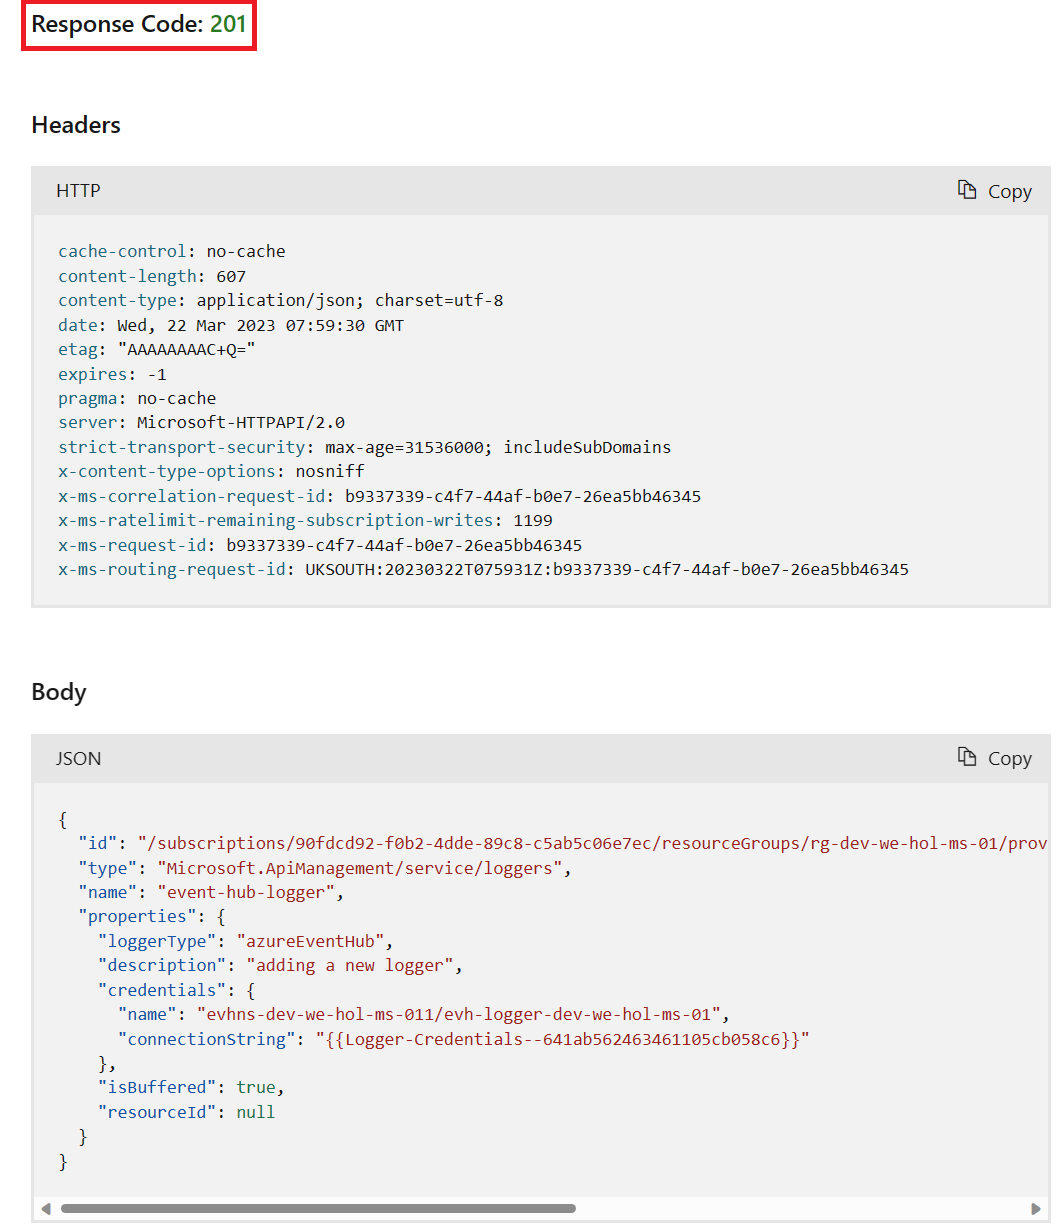
Create an API Management logger
 {
     "properties": {
         "loggerType": "azureEventHub",
         "description": "adding a new logger",
         "credentials": {
             "name": "",
             "connectionString": ""
         }
     }
 }
SharedAccessKey. Please do not alter your key. {
"properties": {
"loggerType": "azureEventHub",
"description": "adding a new logger",
"credentials": {
"name": "eh-sjk-01062022/myeventhub",
"connectionString": "Endpoint=sb://eh-sjk-01062022.servicebus.windows.net/;SharedAccessKeyName=sendpolicy;SharedAccessKey=********;EntityPath=myeventhub"
}
}
}
Configure log-to-eventhub policies
In this example, we’re adding a policy to the Echo API. tag in the inbound or outbound policy section.log-to-eventhub policy statement template.
 <log-to-eventhub logger-id="">
     @{
         return new JObject(
             new JProperty("EventTime", DateTime.UtcNow.ToString()),
             new JProperty("ServiceName", context.Deployment.ServiceName),
             new JProperty("RequestId", context.RequestId),
             new JProperty("RequestIp", context.Request.IpAddress),
             new JProperty("OperationName", context.Operation.Name)
         ).ToString();
     }
with the value you used for {loggerId} in the request URL to create the logger in the previous step (e.g. eventhublogger).log-to-eventhub element. In this example, a string in JSON format containing the date and time, service name, request ID, request IP address, and operation name is logged.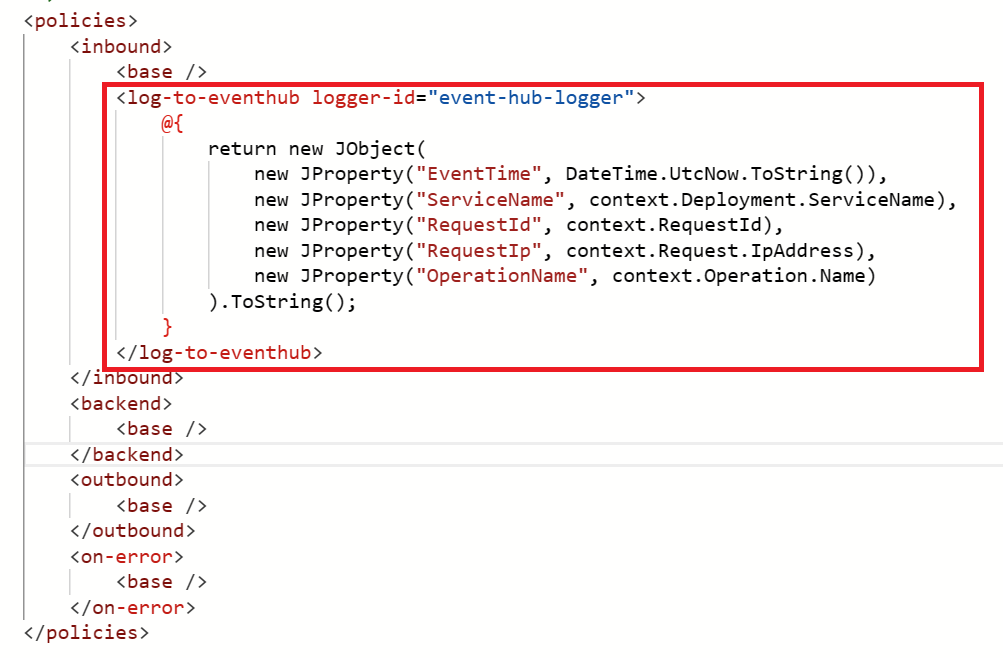
Verify Events are logged in Event Hub
Exercise 6: Security
Task 1: JSON Web Token Validation
JSON Web Tokens (JWT) – Creation
1862842300){
"sub": "1234567890",
"name": "John Doe",
"admin" : true,
"exp": 1862842300
}
123412341234123412341234 as an example, which is a rather weak secret but serves the demo purpose.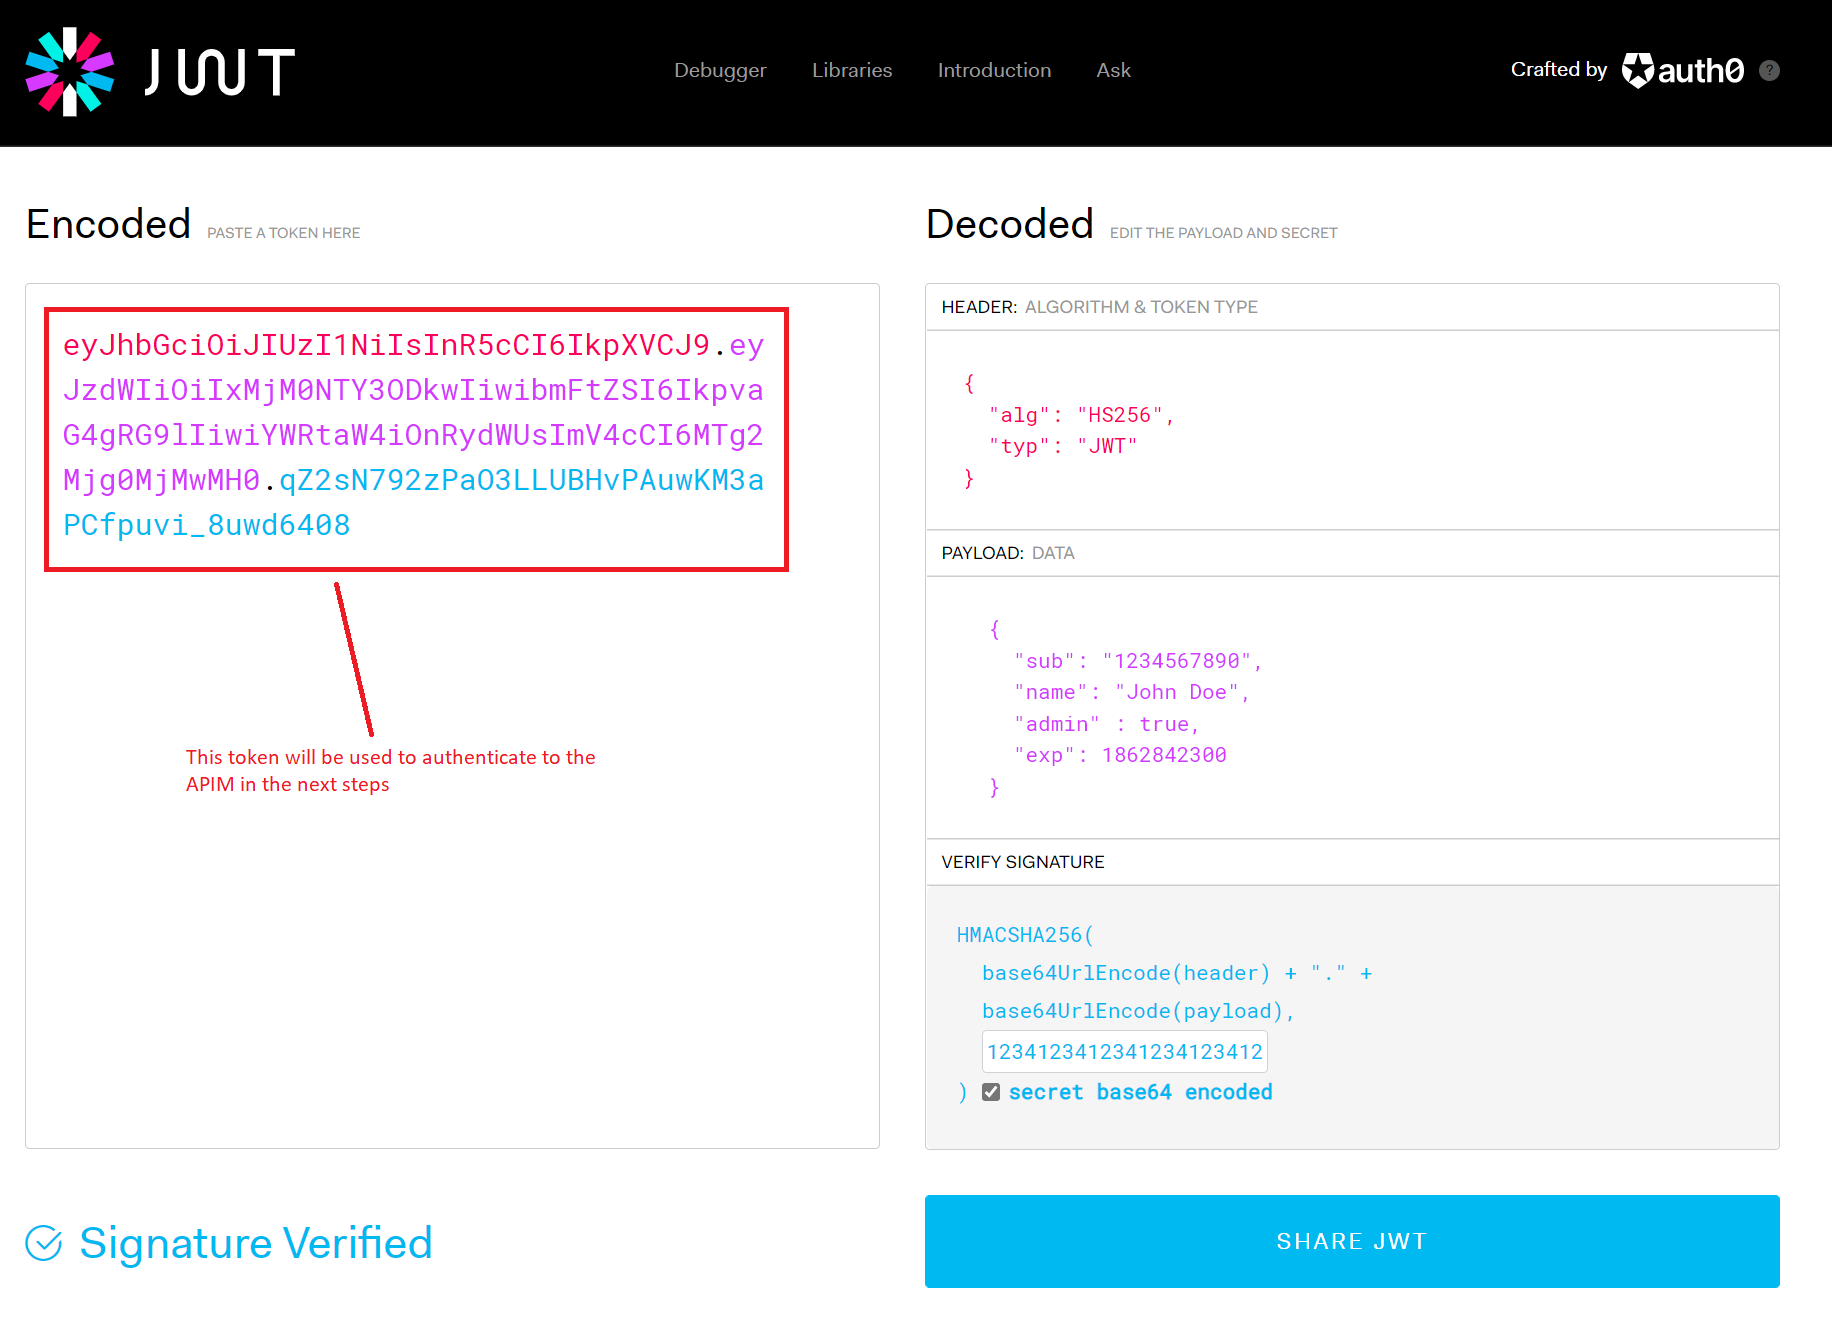
JSON Web Tokens (JWT) – Validation
validate-jwt policy with the signing key.
        <base />
        <validate-jwt header-name="Authorization" failed-validation-httpcode="401" failed-validation-error-message="Unauthorized">

                123412341234123412341234


    ...
401 Unauthorized error.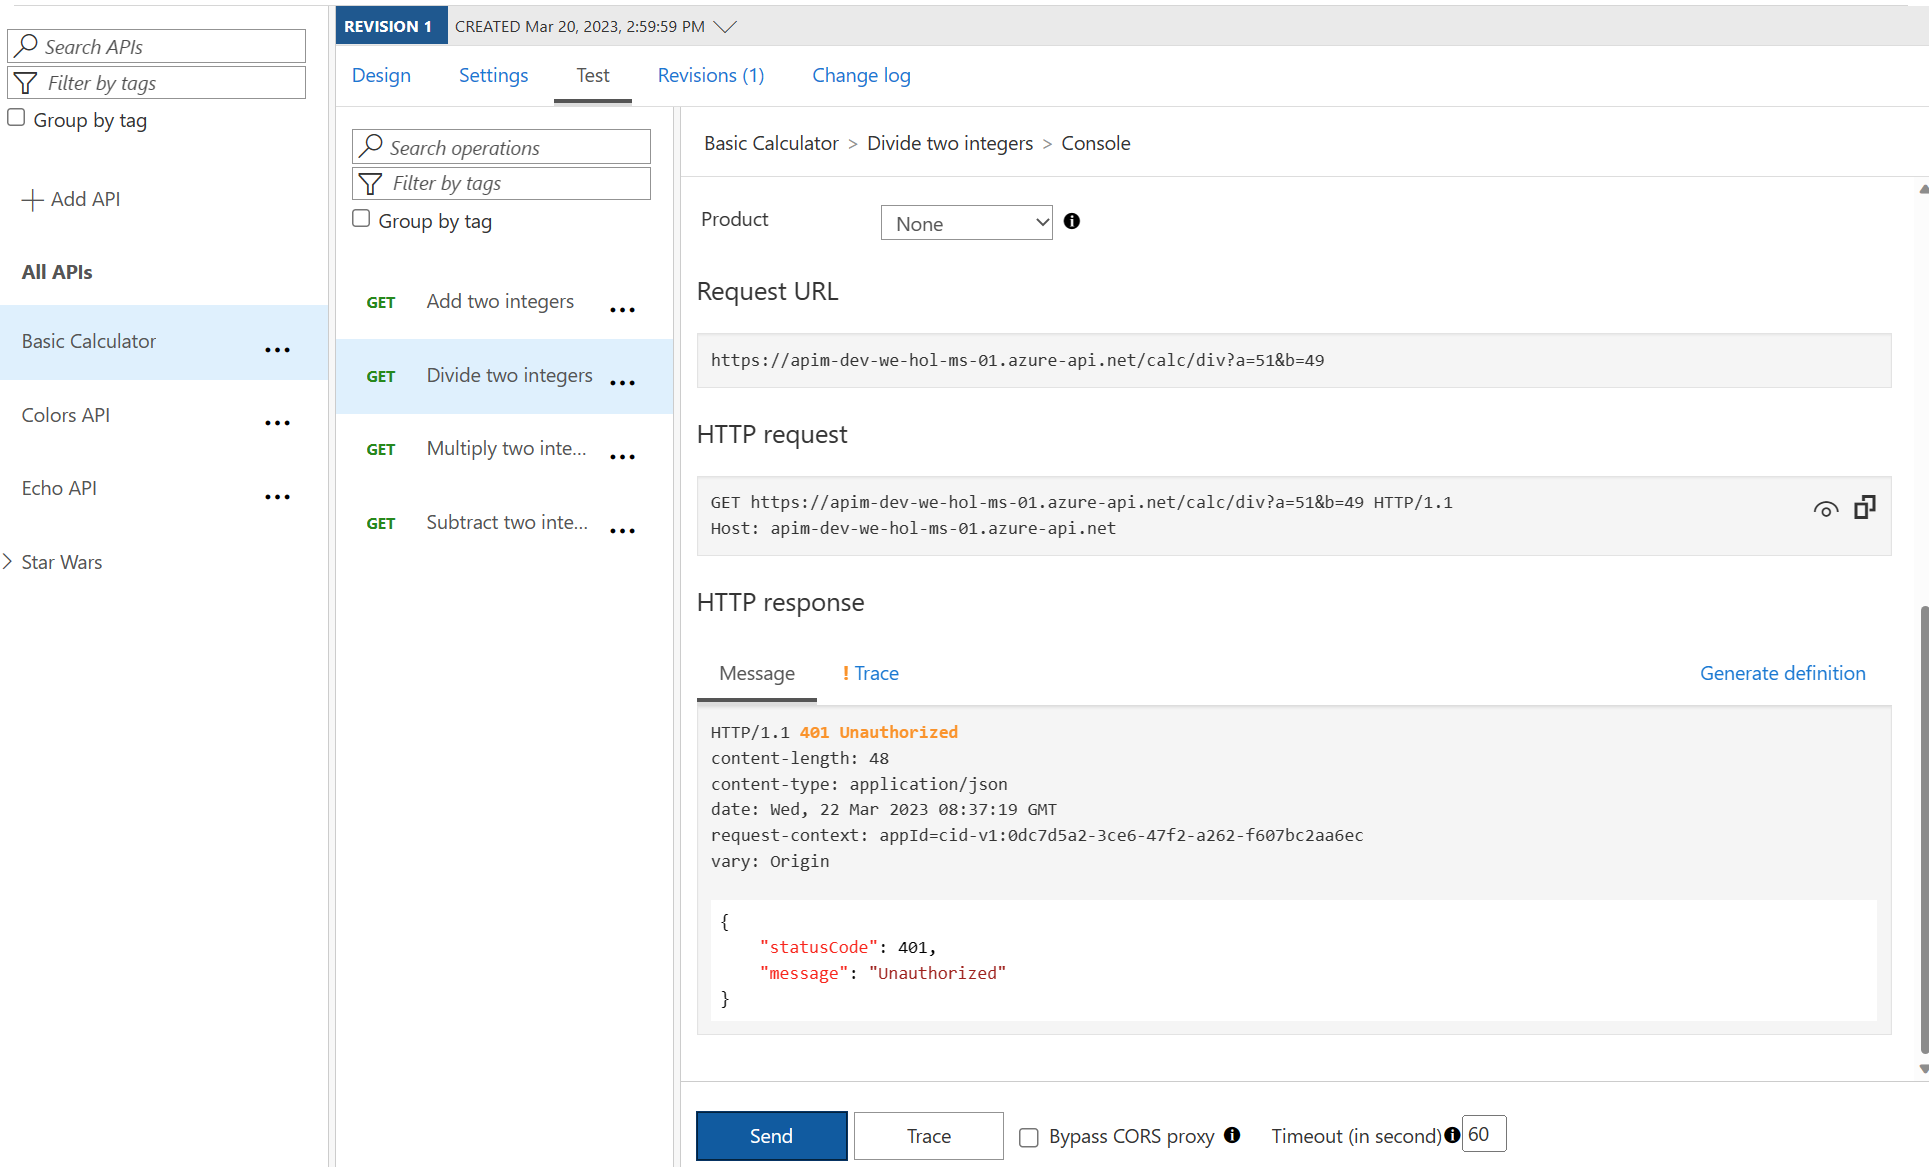
Authorization header to the test:AuthorizationBearer with the encoded value from https://jwt.io above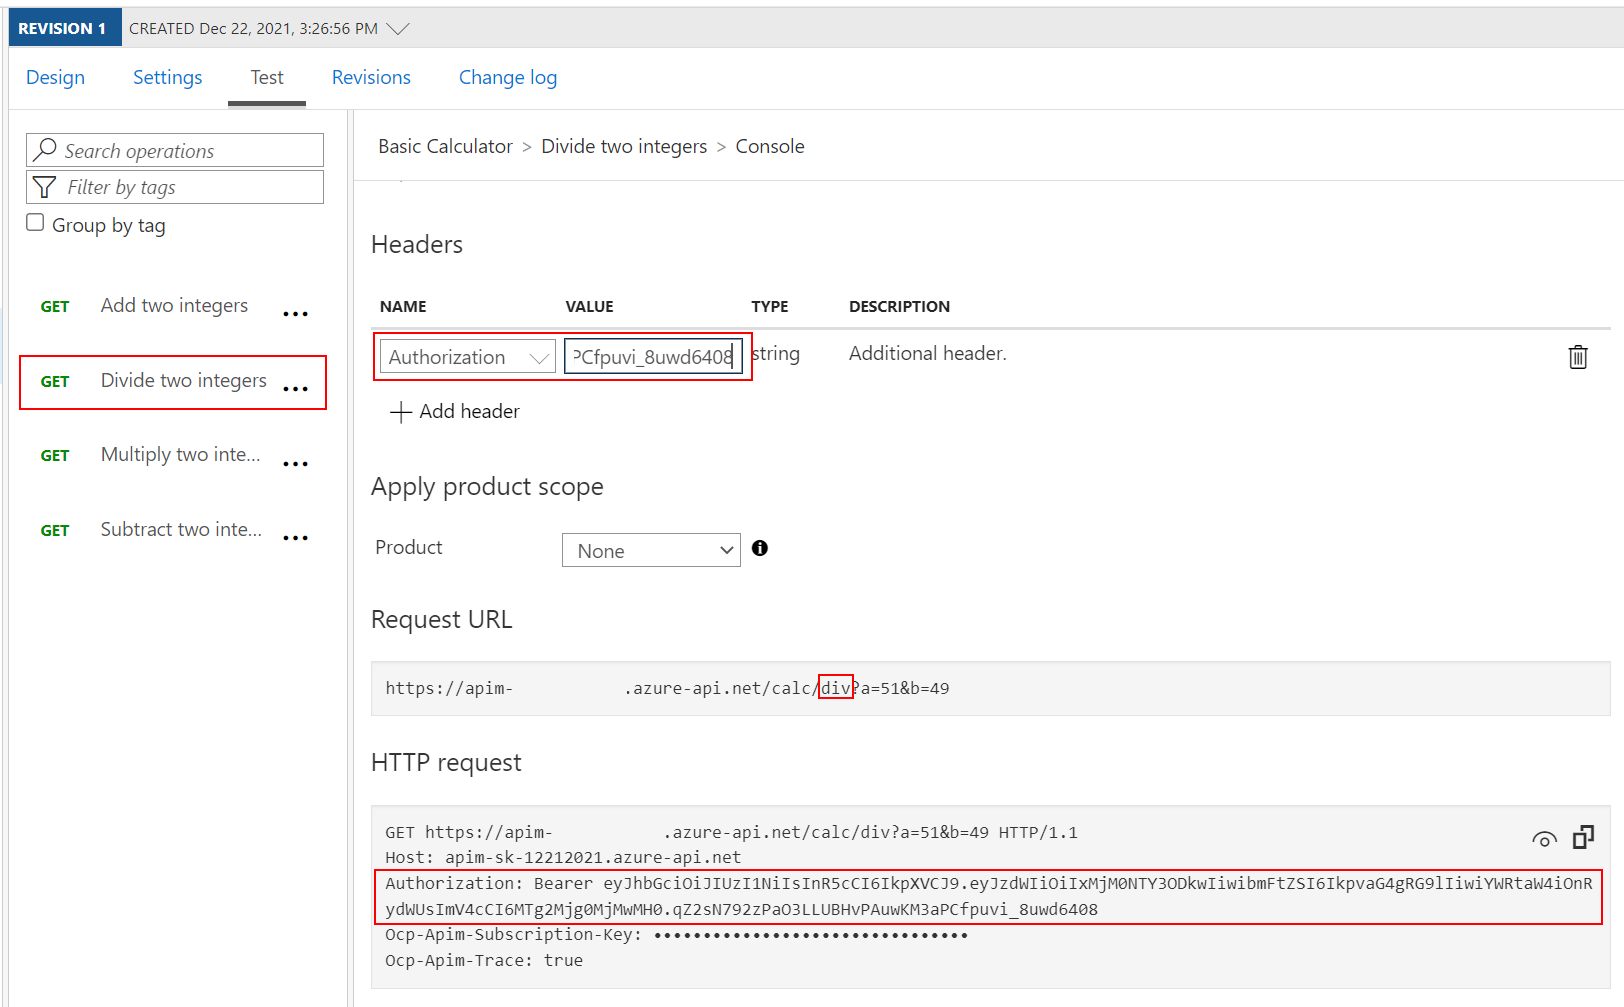
200 Success.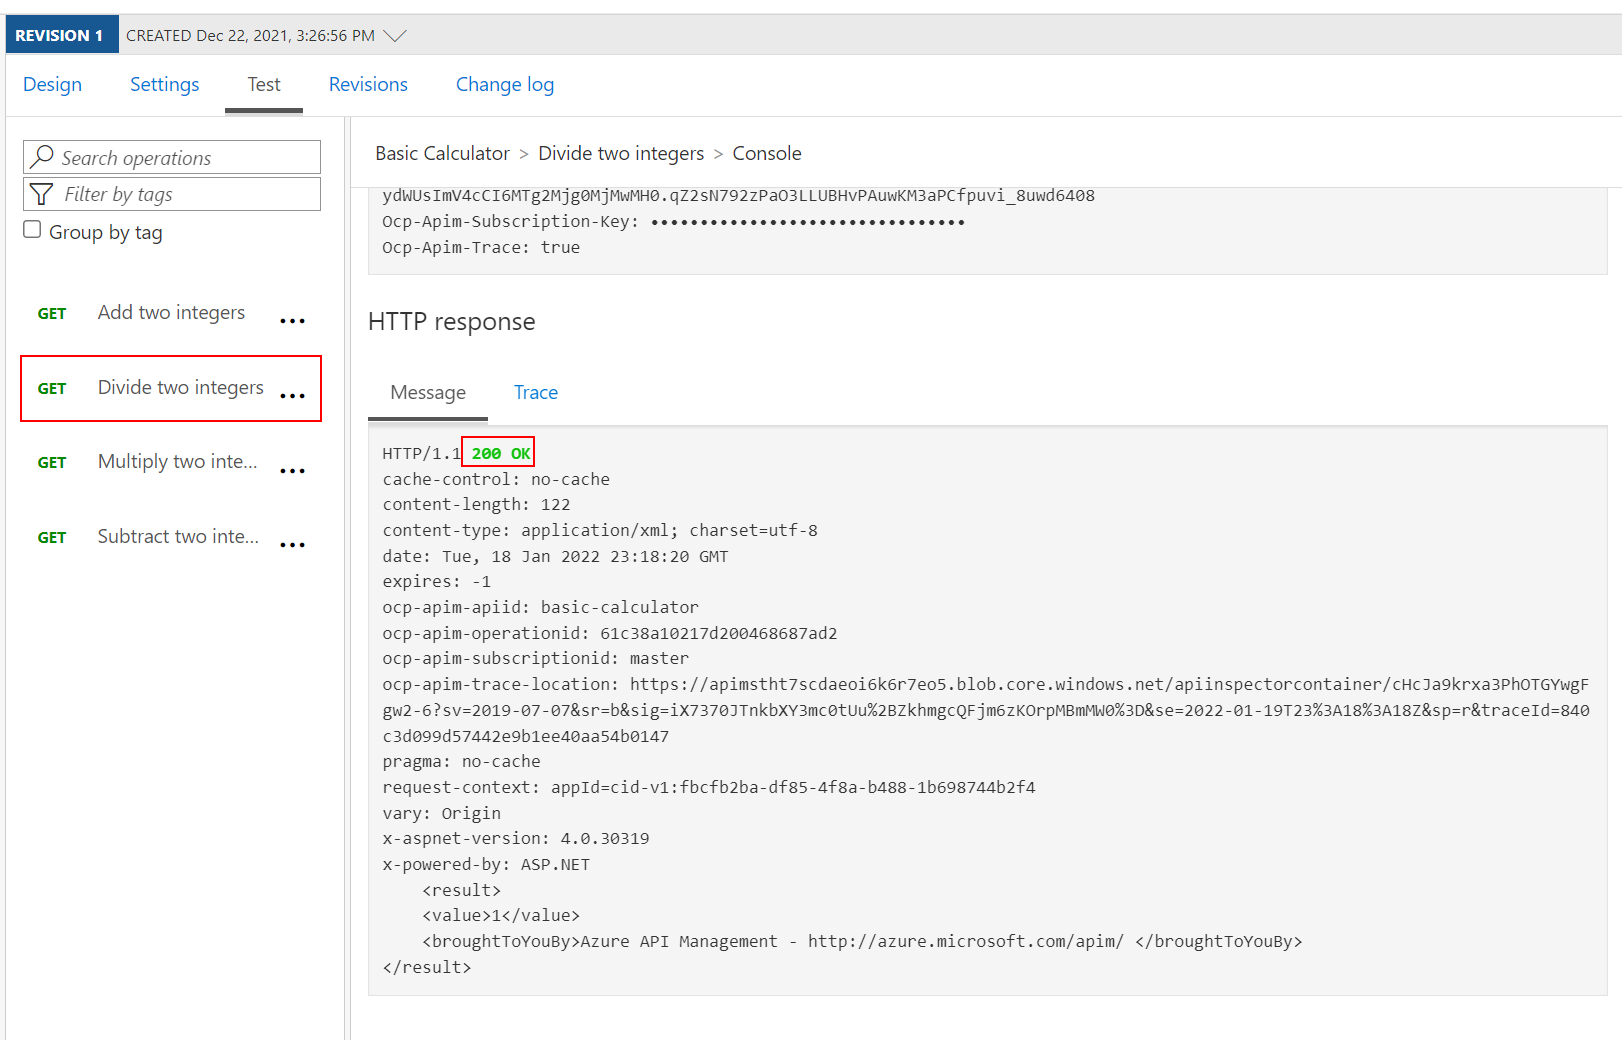
JSON Web Tokens (JWT) – Check that a Claim Exists
validate-jwt policy to not only validate the JWT but ensure that a specific admin claim exists. Recall that we set admin: true in our JWT token on https://jwt.io above.
        <base />
        <validate-jwt header-name="Authorization" failed-validation-httpcode="401" failed-validation-error-message="Unauthorized">

                123412341234123412341234


                <claim name="admin" match="any">
                    true


    ...
Authorization header as above and observe the 200 success. We have not fundamentally changed the test scenario as we only restricted the claims to something that we already had in our payload.required-claims with a claim that does not exist (e.g. adminx)
        <base />
        <validate-jwt header-name="Authorization" failed-validation-httpcode="401" failed-validation-error-message="Unauthorized">

                123412341234123412341234


                <claim name="adminx" match="any">
                    true


    ...
Authorization header once more and observe the 401 Unauthorized error as the token specifies admin but the policy requires adminx.JSON Web Tokens (JWT) – Extract Claim and Pass to Backend
name claim and place it into a header underneath the validate-jwt policy.adminx to admin as we are interested in a successful test again.
        <base />
        <validate-jwt header-name="Authorization" failed-validation-httpcode="401" failed-validation-error-message="Unauthorized">

                123412341234123412341234


                <claim name="admin" match="any">
                    true


        <set-header exists-action="override" name="username">
            @{
                Jwt jwt;
                context.Request.Headers.GetValueOrDefault("Authorization","scheme param").Split(' ').Last().TryParseJwt(out jwt);
                return jwt.Claims.GetValueOrDefault("name", "?");
            }


    ...
Authorization header once more and observe the 200 Success.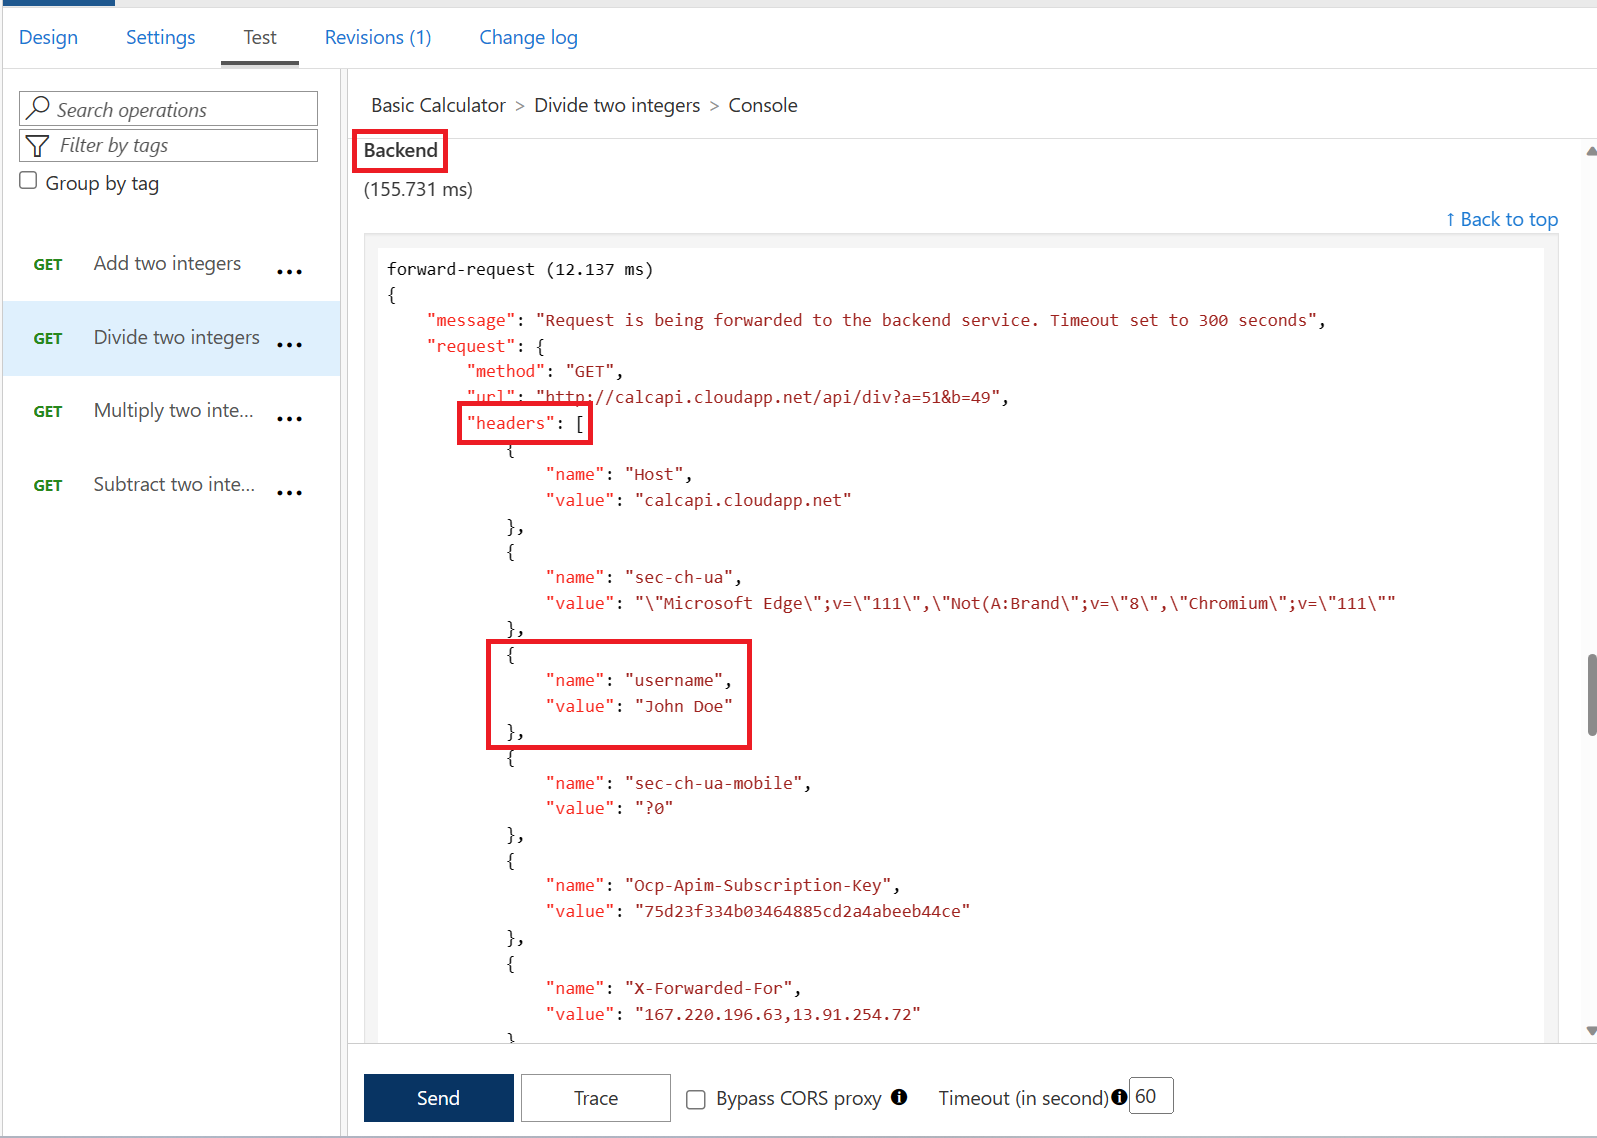
JSON Web Tokens (JWT) – Improvements
issuer-signing-key and instead use a Named Value that you can more easily administer and change outside of an API’s policies. If you have time in this exercise, go ahead and give it a try.Task 2: Oauth2
2.1: Azure APIM and Oauth2
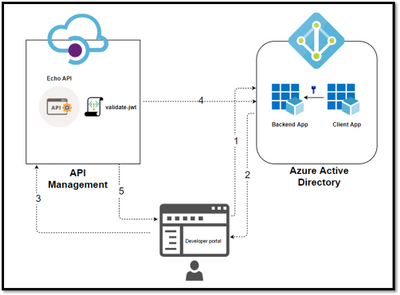
Grant Flow Description Use Case Authorization Code It is the most used grant type to authorize the Client to access protected data from a Resource Server. Used by the secure client like a web server. Implicit It is intended for user-based clients who can’t keep a client secret because all the application code and storage is easily accessible. Used by the client that can’t protect a client secret/token, such as a mobile app or single page application. Client Credentials This grant type is non interactive way for obtaining an access token outside of the context of a user. It is suitable for machine-to-machine authentication where a specific user’s permission to access data is not required. Resource Owner password Credentials It uses the username and the password credentials of a Resource Owner (user) to authorize and access protected data from a Resource Server. For logging in with a username and password (only for first-party apps) High-level steps required to configure OAUTH
2.2: AAD Create a new tenant

2.3: Authorization Code

Register an application (backend-app) in Azure AD to represent the Basic Calculator API
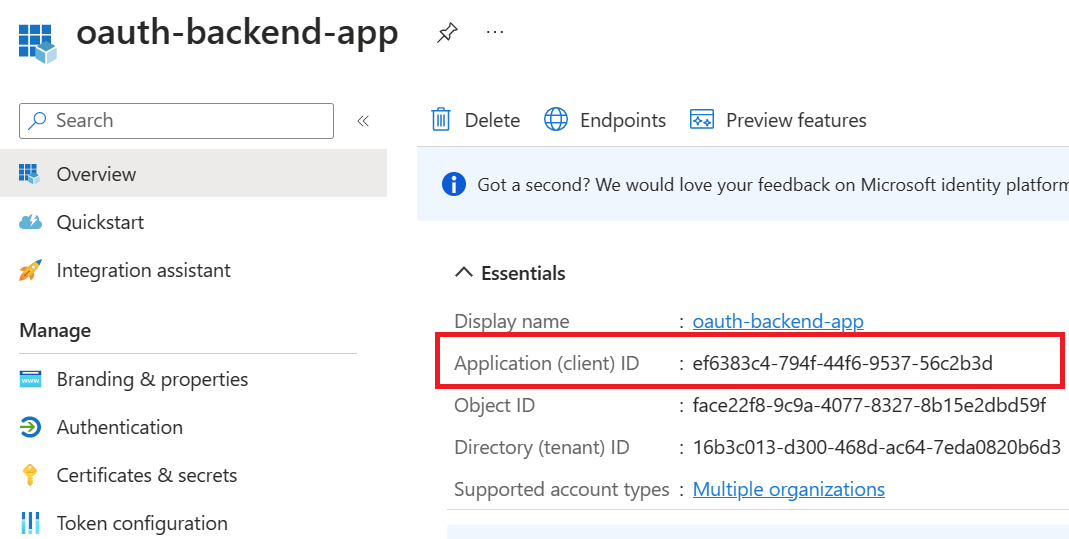
oauth-backend-app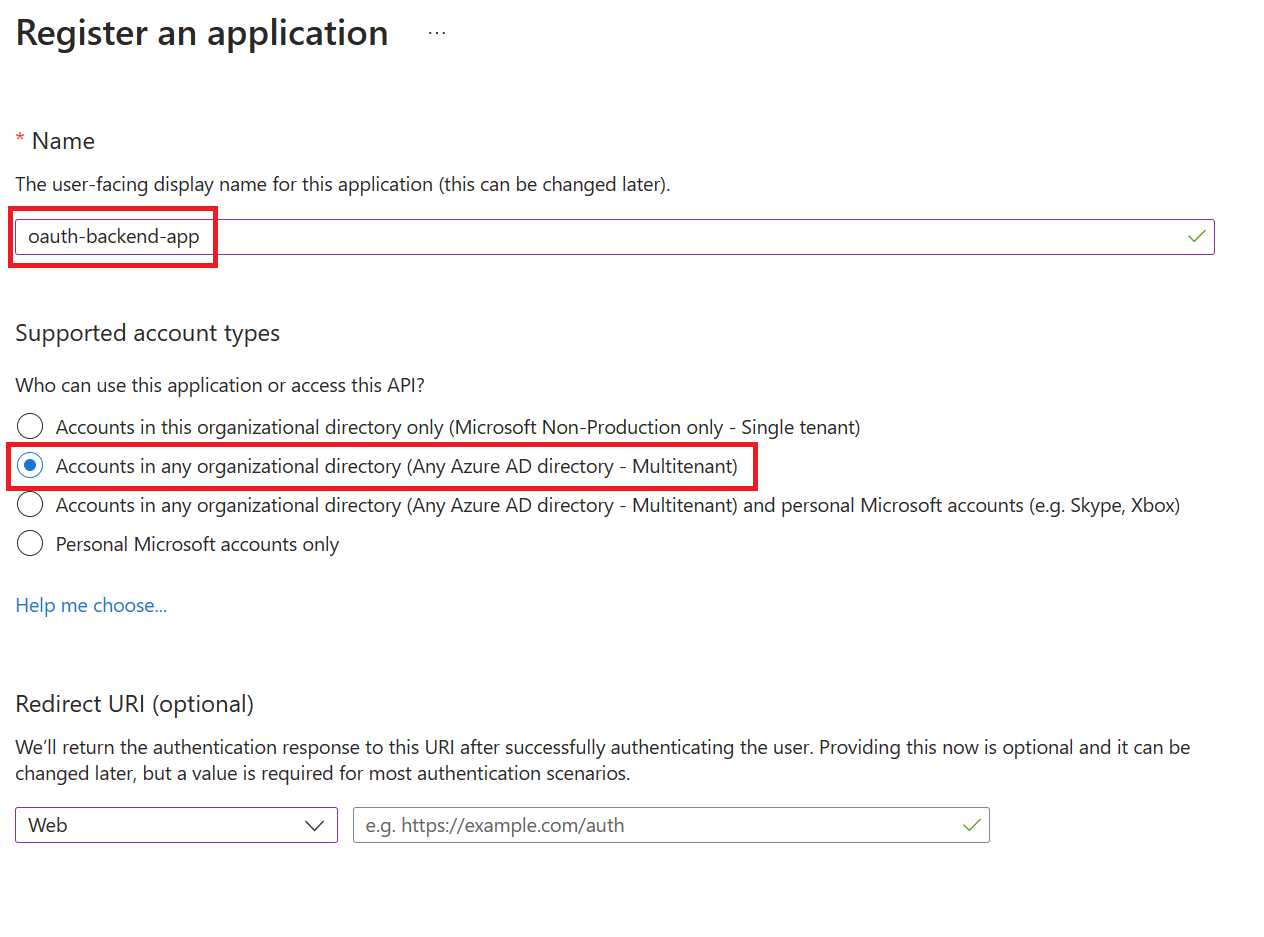

Register another application (client-app) in Azure AD to represent the Developer Portal( client application)
oauth-client-app
Grant permissions for client-app to call backend-app
API permissionsAdd a permissionMy APIsbackend-app-oauth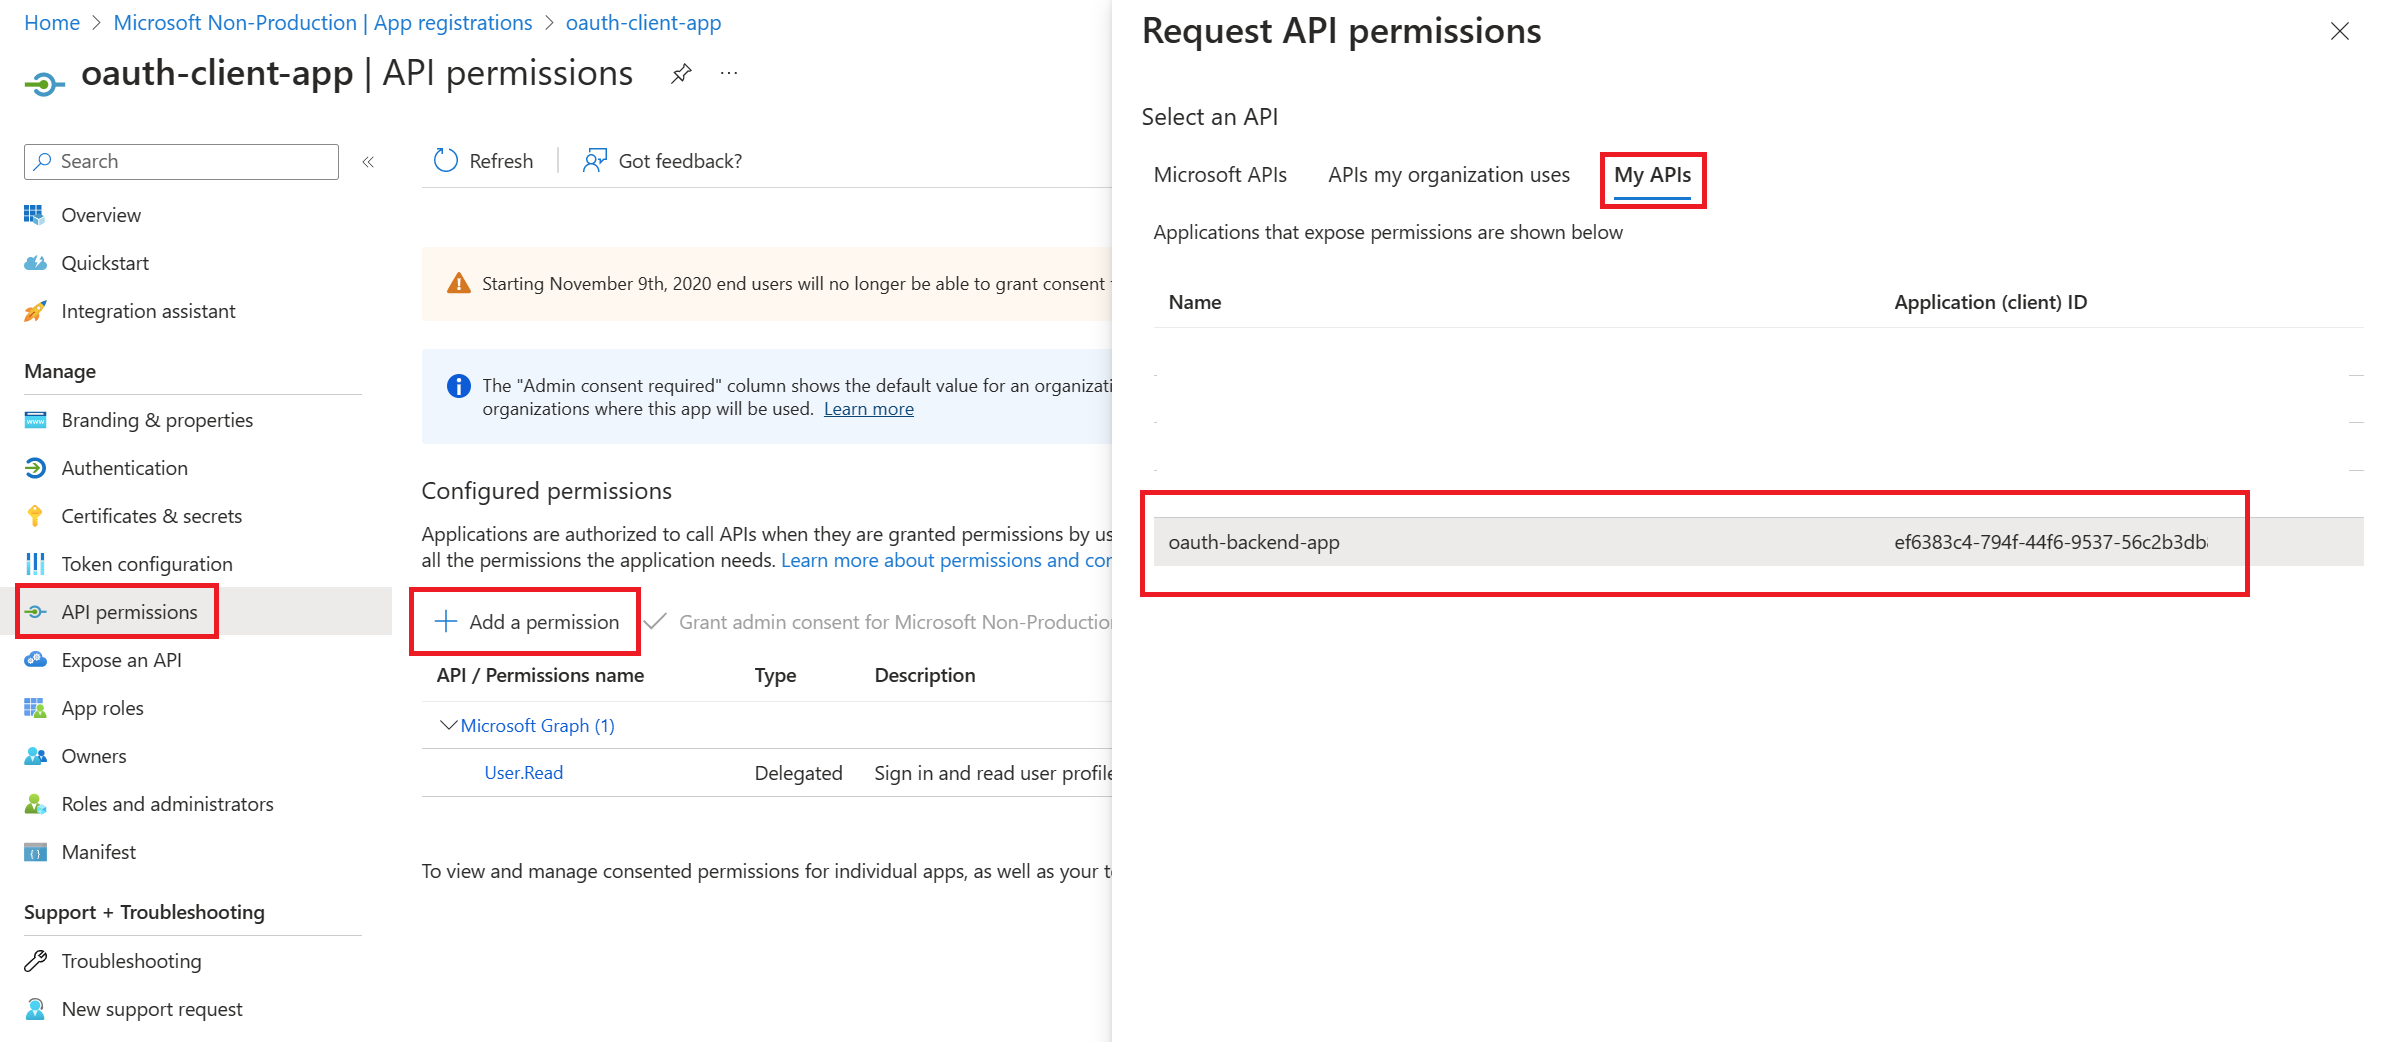
Delegated Permissions optionCalculator.Read checkboxAdd Permissions button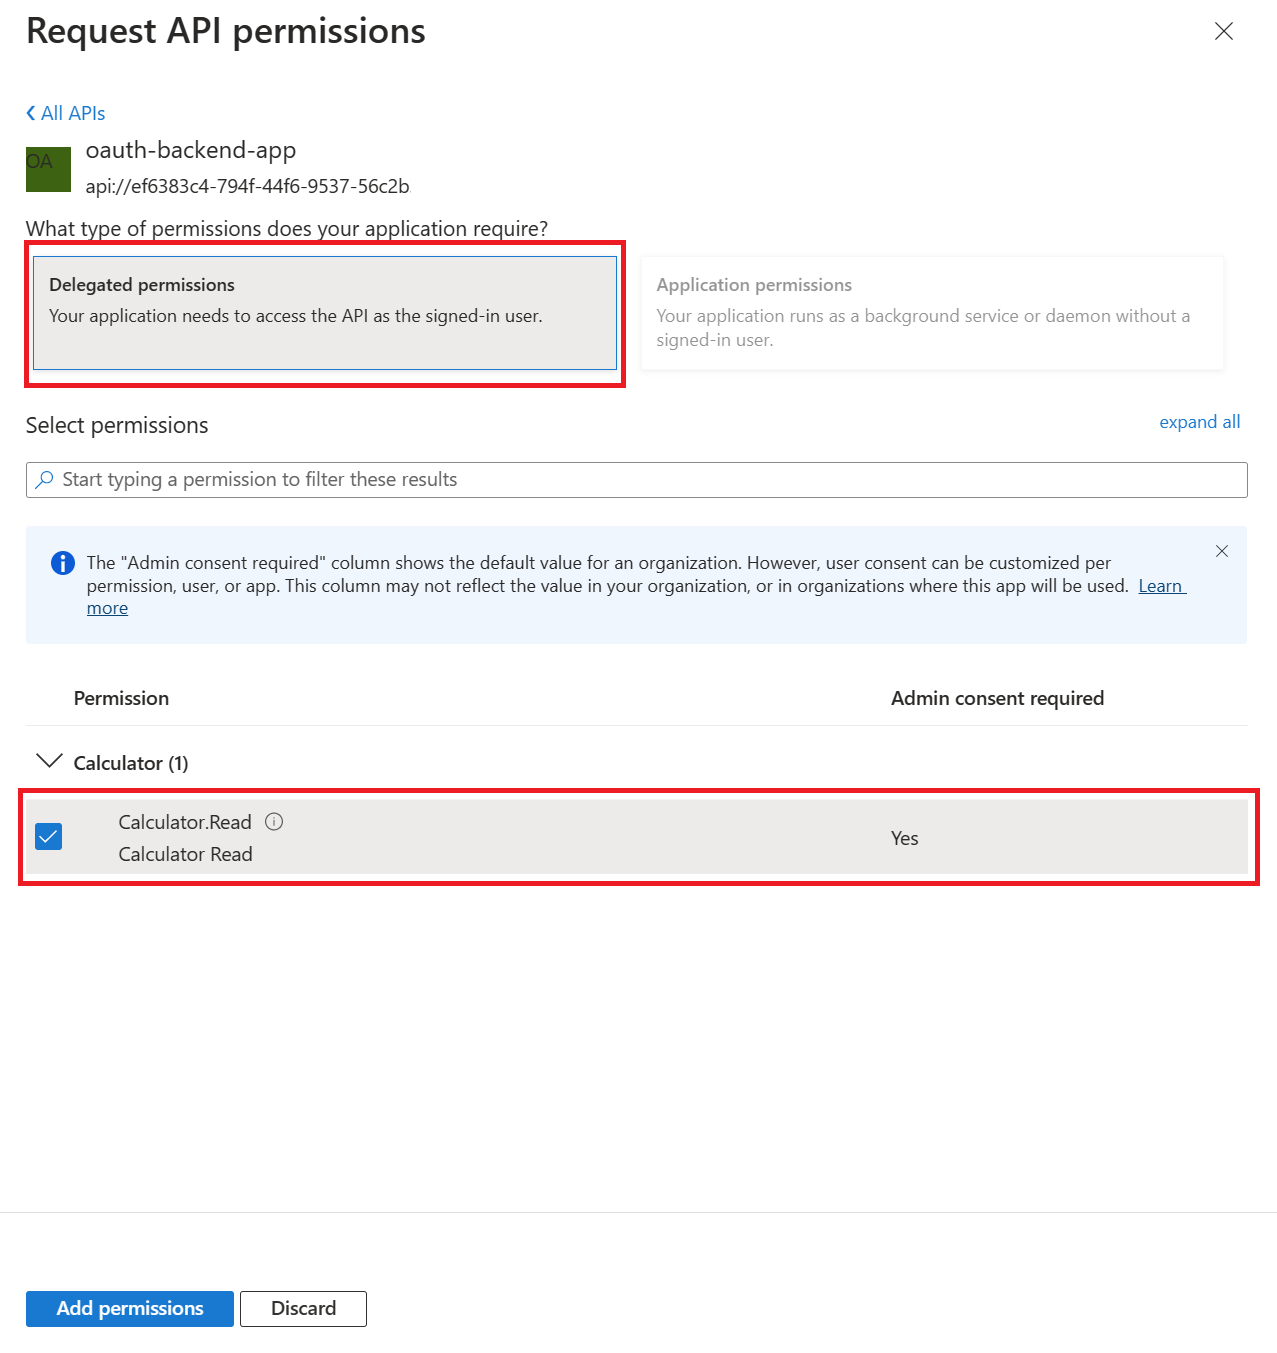
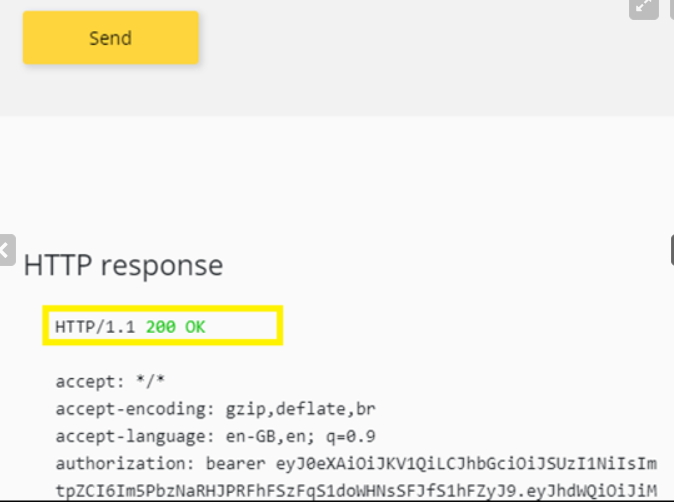
Grant admin consent for ...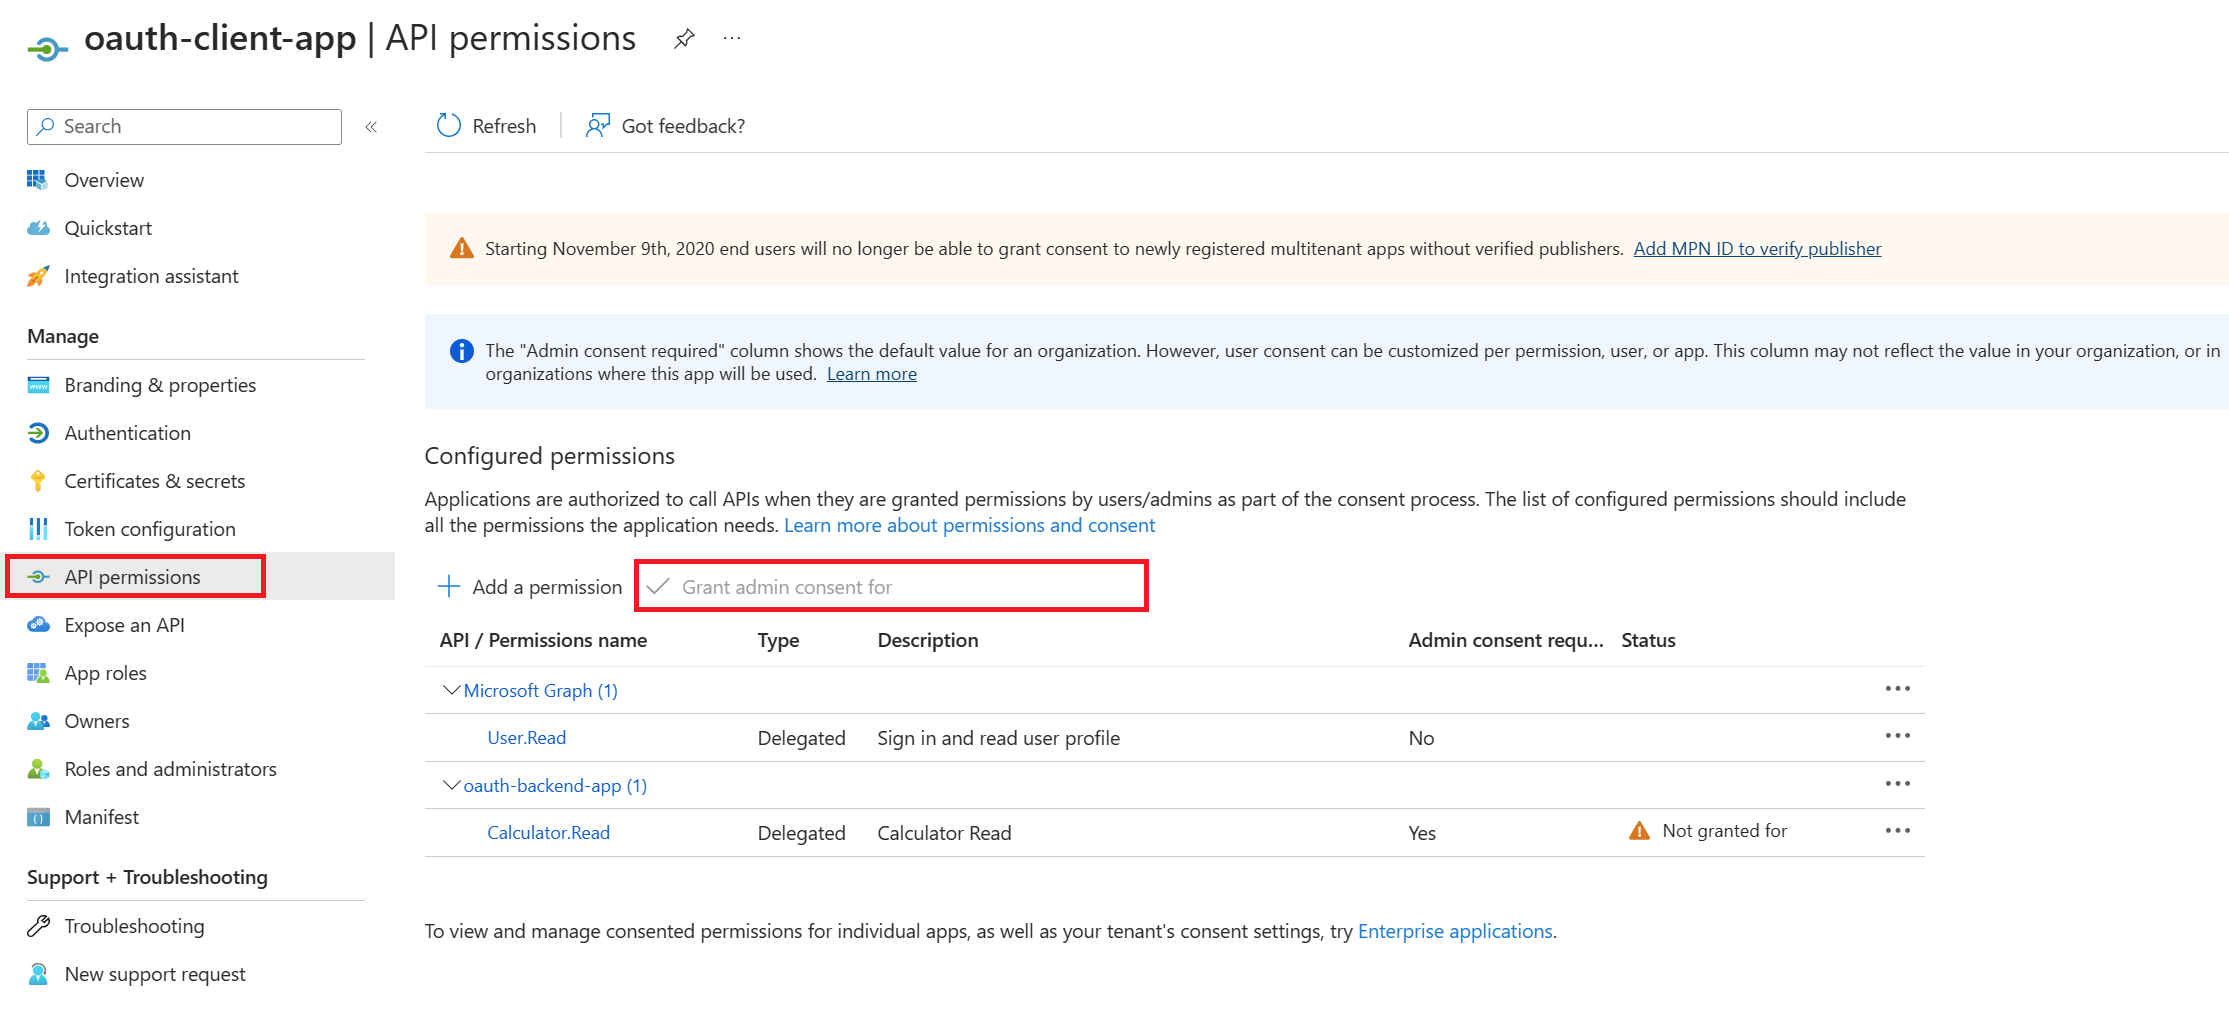
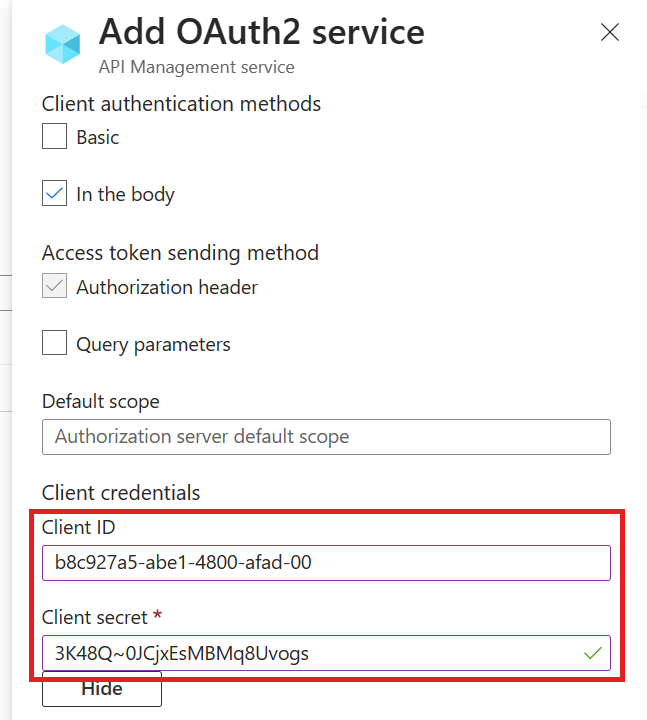
Enable OAuth 2.0 in the Developer Console for Authorization Code Grant type
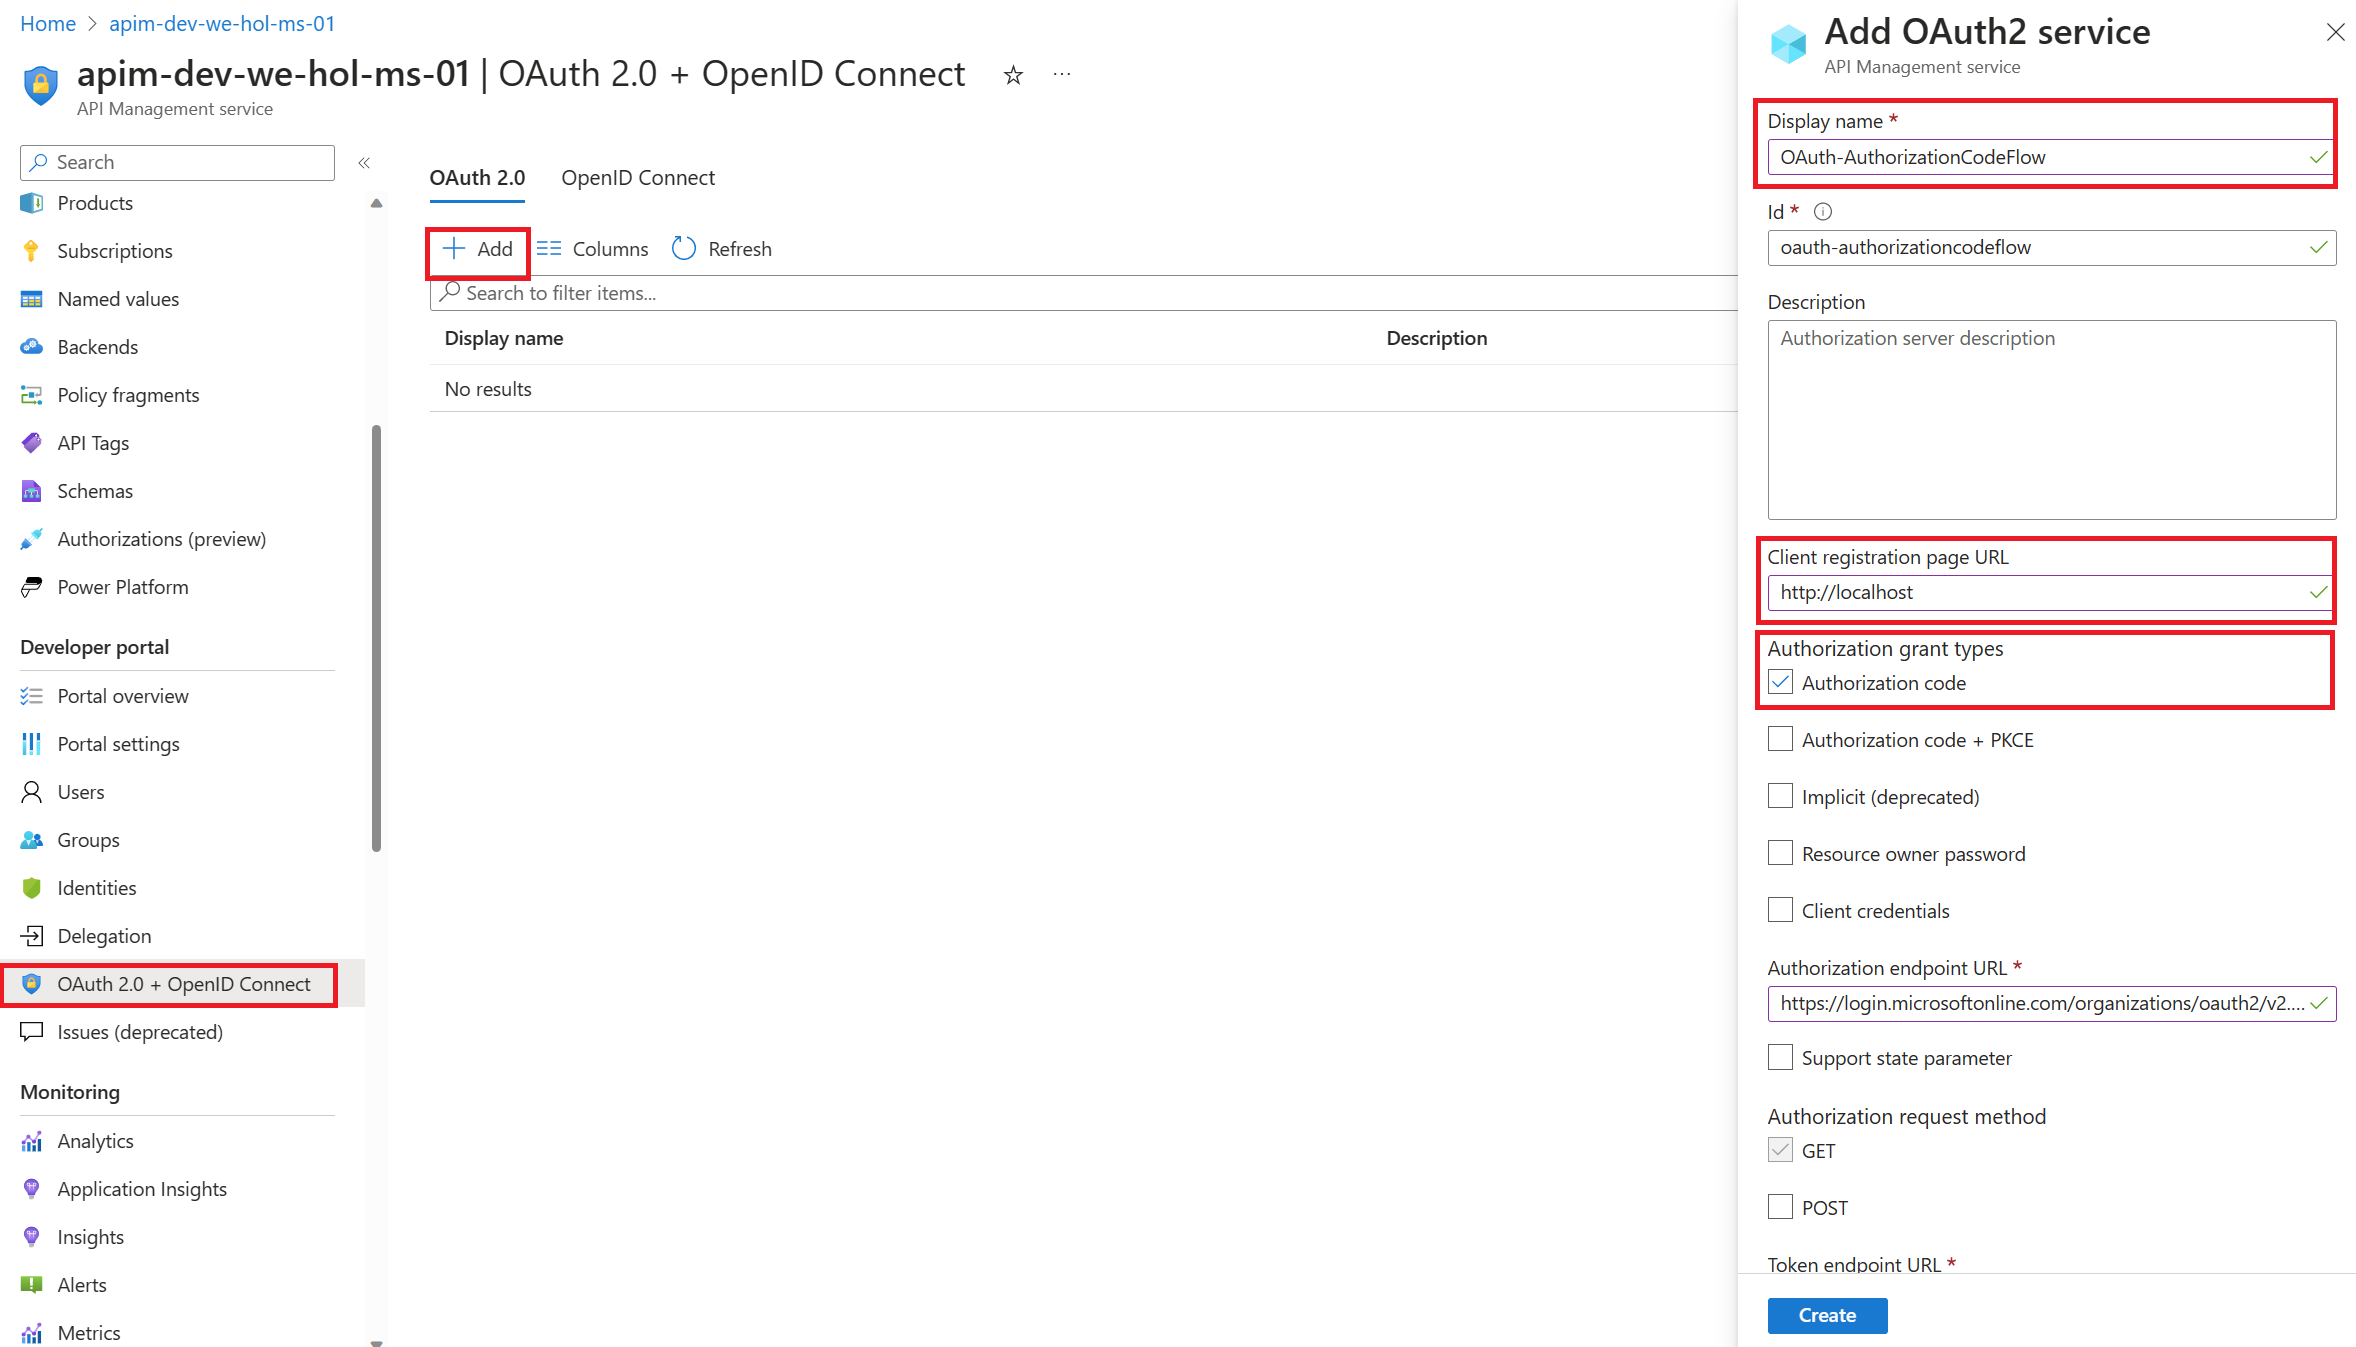
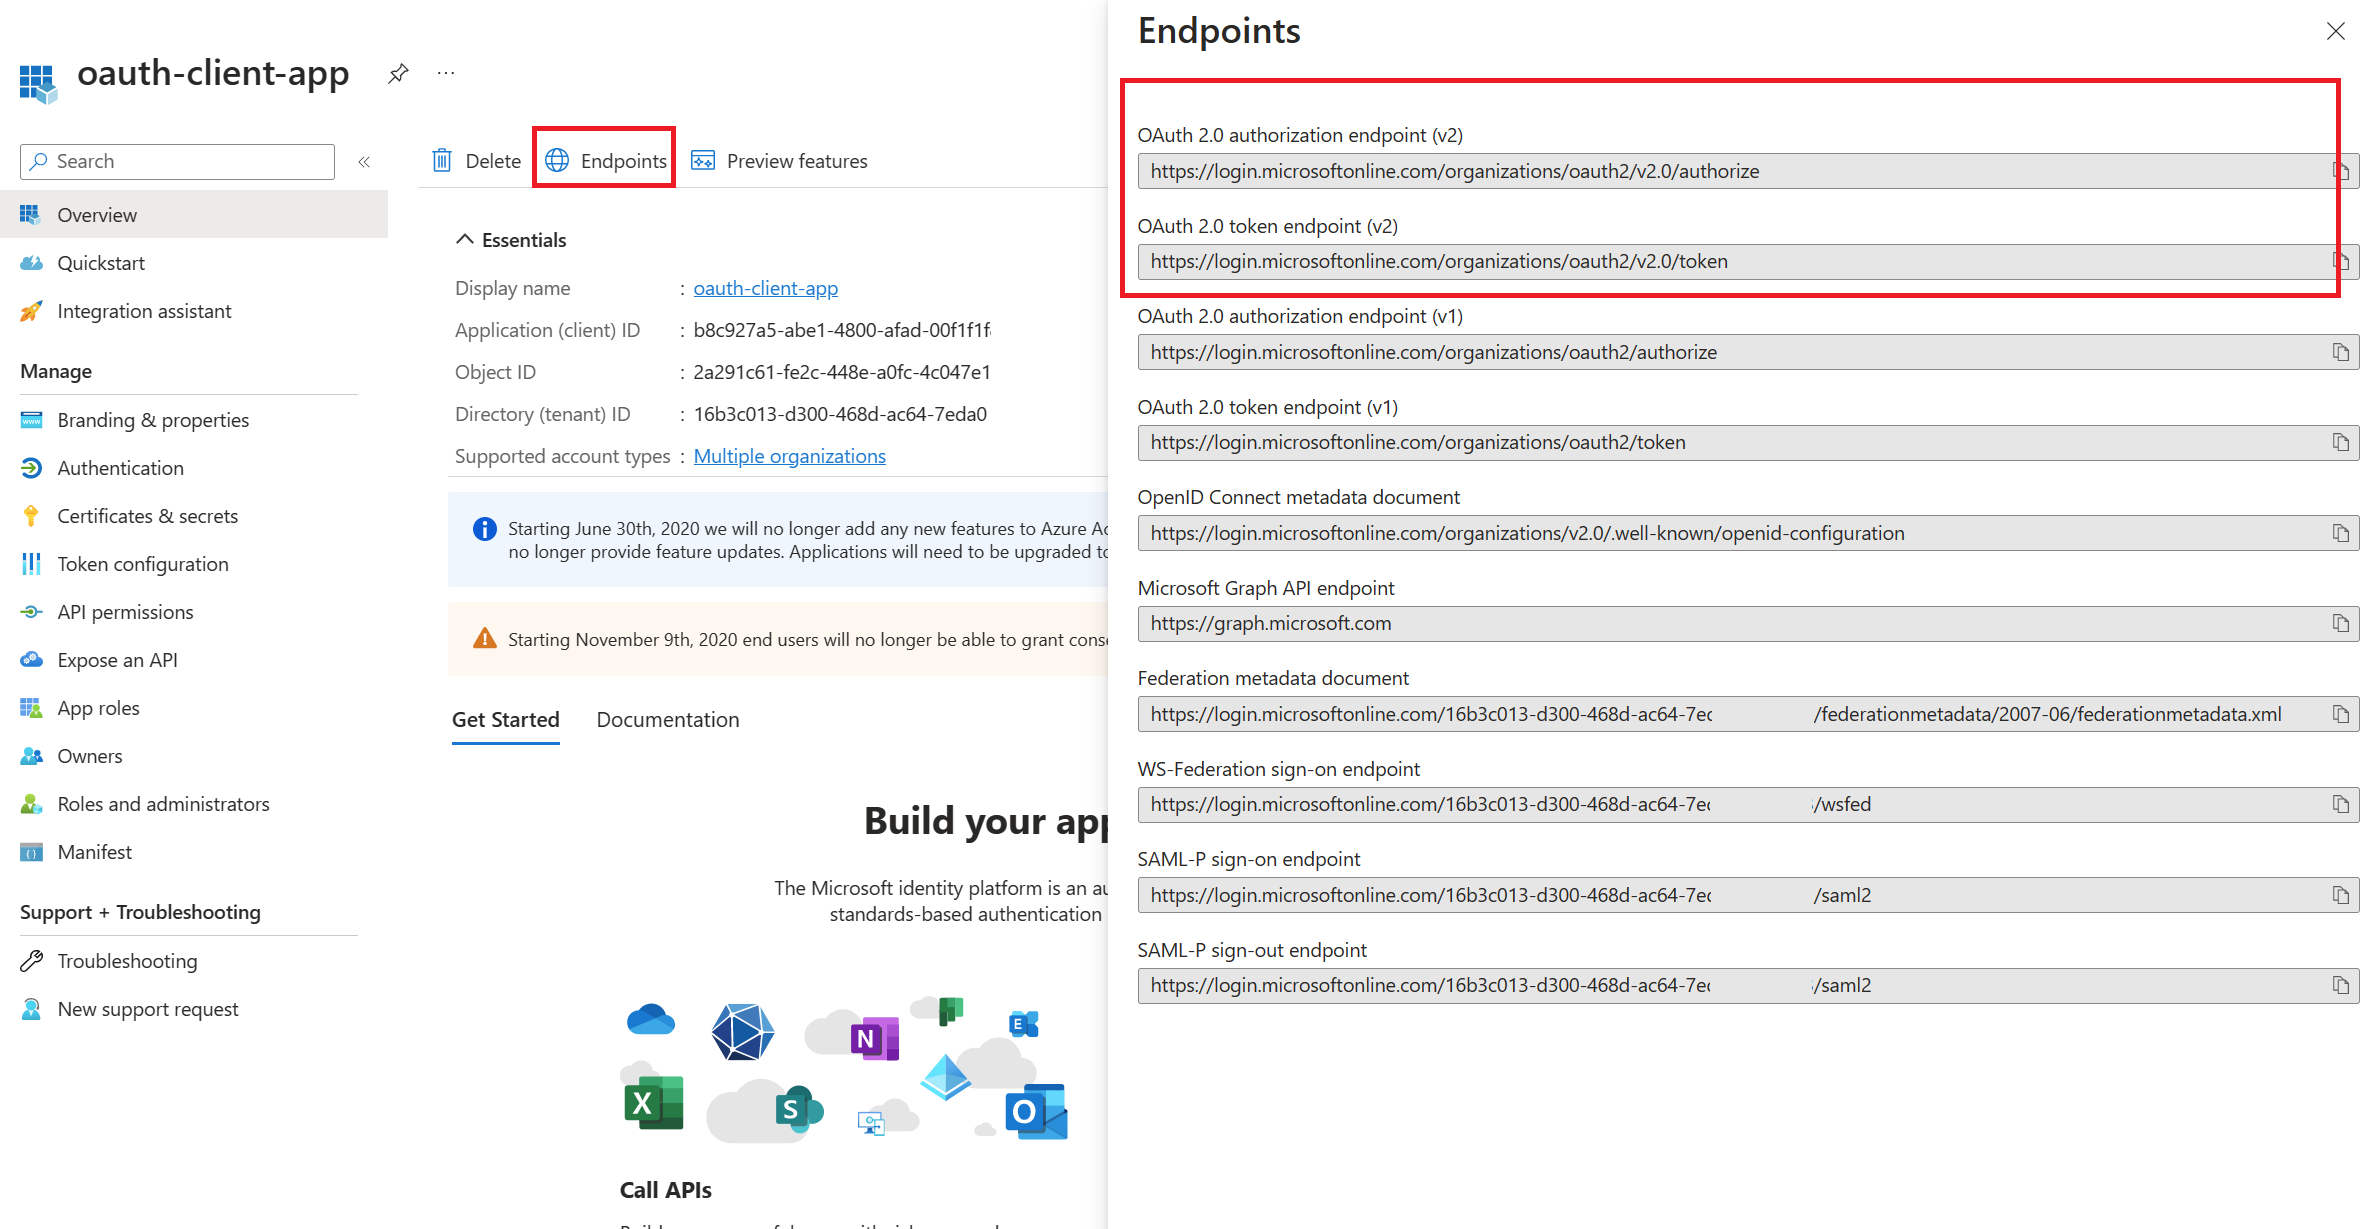
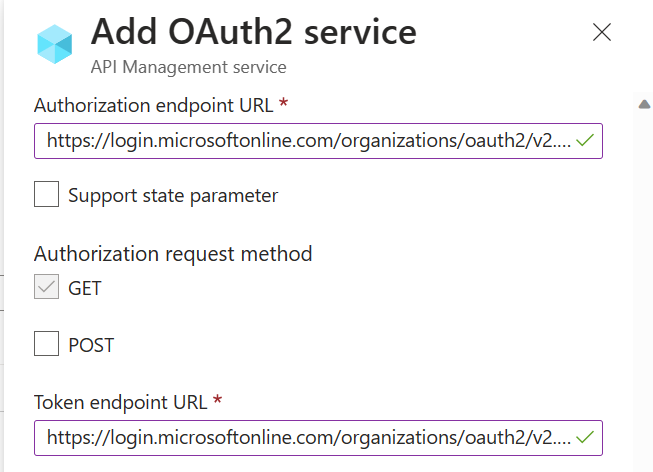
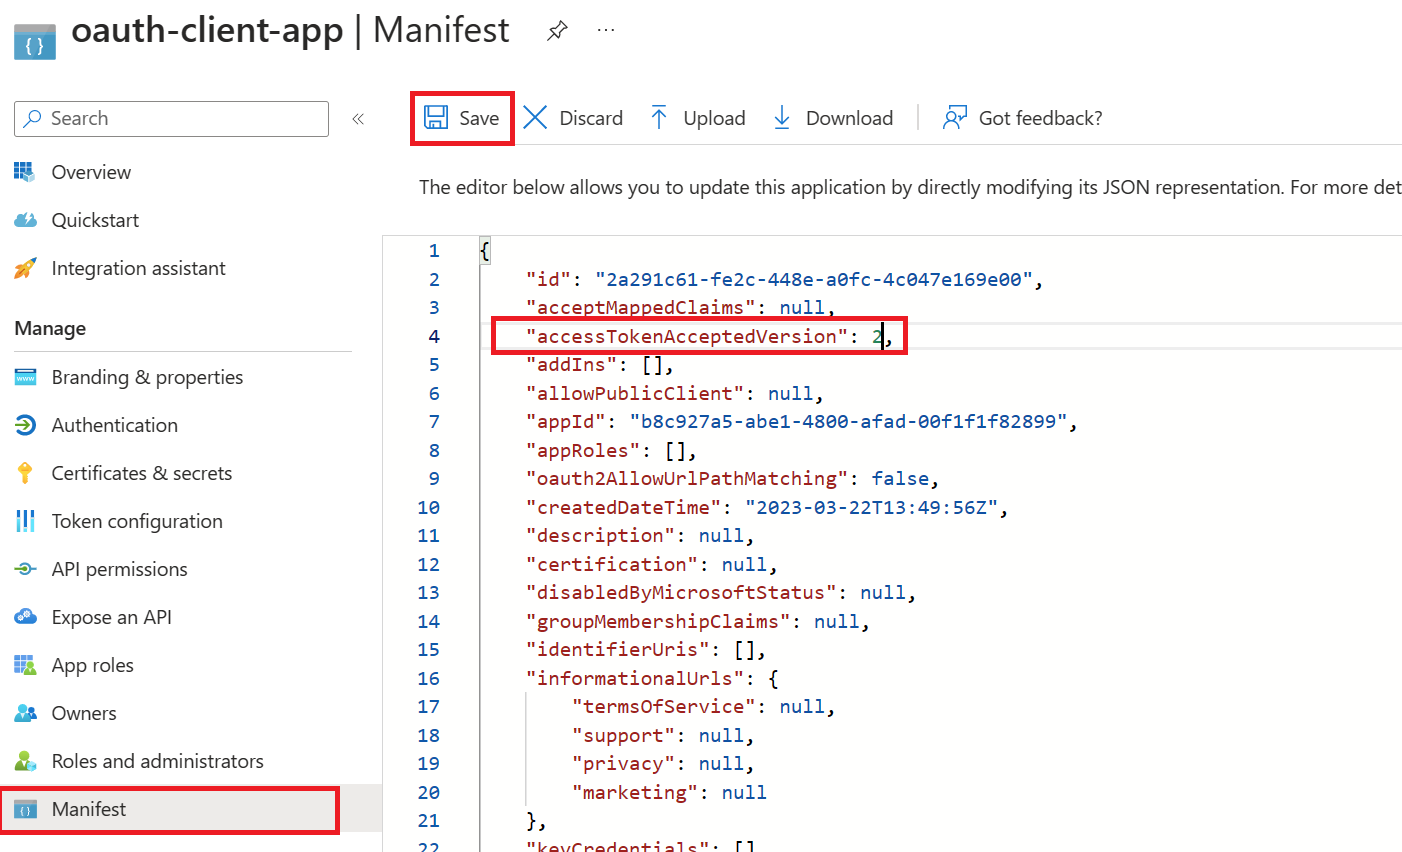
ENDPOINTS VERSIONS
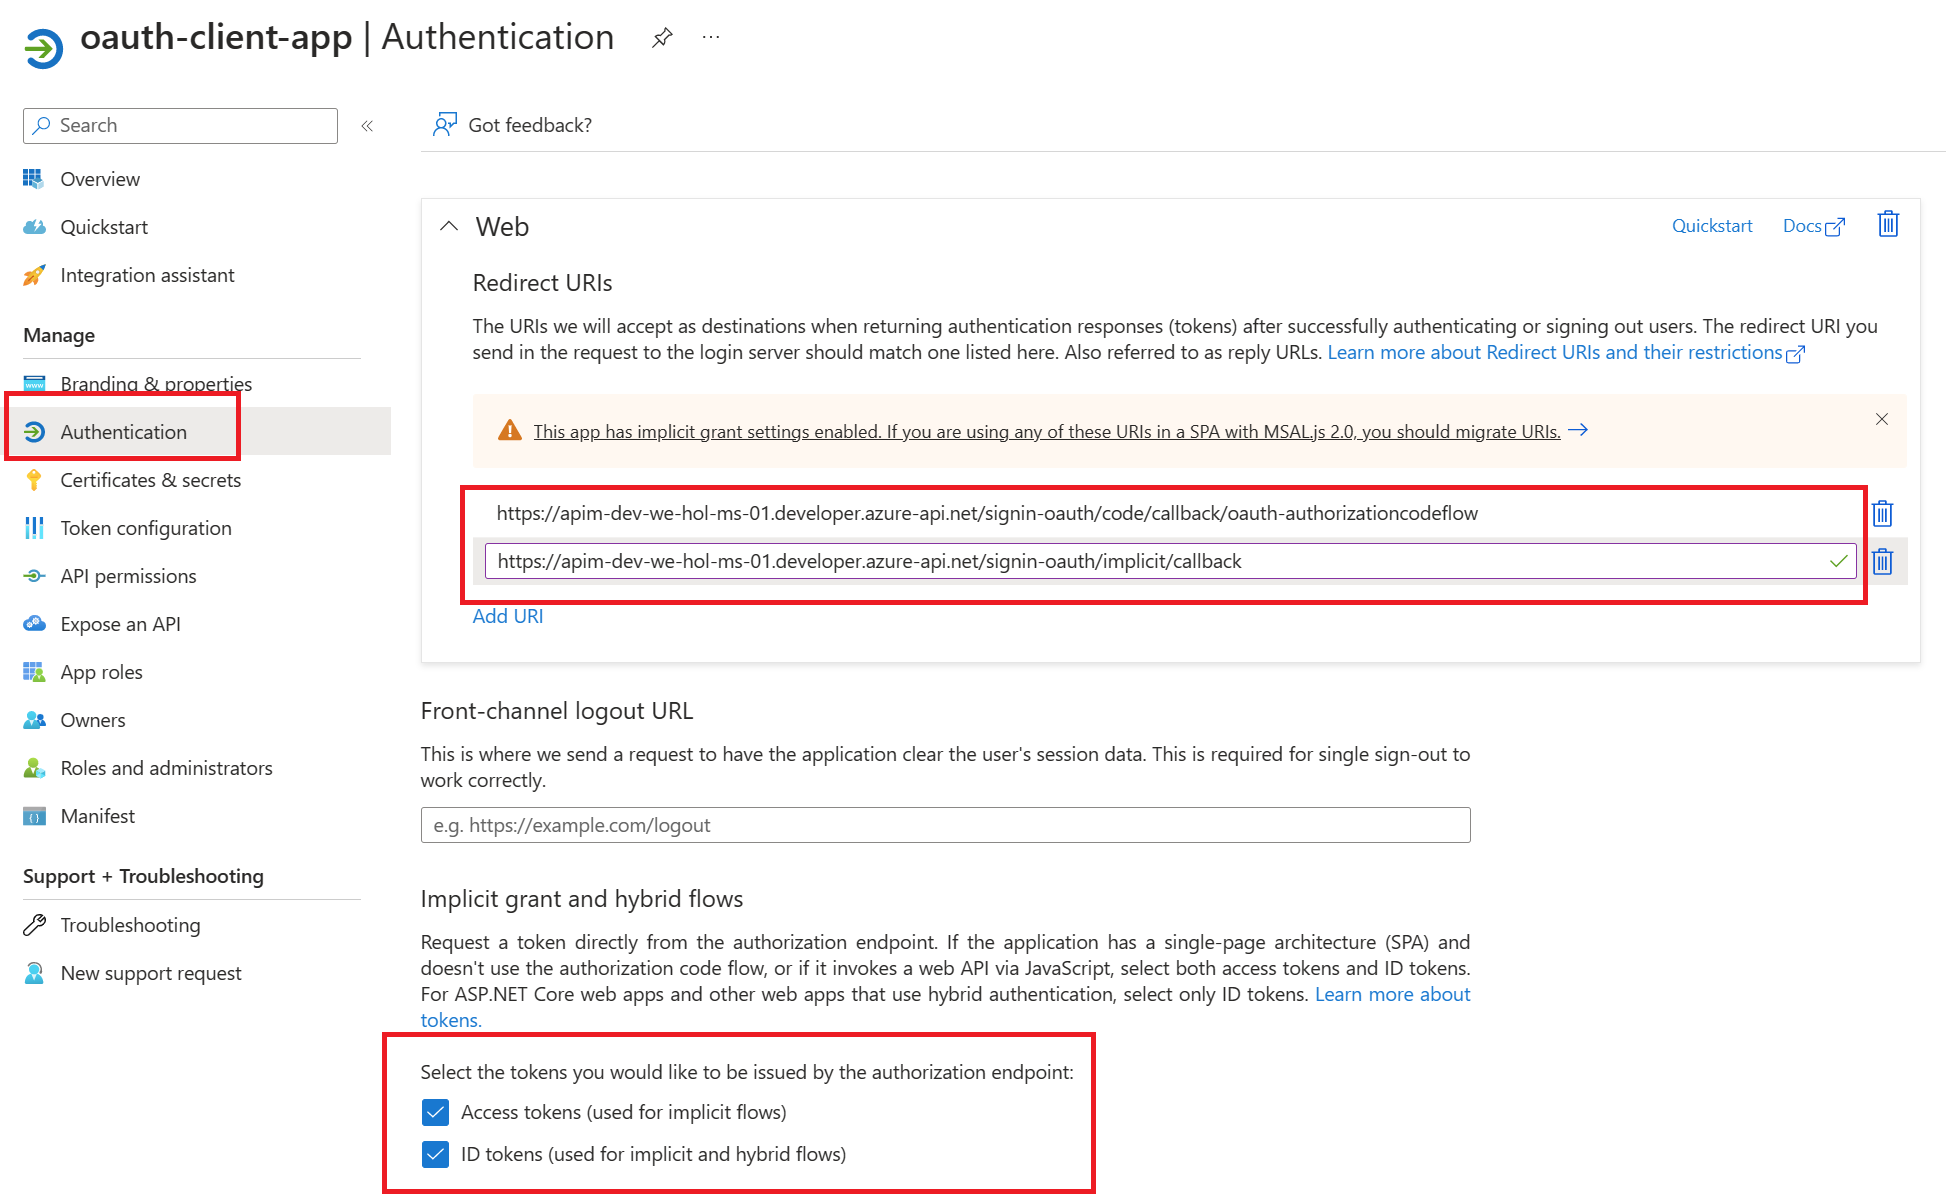
Basic Calculator API and Go to Settings.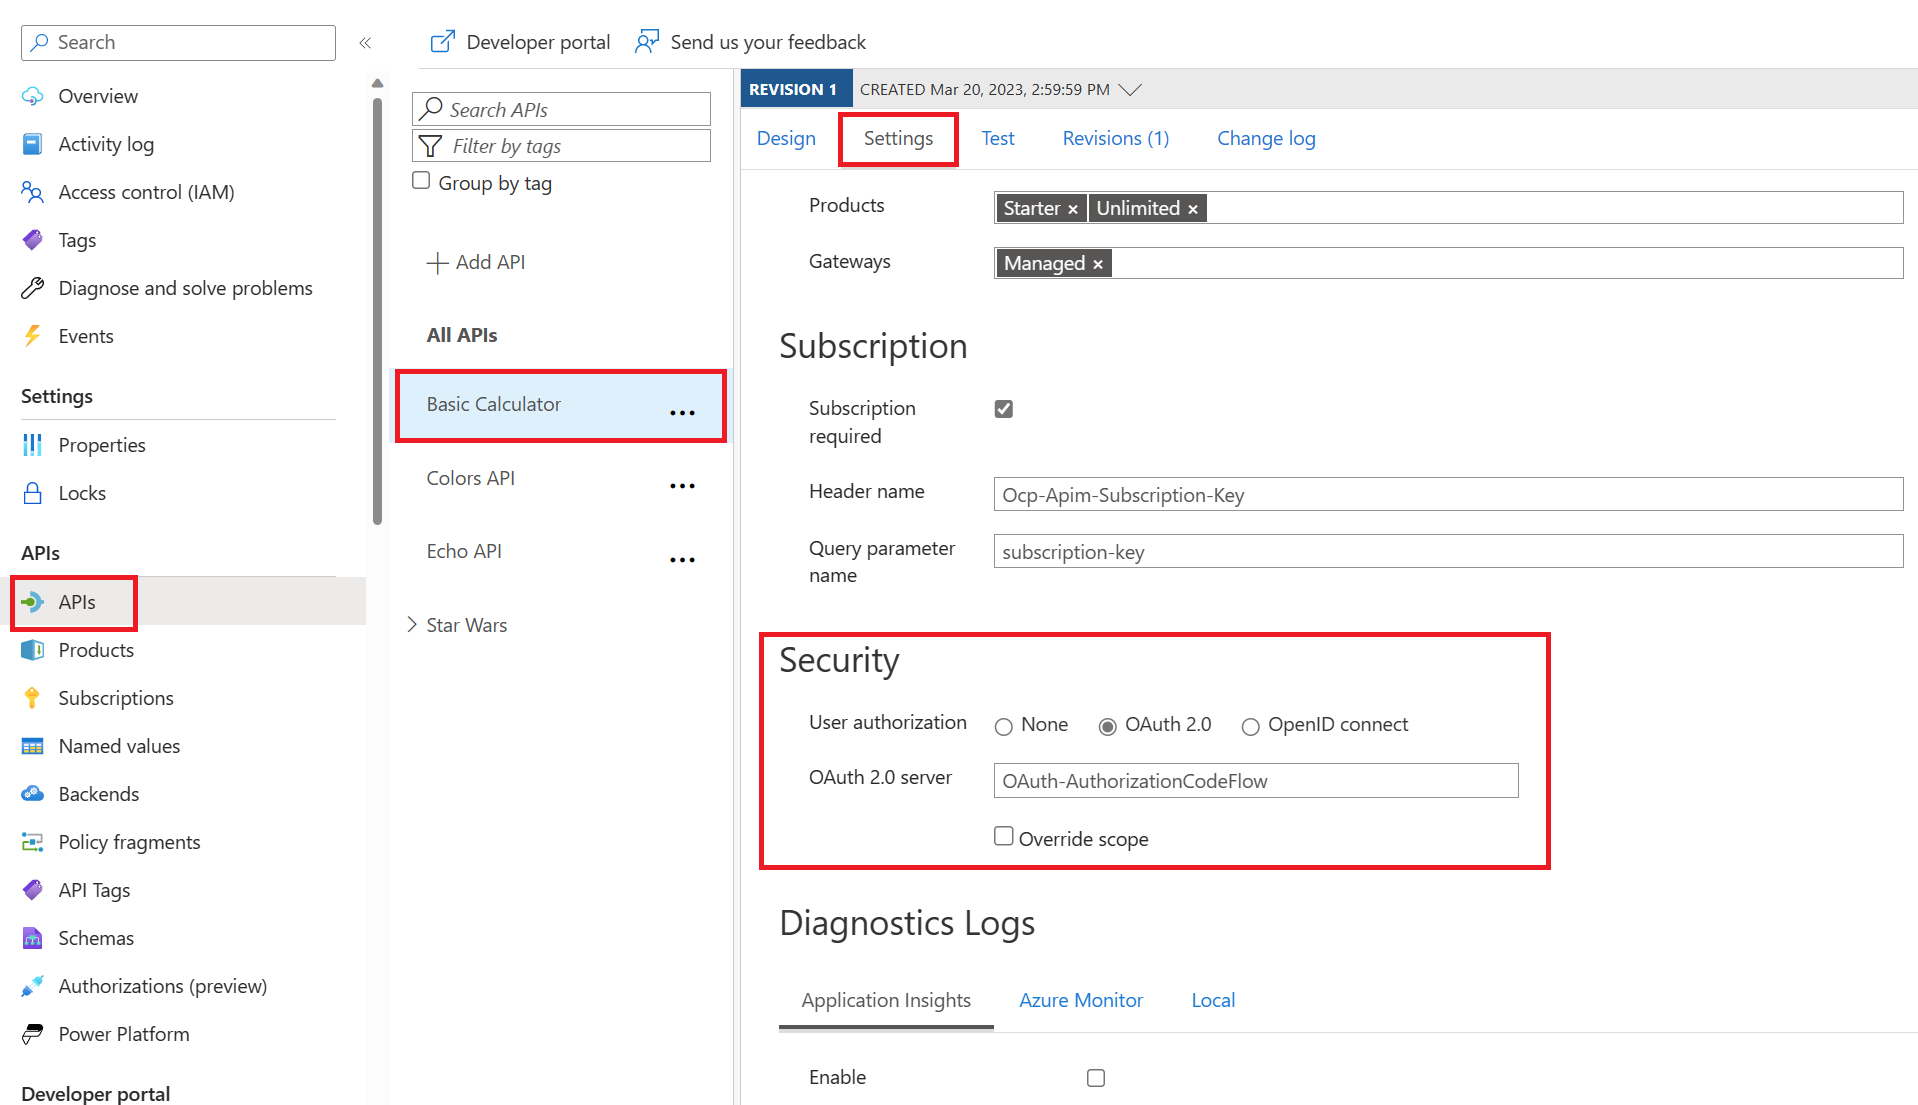

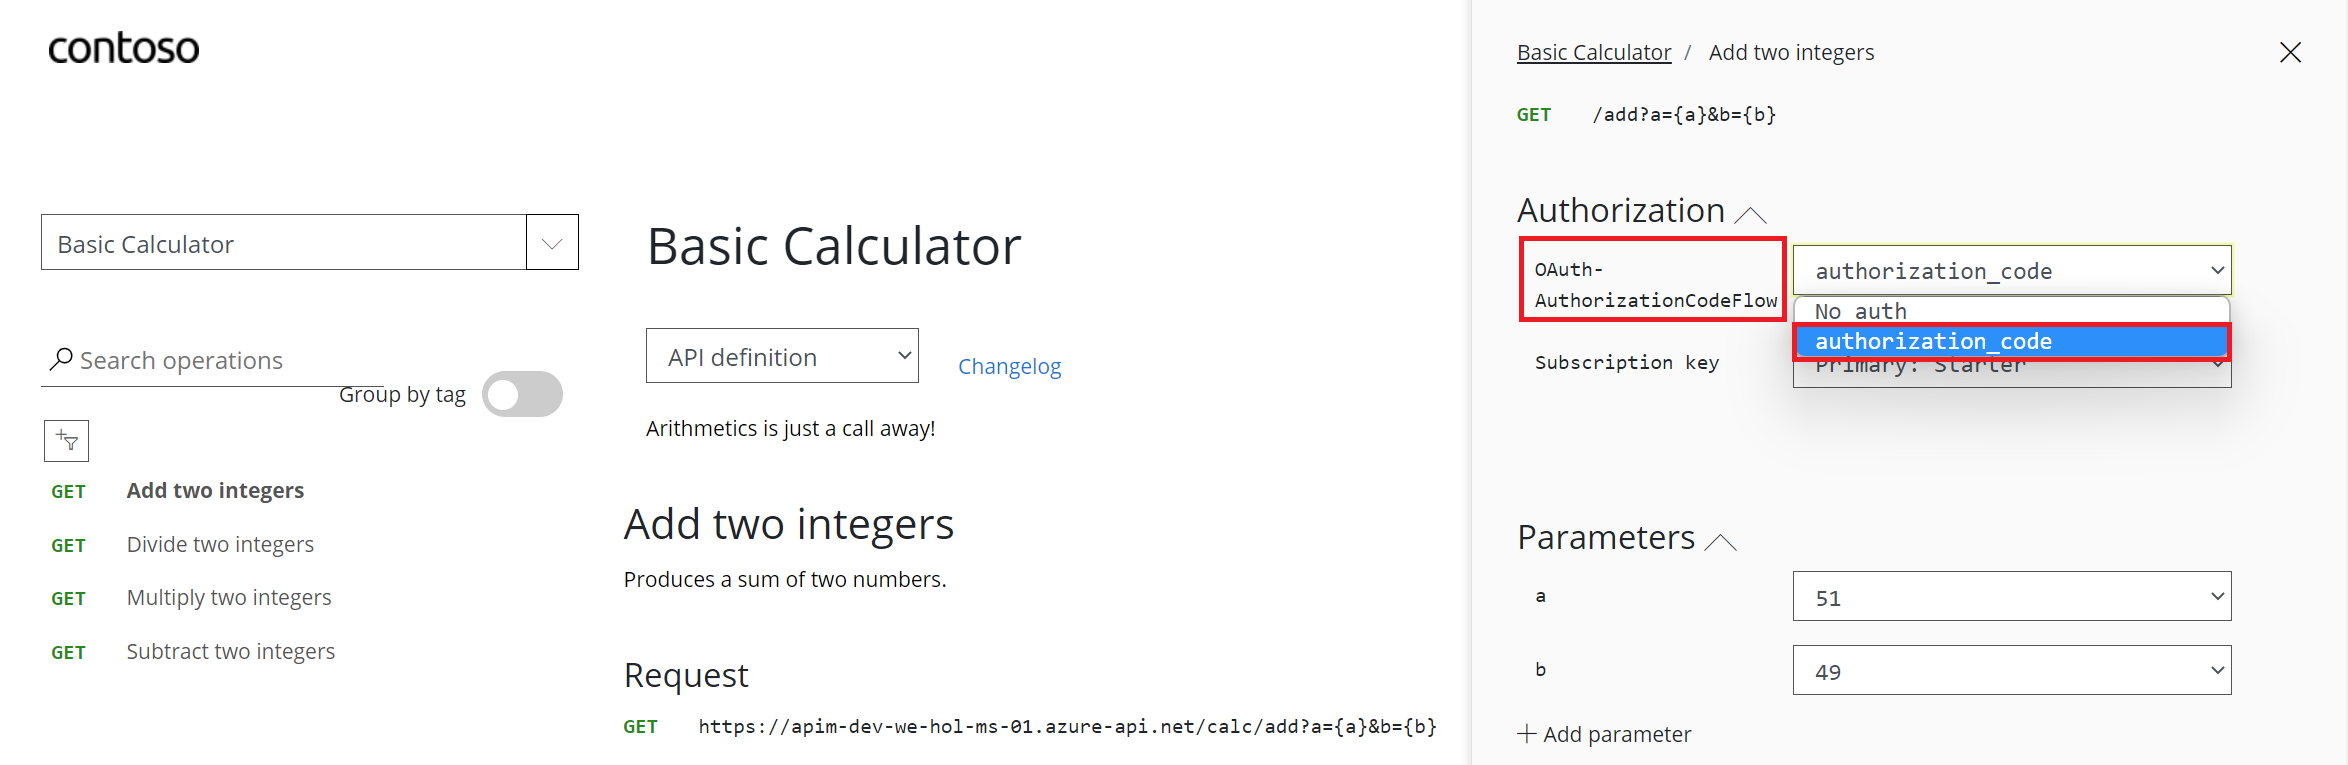
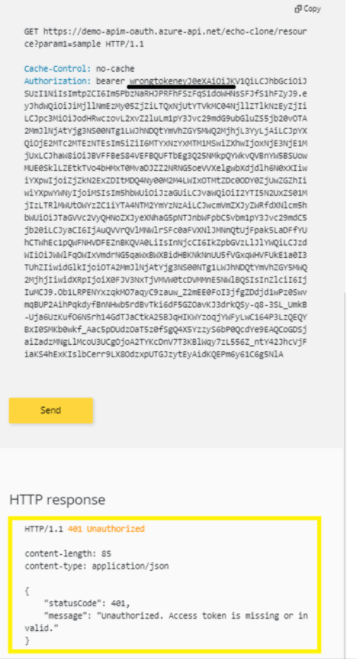
CALLING THE API FROM THE DEVELOPER PORTAL

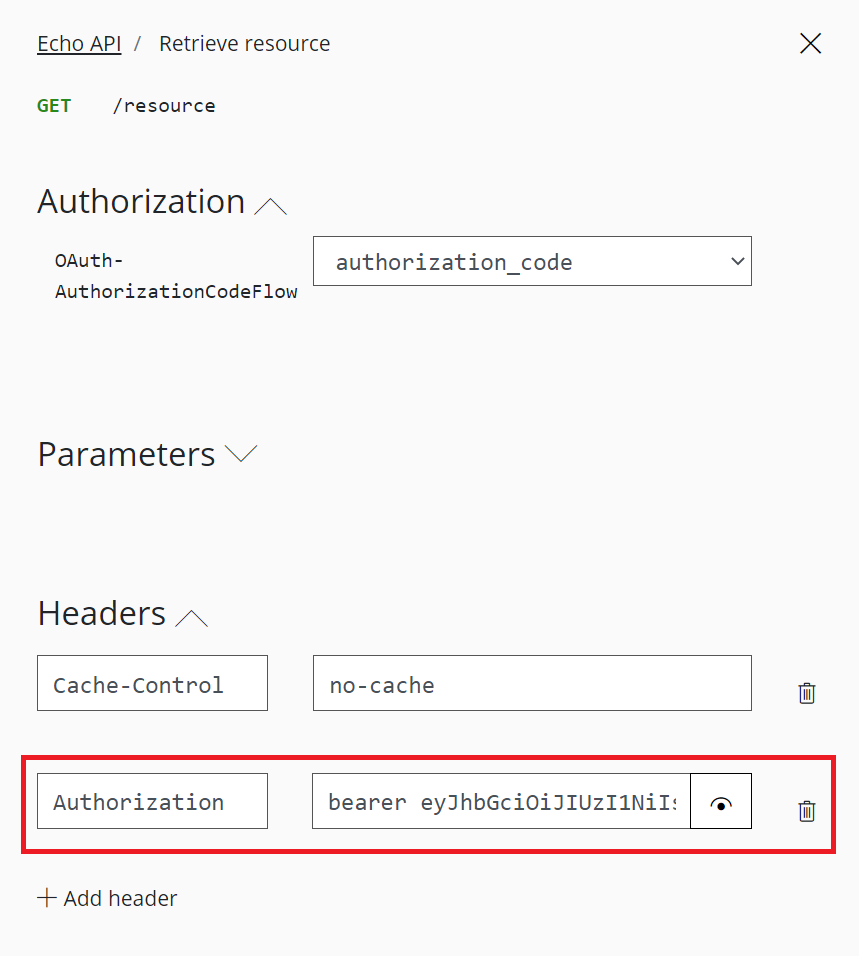
Validate-jwt policy to pre-authorize requests with AD token:
validate-jwt Policy by validating the access tokens of each incoming request. If a request does not have a valid token, API Management blocks it.Basic Calculator Api and open the inbound policy to add the validate-jwt policy(It checks the audience claim in an access token and returns an error message if the token is not valid.) and save it.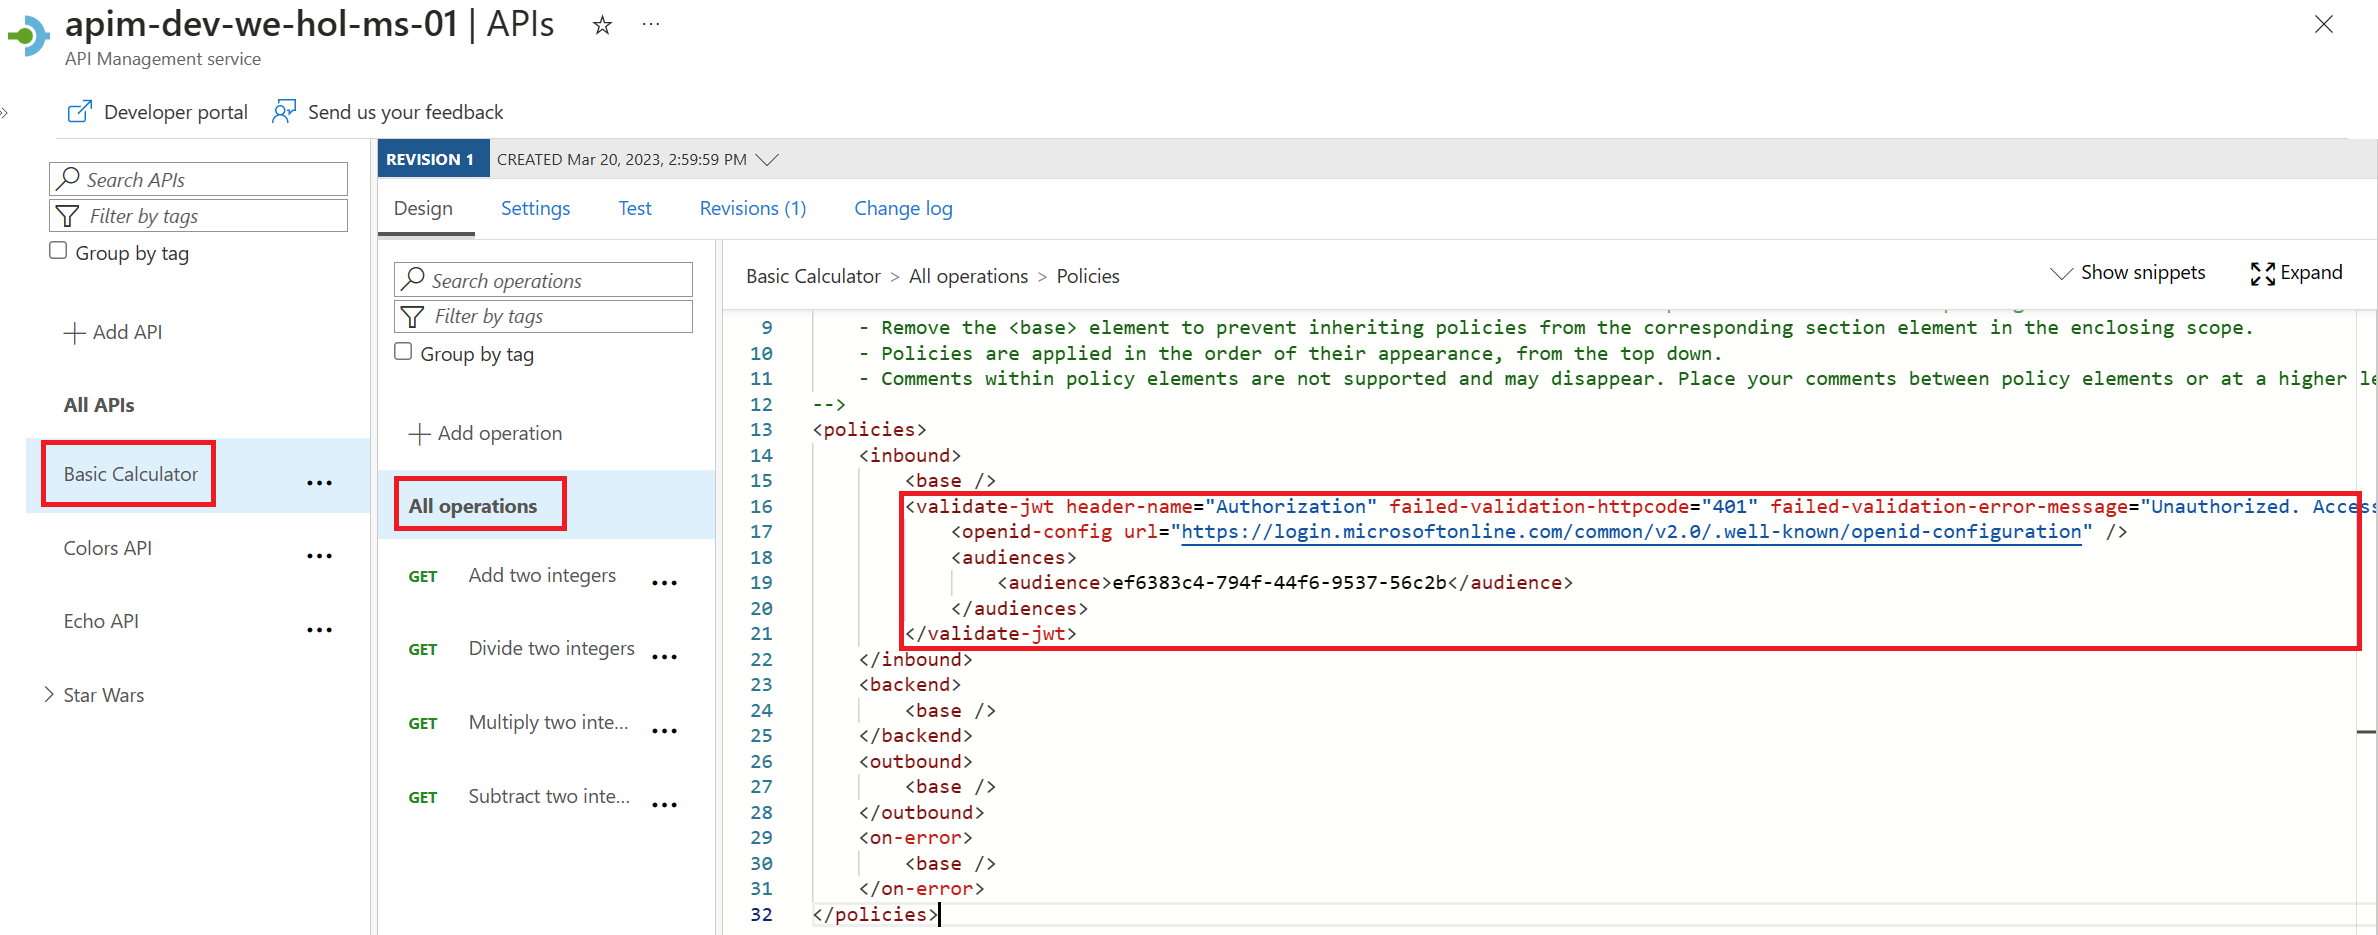
api://d183fdbe-fc28-4ef7-9ca1-e7b4a4cd1ff8/Calculator.read , we need to use the id d183fdbe-fc28-4ef7-9ca1-e7b4a4cd1ff8 as audience<validate-jwt header-name="Authorization" failed-validation-httpcode="401" failed-validation-error-message="Unauthorized. Access token is missing or invalid.">
<openid-config url="https://login.microsoftonline.com/common/v2.0/.well-known/openid-configuration" />
YOUR-BACKENDAPP-SCOPE-ID
UNDERSTANDING VALIDATE-JWT POLICY
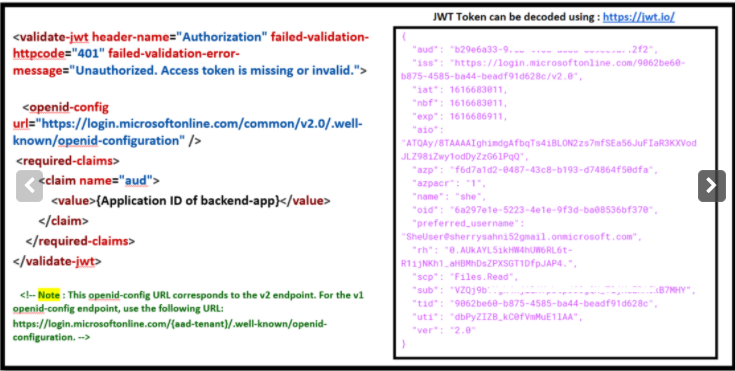
validate-jwt policy works (the image in the right side is the decoded JWT Token)Task 3: Managed Identities
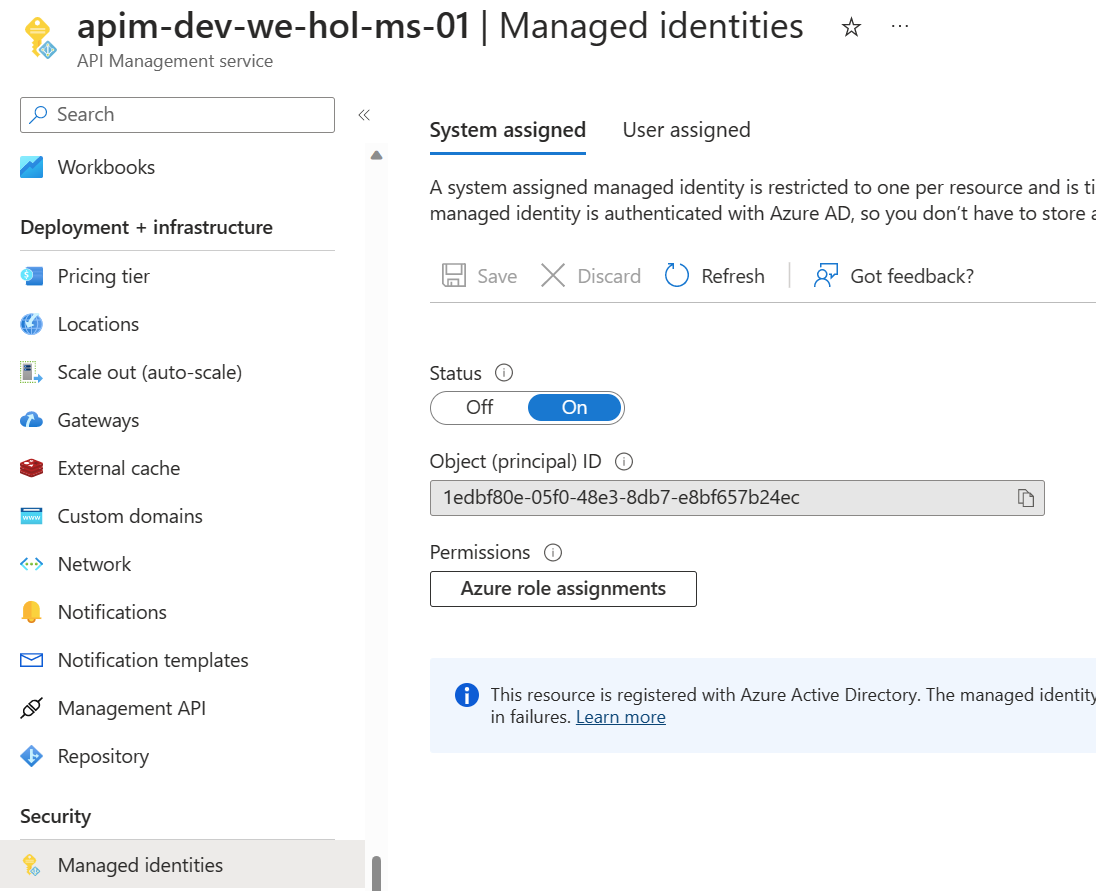
Security
Managed Service Identity
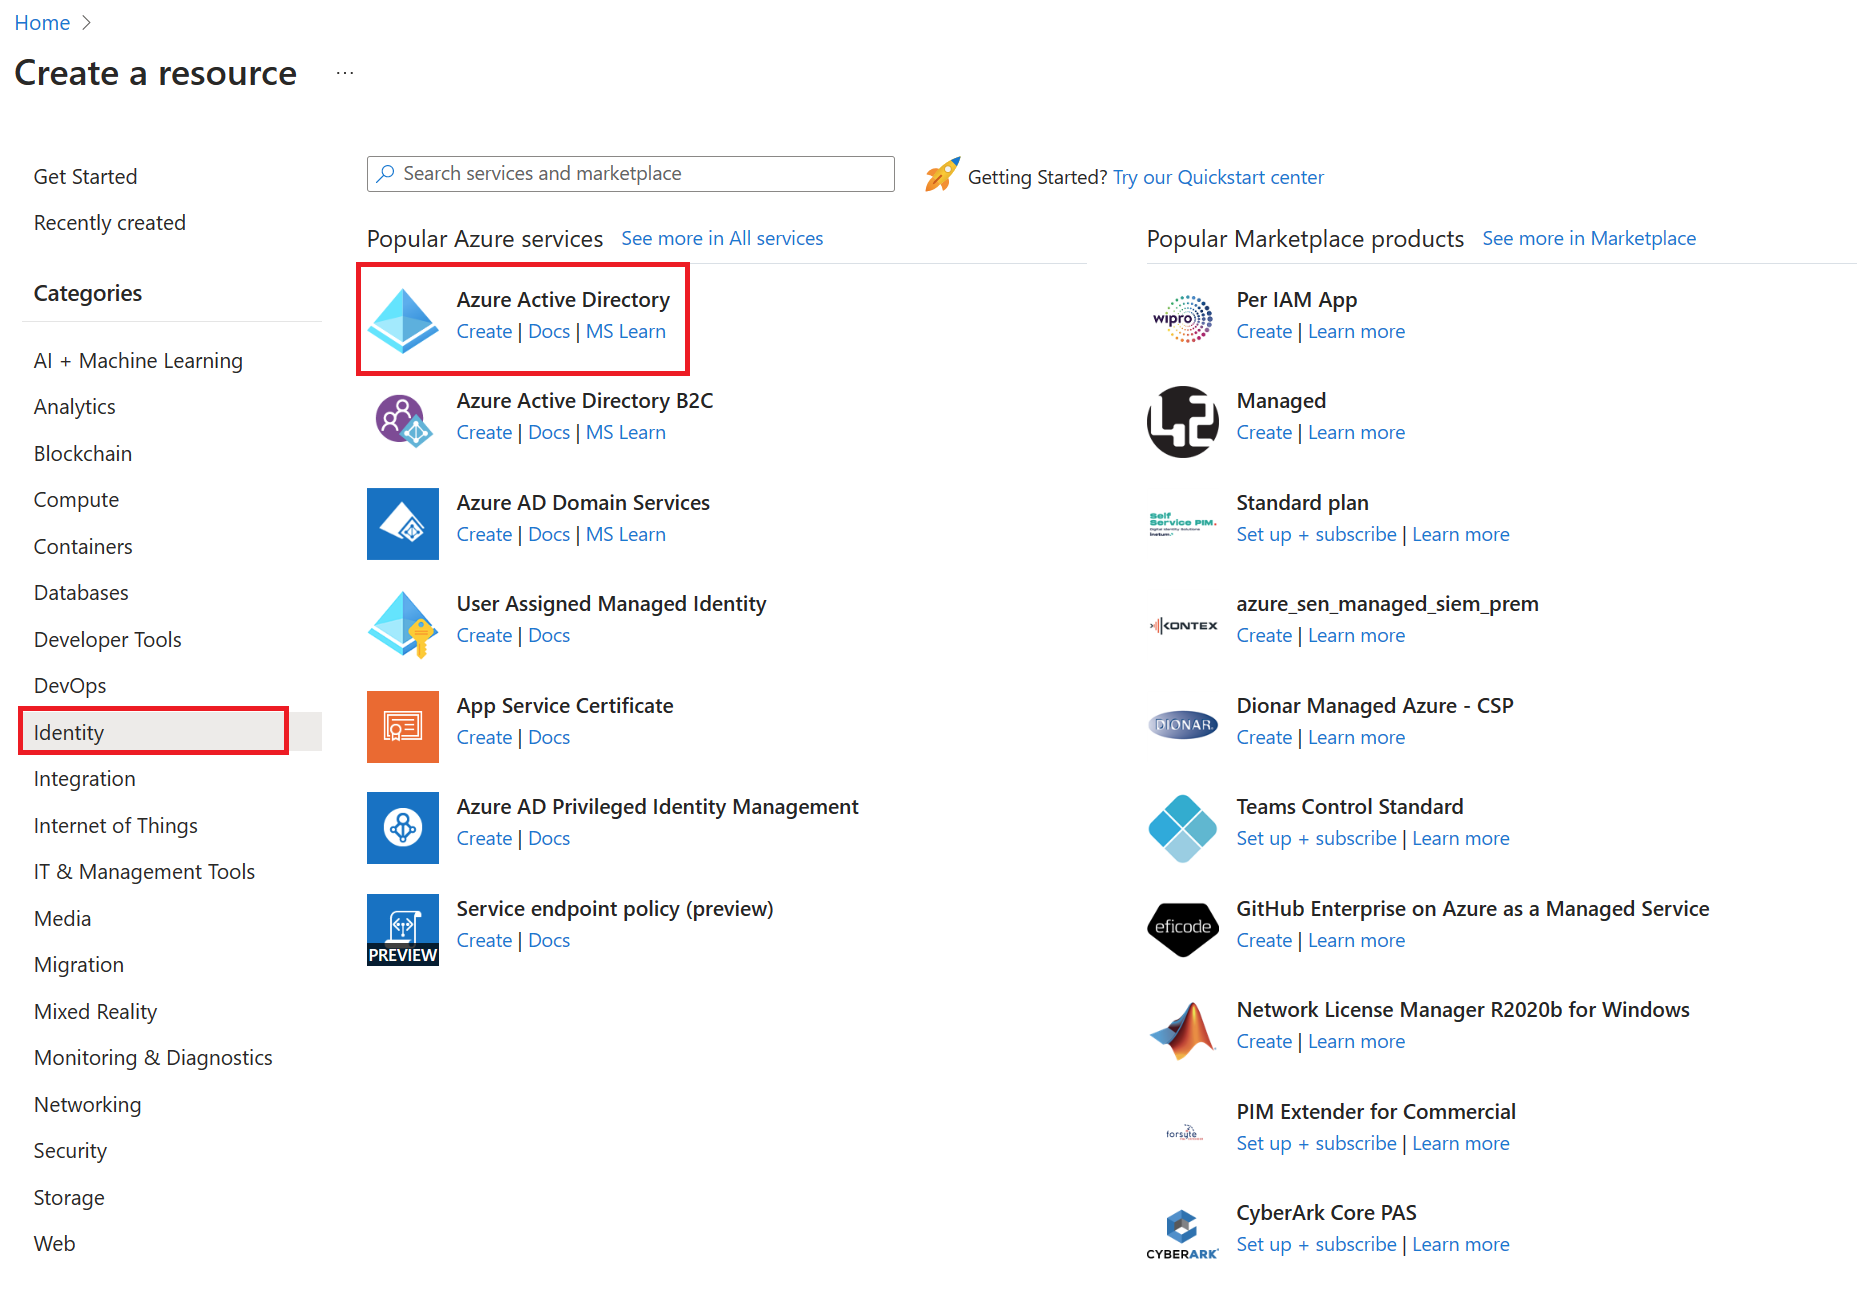
REGISTER API MANAGEMENT WITH ACTIVE DIRECTORY
KEY VAULT – CREATE KEY VAULT AND ADD A SECRET
favoritePerson3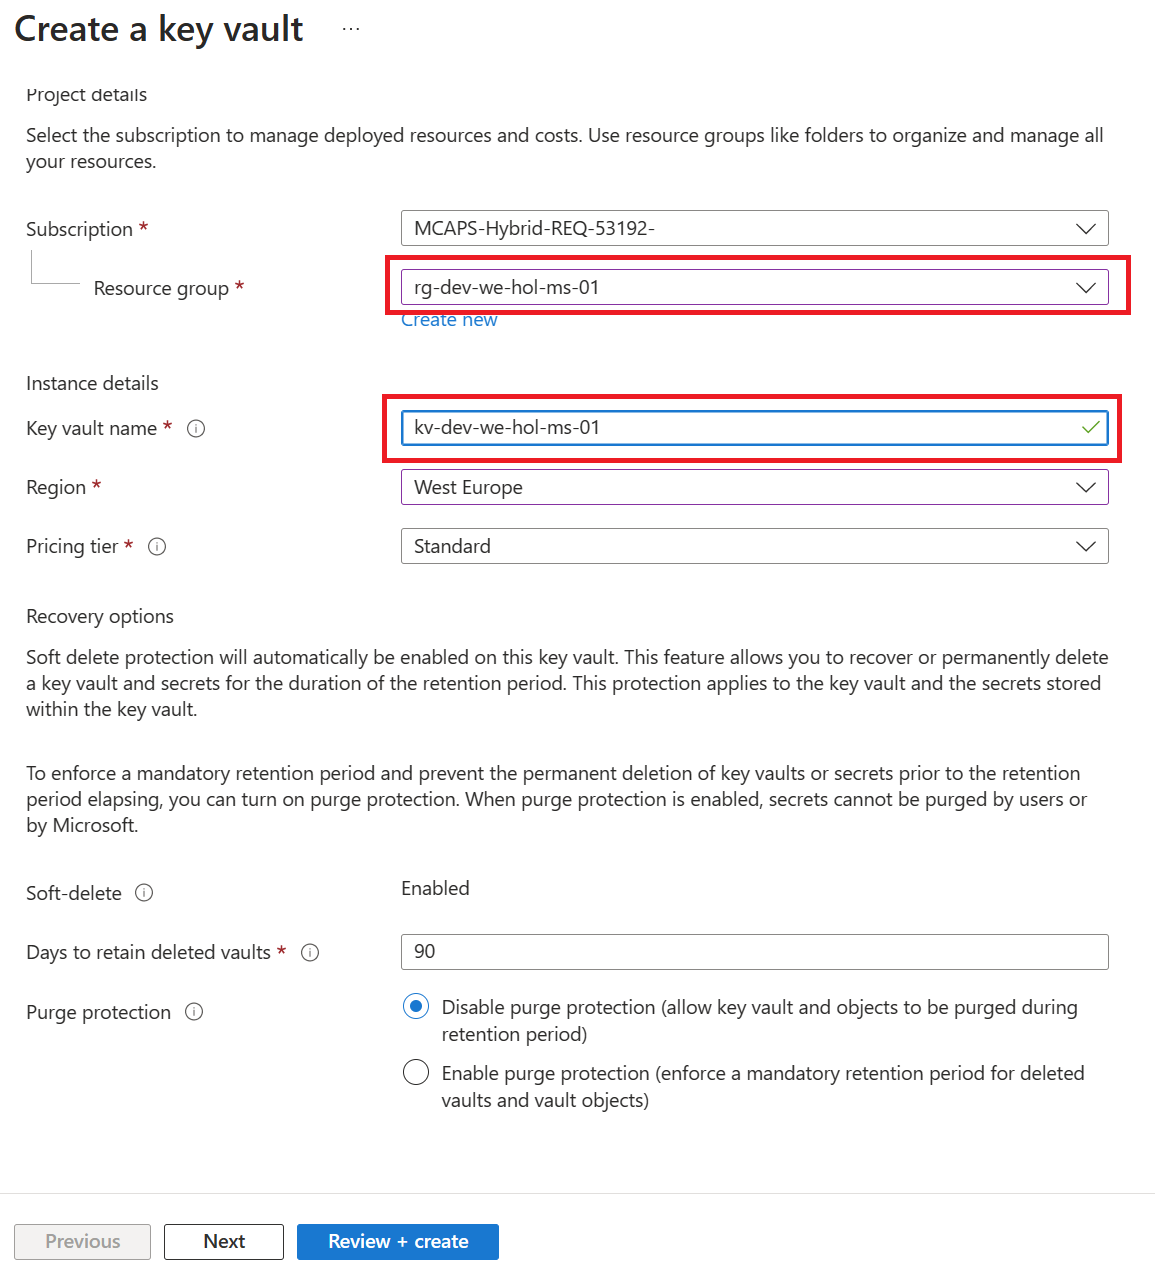
KEY VAULT – ACCESS POLICY AND PRINCIPAL ASSIGNMENT

Get operation from the list of Secret permissions


API MANAGEMENT, KEY VAULT AND MANAGED SERVICE IDENTITY
<base />
<send-request mode="new" response-variable-name="secretResponse" timeout="20" ignore-error="false">
    https://{your-keyvault-base-uri}.azure.net/secrets/favoritePerson/?api-version=7.0
    GET
    <authentication-managed-identity resource="https://vault.azure.net" />

<set-variable name="favoritePersonRequest" value="@{
    var secret = ((IResponse)context.Variables["secretResponse"]).Body.As<JObject>();
    return "/people/" + secret["value"].ToString() + "/";
}" />
<rewrite-uri template="@((string)context.Variables["favoritePersonRequest"])" />
TEST THE OPERATION
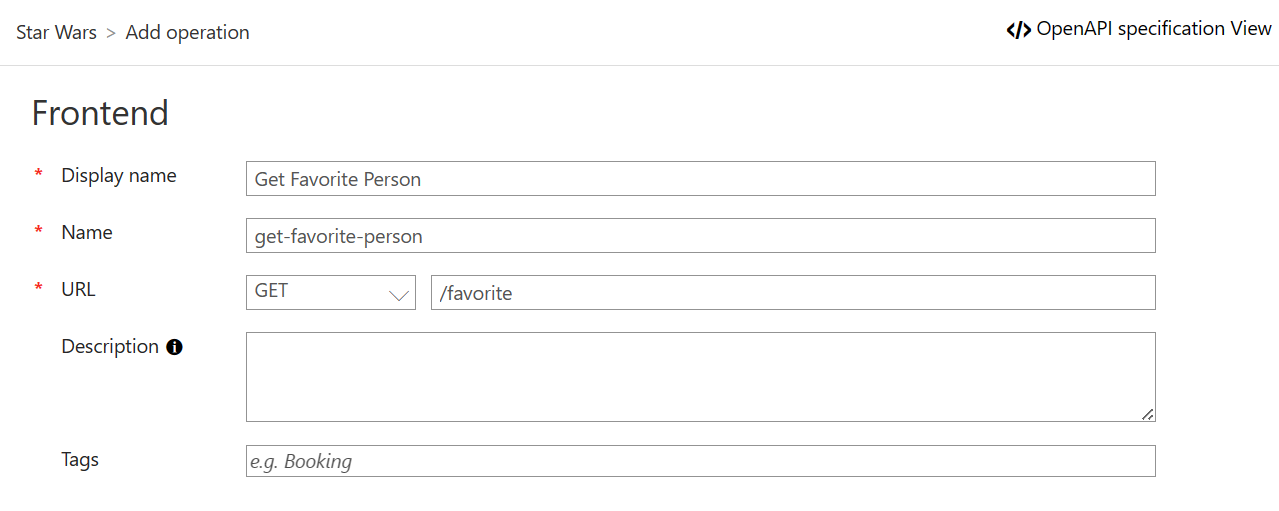
https://{your-apim-instance}.azure-api.net/sw/favoriteExercise 7: DevOps
Task 1: Azure DevOps + Apim Devops Kit
Continuos Integration and Continuos Deployment using Azure DevOps
Pre-reqs
Architecture
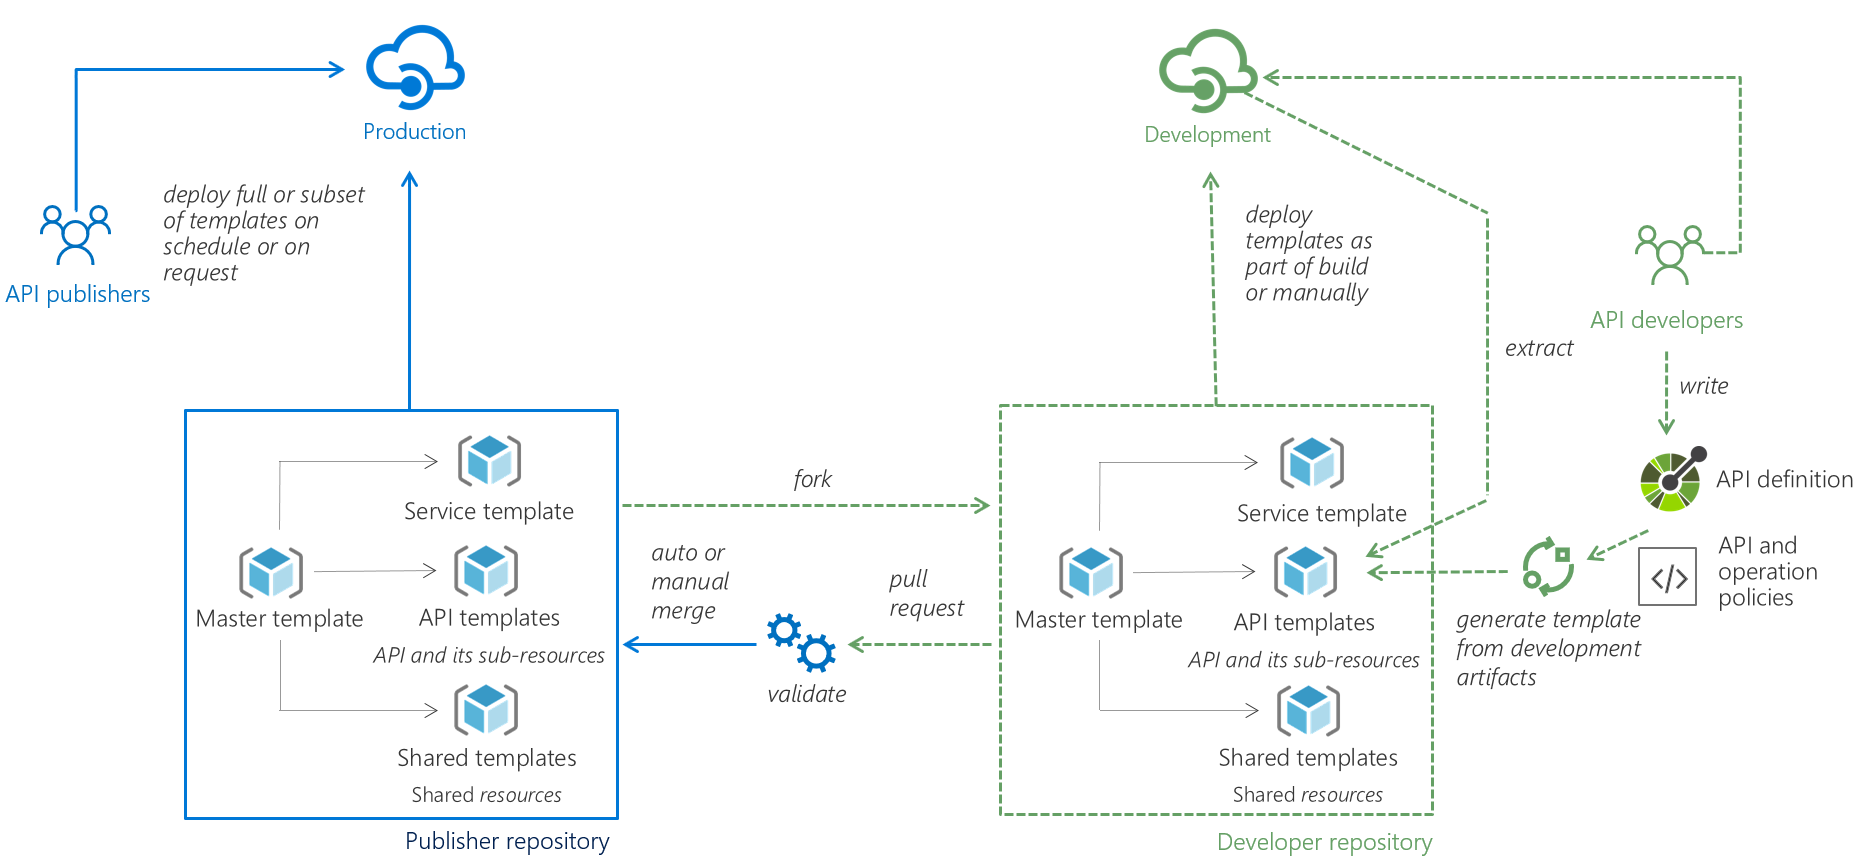

APIM DevOps Toolkit
  git clone https://github.com/Azure/azure-api-management-devops-resource-kit.git
  cd src/APIM_ARMTemplate/apimtemplate
dotnet restore
 # View subscriptions
 az account list
 # Verify selected subscription
 az account show
 # Set correct subscription (if needed)
 az account set --subscription

 # Verify correct subscription is now set
 az account show
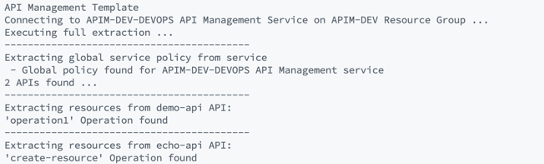
extractorConfig argument:extract --extractorConfig c:/temp/extractSettings.jsonextract --sourceApimName my-feature-apim --destinationApimName company-stable-apim --resourceGroup my-feature-rg --fileFolder c:\\temp\\apim-extract --apiName MyFeatureV1Api dotnet run extract --sourceApimName --resourceGroup --destinationApimName --fileFolder apim-extract
dotnet run extract --sourceApimName famc-apimlab2 --resourceGroup famc-apimlab2 --destinationApimName famc-apimlab2-prod --fileFolder apim-extract

git add *
git commit -a -m "add extracted *.json files to devops repository
git push
Build Pipeline


Release Pipeline
- Products.template.json
- Tags.template.json
- namedValues.template.json
- apis.template.json
- globalServicePolice.template.json


Exercise 8: Fusion Dev
Task 1: Powerapp + Azure Apim API
Create a custom connector

OpenAPI v2 (JSON) file that can be imported as a Custom Connector within Power Platform. You can find a sample here.View your custom connector in Power Platform

GetPeople action, and in the Request section, select + Import from sample. Enter a sample request URL with the search query string:https://apim-star-wars-xxxx.azure-api.net/sw/people?search=Luke
getpeople action, select the 200 response and then select + Import from sample. Copy and paste a sample JSON response into the Body section of the response. Close the import panel and select Update connector.
getpeoplebyid action.
Generate the Star Wars Fan Club Application
Connect to the backing data source
Add Favorite Character information
Add the Star Wars API Data Source

Customize the generated app

Add controls to the View Detail screen

Connect the Detail Screen to the Star Wars API
Navigate(DetailScreen1, ScreenTransition.None);

ClearCollect(characterCollection, StarWarsAPI.getpeople({search: ThisItem.MemberFavoriteCharacter}).results);

Show the Star Wars character information on the Detail Screen
"Name:" & " " & First(characterCollection).name

Exercise 9: Additional Topics
TABLE OF CONTENTS
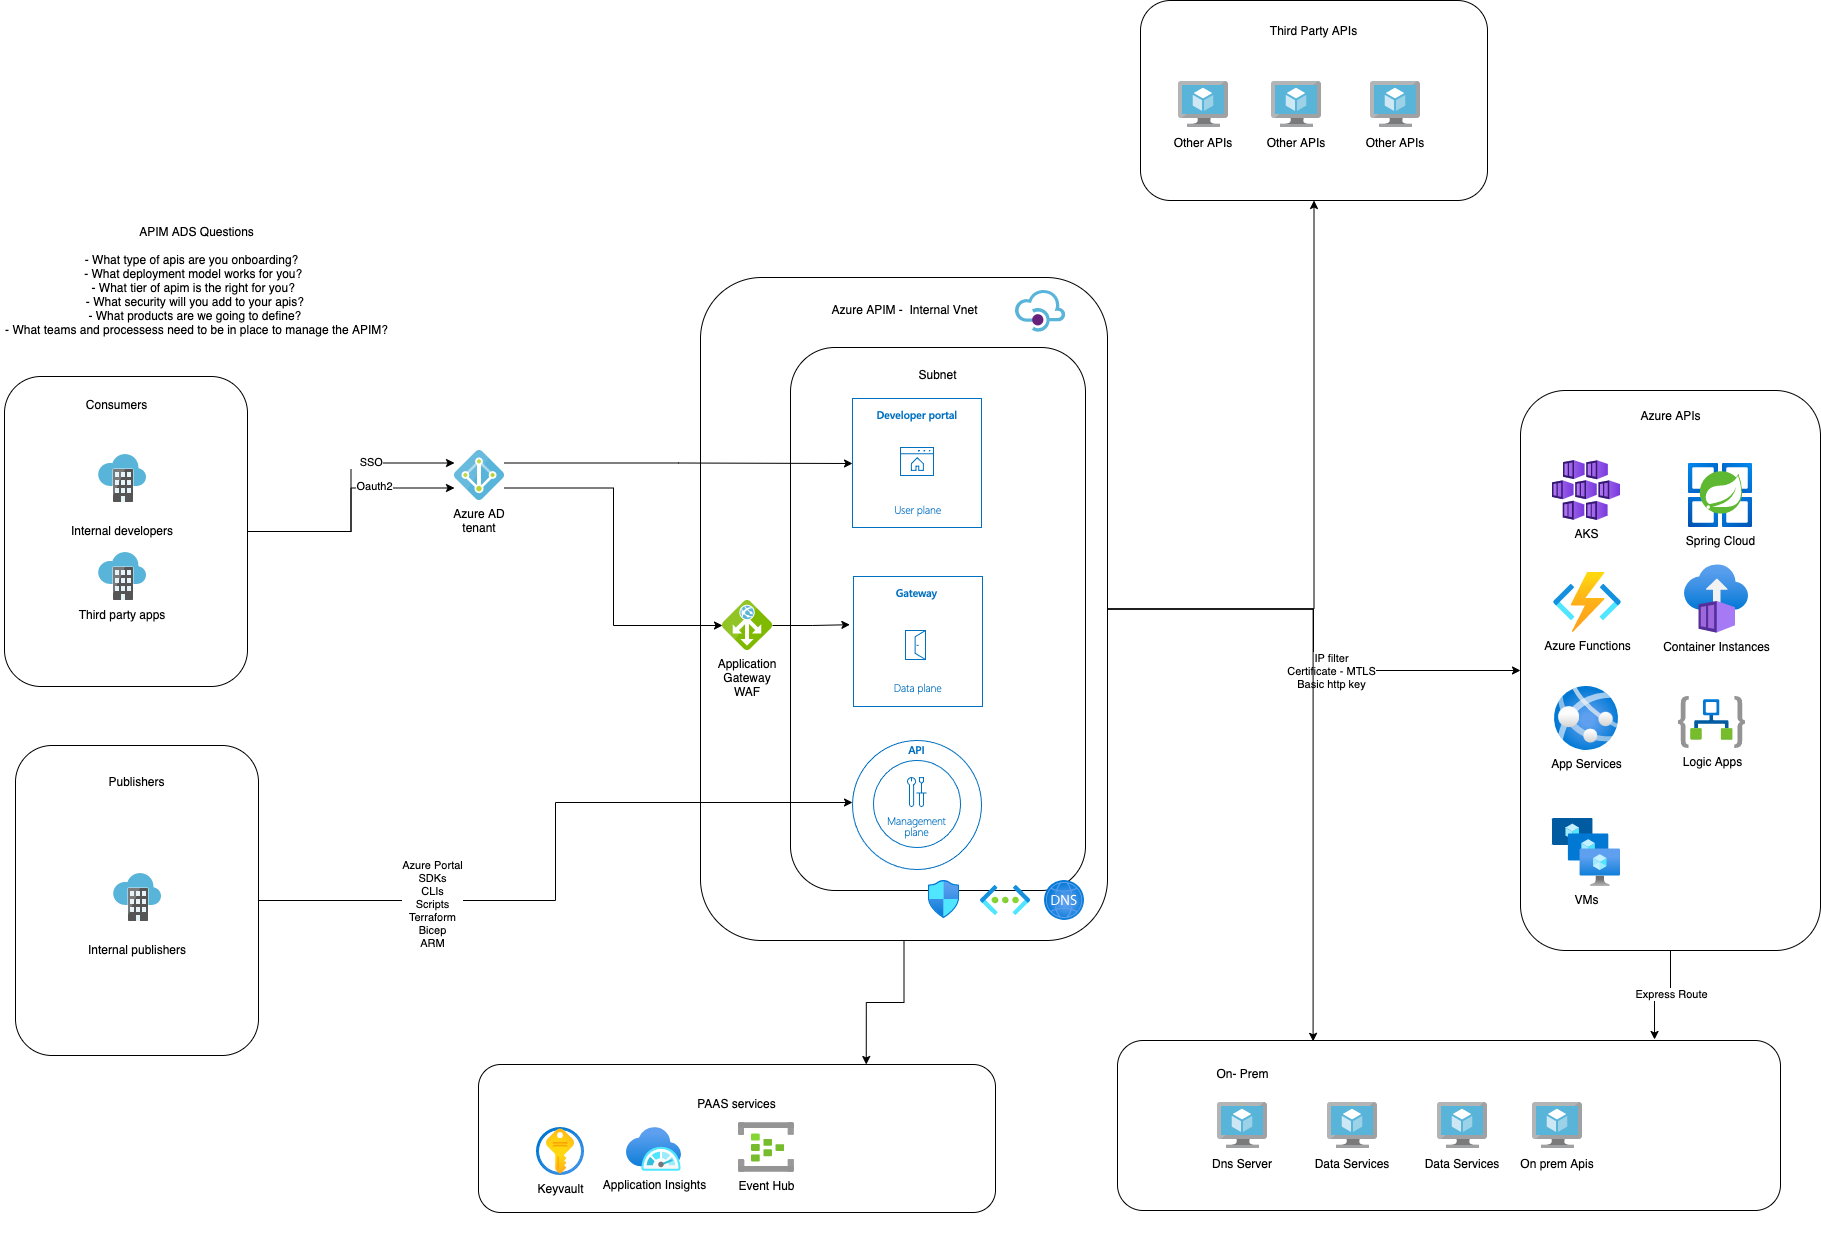
Task 1: Architecture Desing Session
Task 2: Provision your own instance of ColoursWeb/ColoursAPI
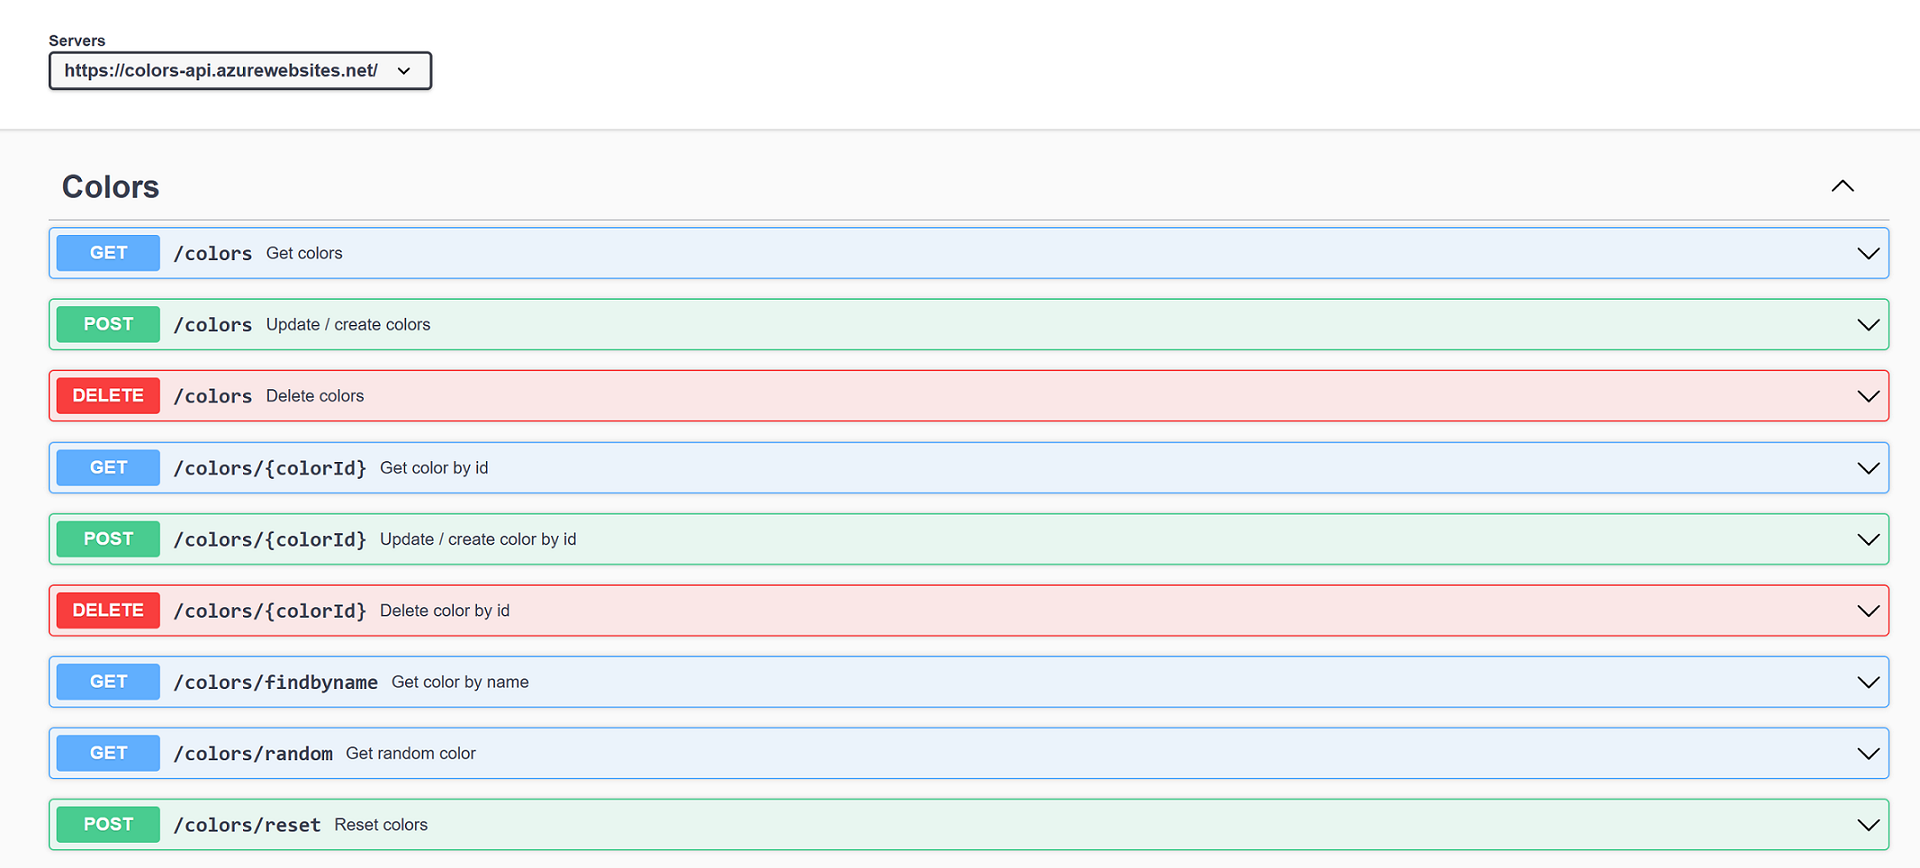
Deploying Web and API containers with Azure Container Instances

 APIMLAB_UNIQUE_SUFFIX=$USER$RANDOM
 # Remove Underscores and Dashes
 APIMLAB_UNIQUE_SUFFIX="${APIMLAB_UNIQUE_SUFFIX//_}"
 APIMLAB_UNIQUE_SUFFIX="${APIMLAB_UNIQUE_SUFFIX//-}"
 # Check Unique Suffix Value (Should be No Underscores or Dashes)
 echo $APIMLAB_UNIQUE_SUFFIX
 # Persist for Later Sessions in Case of Timeout
 echo export APIMLAB_UNIQUE_SUFFIX=$APIMLAB_UNIQUE_SUFFIX >> ~/.bashrc
 #we define some variables first
 APIMLAB_RGNAME=myColorsAppRg-$APIMLAB_UNIQUE_SUFFIX
 APIMLAB_LOCATION=eastus
 # Persist for Later Sessions in Case of Timeout
 echo export APIMLAB_RGNAME=$APIMLAB_RGNAME >> ~/.bashrc
 echo export APIMLAB_LOCATION=$APIMLAB_LOCATION >> ~/.bashrc

 #we create the resource group
 az group create --name $APIMLAB_RGNAME --location $APIMLAB_LOCATION
#we define some variables first
APIMLAB_COLORS_WEB=mycolorsweb-$APIMLAB_UNIQUE_SUFFIX
APIMLAB_IMAGE_WEB=ghcr.io/markharrison/coloursweb:latest
APIMLAB_DNSLABEL_WEB=acicolorweb$APIMLAB_UNIQUE_SUFFIX
# Persist for Later Sessions in Case of Timeout
echo export APIMLAB_COLORS_WEB=$APIMLAB_COLORS_WEB >> ~/.bashrc
echo export APIMLAB_IMAGE_WEB=$APIMLAB_IMAGE_WEB >> ~/.bashrc
echo export APIMLAB_DNSLABEL_WEB=$APIMLAB_DNSLABEL_WEB >> ~/.bashrc


#we create the container instance for the colors web
az container create --resource-group $APIMLAB_RGNAME --name $APIMLAB_COLORS_WEB --image $APIMLAB_IMAGE_WEB --dns-name-label $APIMLAB_DNSLABEL_WEB --ports 80 --restart-policy OnFailure --no-wait
 #we check the status
 az container show --resource-group $APIMLAB_RGNAME --name $APIMLAB_COLORS_WEB --query "{FQDN:ipAddress.fqdn,ProvisioningState:provisioningState}" --out table
 FQDN                                                  ProvisioningState
 ----------------------------------------------------  -------------------
 aci-color-web-fernando22287.eastus.azurecontainer.io  Succeeded

#we define some variables first
APIMLAB_COLORS_API=mycolorsapi-$APIMLAB_UNIQUE_SUFFIX
APIMLAB_IMAGE_API=ghcr.io/markharrison/coloursapi:latest
APIMLAB_DNSLABEL_API=aci-color-api-$APIMLAB_UNIQUE_SUFFIX
# Persist for Later Sessions in Case of Timeout
echo export APIMLAB_COLORS_WEB=$APIMLAB_COLORS_WEB >> ~/.bashrc
echo export APIMLAB_IMAGE_WEB=$APIMLAB_IMAGE_WEB >> ~/.bashrc
echo export APIMLAB_DNSLABEL_WEB=$APIMLAB_DNSLABEL_WEB >> ~/.bashrc


#we create the container instance for the colors api
az container create --resource-group $APIMLAB_RGNAME --name $APIMLAB_COLORS_API --image $APIMLAB_IMAGE_API --dns-name-label $APIMLAB_DNSLABEL_API --ports 80 --restart-policy OnFailure --no-wait
#we check the status
az container show --resource-group $APIMLAB_RGNAME --name $APIMLAB_COLORS_API --query "{FQDN:ipAddress.fqdn,ProvisioningState:provisioningState}" --out table
FQDN                                                  ProvisioningState
----------------------------------------------------  -------------------
aci-color-api-fernando22287.eastus.azurecontainer.io  Succeeded

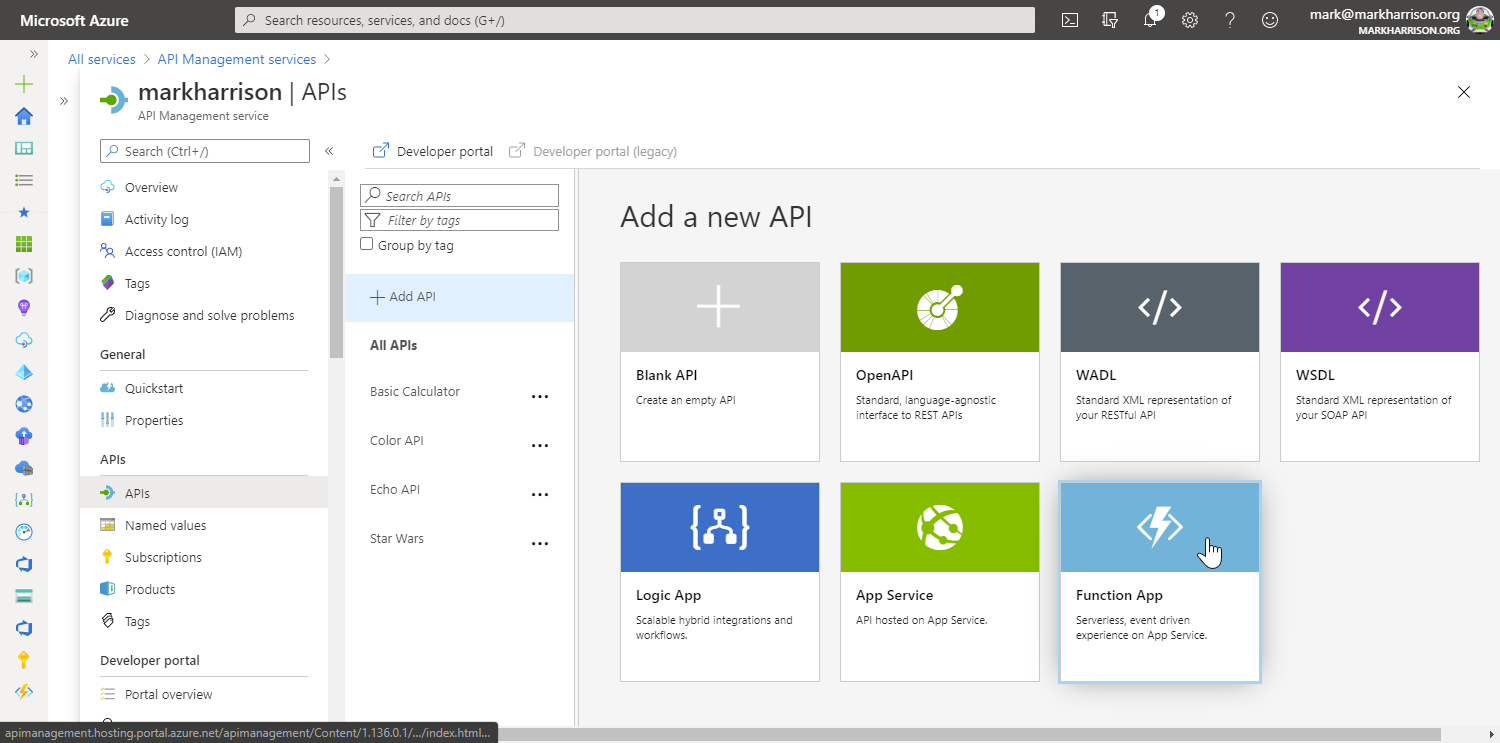
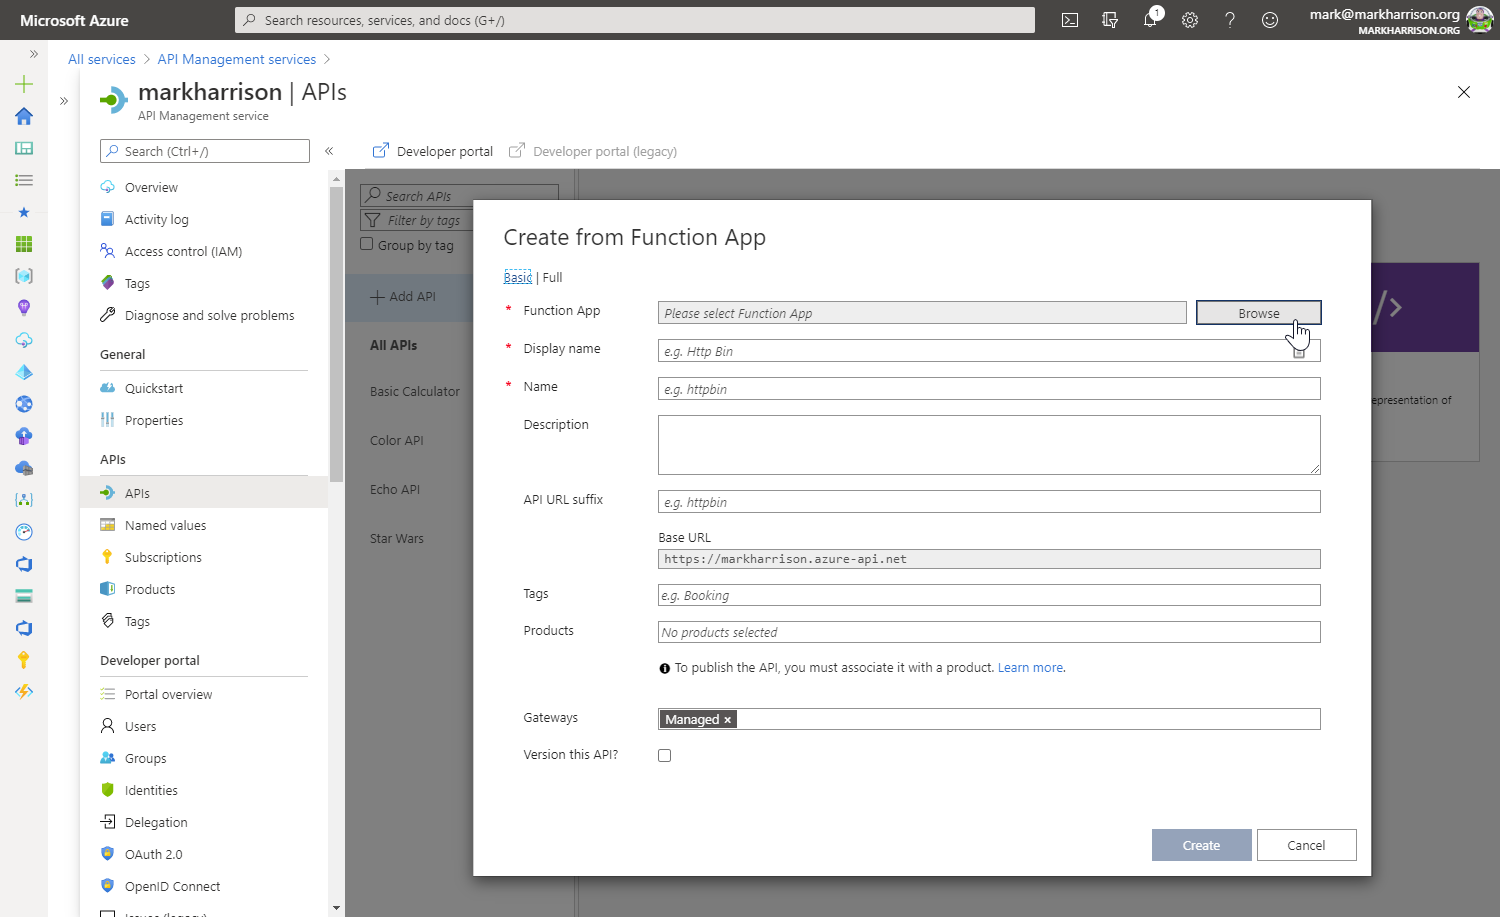
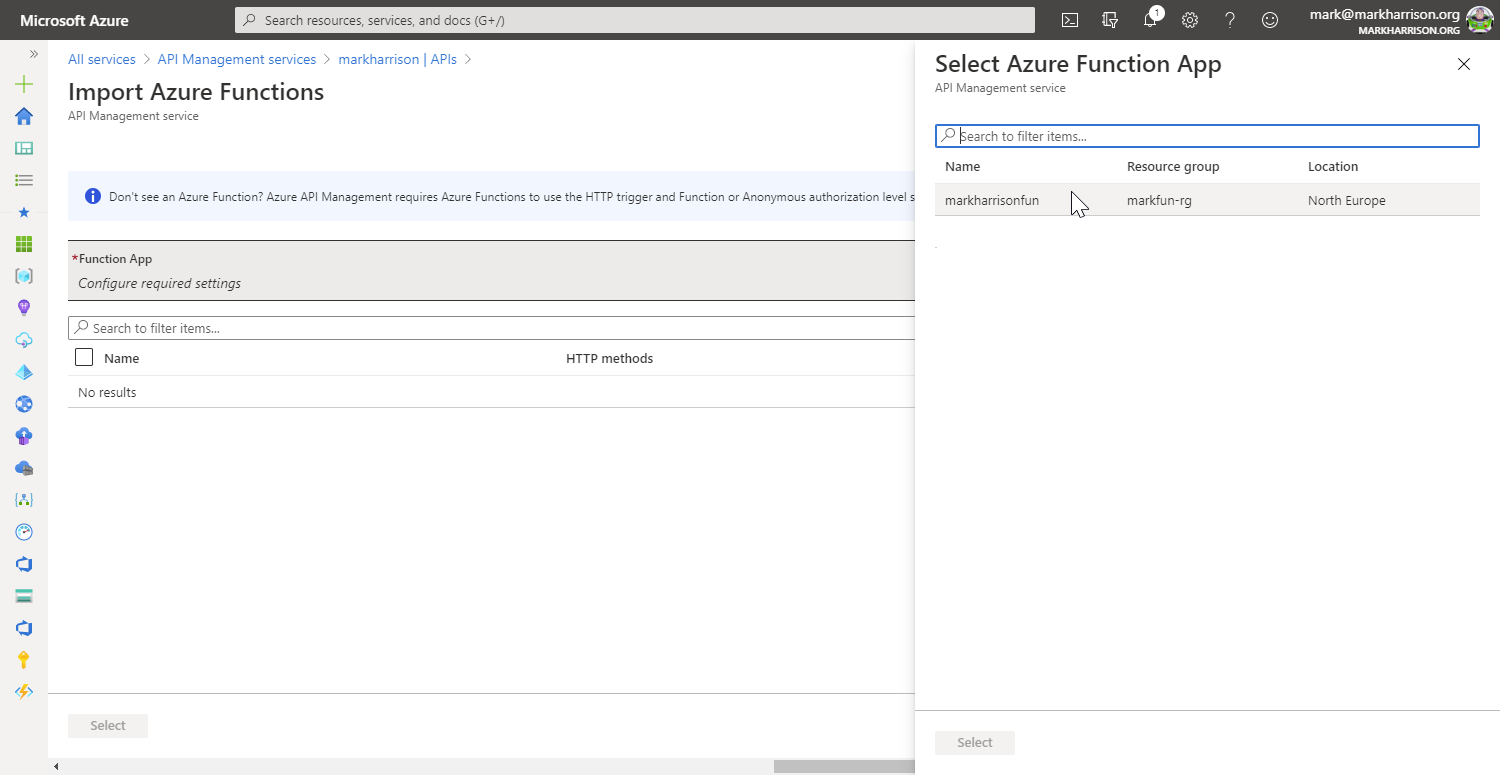
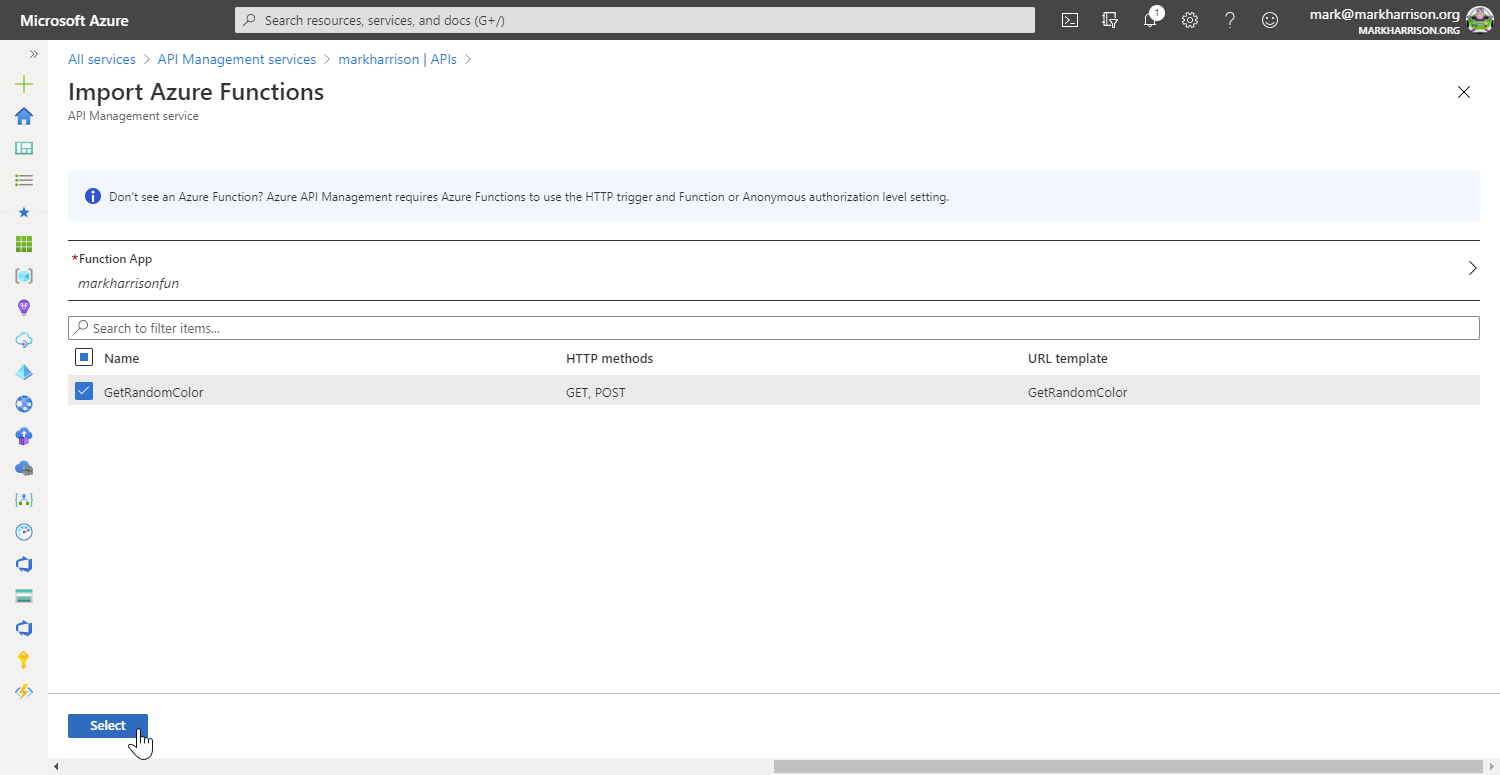
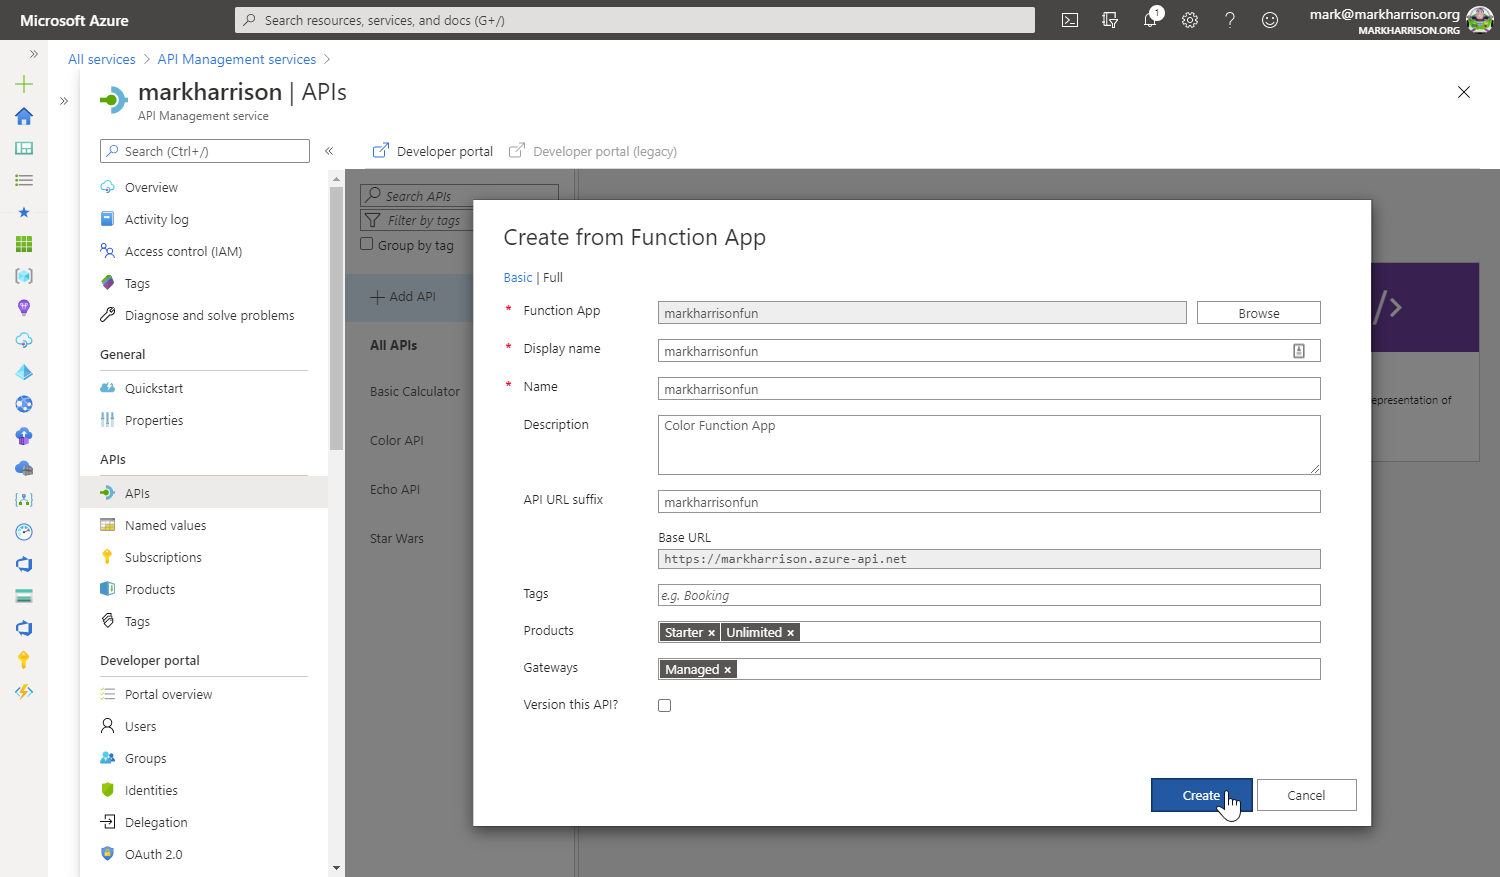
Task 3: API Proxy to Serverless
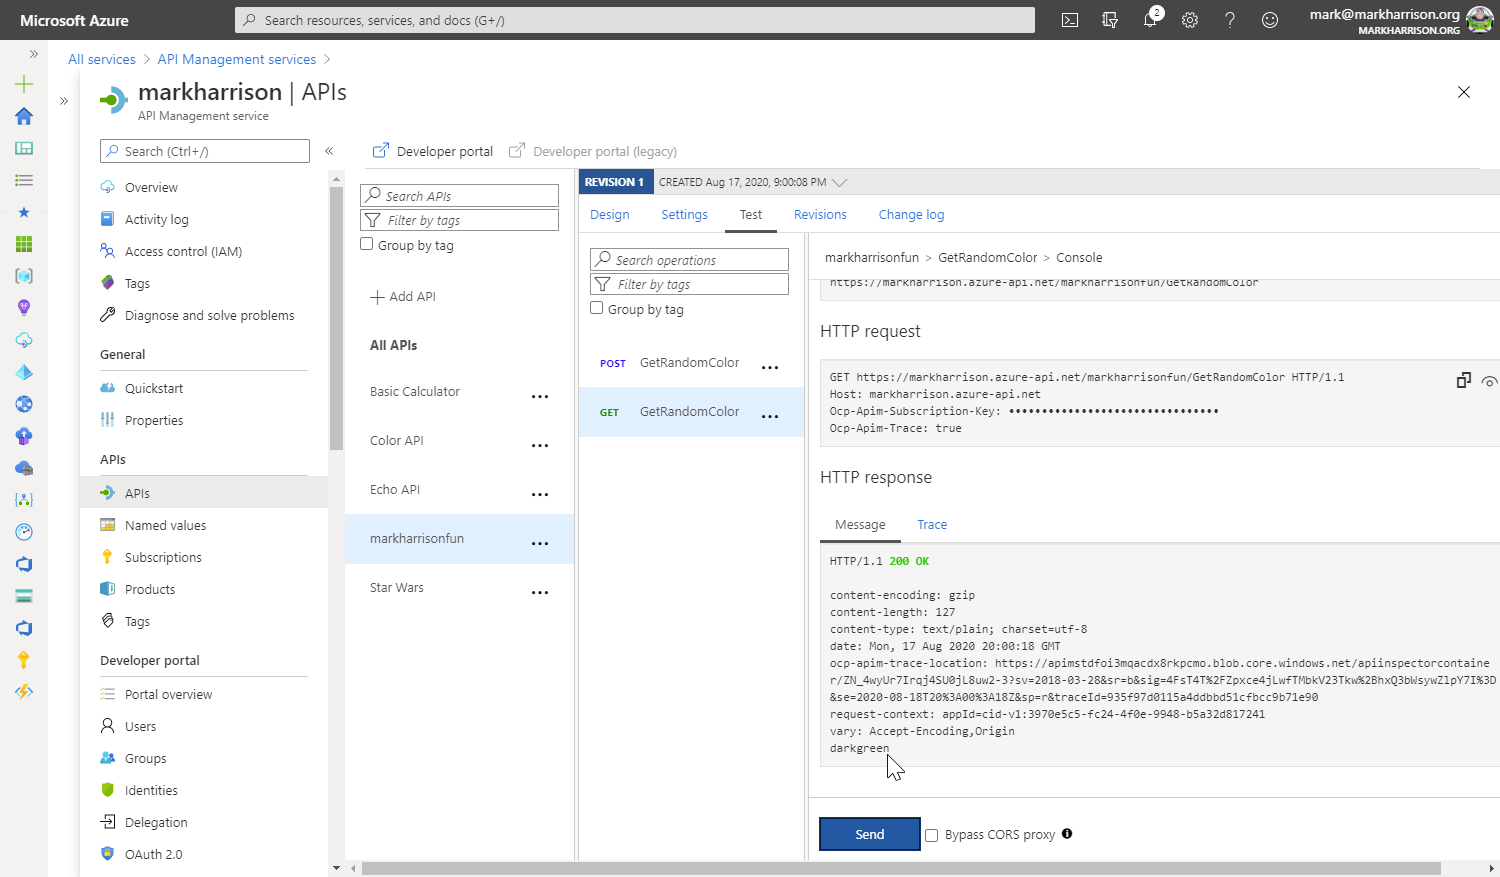
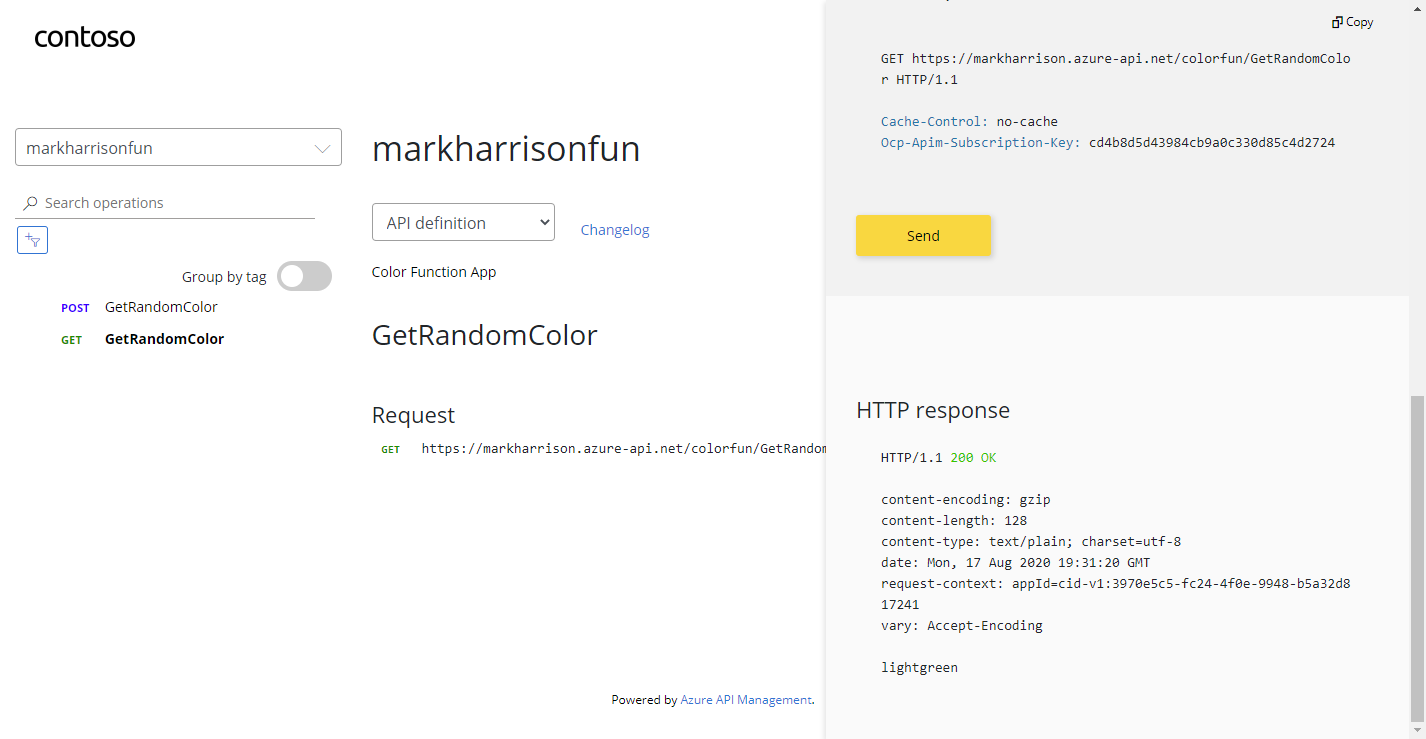
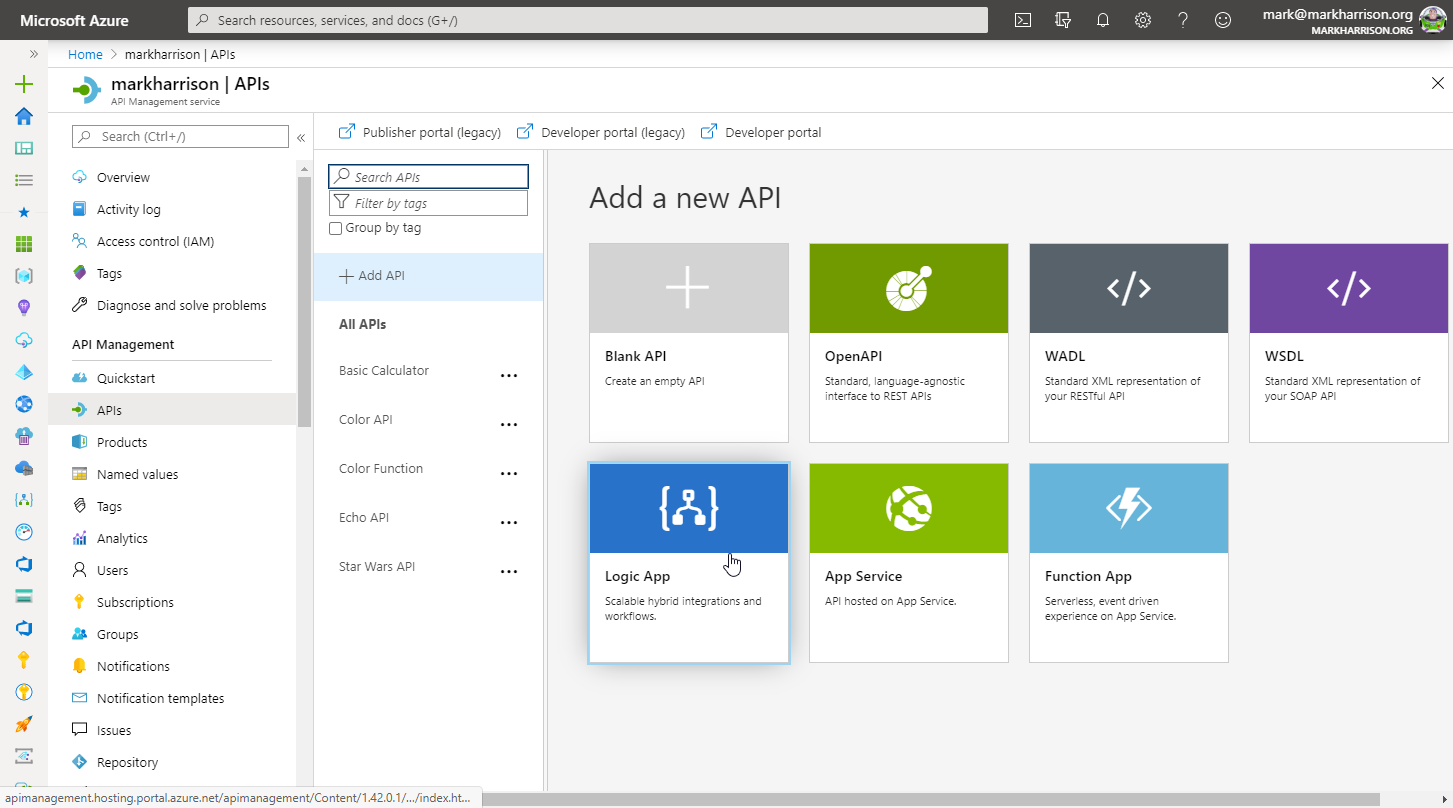
Azure Functions
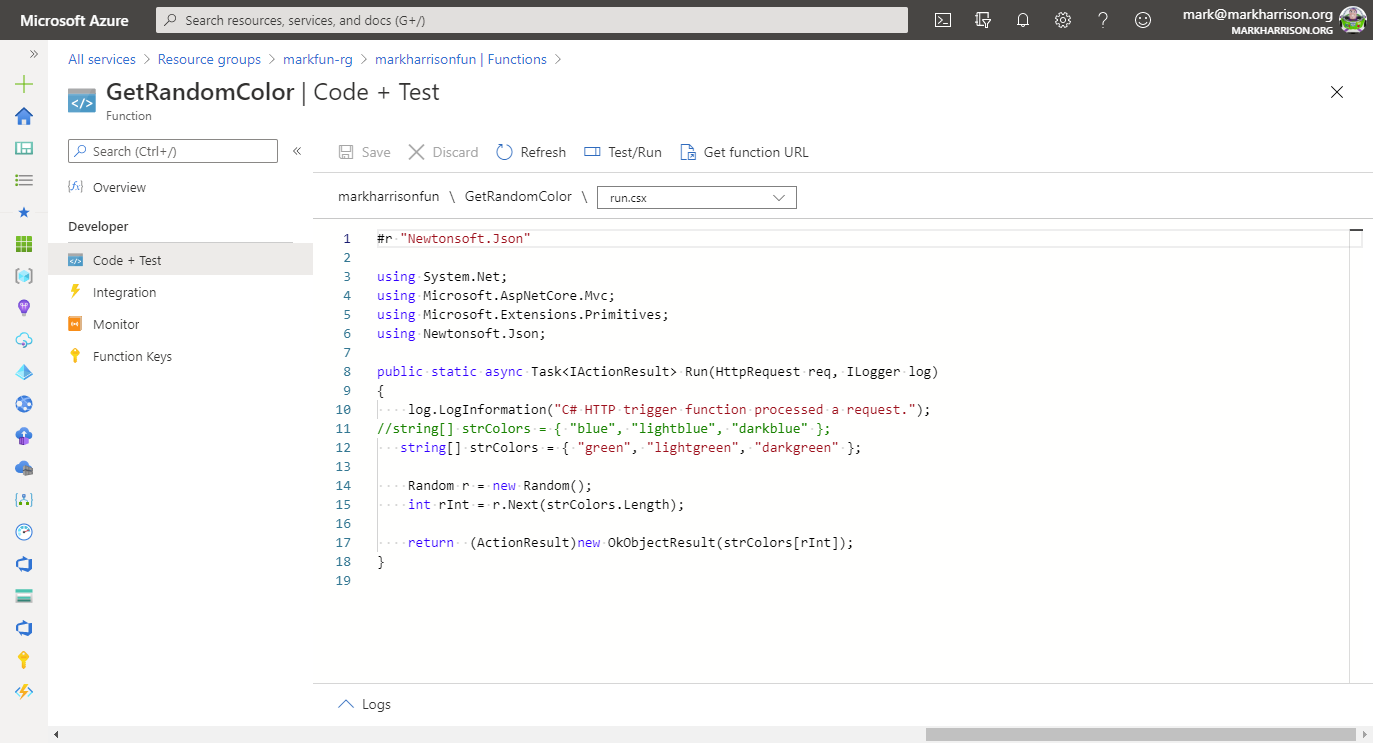
    //string[] strColors = { "blue", "lightblue", "darkblue" };
    string[] strColors = { "green", "lightgreen", "darkgreen" };

    Random r = new Random();
    int rInt = r.Next(strColors.Length);

    return  (ActionResult)new OkObjectResult(strColors[rInt]);
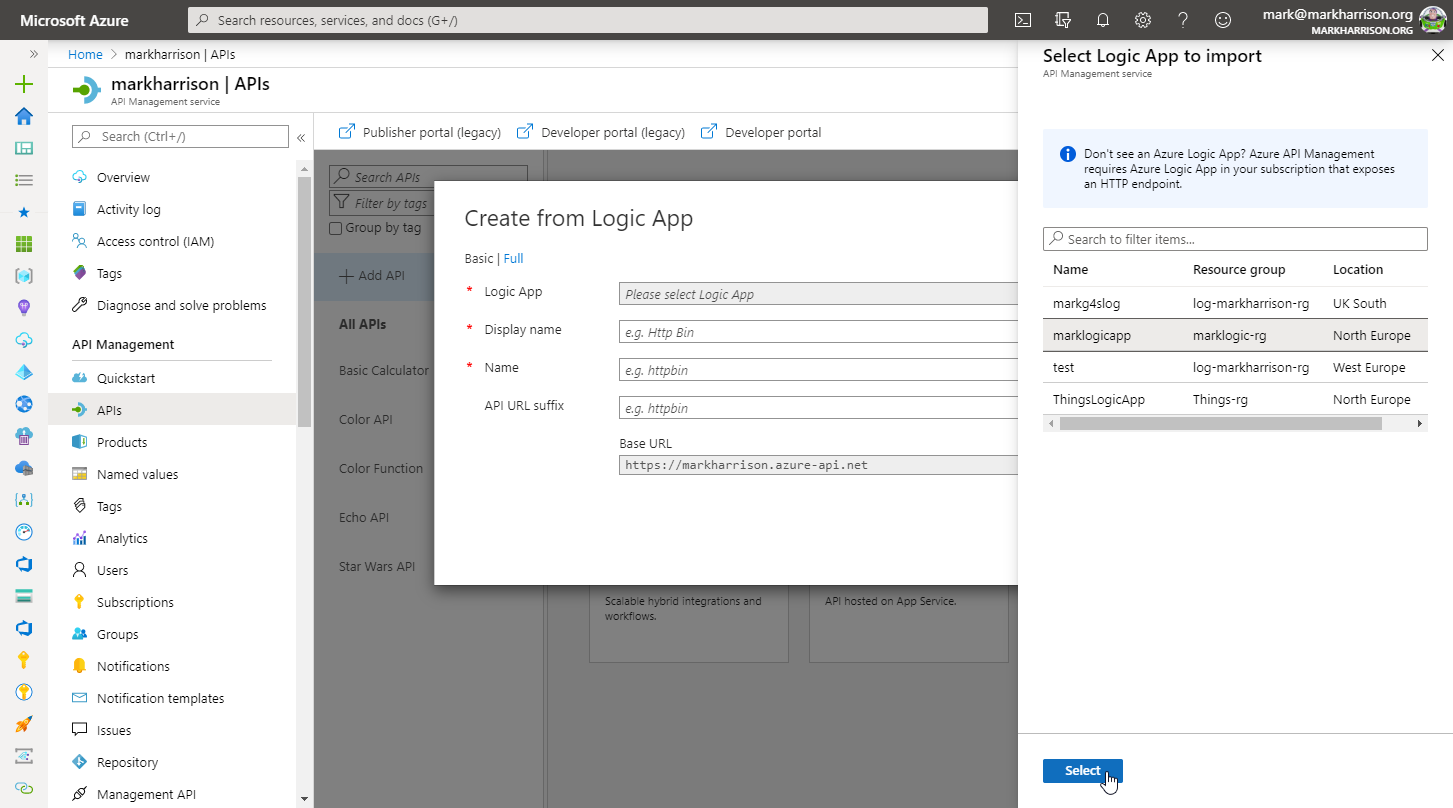
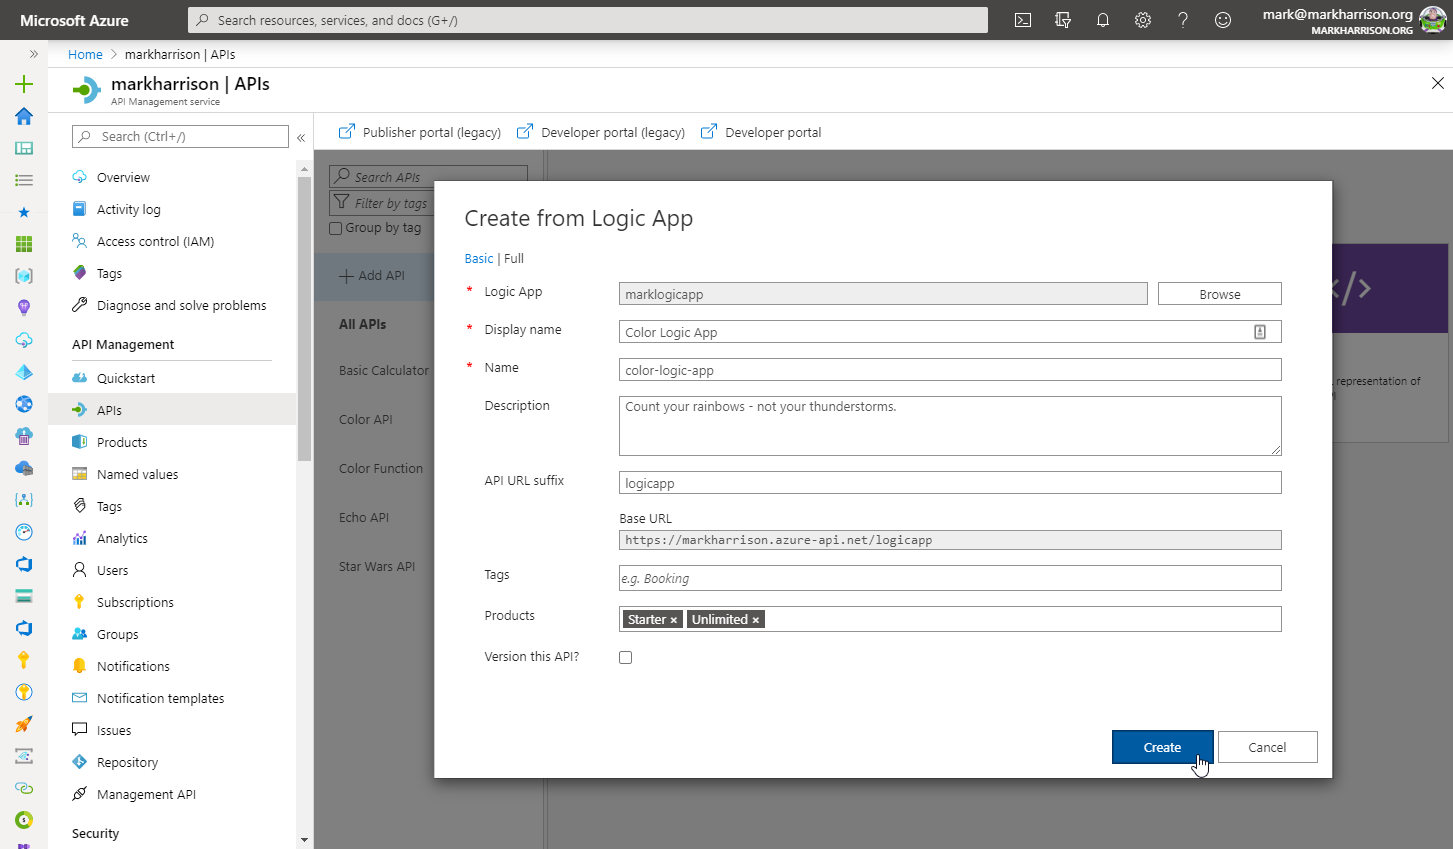
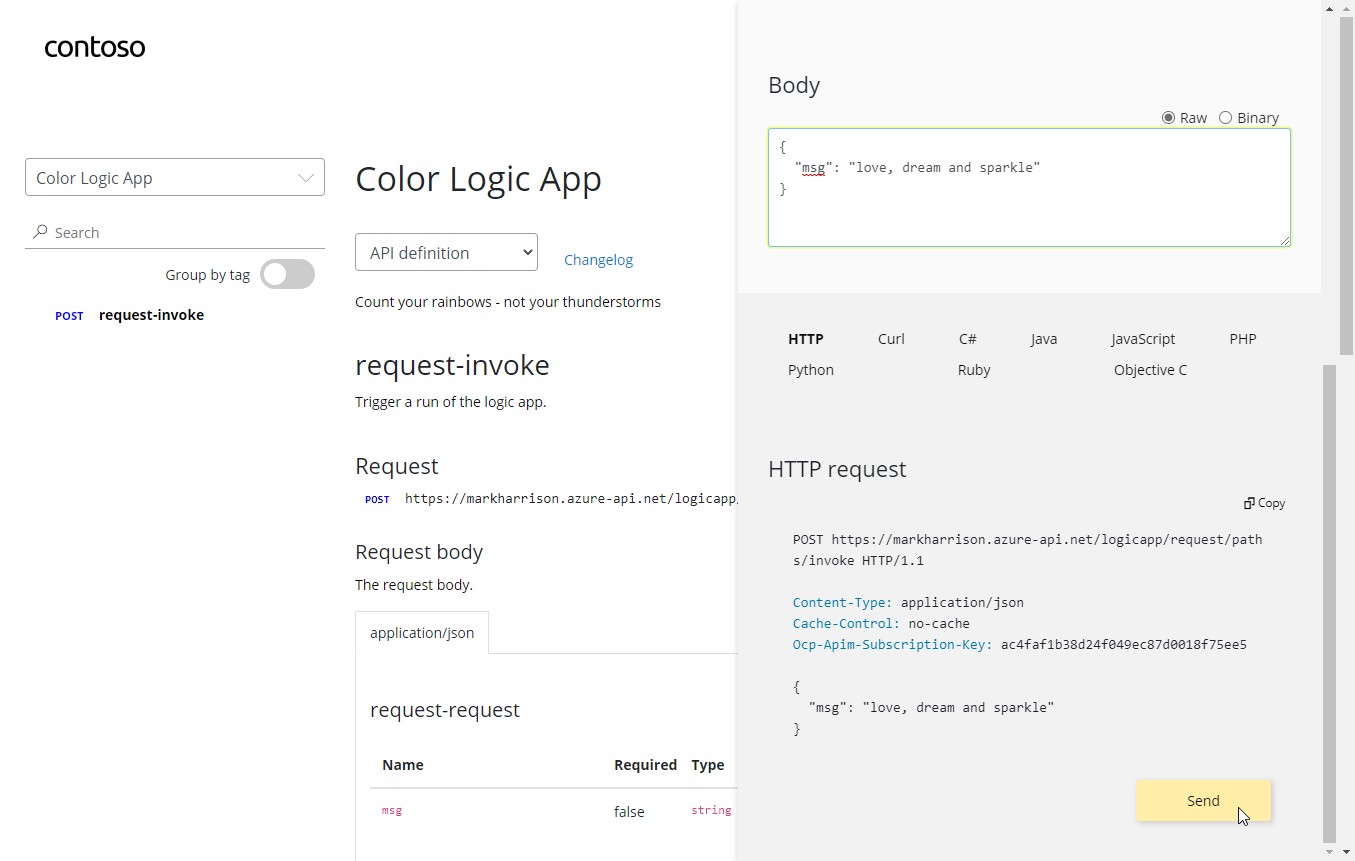
Azure Logic Apps
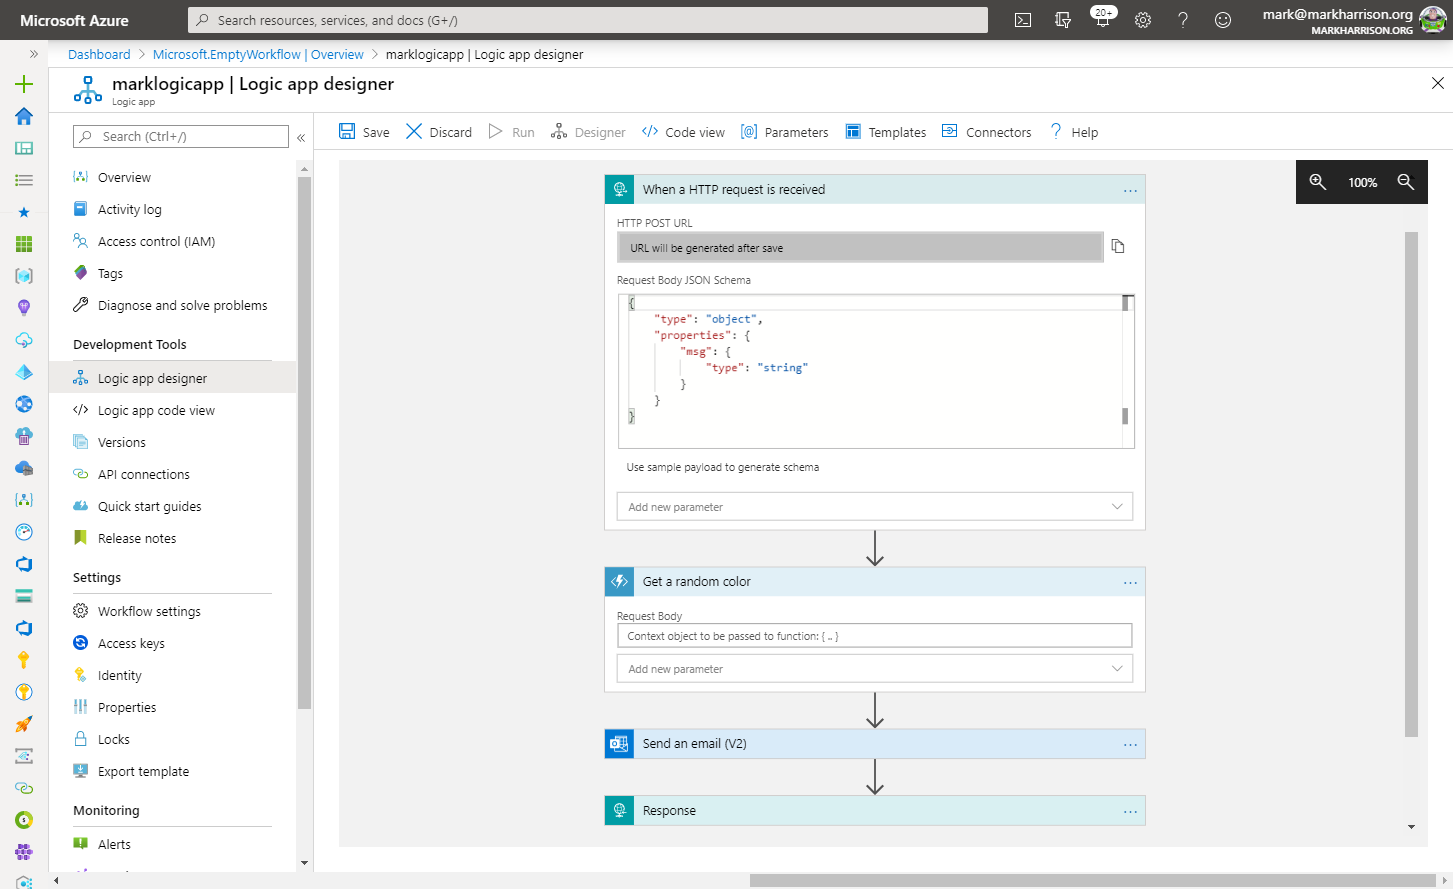
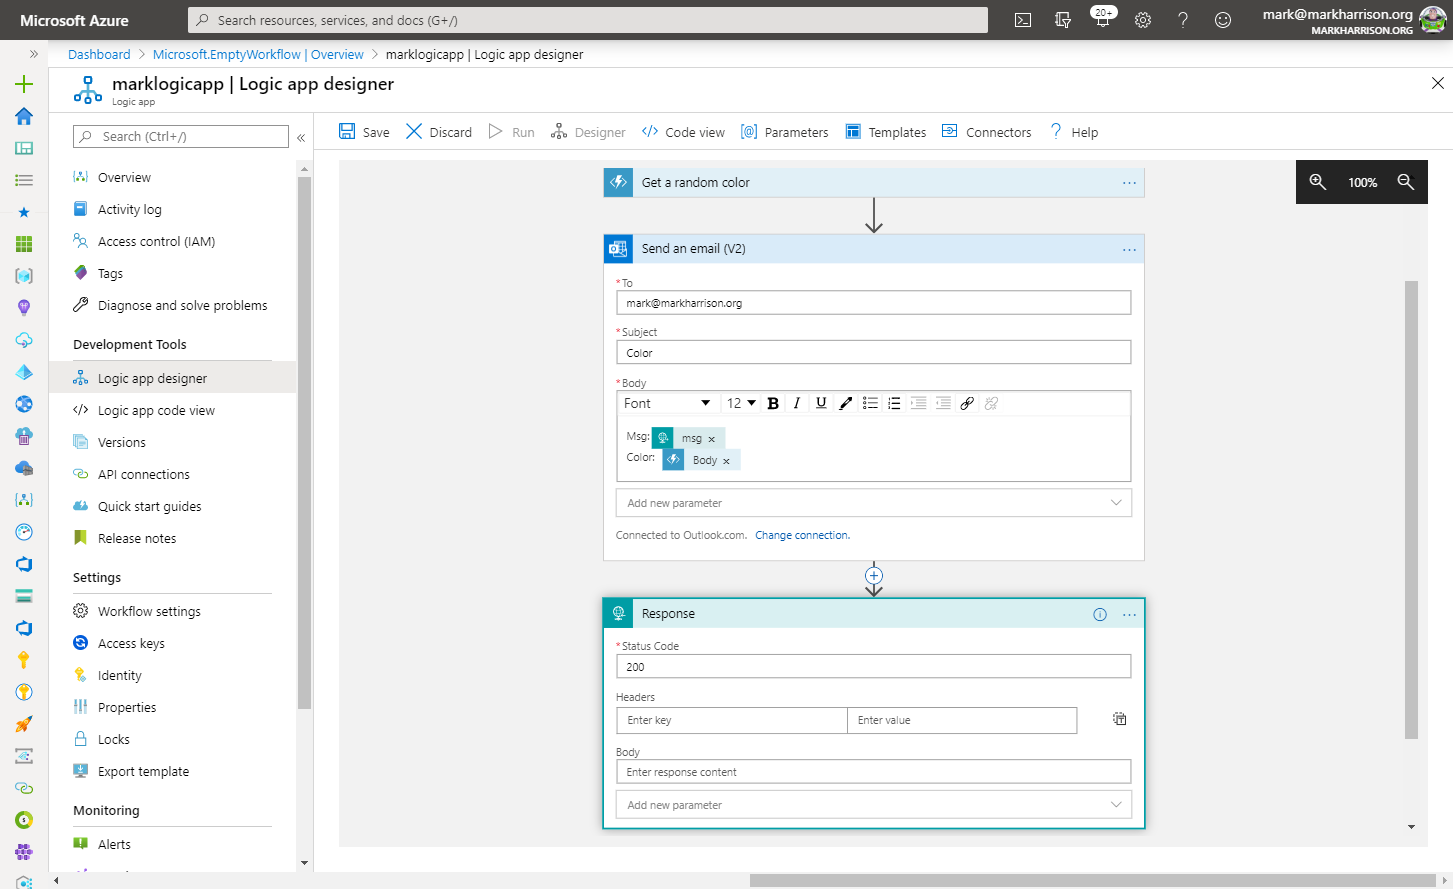
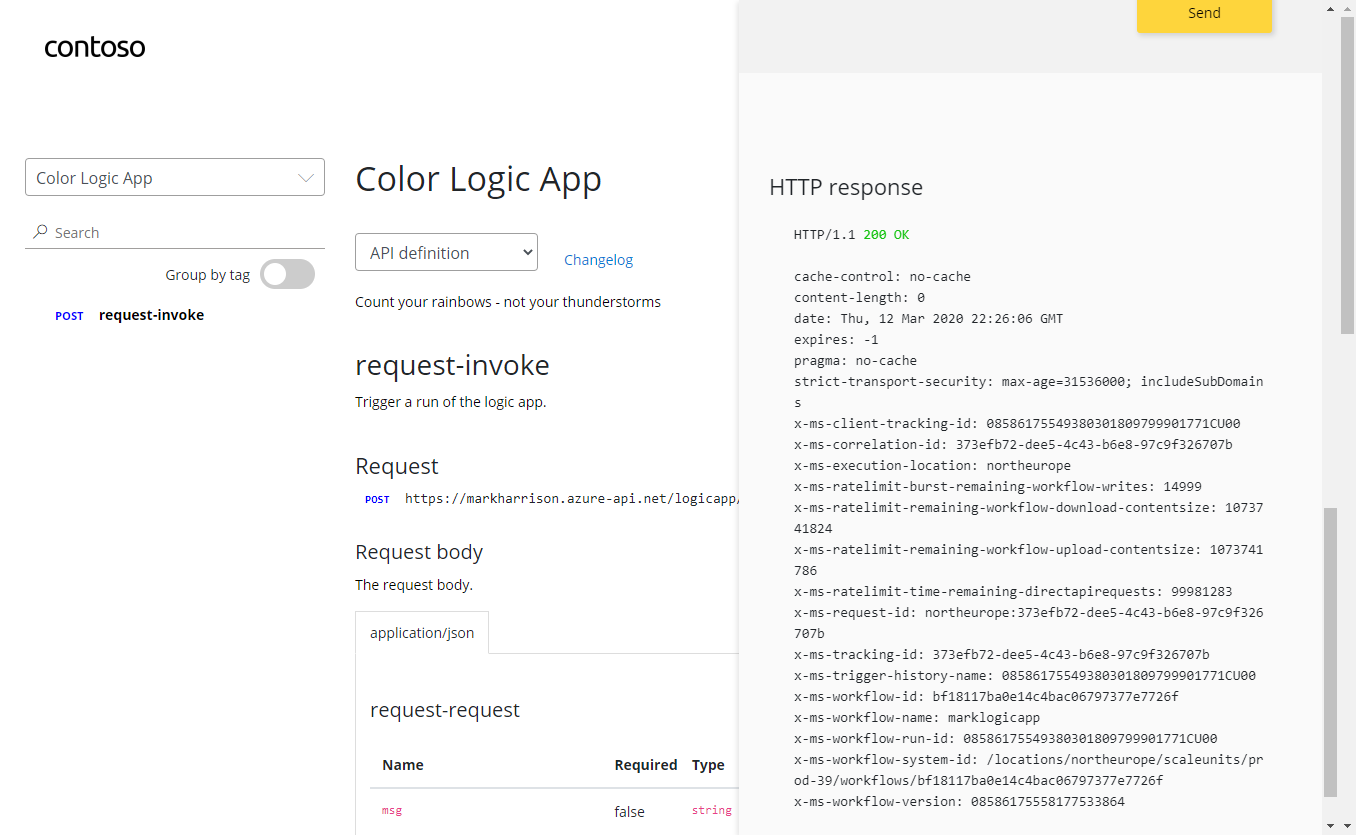
msg) can be extracted and referred to in the subsequent logic{
"msg": "text"
}

Task 4: Self-hosted Gateway
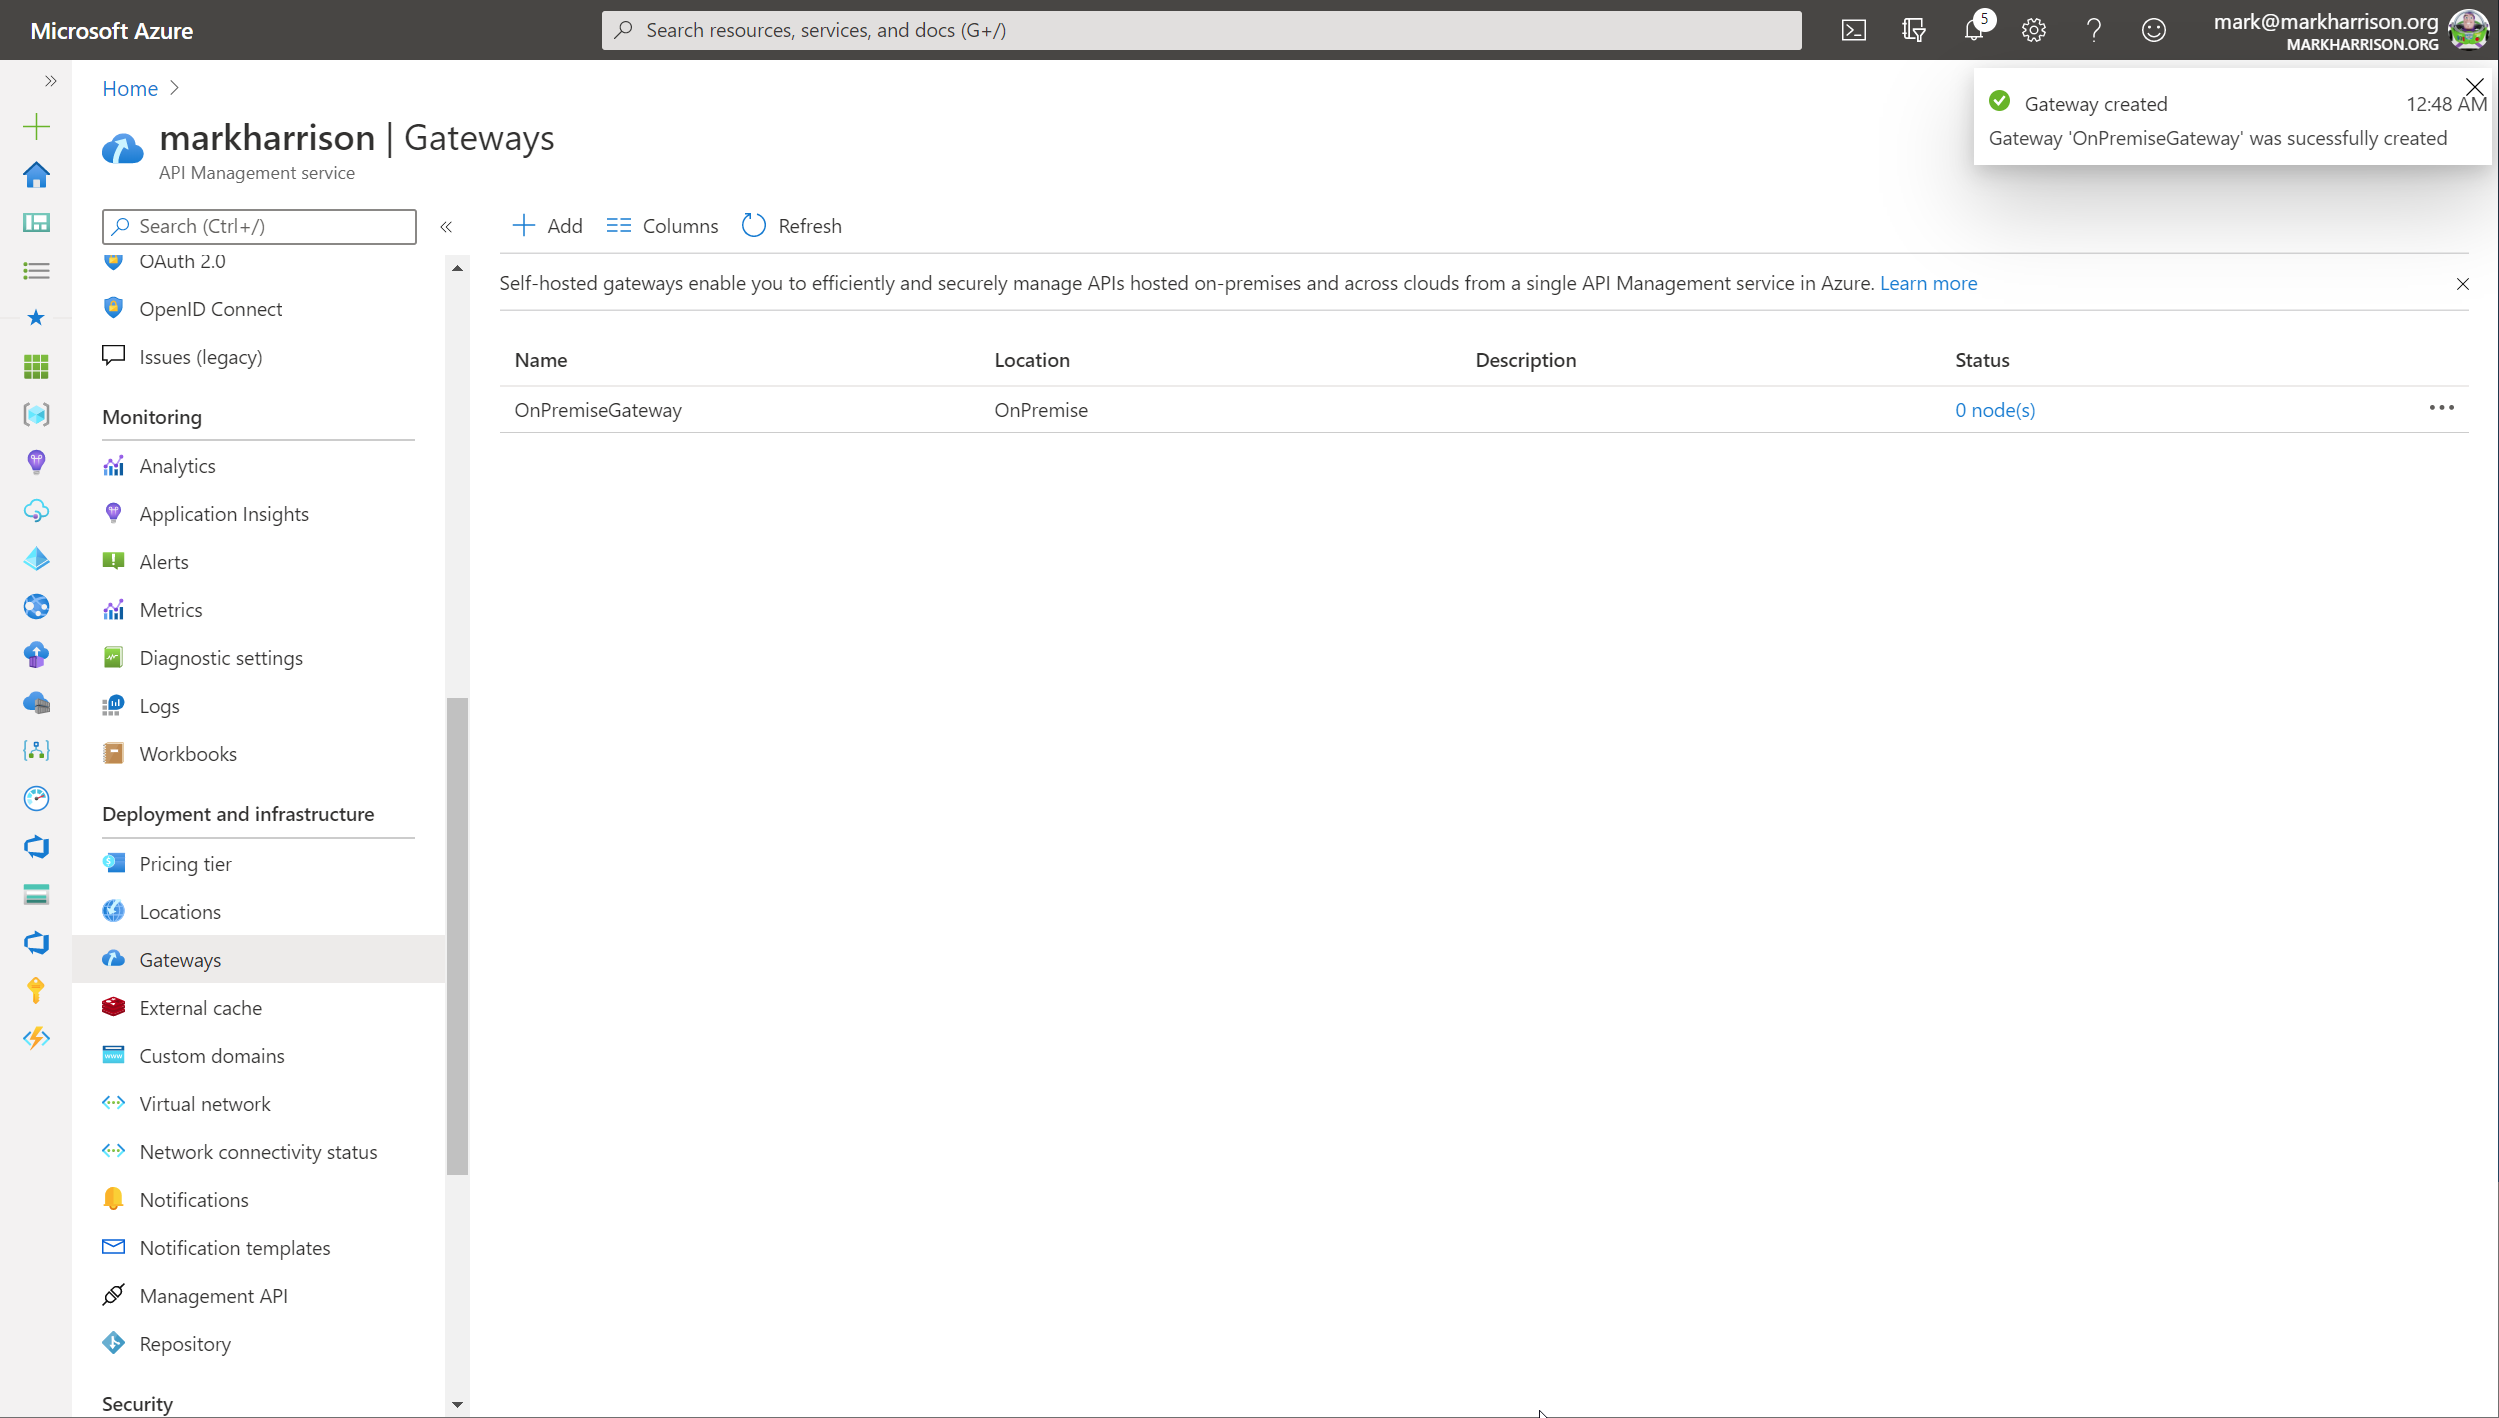
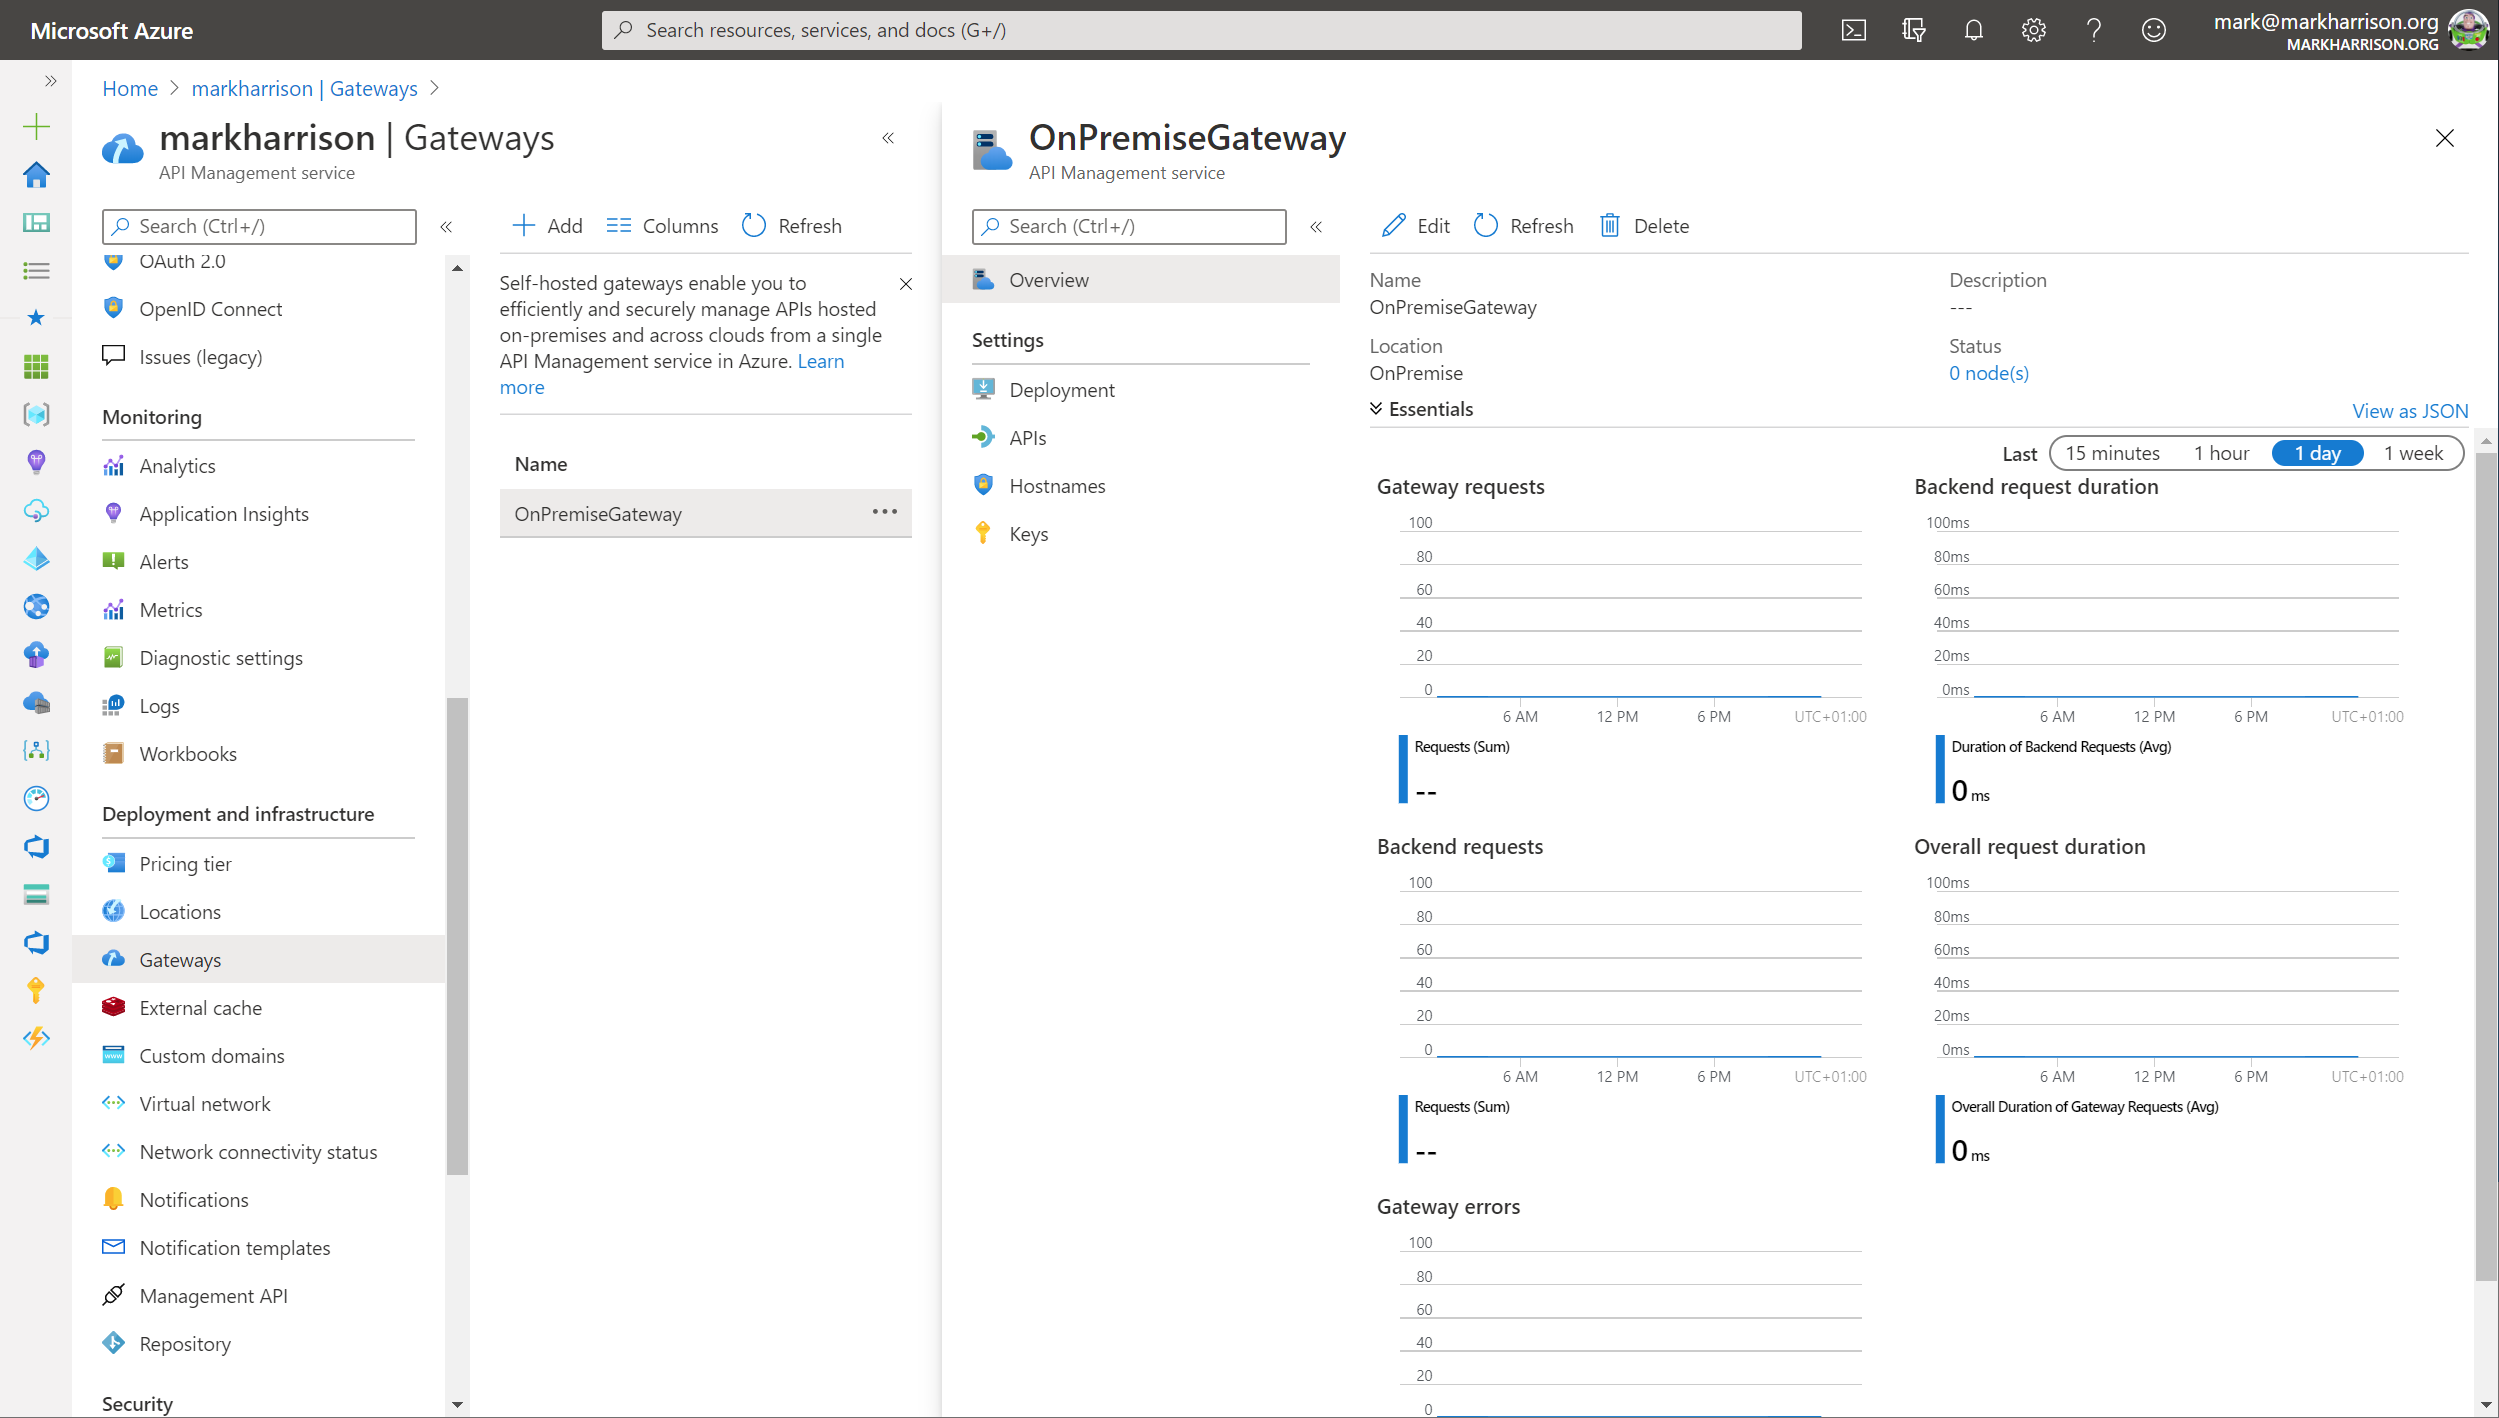
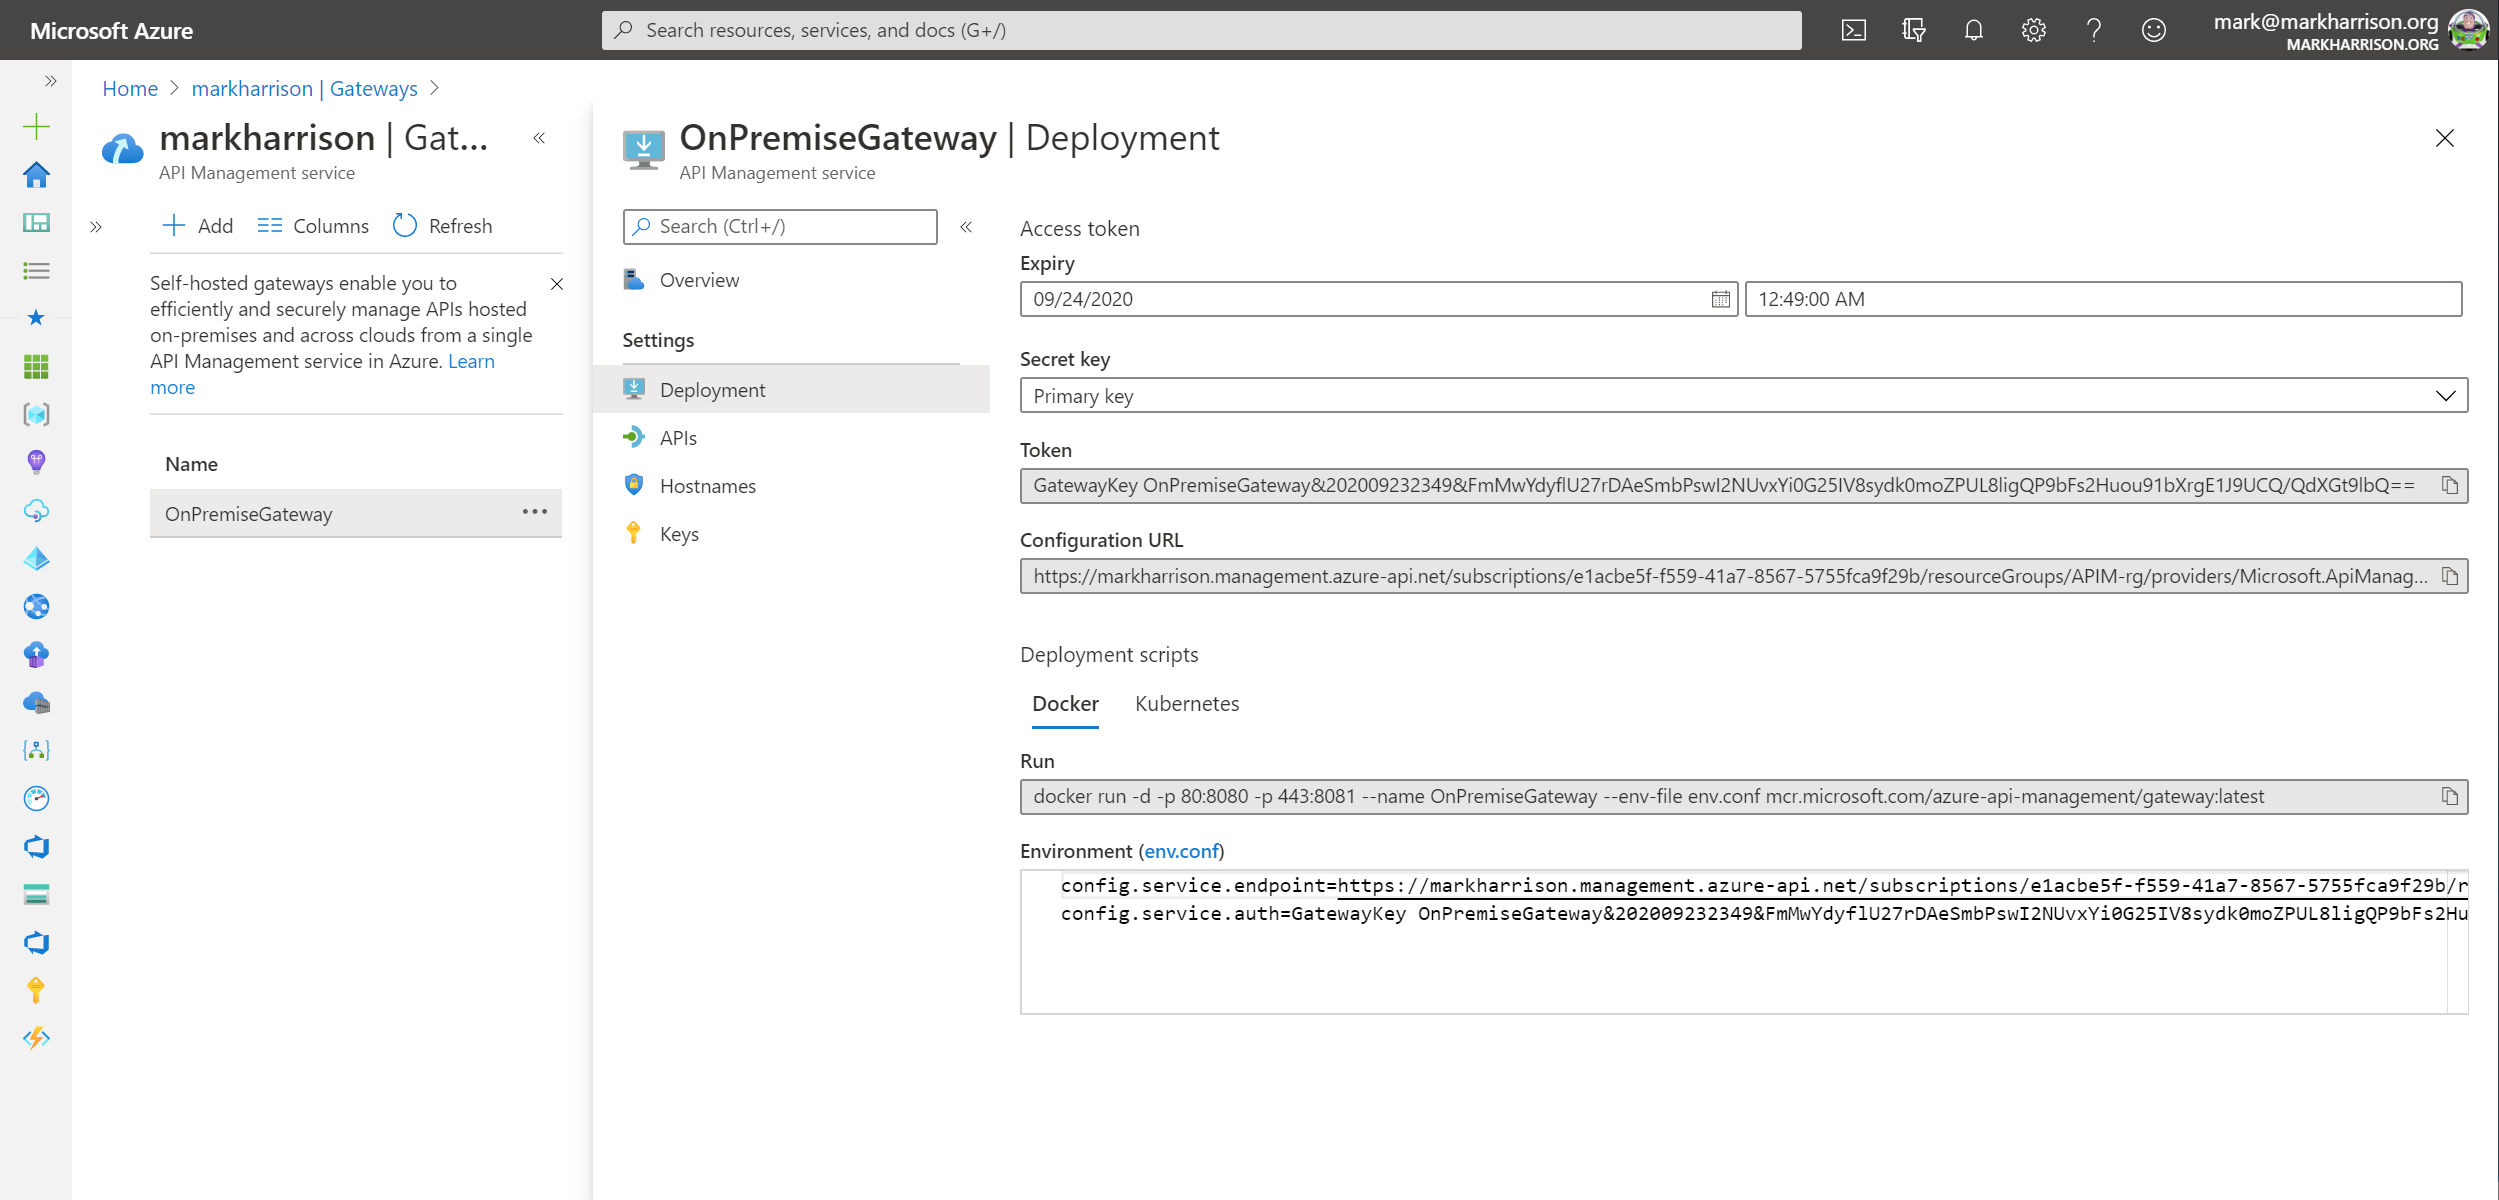
Deploy the Self-hosted Gateway
Gateways option from the menu+ Add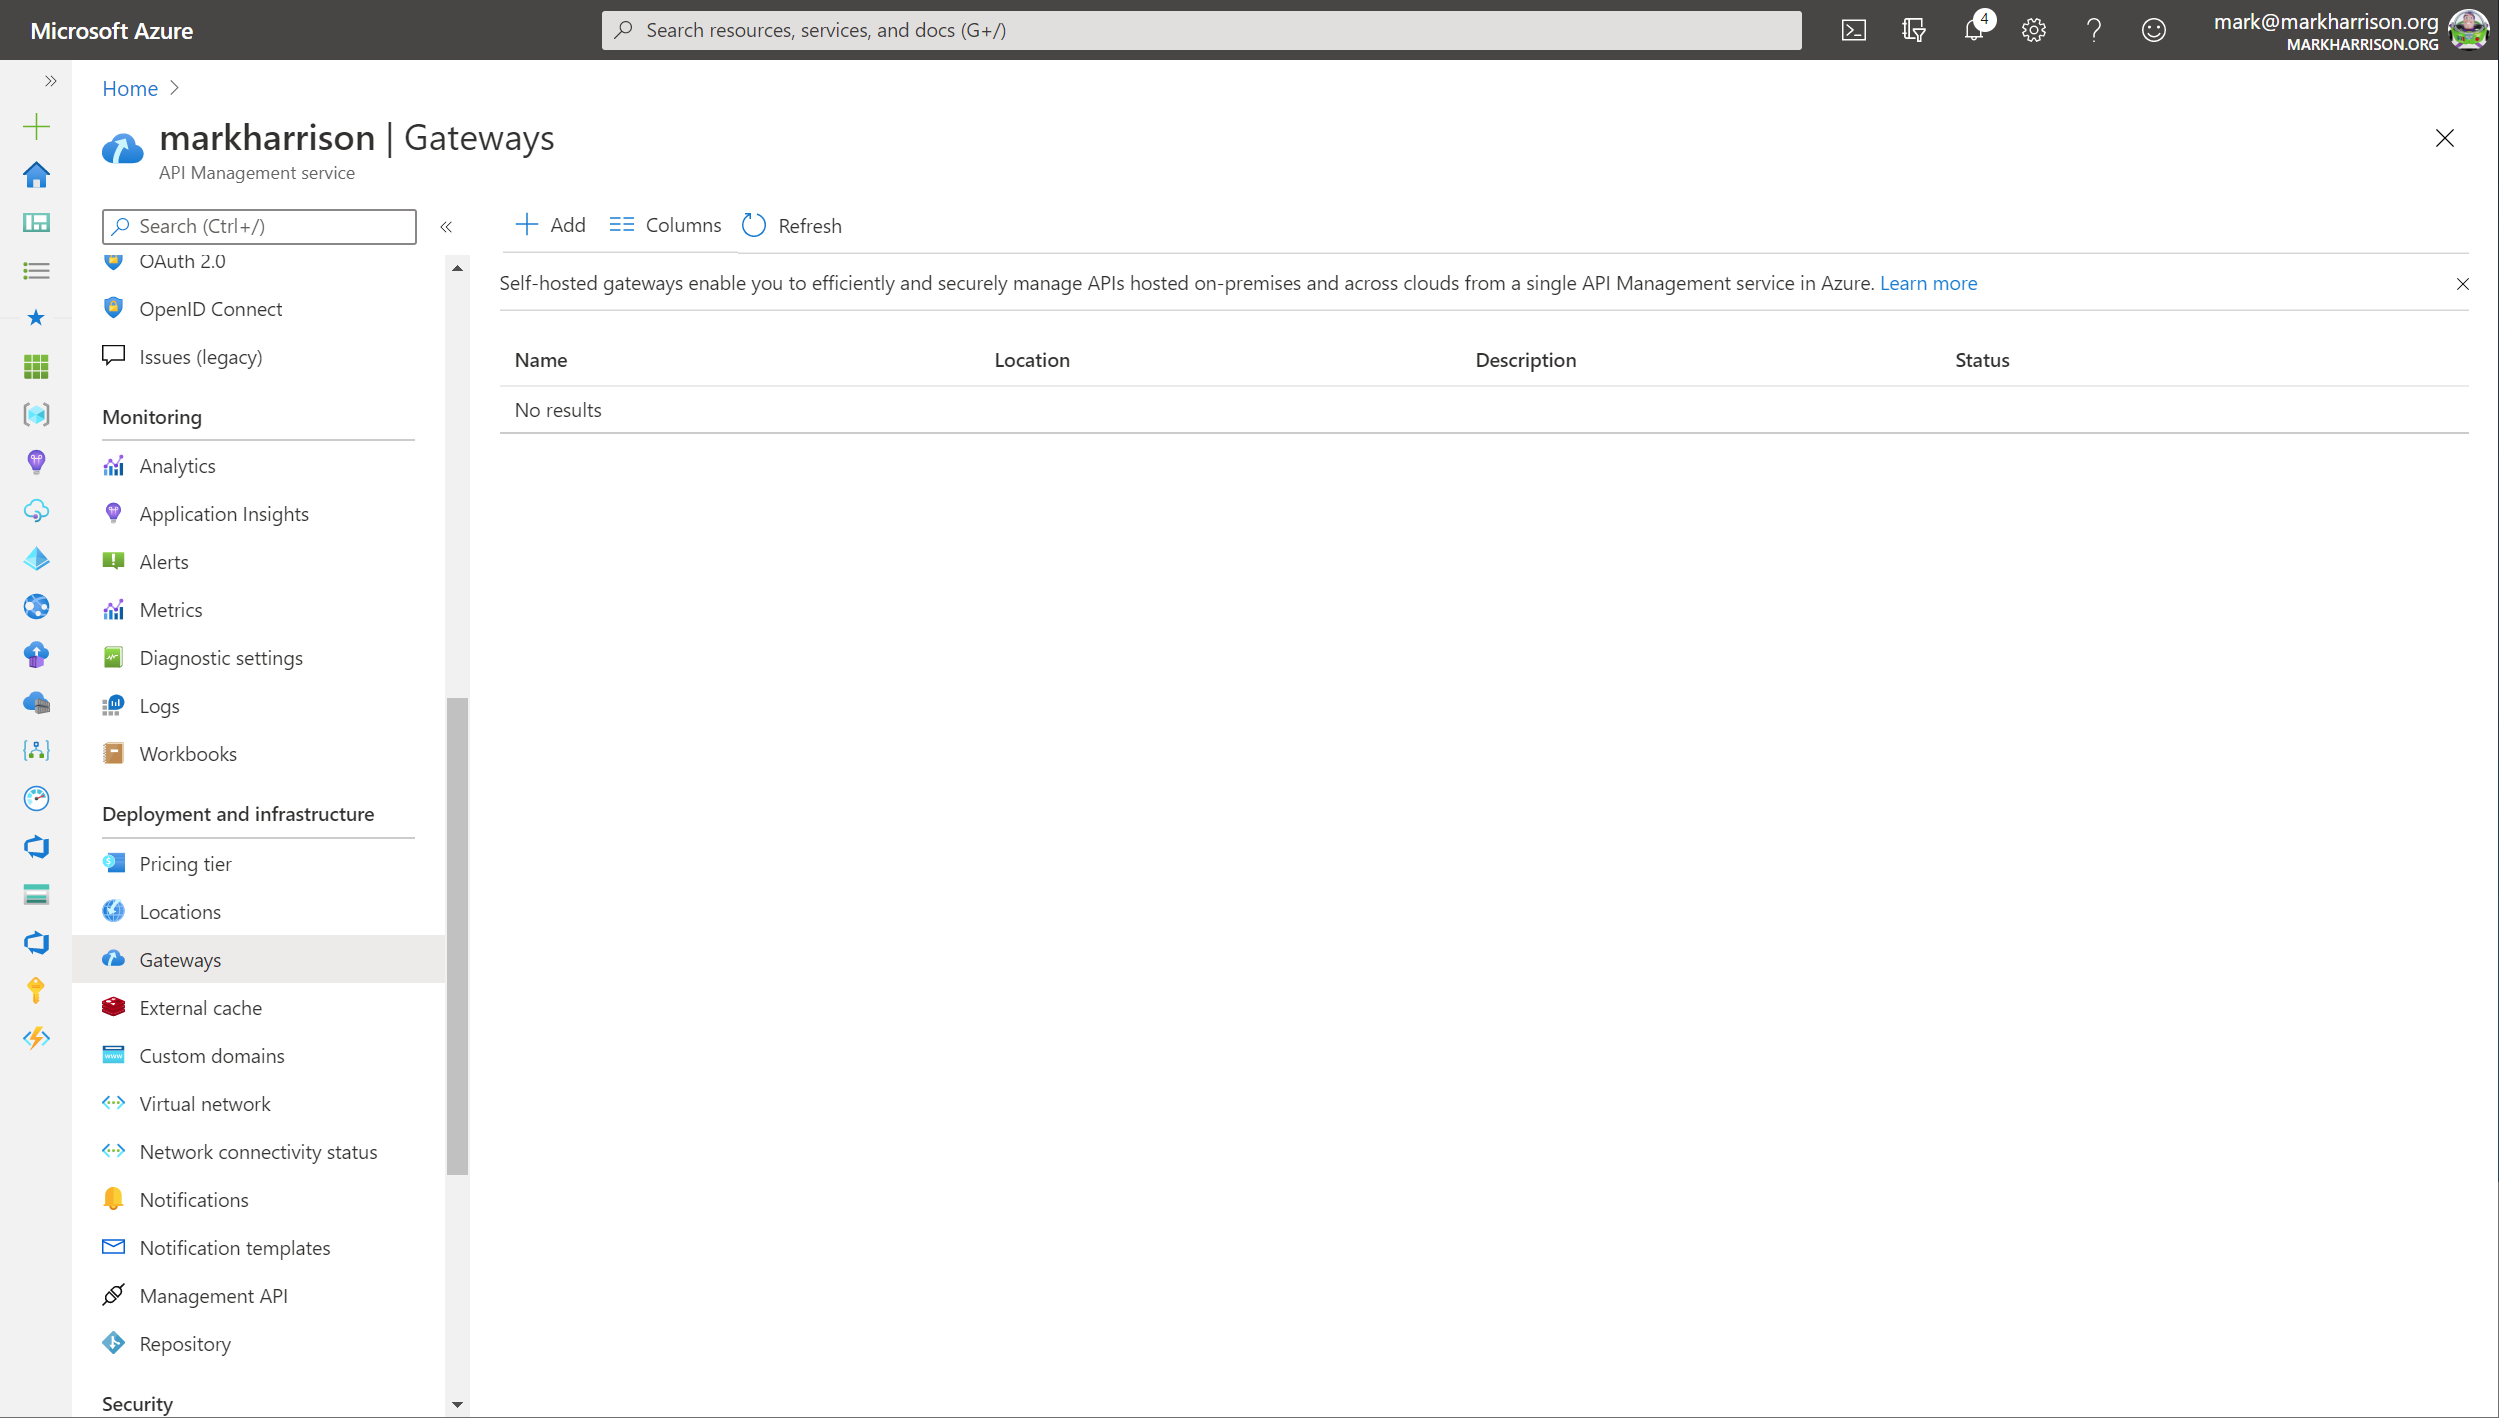
Add button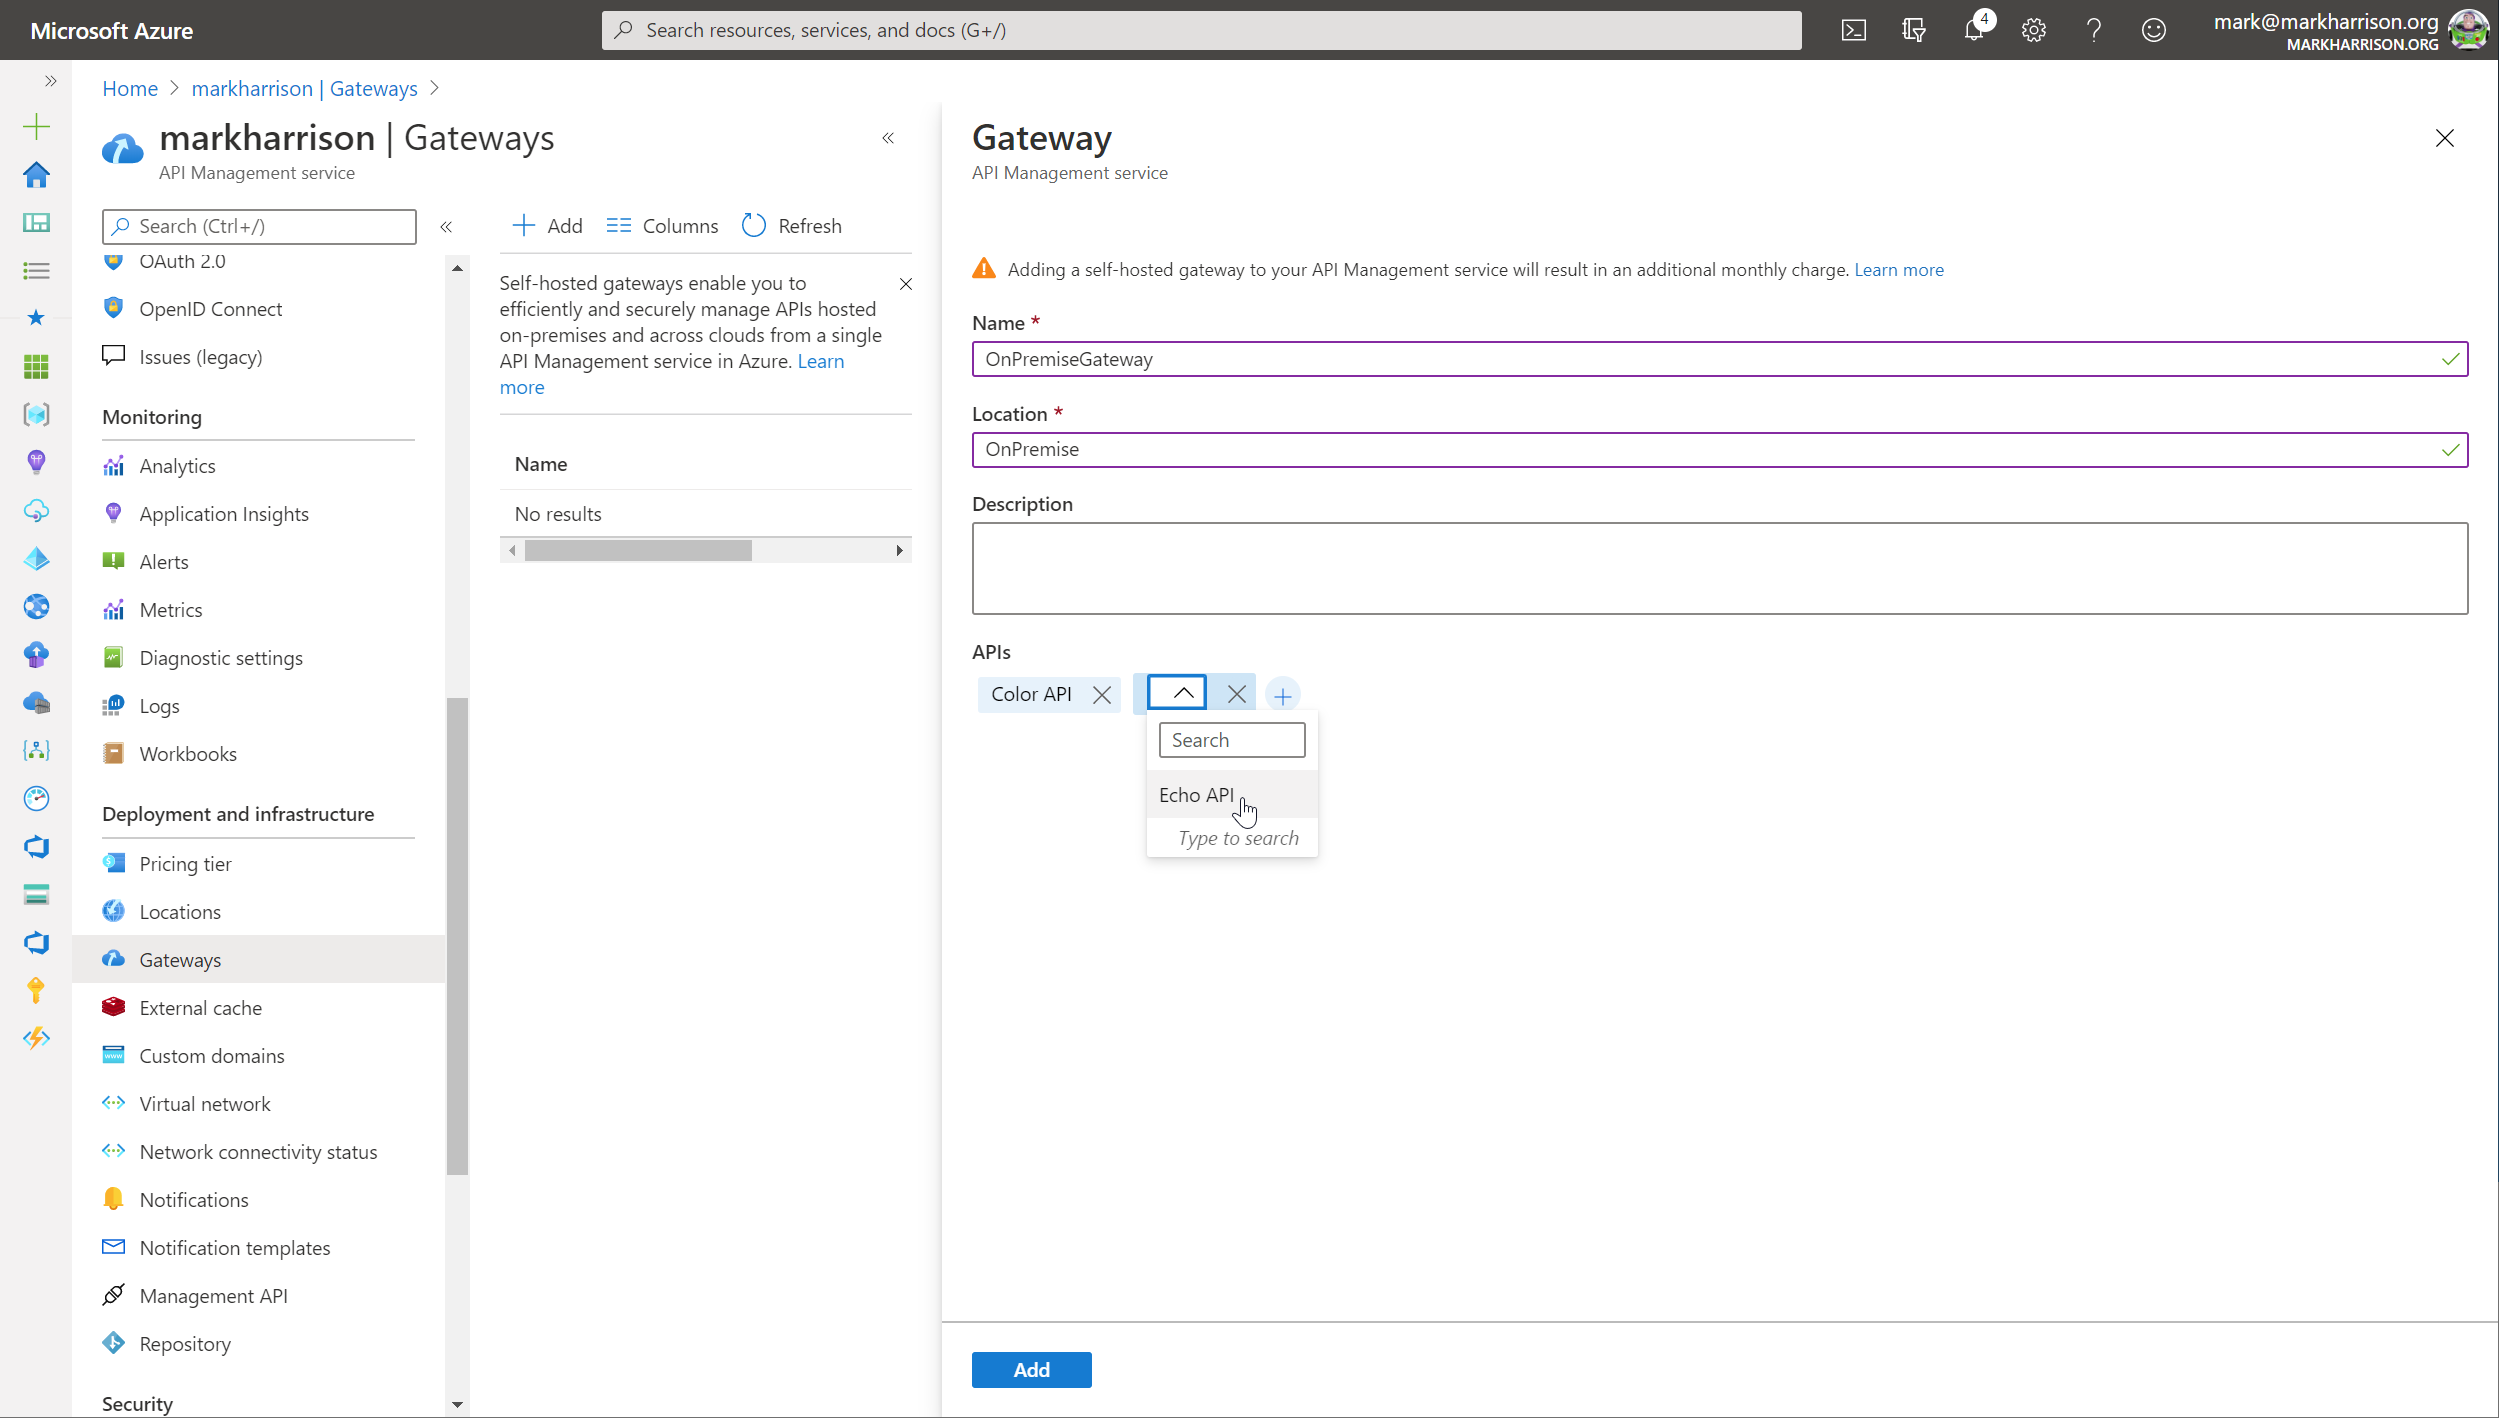
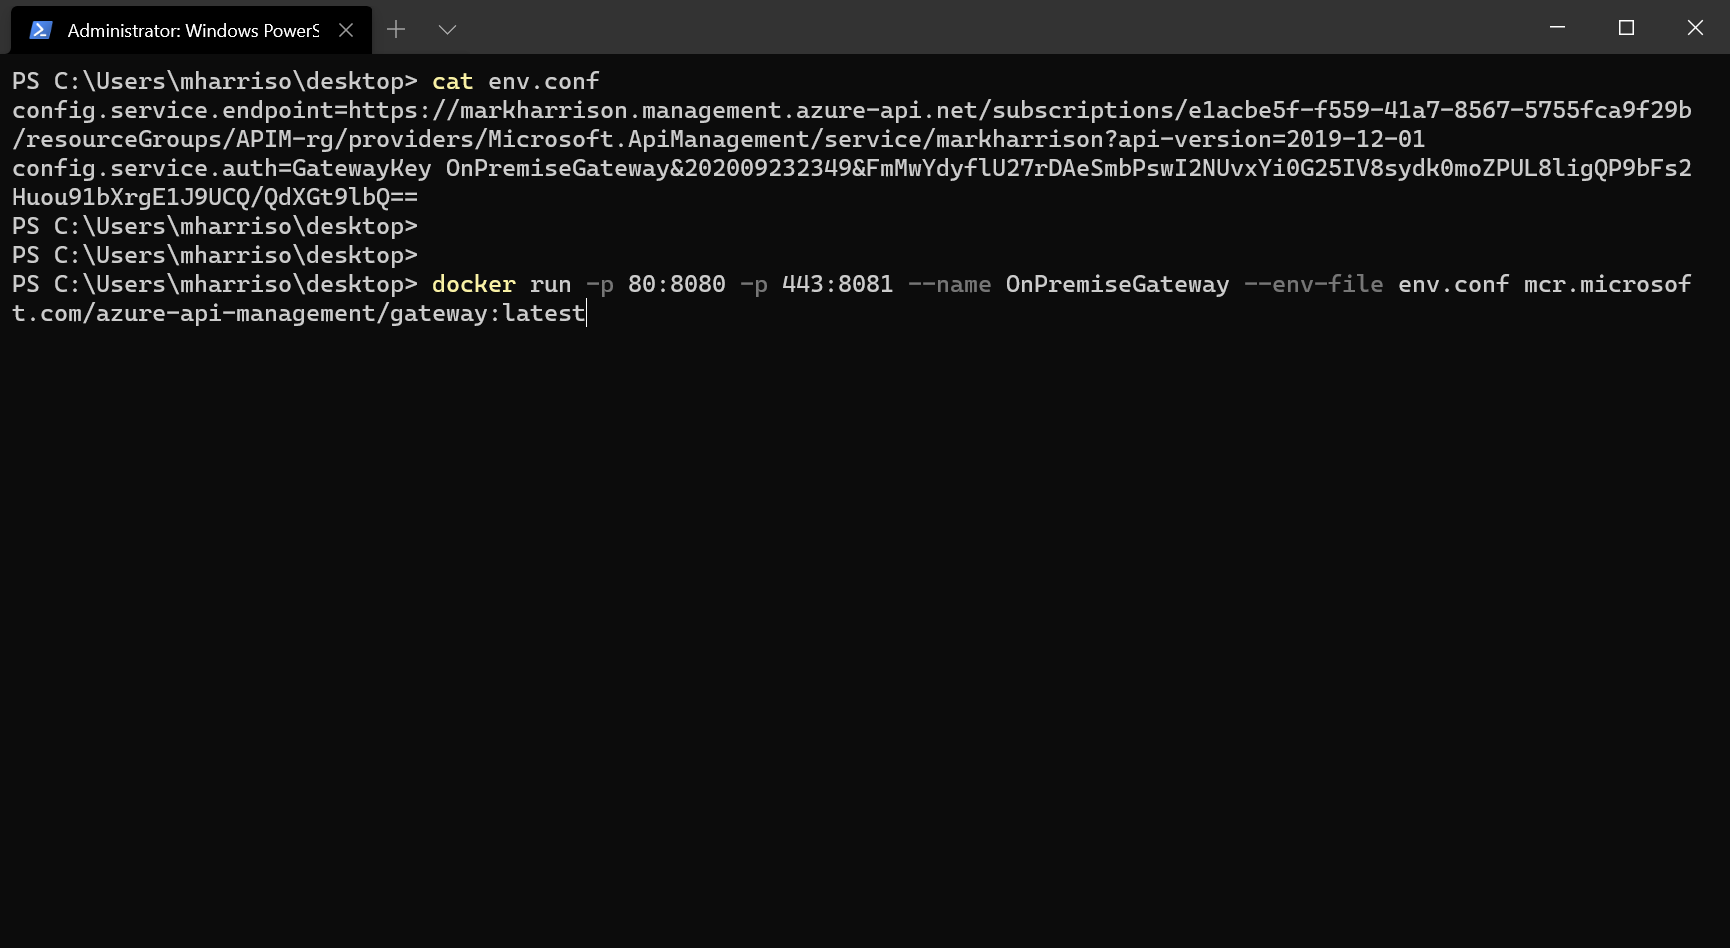
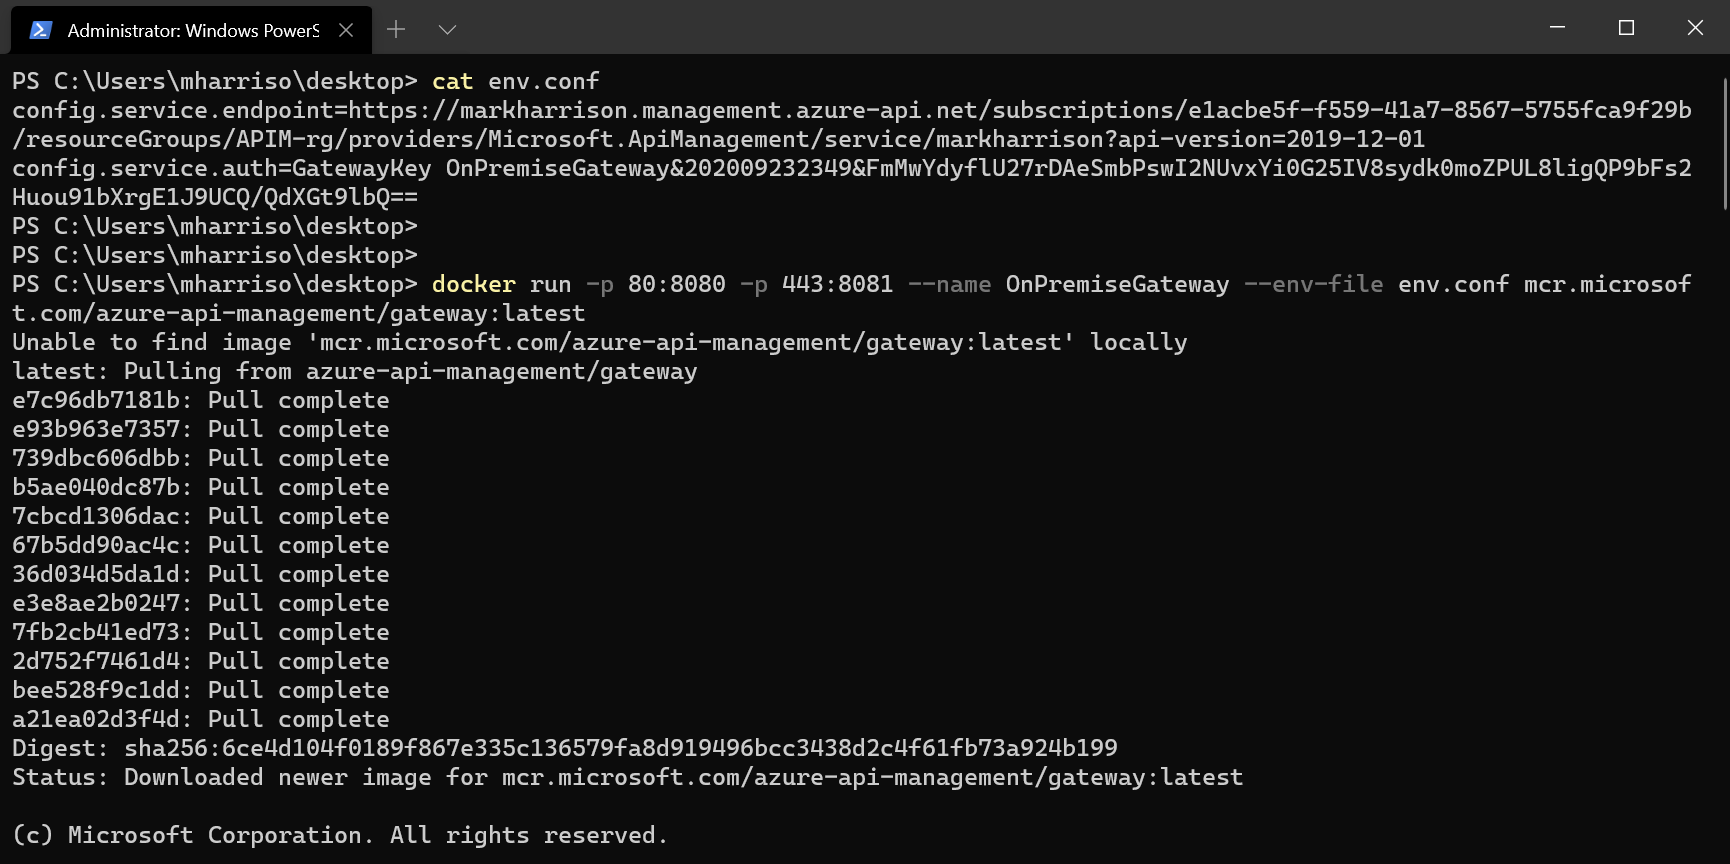
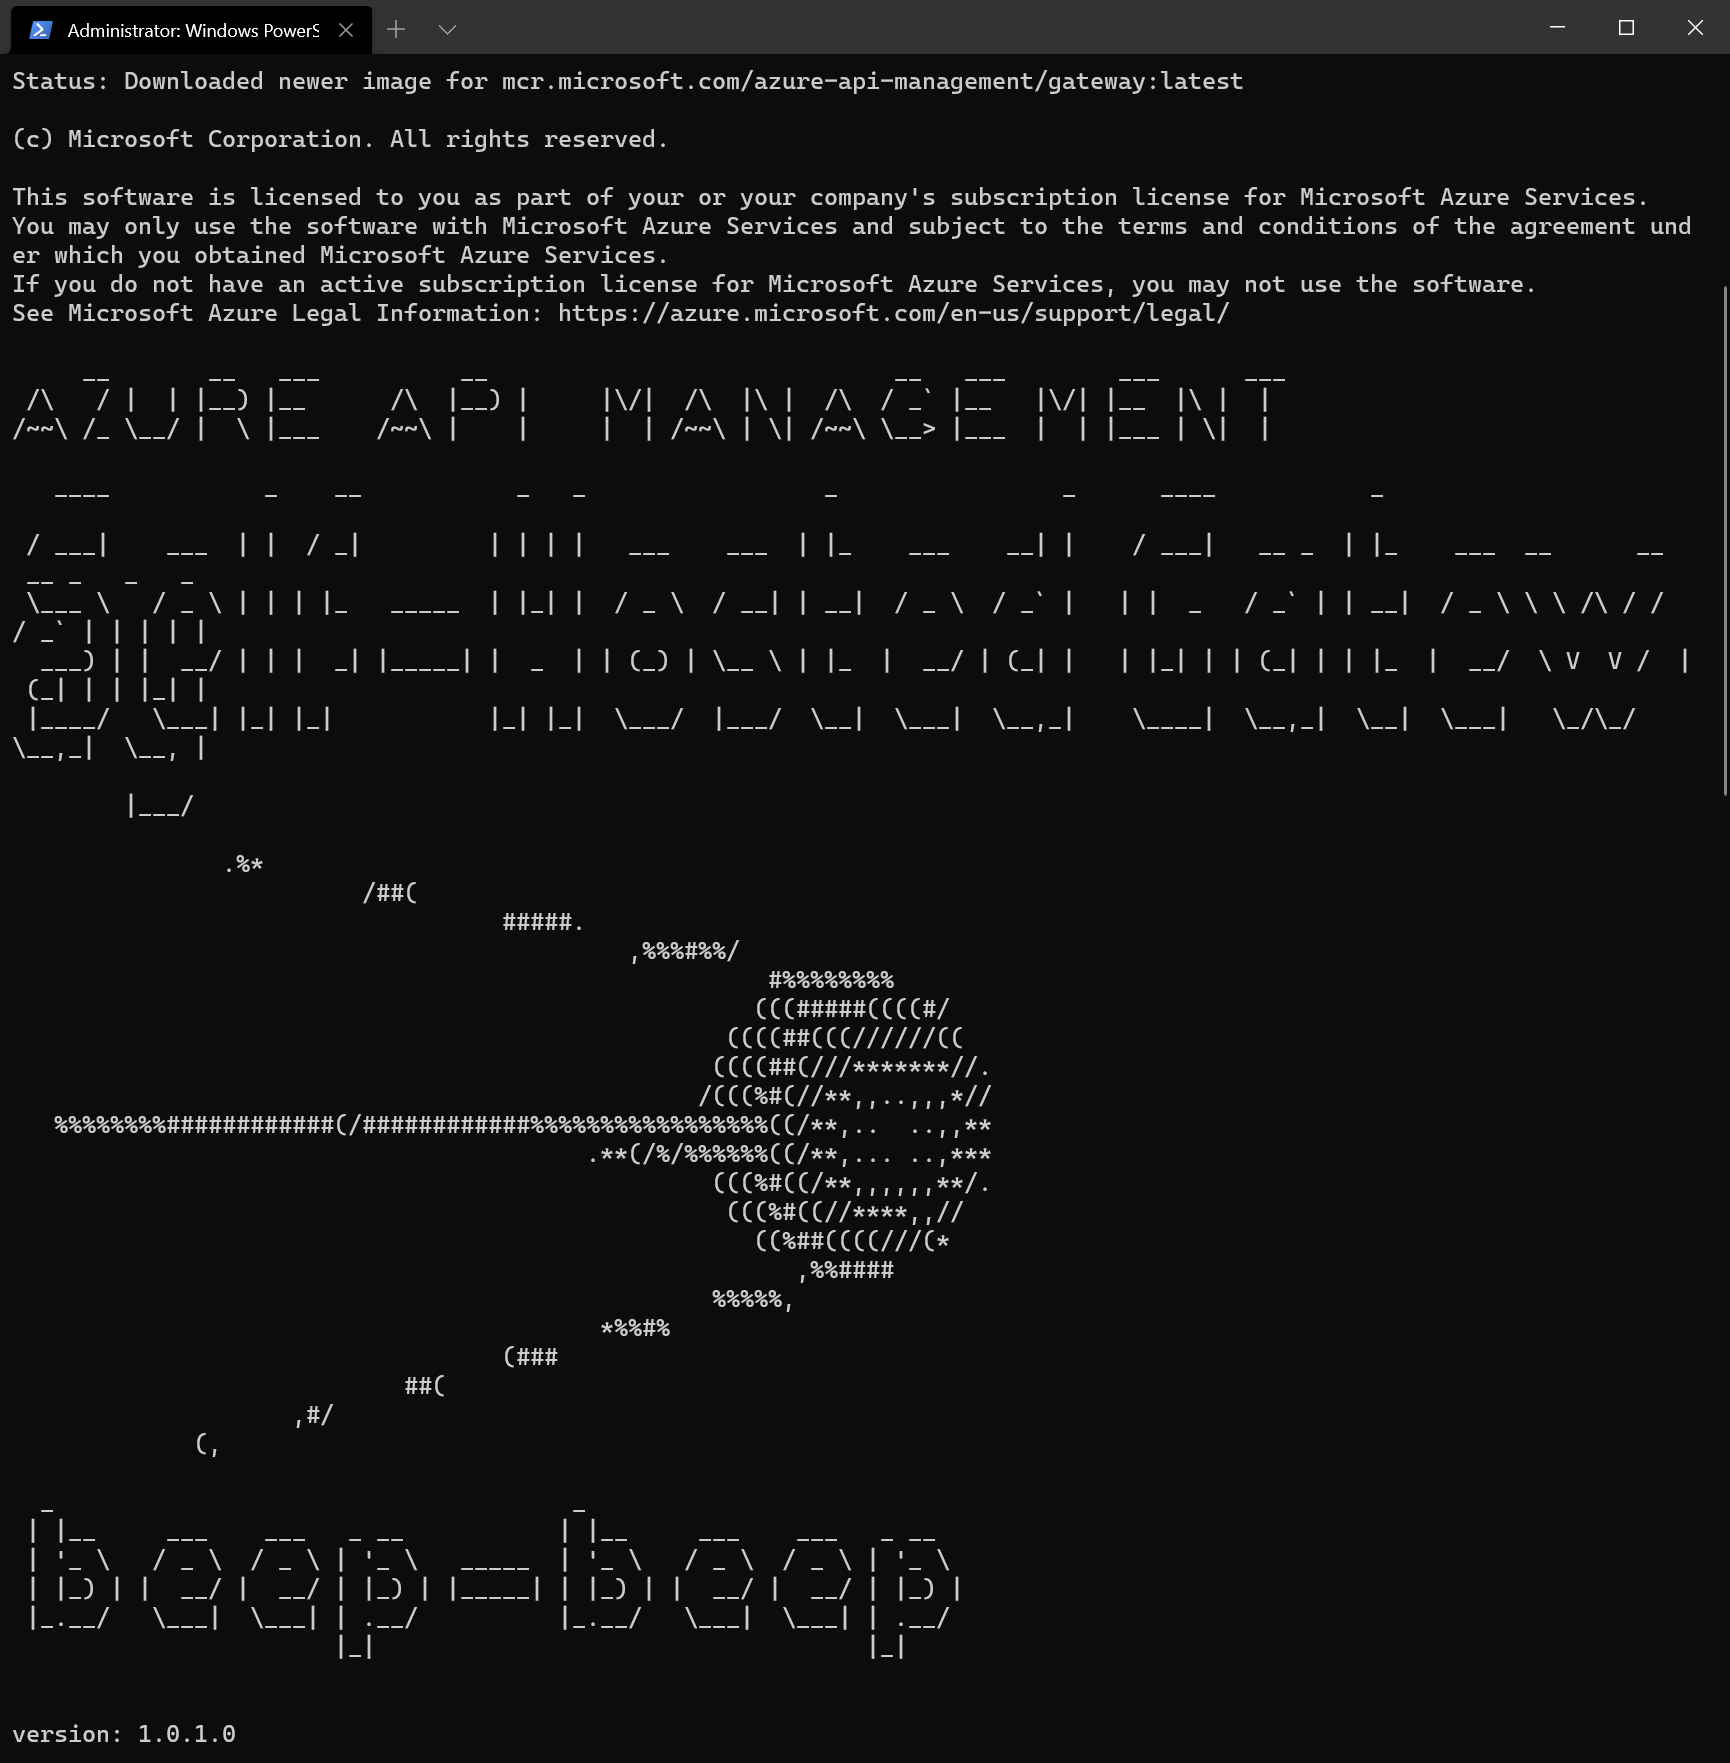
Deployment option from the menudocker run -p 80:8080 -p 443:8081 --name OnPremiseGateway --env-file env.conf mcr.microsoft.com/azure-api-management/gateway:latest

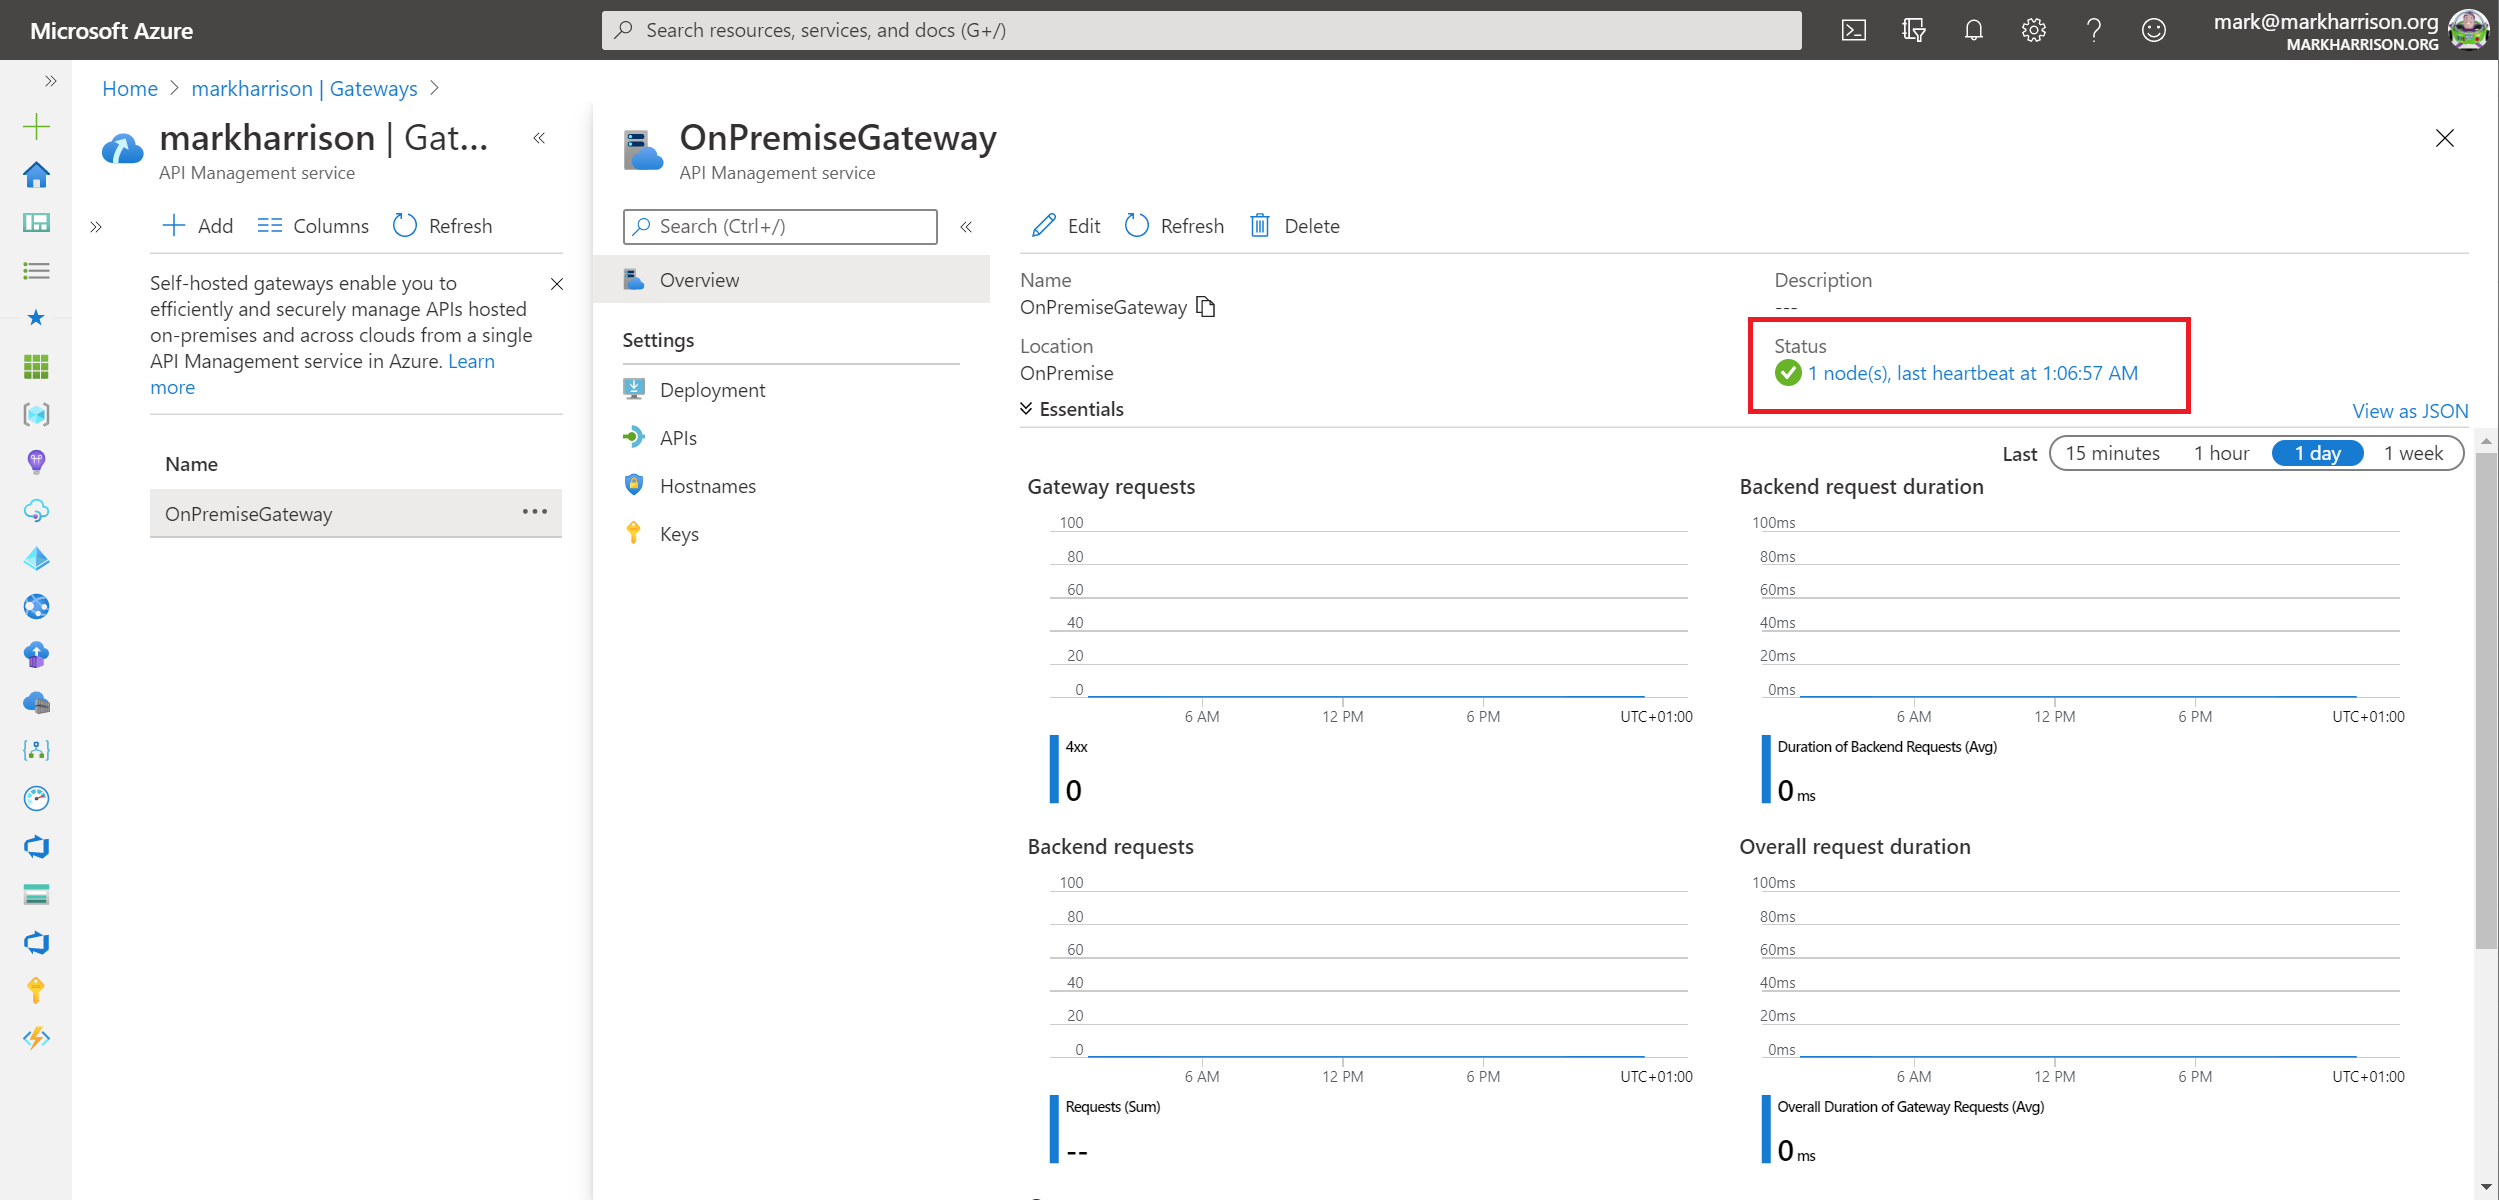
Testing the API

 |
| 